Welcome to the Builder Resources! 

NOTE: Registration and login is required to access all Zip Files!
The Builder Resources page is a “One Stop Shop” for nearly everything in the Lear45 DIY home built cockpit project including all the backlit control panels!  Here at Hangar45, we have worked hard to research, develop and release the most sought after information regarding the Lear45 panels and parts needed to make a home built flight simulator!  All the tabs on this page have been populated with DXF drawings and information pertaining to that particular panel or part!  In the near future, G-code, CAM and CDR files will be added to each individual zip file.  NOT FOR REAL WORLD AVIATION!
Why release this information you might ask?  We want to give our Hangar45 members the choice to either purchase the panels and parts from the HANGAR PRODUCTS page or enjoy the experience of building their own panels and parts with complete confidence that they have everything they need to finish their project.  By releasing the DXF files, Hangar45 has separated itself from all other flightsim websites and making full scale flight simulation obtainable for everyone!  If you have any request for information that has not yet been released, or you find something that needs additional attention, please contact us.
NOTE:  The information you find in these tabs is just one way to go about making panels and parts for your flight simulator.  You can either follow this path or use these DXF drawings as a template to make your own version.  Just be mindful that if you change the scale or mounting placements, it will affect how panels purchased will fit.  Feel free to use these drawings and files as you see fit for your own personal use.  DO NOT USE THESE FILES FOR THE PURPOSE OF COMMERCIAL USE! 


What will you need to build your own Lear45 project?  Believe it or not, with the exception of a CNC machine and access to a laser engraver, only common workshop tools are needed for 99% of the work.  If building the panels and parts are not for you, everything listed on this page is available on the HANGAR PRODUCTS page.


There are a few items that may help if you know:
  1.  The DXF files were created in Autosketch9 
  2.  The CAM files were created in Artcam2008
  3.  The CDR files were created in CorelDRAW X4
  4.  The .TAP G-code is available in mm and Inch
  5.  Make sure you install the Futura Font family!
  6.  All SMD resistors and LEDs are size 1206
 
Each of the Resource Tabs below has a compressed WinZip file in them that contains the DXF, CAM, CDR, G-code and other information needed to build that particular part or panel.  Once the WinZip file has been uploaded, no new files will be added to them unless noted in the description of the part or panel.
NOTE: Registration and login is required to access all Zip Files!


INTEGRATED BACKLIT PANEL FILES:

Project45 Audio Control Panels

Audio Control Panels v2.0

The Audio Control Panel DXF drawing is only the front light plate and backer at this time.  The ACP light plate has been optimally configured to replicate all the radios including the optional equipment you would find in the Lear45 flight deck.  These options include: NAV1, NAV2, VHF1, VHF2, HF1 ADF1, ADF2 and DME.  

This ACP light plate is designed to either fit on top of a real ACP avionics box or your own simulated hardware. 

Find more information about the Audio Control Panel HERE

Audio Control Panels G-code coming soon! 

Project45 Airshow Panel

Airshow Panel v2.0

The Airshow Panel is one of those panels that you will want in your sim at some point during your build.  This version of the Airshow Panel is what is referred to as “Visually Operational”, or in other words, “Eye Candy”.  The display window and switches have limited functionality. 

Find more information about the Airshow Panel HERE

Airshow Panel G-code coming soon!

Project45 APU Panel

APU Panel v2.0

The Auxiliary Power Unit Panel is going to be a MUST HAVE in any Lear45 flight deck!  The APU DXF is designed with a three digit seven segment display which will be powered by a small Ruscool Electronics interface card.

Find more information about the APU Panel HERE

APU Panel G-code coming soon!

Project45 Circuit Breaker Panels

Circuit Breaker Panels v2.0 coming soon!

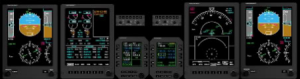
Project45 Display Units

Display Units v2.0

The Display Units replicate the Honeywell DU bezels found in the Lear45 in almost every way possible.  All the buttons and encoders are fully functional via the Jet45 AAS software.  The bezels are true 1 to 1 scale, use either 5 or 12 volt back lighting and they are designed to have a 15 inch LCD screen behind each pair.

Find more information about the Display Units HERE

Project45 EFIS Display Control Panels

EFIS Display Control Panels v2.0

The EFIS Display Control Panels replicate the real Honeywell panels found in the Lear45 in almost every way possible.  All the buttons and encoders are fully functional via the Jet45 AAS software.  The panels are true 1 to 1 scale and can use either 5 or 12 volt back lighting.

Find more information about the EFIS Display Control Panels HERE

EFIS Panel G-code coming soon!

Project45 Electrical Control Panel

Electrical Control Panel v2.0

The Electrical Panel has been completely reworked for optimal back lighting and is 1 to 1 true to scale.  This panel, like all the other lower panels in the Lear45 is primarily populated with AML-21 switches which use the 389 replica laser engraved lenses found HERE

Find more information about the Electrical Panel HERE

Electrical Panel G-code coming soon!

Project45 ELT Panel

ELT Panel v2.0

The Emergency Locator Transmitter panel is designed to operate using either software logic or hardware logic.  If you opt for the hardware version, you will need to make the ELT Sub Module which includes a flasher and a relay to sound an alarm when the ELT is triggered.

Find more information about the ELT Panel HERE

ELT Panel G-code coming soon!

Project45 Engine Control Panel

Engine Control Panel v2.0

The Engine Control Panel has been completely reworked for optimal back lighting and is 1 to 1 true to scale.  This panel, like the other lower panels in the Lear45 is primarily populated with AML-21 switches which use the 389 replica laser engraved lenses found HERE

Find more information about the Engine Control Panel HERE

Engine Control Panel G-code coming soon!

Project45 Environmental Control Panel

Environmental Control Panel v2.0

The Environmental Control Panel has been completely reworked for optimal back lighting and is 1 to 1 true to scale.  This panel, like all the other lower panels in the Lear45 is primarily populated with AML-21 switches which use the 389 replica laser engraved lenses found HERE

Find more information about the Engine Control Panel HERE

Environmental Control Panel G-code coming soon!

Project45 Flight Guidance Control Panel

Flight Guidance Control Panel v2.1

The FGC panel is one of the most complicated panels in the Lear45 mostly due to the multi-function button switches.  Twelve of the fourteen button switches have a green indicator light built into them in addition to the back lighting for the button cap legends.

The Mountain Switches that we use have become obsolete and are getting hard to find.  Check out this thread for more information and availability on these hard to find switches HERE

NOTE: THE FGC panel has been updated to v2.1 on 07-12-19.  The changes include minor scaling issues which effect most of the major components of the panel.

Find more information about the FGC panel HERE

Project45 Gear / Hydraulic Panel

Gear / Hydraulic Panel v2.0

The Gear / Hydraulic Panel has been completely reworked for optimal back lighting and is 1 to 1 true to scale.  This panel, like all the other lower panels in the Lear45 is primarily populated with AML-21 switches which use the 389 replica laser engraved lenses found HERE

Find more information about the Engine Control Panel HERE

Gear / HYD Panel G-code coming soon!

Project45 HF Radio Panel

HF Radio Panel v2.0

The HF Radio Panel DXF is complete and available for anyone to make and add to your sim.  However, at this time, the functionality of the HF Radio is projected to be limited depending on future development of the Audio Control Panel.

Find more information about the HF Radio Panel HERE

HF Radio Panel G-code coming soon!

Project45 Left Crew Panel

Left Crew Panel v2.0

The Left Crew Panel has been completely reworked for optimal back lighting and is 1 to 1 true to scale.  This panel, like all the other lower panels in the Lear45 is primarily populated with AML-21 switches which use the 389 replica laser engraved lenses found HERE

Find more information about the Engine Control Panel HERE

Left Crew G-code coming soon!

Project45 Pitch Trim Panel

Pitch Trim Panel v2.0

The Pitch Trim panel is a must have panel in your sim if you are looking to replicate your trim system to as close to the real thing as possible.  Within the DXF drawing, there is a wiring diagram that illustrates at least one way to wire up your hardware on the Pitch Trim panel to your interface cards and relays.

Additionally, there are two different types of backer panels to accept two different types of trim switches.  The real trim switch is over $100 which is why we have given builders a more affordable option:

  1. Mason 309-4301 Trim Switch
  2. Project45 Replica Trim Switch

Find more information about the Pitch Trim Panel HERE

Project45 Pressurization Panel

Pressurization Panel v2.0

The Pressurization Panel has been completely reworked for optimal back lighting and is 1 to 1 true to scale.  This panel, like all the other lower panels in the Lear45 is primarily populated with AML-21 switches which use the 389 replica laser engraved lenses found HERE

Find more information about the Pressurization Panel HERE

Pressurization Panel G-code coming soon!

Project45 Reversion Panels

Reversion Panels v2.0

The reversion Panels, also known as the Master Caution Panels, are some of the smallest backlit panels in the LJ45 sim.  These are a good place to start with learning how to build your panels because if, (realistically when), you make a mistake or two, they will be small and the amount of time and material lost will be minimal.

The Reversion Panel drawings and files include the sub panel parts needed to assemble the multi-function rotary switch with a push button option,(EICAS REV PUSH) which is a programmable feature within Jet45 AAS.

Find more information about the Reversion Panels HERE

Project45 SELCAL Panel

SELCAL Panel v2.0

The Selective Calling (SELCAL) Panel works in conjunction with the inflight phone.  The SELCAL choose between the VHF and HF bands when an incoming phone call is detected.  In our case, we will not be hooking a flight phone up to the SELCAL panel so it is going to be limited to what you can expect from it.

Find more information about the SELCAL Panel HERE

SELCAL Panel G-code coming soon!

Project45 System Test Panel

System Test Panel v2.0

The System Test Panel has been completely reworked for optimal back lighting and is 1 to 1 true to scale.  This panel, like all the lower panels in the Lear45 is primarily populated with AML-21 switches which use the 389 replica laser engraved lenses found HERE

Find more information about the System Test Panel HERE

System Test Panel G-code coming soon!

Project45 Throttle Quadrant Light Plate

Throttle Quadrant Cover Panel v2.0

The TQ Cover Panel has been completely reworked for optimal back lighting and is 1 to 1 true to scale.  This is one of the most difficult panels to replicate correctly because it requires being heated up and bent over a wooden form.  The TQ Cover Panel can use either 5 or 12 volt back lighting.

Find more information about the TQ Cover Panel HERE

TQ Cover Panel G-code coming soon!

Project45 WX Radar Panel

WX Radar Panel v2.0

The physical WX Radar Panel has been completely reworked and is ready to be modeled.  However, it is still one of the few areas of our project that has not completely been resolved as far as implementing into our sim.  Hopefully MSFS 2020 has a built in WX Radar system.

Find more information about the WX Radar Panel HERE

WX Radar Panel G-code coming soon!


Get a licensed version of the Jet45 Advanced Avionics Suite and the UNS-1 FMS Simulation software at Flightdecksoft today!


INSTRUMENTS AND STANDBY GAUGE FILES:

Project45 Angle of Attack Gauges

Angle of Attack Gauges v2.0

The AOA Gauge DXF is still a work in progress but there is enough here if anyone wants to move forward.  There are a couple options for the AOA Gauges.  First, we can use real DC Gauges and interface cards.  Our other option is to purchase generic gauges from Flight Illusions and program them to be AOA Gauges.

Find more information about the AOA Gauges HERE

Additional AOA development coming soon!

Project45 Clearance Delivery Radio Panel

Clearance Delivery Radio Panel v2.0

This DXF drawing has three renditions of the CDR.  The first being a modified version to be used with Ruscool Electronics.  The second version is a 1 to 1 scale CDR that illustrates the true scale of the display window and the proper placement of the encoders and buttons.  The last version is of the CD-850 which includes additional functionality.

NOTE: Use Ruscool CDR MASTER version unless you are supplying your own electronics!

Find more information about the CDR Panel HERE

CDR Panel G-code coming soon!

Project45 Control Display Unit

Control Display Unit Panel v2.0

The CDU or otherwise known as the Flight Management System is a system that no high end flight simulator should go without and you will not have to thanks to Jason Hite at FLIGHTDECKSOFTJason has developed a FMS program that replicates the UNS-1 flight management system that is second only to the real thing!

The problem quickly became, “How do we model the physical hardware of the CDU?”  The solution to the problem was to create a functional backer powered by an Arduino Nano interface card mounted behind the front face of a UNS-1 with a small and affordable LCD screen!

The DXF file below has all you would need to build your own functional CDU backer!  In addition to the functional CDU backer, there are several drawings to show how a CDU/FMS can be constructed based on a single piece of double sided clad.  Believe it or not, back lighting is also incorporated into the design!   

Find more information about the CDU/FMS Panel HERE

CDU Panel G-code coming soon!

Project45 Crew Warning Panel

Crew Warning Panel v2.0

The Crew Warning Panel DXF is complete and ready to advance to production.  Each of the warning indicator LEDs on the CWP will be driven by LED driver boards via an Arduino Nano card.  The CWP software will be incorporated into the Jet45 AAS by FIGHTDECKSOFT

Find more information about the Crew Warning Panel HERE

Crew Warning Panel G-code coming soon!

Project45 Radio Management Units

Radio Management Units v2.0

The RMUs replicate the real Honeywell panels found in the Lear45 in almost every way possible.  All the relevant buttons and dual encoders are fully functional via the Jet45 AAS software.  The RMUs are true 1 to 1 scale and use either 5 or 12 volt back lighting.

Find more information about the RMUs HERE

RMU G-code coming soon!

Project45 Standby Compass Gauge

Standby Compass Gauge v2.0

The Standby Compass Gauge is still a work in progress.  We will either be making our own compass gauges with the use of real DC meters gauges and interface cards or we can obtain mechanical gauges from Flightillusions

Find more information about the Standby Compass Gauge HERE

Additional Standby Compass development coming soon!

Project45 Standby Altitude Gauge

Standby Altitude Gauge v2.0

The Standby Altitude Gauge has two options:  The Primary bezel version uses an LCD screen behind all three standby gauges.  This version will require Dave Ault’s Standby Gauge Software to run the gauge on the LCD screen. 

The Alternative bezel version is to be used with mechanical gauges from Flightillusions  This alternative option is in the process of being implemented and will require some minor updates to the DXF drawing.

Find more information about the Standby Altitude Gauge HERE

Standby Altitude G-code coming soon!

Project45 Standby Airspeed Gauge

Standby Airspeed Gauge v2.0

The Standby Airspeed Gauge has two options:  The Primary bezel version uses an LCD screen behind all three standby gauges.  This version will require Dave Ault’s Standby Gauge Software to run the gauge on the LCD screen. 

The Alternative bezel version is to be used with mechanical gauges from Flightillusions  This alternative option is in the process of being implemented and will require some minor updates to the DXF drawing.

Find more information about the Standby Airspeed Gauge HERE

Standby Airspeed G-code coming soon!

Project45 Standby HSI Gauge

Standby HSI Gauge v2.0

The Standby HSI Gauge has two options:  The Primary bezel version uses an LCD screen behind all three standby gauges.  This version will require Dave Ault’s Standby Gauge Software to run the gauge on the LCD screen. 

The Alternative bezel version is to be used with mechanical gauges from Flightillusions  This alternative option is in the process of being implemented and will require some minor updates to the DXF drawing.

Find more information about the Standby HSI Gauge HERE

Standby HSI G-code coming soon!

Project45 Chronometer Gauges

Chronometer Gauges v2.0

It is highly recommended by several members here at Hangar45 to purchase a set of authentic Davtron M850 Chronometers if you are looking to build the best Lear45 simulator you can afford.  For about $450 a piece, you would just about have this part of your build completed. 

However, you may have obtained a set of M850s with black face plates, or maybe the set you have needs to be freshen up a bit.  In this case, you can create your own replica face plates.  Additionally, if it is not in your budget to purchase a set of authentic Davtron Chronometers, you can make a set of chronometer covers to either cover the opening in the MIP or add more affordable chronometers. 

Find more information about the Chronometers HERE


STRUCTURAL / FLIGHT CONTROL FILES:

Project45 L45 Cockpit Shell Kit

L45 Cockpit Shell Kit

The L45 shell plans are not available in digital format.  You can however purchase the full scale paper copy version which includes drawings of all the major components of the shell and interior furniture parts. 

Take a look at the Shall Assembly Manual (SAM) HERE

Find more information about the L45 shell paper plans HERE

Project45 Base Frame & Deck

Base Frame & Deck v2.0 coming soon!

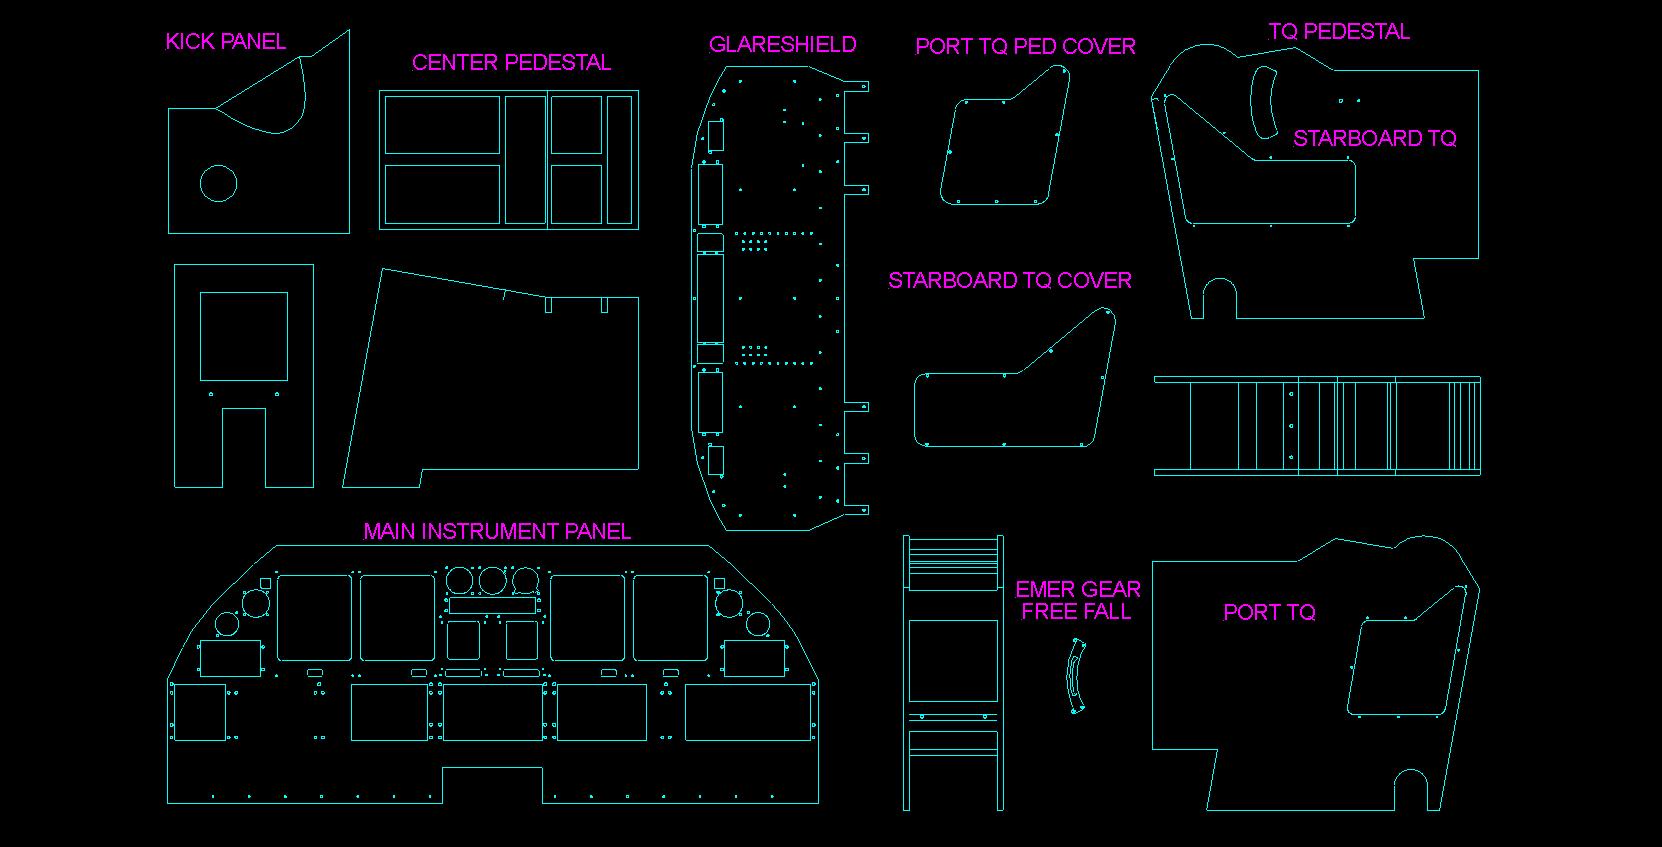
Project45 Aluminum MIP / Glareshield

Aluminum MIP / Glareshield v2.0

Over 12 years of refining and tuning have gone into the 2.0 version of the Aluminum MIP and Glareshield!  For you guys who already have a Project45 MIP and Glareshield, don’t panic!  In most cases, if your sim is up and running, you already made the changes as updates have been released. 

In addition to minor tweaking changes, the MIP DXF has been modified for two different versions of the three Standby Gauges.  First, the LCD version which we have used exclusively up until this time and now the optional mechanical Standby Gauges by Flight Illusions.

The Glareshield has been updated with an additional bend in the area of the Light Shade Bracket to better replicate the shape of the GS in the real Lear45.  The end result causes the GS to end up in about the same position as the v1.0 GS with only two bends with a little more clearance above the Display Units.

Find more information about the Aluminum MIP and Glareshield HERE

Project45 MIP Backer / Tower

MIP Backer / Tower v2.0

The Project45 MIP Backer and Tower is designed using .5″ Birch wood so no special tools are needed other than wood working tools.  Two 15 inch LCD screens without their plastic bezels are used behind DUs 1 and 2 and DUs 3 and 4.  A third 15 inch wide view LCD screen used for the center area of the MIP.  There are future plans to replace the center LCD screen with mechanical gauges and a smaller 10 inch LCD screen for the RMUs.

The real Lear45 Main Instrument Panel structural components are built much differently than the Project45 method.  DO NOT USE ANY MATERIAL THICKER THAN .5″!  The MIP Tower should be glued and assembled using a finishing nail gun.  The MIP Backer is held together with wood glue only.

Find more information about the MIP Backer and Tower HERE

Project45 Center Pedestal

Center Pedestal v2.0

The Project45 Center Pedestal is designed using .5″ Birch wood so that no special tools are needed other than wood working.  (The Center Pedestal full scale profile template is included with the L45 Shell Paper Plans.)

The Center Pedestal in the real Lear45 is built using .0625″ thick aircraft grade aluminum.  DO NOT USE ANY MATERIAL THICKER THAN .5″!  At a half inch thick, most all of the switch hardware fits within the panel openings.  Any thicker and the switch hardware will not fit.

The Center Pedestal should be glued and assembled using a finishing nail gun.  Round off the rear vertical edges to replicate the aluminum 90 degree bend.  After a few coats of primer and sanding, the finish looks as smooth as a metal finish!

Find more information about the Center Pedestal HERE

Project45 Throttle Quadrant Pedestal

Throttle Quadrant Pedestal v2.0

The Project45 TQ Pedestal is designed using .5″ Birch wood so that no special tools are needed other than wood working.  (The TQ Pedestal full scale profile template is included with the L45 Shell Paper Plans.)

The DXF file also includes the TQ side access covers which are made of .0625″ thick aluminum.  These pieces can either be cut by hand or preferably if you have access to a CNC waterjet.

Additionally, the TQ Pedestal drawing includes the Free fall landing gear cut outs, the exact placement of the column crossover and the rudder pedal crossover.  The TQ Pedestal should be glued and assembled using a finishing nail gun.

Find more information about the TQ Pedestal HERE

Project45 Throttle Quadrant Module

Throttle Quadrant Module v2.0

The Project45 Throttle Quadrant Module is the most difficult assembly to put together within the whole project. This TQ Module has many working features and is a must have if you are serious about building a Lear45 simulator!  If you are interested in purchasing a TQ Module visit the Hangar Products page.

Highlighted features:

  • Dual Throttle full range and  APR detents
  • Dual Fuel cutoff switches
  • Flaps lever with locking percent gates
  • Spoilers lever with position gates
  • Reverse Thrust levers and switches
  • Locking Parking Brake (turn left or right)
  • Mute and GO-AROUND switches
  • Throttle lever dust cover sliders

Find more information about the Project45 TQ Module HERE

Project45 Lower Column Crossover

Lower Column Crossover v2.0 coming soon!

Project45 Column & Yokes

Columns & Yokes v2.0

This DXF includes everything you need to make your own Column Heads, Column Covers and Control Columns.  Some of the construction techniques are unconventional but get the job done.

The best way to replicate the Lear45 yokes is to acquire a set of earlier yokes, such as the Lear23, Lear35, etc.  Keep in mind that the most expensive part of the yokes are the trim switches.  Try to acquire the yokes with at least the trim switches included.

Find more information about the Columns & Yokes HERE , HERE or HERE

Columns & Yokes G-code coming soon!

Project45 Dual Rudder Pedal System

Dual Rudder Pedal System v2.0

The Project45 Dual Rudder Pedal System in now on the drawing table!  The preliminary DXF drawing is here in this Zip File and has more than enough information if you want to move forward on your own.

This pedal system is a parallelogram design and both sets will be able to mechanically adjust up to four inches forward and four inches aft independently from each other.  They are also mechanically true to scale, which means the geometry of the swings and movements will replicate the real Lear45 pedal system exactly.  

We need to give a big thank you to Tom Goldberg and Randy Buchanan for taking on earlier versions of the dual rudder pedal system!  I am not sure where our Lear45 project would be without their fantastic efforts!

Find more information about the Dual Rudder Pedal System HERE

Additional Dual Rudder Pedal development coming soon!

Project45 Crew Seats

Crew Seats v2.0

The Lear45 Crew Seats are still under development but like a few other areas of this project, there is enough information in the DXF file below for anyone to move forward with it.

The Project45 Crew Seat design is based on the scale and movements of the real Lear45 Crew Seats.  They will be able to adjust forwards, backwards, up, down, recline etc.  The armrest will also be able to adjust and stow behind the back of the seats.  Everything has been considered with this preliminary design!

Find more information about the Crew Seats HERE

Additional Crew Seats Development coming soon!

Project45 Interior Trim Panels

Interior Trim Panels v2.0

A big thanks to Shane Barnes for taking the lead on the Lear45 Interior Trim Panels!  Shane was able to obtain real interior trim panels from a salvaged Lear45 aircraft and took the time to document those parts for our use here in the Hangar.

In addition to the DXF drawings of the lower trim panels and Kick Plate Panels, we have several photos available in the Zip File that better document the lower trim panels, upper trim panels and the Glareshield Cover.

NOTE: Please keep in mind that the measurements in the DXF file will require some adjustments to fit your individual Lear45 cockpit project.  Use this drawing as a guide to build your own custom trim panels.

Find more information about the Interior Trim Panels HERE

Additional Trim Panel Development coming soon!


HARDWARE / OTHER MISC PARTS FILES:

Project45 AML LED Mods

AML LED Mods v2.0

The AML LED Mods are the perfect solution to the AML21 switches with incandescent bulb sockets!  There are seventy AML21 switches in the LJ45 sim and ALL of them require at least one 3mm LED light inside it.  This AML LED Mod solution solves that problem by soldering the two legs of the LED to the AML LED Mod.  Then it simply plugs into the incandescent bulb socket!

Additionally, there are several AML21 switches that require two 3mm LED lights.  Packing two LEDs into a space designed for only one bulb is a little tricky but it has been resolved as well.  The solution is to solder the two positive legs onto the AML LED Mod and then group the two ground legs.  A carefully drilled hole through the bottom of the AML21 switch is needed for the grouped ground. 

Find more information about the AML LED Mods HERE

Project45 Dzus Fastener Replicas

DZUS Fastener Replicas v2.0

The DZUS Fastener Replicas are a great solution if you are looking for the real look without the real locking mechanism.  In our case, most of the panels that use real DZUS fasteners are on the TQ Pedestal and the Center Pedestal.  In these areas we are using .5″ Birch wood and there is no room for DZUS rails to be installed.

The files within the folder below are to make a single DZUS replica, a pack of three or a pack of six DZUS replicas.  Our LJ45 sim projects require a total of 60 DZUS Replicas.  After the DZUS Replicas are cut, you will need to shape the top edges with a Dremel tool to give them their curved edge look.

Find more information about the DZUS Fasteners HERE

Project45 Hobbs Panel

Hobbs Panel v2.0

The Hobbs Panel is a very simple panel to cut making it another great place to start if you are looking to cut all of your own panels using these files.  It is basically just a single backer that the Hobbs hour meter mounts into.

Find more information about the Hobbs Panel HERE

Project45 Landing Gear Knob

Landing Gear Knob v2.0

The Landing Gear Knob is made of Nylon and requires a Lathe to make the dual grooves around the edge.  Additionally, a router is needed to add the .25″ radial edge on both side of the knob and a CNC is used to cut the internal finger pockets on both sides. 

The knobs are available in the Hangar Products page.

Find more information about the Landing Gear Knob HERE

Landing Gear Knob G-code coming soon!

Project45 Gear Free Fall Handle

Gear Free Fall Handle v2.0

The Gear Free Fall assembly and handle is a nice addition that adds realism to the sim.  The assembly is made of plastics, wood and aluminum pieces.

Find more information about the Gear Free Fall HERE

Gear Free Fall Handle G-code coming soon!

Brake & Pitch Handle

Brake & Pitch Handle v2.0

Both the Emergency Parking Brake and the Pitch Disconnect Handles are made with steel substructure.  These pieces are welded to a steel rod.  The handles are then finished and shaped using Plastic Bondo.  To purchase these handles, visit the Hangar Products page.

Find more information about the Brake & Pitch Handles HERE

GPWS Mounting Plates

GPWS Mounting Plates v2.0

The GPWS Plates are a must have in your sim in order to properly mount the GPWS indicators on the MIP.  The GPWS Plates are held in place on the back side of the MIP with either Liquid Nail or a Silicone Adhesive.

Find more information about the GPWS Plates HERE

GPWS Plates G-code coming soon!

Project45 Turn Coordinators

Turn Coordinators v2.0

The Turn Coordinators, also known as “Inclinometers”, are mounted on the Glare Shield Lamp Shade Bracket in front of DU1 and DU4.  It is only “eye candy”.  The ball does not move by design.

Find more information about the Turn Coordinators HERE

Turn Coordinators G-code coming soon!

Project45 QRH Aluminum Pocket Tray

QRH Aluminum Pocket Tray v2.0

The QRH Tray (Quick Reference Handbook) is made of aircraft grade aluminum and bent on a light weight hand brake.  The QRH Tray is then mounted with screws to the rear of your Center Pedestal.

Find more information about the QRH Pocket HERE

QRH Tray G-code coming soon!

Project45 Phone Pocket Panel

Phone Pocket Panel v2.0

The phone Pocket Panel DXF is a simple 2D file and easy to cut.  Once all the parts have been cut out, they are held together with SCIGRIP 16 fast clear set medium bodied solvent cement for Acrylic plastic.

Find more information about the Phone Panel HERE

Phone Panel G-code coming soon!

Project45 Sun Visor and Rail System

Sun Visor System v2.0

Each sun visor travels on it’s own metal rail along the top of the windscreens to block the sun from any angle.  This is not a necessary item in our simulators but it does add additional realism. 

Find more information about the Sun Visor System HERE

Additional Sun Visor development coming soon!


Your donation to help support the release of these files is very much appreciated!

WARNING:  The information found on this website is only suitable for Hobby Flight Simulation and flight simulator enthusiast!  In most cases the information found here is outdated and SHALL NOT be used for Real World Aviation or real world references!