


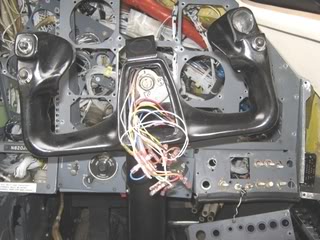
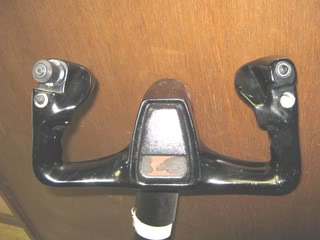
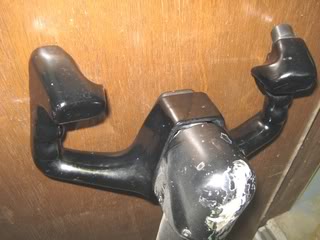
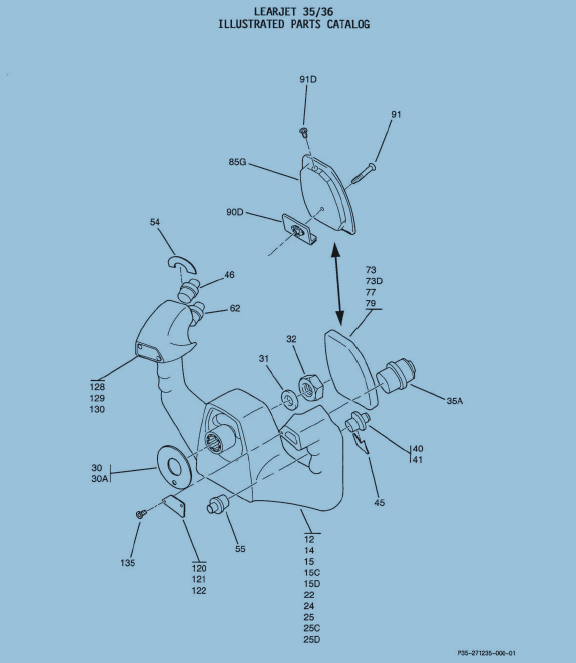
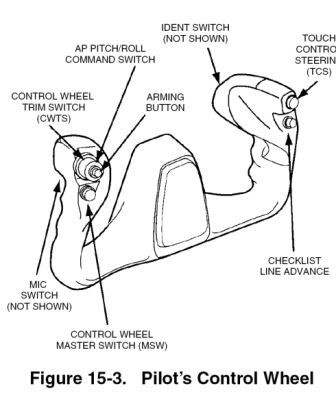
(Original thread started on 09-22-11 by Alan Norris) I found this yoke but they want $1,000 plus shipping. It's from a Lear35. I think that it's a little expensive don't you think: Does anyone know if trim switches are easy and inexpensive to come by? (Posted by Eric Tomlin on 09-22-11) Alan, without a trim switch it is a bit high. When you think of it that way, that PFC yoke for $900 isn't so bad. Fully built, ready to interface, plug and play and on a stand. The switches are being pulled from these older yokes to be placed into other working LJ's that haven't been sent to a storage lot yet. That's how expensive the switches are- cheaper to pull them from an in-op aircraft than to source them otherwise. That's the story from a broker to a member here (Shane) and is why we're seeing several yokes on eBay and the 'net without the switches in them. (Posted by Shane Barnes on 09-22-11) I was able to source several sets of Lear yokes w/switches for members here before the prices went thru the roof and that is about the price paid for a matching set with switches. The asking price now for a set of yokes without switches is about $750 and I think $1500 to $2000 with switches. (This price could have changed as I've not checked in nearly a year) So that is high if that is just for one, that is close to the asking price for two without switches. As for the switches, almost impossible to find as the switches are more valuable than the yokes, especially the trim switch. Think of it this way, the yoke will last forever where as switches will wear out at some point so they are in demand. Here are my thoughts on the Lear yoke prices in the next year or so. Once the salvagers have stripped the switches out of these yokes they are going to realize they have a hunk of metal that is useless because yokes don't wear out or break that often if ever. So I think at some point in the next year or so you will see the yokes without switches come down in price because who is going to buy them other than sim builders and there is not that many of us out here! Better to get a couple hundred dollars out of them versus them sitting on their shelves collecting dust. Kinda like the real MD80 and 727/737 parts. . they have come down in price compared to a couple years ago as more are being salvaged. Of course I could be wrong, just my thoughts and it won't cost you anything to wait for a better deal or use a CH yoke temporarily mounted to the control column head. That was the original plan until several of us found Lear yokes. (Posted by Ron Rollo on 11-29-11) Hey Alan, one other thought for you, there is a difference between the pilot's side yoke and the co pilot's yoke. They are a mirror image of each other. So if your going to spend big bucks for a Lear35 yoke, at least get the Pilot's side yoke AND make sure it comes with all the hardware, especially the hat switch. (Posted by Alan Norris on 11-30-11) Okay, they came up with another yoke off a Lear35. $450 less the trim switch. I guess that's the valuable switch that is salvaged because of its scarcity. Is it somewhat like a regular spring loaded slider or rocker switch? (Posted by Shane Barnes on 11-30-11) Hey Alan, the price is not bad if you get the two switches shown (push buttons) and most likely there is one more that you can't see in the photo that is mounted to the back of the grip. Might go for that yoke if you are comfortable with the price. If you can find a Cessna trim switch (hat switch) it is similar to the Lear design minus a push button switch built into the top of it then you could modify the switch to work for trim. A four way hat switch will work for the trim. Eric and I talked about this switch earlier this evening. The center push button switch on the hat switch of the real Lear trim switch is not implemented in FS but it can be implemented with a little hardware logic. I have seen a switch that I think will work and I think by adding a short length of tubing it will give the HAT switch the look/height of the Lear45 if you want the HAT switch to look the part of the Lear trim switch. (Posted by Eric Tomlin on 11-30-11) That looks great! Too bad the trim switch will be pulled out as it's the main one you require on a yoke! But, for that amount it's not bad. The trim switch is a 4 way switch. The N and S positions are for up and down pitch trim with the E and W being for Aileron trim. These are activated once you press the center button down and hold, plus the fwd/aft or left/right motion. (Posted by Ron Rollo on 11-30-11) Hey Alan, I think it is a good deal, probably the best you will find any time soon. Before I got my hands on my two yokes I had put a lot of thought into making my own trim switch. Mouser sells a nice little hat switch with a center push button that would be the center of your design. It can be done, you'll just have to wrap your mind around it to get it done. (Posted by Alan Norris on 12-18-11) Well I got that yoke and it came without the top hat switch and the lower of the two push buttons on the RHS. I know what the top hat switch does (pitch and rudder trim). Does anyone happen to know the following switch functions: LHS behind the grip -- cancel autopilot? LHS bottom -- PTT? RHS top?RHS bottom? Also -- someone mentioned a 4-way switch with a push button that Mouser offers. Any idea what the part number is. One more thing, does anyone have a part number for the missing push button (I assume it's a PB) on the RHS of my yoke? The yoke is coated with thick black plastic that has a couple of nicks and gouges in it. What is everyone doing to refinish theirs -- strip the plastic or coat over the top after scuffing it? (Posted by Ron Rollo on 12-18-11) I plan on stripping my yokes of all the hardware and having the yokes sand blasted. Then they will be powder coated with a textured flat black paint. See this tutorial thread HERE As for the push buttons, I will wire them all up and at least have a plug for everything. Later on if I need it, I will have it. If not, it will go unused, no big deal. At least I won't have to dig inside the yokes again. (Posted by Shane Barnes on 12-20-11) The push button switches are Mason brand switches. Unknown part number at this time. I plan on leaving mine black and living with the small nicks and gouges . . gives it character. I started to paint it with textured paint to give the appearance of the real 45 yoke but the textured paint I have used on a few things in my generic sim gets dirty over time from repeated contact with your hands and the textured surface makes it very hard to clean. I guess I could fly with white gloves on! (Posted by Alan Norris on 12-20-11) I just got a PDF from Lear35/36 with the various yoke switches (with different switch options). Hope this is helpful: To see the rest of the Learjet 35/36 Yoke document, click HERE One thing that puzzles me is that the parts catalog lists these switches (listed with their locations on the yoke) -- not sure exactly what they all do: Trim & Trim Arm Switch (left top -- the one that was stripped from my yoke before they shipped it) Master Autopilot Release, Nose Steering Primary Pitch Trim Cut Out Switch (left bottom) Microphone Control (presumably the PTT switch) (left rear) Roll and Pitch Maneuver Switch (right top) Autopilot Pitch Release and Primary and Secondary Flight Director Sync Switch (right bottom -- missing one mine) The switches I have at the right top, the right bottom and right rear are all similar in that they have four terminals. Now the functions can be different from plane to plane so I'm not sure what they do. For instance the one that was at the right top on mine has only two terminals connected but is spring loaded side to side, The one at the left rear has only two connected and is NO (PTT). The one at the left bottom has all terminals connected and two are NC and two are NO but one of the wires was connected to another switch. UPDATE: I lucked out on finding the company that supplies these switches -- both are not the one cited in the parts manual. They may have gone out of business or been bought out. I did get quotes from Bombardier's parts department. Here they are: Master Autopilot, Nose Steering Primary Pitch Trim Cut Out Switch $45 Roll and Pitch Maneuver Switch $31.50 Trim and Trim Arm switch $1,287 (Posted by Will Sasse on 12-21-11) PTT, Autopilot cancel, & Roll Pitch Sync (Maneuver) can be any momentary button switch, at least in functionality - if not appearance! On the real LJ the trim switch will be twin action, either split button, or push-in then rotate to activate. the first action is to prevent accidental activation of the trim (resulting in really bad control forces for the pilot). I do not think it necessary to model the twin action in the sim, so any 4-way hat switch body would do. The Roll & Pitch Maneuver is probably the Control Wheel Steering (CWS) button, again a momentary button, which syncs the Flight Director to the current aircraft attitude - part of the autopilot. As to the momentary with many connections, it depends on what equipment was installed in the aircraft the yoke came from. Without some clue I an clueless as to what they could be.... It's possible the common connection could be ground/neutral? NC = Normally Closed, NO = Normally Open: Again, I think it would depend what it was connected to as to which terminals were used for what? Reference real Lear35 yokes: I squeezed into a real L35 today and had the yoke switches explained to me. Goes like this.... Left/Front/Top: 4-way Electric trim (elevator & aileron)- this we knew. The interesting part is that the central button function on the trim rocker varies depending on whether the autopilot is engaged or not. When A/P engaged, central button acts as an A/P disconnect button. There is no need to push it to activate electric trim with A/P engaged. With A/P disengaged you must push this button to activate electric trim. Left/Front/Lwr: Nose Wheel Steering Activate & A/P disconnect. On takeoff, the pilot holds this button in to retain nose wheel steering via rudder pedals until airspeed is sufficient for rudder effectiveness - this speed is calculated by pilots pre takeoff. For Taxiing purposes there is another button on the center console to active/deactivate nose wheel steering. Left/Rear: PTT Right/Front/Top: A/P disconnect Right/Front/Lwr: Pitch Sync (Control Wheel Steering). I don't know if any of this translates into the L45, but it explains the functions of your L35 switches. (Posted by Eric Tomlin on 12-23-11) Here's a LJ45 Yoke: All flight control trim motors and electrical servos can be disabled by depressing and holding either control wheel master switch (MSW) in the event of a malfunction causing control inputs. Autopilot Pitch Servo Autopilot elevator operation is provided by the autopilot pitch servo actuator that is connected to the elevator aft sector assembly (Figure 15-2). The pitch servo actuator is a two direction torque motor. It incorporates an electrical clutch that engages only when the autopilot is engaged. If a system malfunction causes the servo to produce an undesired elevator movement, the crew can disengage the servo by disengaging the autopilot or by depressing either control wheel master switch (MSW). Depressing and holding the touch control steering (TCS) button will also disengage the clutch while held, but does not disengage the autopilot (Figure 15-3). Autopilot Roll Servo The ailerons are positioned by a roll servo when the autopilot is in use. The autopilot roll servo is a two direction torque motor mounted within the wing/fuselage fairing and is coupled via a closed loop cable to the aft aileron control quadrant assembly in the center wing area (Figure 15-6). The roll servo incorporates an electrical clutch that engages only when the autopilot is engaged. In the event of a malfunction, the servo can be manually overridden by the pilot or disconnected by disengaging the autopilot or by depressing either Control Wheel Master Switch (MSW). Depressing and holding the Touch Control Steering (TCS) button also disengages the roll servo clutch, but does not disengage the autopilot (Figure 15-3). Aileron Trim An aileron trim tab is an integral part of the left-hand aileron surface (Figures 15-6 and 15-7). The Control Wheel Trim Switches (CWTS), located on the outboard horn of each pilot's control wheel (Figure 15-3) control the aileron trim tab actuator motor. Depressing the arming button in the center of the trim switch and simultaneously moving the barrel of the switch left or right energizes the trim tab motor, which transmits motion to the trim tab through dual connecting rods. The pilot's trim switch has priority over the copilot's trim switch. The switch that's associated with Nose Wheel Steering simply connects/disconnects that system, not actually steering the nose wheel and this only applies to a non- LJ45 as far as connecting it (if I read Will's post correctly). In the LJ45, you turn the Nose Steering on via a switch on the System Test Panel. The way it works is listed below. For the LJ45, you can turn this system off by either the switch itself or by depressing the MSW. Regarding the checklists advance button- that checklist feature is an option and is displayed on the MFD (DU3 typically). NOSE WHEEL STEERING SYSTEM-GENERAL The digital nose wheel steering (NWS) system is a steer-by-wire system that provides nose wheel deflections up to a maximum of 60 degree left or right for maneuvering the airplane on the ground. The system provides variable steering authority based on the airplane’s groundspeed and rudder pedal inputs by the crew. A steering command based upon pedal position and force, nose strut position, and aircraft speed is calculated by the NWS controller (computer). This command is relayed to a DC motor (servo actuator) on the top of the nose strut, which positions the nose wheel via a nose wheel strut gearbox. The NWS system can be Armed and Disarmed with the momentary action NOSE STEER switch on the GEAR/HYD control panel. The NOSE STEER switch will illuminate “ON” when the following conditions occur: • Both system DC power sources are available to the computer • The nose gear is down and locked • No system faults or failures are detected Once Armed, engagement is possible when WOW signals indicate the aircraft is on the ground and information from the wheel speed transducers is available. “Engaged” is described as the operating mode of the NWS system in which the system has been Armed, power is applied to the Servo Actuator and nose wheel movement is being controlled via the NWS computer command. NWS engagement is automatic when the system is armed and the right conditions exist. Engagement is not annunciated in the cockpit. The NWS system can be [b]Disarmed/Disengaged[/b] by momentarily depressing the NOSE STEER switch/indicator or either Control Wheel Master Switch (MSW). The steering authority decreases from a maximum 60 degrees authority at the beginning of takeoff roll and gradually decreases to 7 degrees authority at approximately 70 KIAS as the airplane accelerates for takeoff. The authority limit then remains at 7 degrees to liftoff. On landing, steering authority will initially be limited to 7 degrees left or right after touchdown and as the airplane decelerates, the authority will gradually increase to 60 degrees at the lowest ground speeds. Fade-in is provided to ensure smooth transition from the disengaged to the engaged mode and allows the pilot adequate time to respond to steering effects on the aircraft. The fade-in gradually increases steering rate over a few seconds until the maximum rate of 22 degrees per second has been reached. The steering system has an out-of-range recovery feature. If the system is engaged out of the normal operating range of 60 degrees left or right, the system will drive the wheel at 35 degrees/second in a direction, which represents the shortest path to an operational range. NORMAL OPERATION The nose wheel steering system is normally selected ON prior to taxi by momentarily depressing the NOSE STEER switch. When the system is armed, “ON” will be illuminated in the NOSE STEER switch/indicator. To disarm/disengage the NWS on the ground, momentarily depress either control wheel master switch (MSW) or momentarily depress the NOSE STEER switch. Depressing either wheel master switch while in flight does not cause the NWS to disarm, but it can be disarmed in flight after the landing gear is lowered by momentarily depressing the NOSE STEER switch. The nose steering should remain engaged throughout takeoff. After lift-off, the nose wheel steering computer commands a 2 second nose centering signal, then disconnects power to the servo actuator. When the landing gear is retracted, the NOSE STEER “ON” legend will extinguish. When the nose gear is down and locked for landing, the “ON” legend will illuminate in the NOSE STEER switch/indicator if power to the nose steer computer has not been interrupted in the interim. The system is armed when the “ON” legend is illuminated and when the aircraft is on the ground the nose wheel steering will engage. This feature is NOT modeled in FSX. However, some of it can be modeled via Internal Variables in the SYS card software InterfaceIT. It can be made much more complete in a System software such as JETSystems that has been slowly worked on for a while now, but this particular system hasn't been worked on yet other than by me personally using InterfaceIT. This is another great example of how CRUCIAL it is to have a copy of the aircraft manual when you're building a flight simulator and expect any kind of real functionality beyond "kick the tires and light the fires" (Posted by Will Sasse on 12-23-11) I now understand the left hand lower switch is the Yoke Master which is why it's wired for NO and NC circuits. Still, having a concise description of the yoke switch functions and how the Master switch interacts would be nice (and having it in one place in the manual too). Still having a hard time grasping TCS. When would we use it? (Posted by Eris Tomlin on 12-23-11) Touch Control Steering- Scenario: ATC: N45LJ, turn twenty degrees left NOW for traffic! N45LJ: Roger, twenty left for traffic So...your AP is ON and you could reach up and fumble with the HDG knob to move it 20 degrees left, but wait...you're flying with the FMS via the NAV function. Drat! Do I fiddle with the thingamajig, or the diddlybob? You do neither. You press the TCS button which acts as a clutch to the autopilot servo and it allows you to move the yoke move in Roll and Pitch regimes without turning off the autopilot. Once released the AP takes over again. (Posted by Alan Norris on 01-09-12) I got one of the four way hat switches from Mouser and have wired it up. It's O.D. is smaller than that in the yoke but if you get a nylon spacer with a 1" O.D. and open up the I.D. to fit the switch it works just fine. Not a lot of movement on the switch but it works. Does anyone have a source for the push button switches as I'm missing two? My yoke didn't have a red button for the master cancel but I did notice a red one on someone's yoke. I guess there are variations from yoke to yoke. For instance, on the photo of the yoke with the red cancel button, the switch on the top right seemed to be a standard switch. Here is a photo of mine which has a side to side function ( I think there may have been a boot of some sort at one time but it seems to have been lost as the internals are visible). (Posted by Shane Barnes on 01-11-12) Hey Alan, the yoke body is the same from the 35 to the 45 but the number of switches and colors are differing. Just remember to look at a photo of the Lear45 yoke and determine what switches and colors you need and where they are located on the yoke. To duplicate the Lear 45 yoke you will need the following switches: 2 red switches, one for each yoke. 6 black switches, three on each yoke. One of these will be on the backside of the yoke. And of course two hat switches, one for each yoke. Here is a photo of my pilot side yoke: And here is the co-pilot side: Notice the red switch is on the outboard side of each yoke? (Posted by Alan Norris on 01-07-12) I just snagged a brand new pitch trim switch off eBay for my yoke for $114. Anyone need the one I installed (top hat switch -- typically found on joysticks)? The part number is good for the real Lear switch -- MASON 403-4300 I checked with a company from whom I purchased my yoke and chronometers and they have the pitch trim switches in an "as removed" condition for $500! Thankfully I got mine for a more affordable price. Here's a shot of the switch wired and installed. It's funny but the left and right rudder trim is identified as RWD and LWD -- rightward and leftward maybe. Also that switch looks like it's gray but in fact it's black. (Posted by Shane Barnes on 09-08-12) That is the first one I have seen on eBay for sale and I have been watching a long time. I thought Alan needed one when I pointed it out to him. Alan, I really considered buying it myself to keep as a spare but then I thought of you and you only needed one. You are also a lot closer to flying than I am! If you have any yoke or switch related questions, please post here! (Original thread started on 09-22-11 by Alan Norris) I found this yoke but they want $1,000 plus shipping. It's from a Lear35. I think that it's a little expensive don't you think: Does anyone know if trim switches are easy and inexpensive to come by? (Posted by Eric Tomlin on 09-22-11) Alan, without a trim switch it is a bit high. When you think of it that way, that PFC yoke for $900 isn't so bad. Fully built, ready to interface, plug and play and on a stand. The switches are being pulled from these older yokes to be placed into other working LJ's that haven't been sent to a storage lot yet. That's how expensive the switches are- cheaper to pull them from an in-op aircraft than to source them otherwise. That's the story from a broker to a member here (Shane) and is why we're seeing several yokes on eBay and the 'net without the switches in them. (Posted by Shane Barnes on 09-22-11) I was able to source several sets of Lear yokes w/switches for members here before the prices went thru the roof and that is about the price paid for a matching set with switches. The asking price now for a set of yokes without switches is about $750 and I think $1500 to $2000 with switches. (This price could have changed as I've not checked in nearly a year) So that is high if that is just for one, that is close to the asking price for two without switches. As for the switches, almost impossible to find as the switches are more valuable than the yokes, especially the trim switch. Think of it this way, the yoke will last forever where as switches will wear out at some point so they are in demand. Here are my thoughts on the Lear yoke prices in the next year or so. Once the salvagers have stripped the switches out of these yokes they are going to realize they have a hunk of metal that is useless because yokes don't wear out or break that often if ever. So I think at some point in the next year or so you will see the yokes without switches come down in price because who is going to buy them other than sim builders and there is not that many of us out here! Better to get a couple hundred dollars out of them versus them sitting on their shelves collecting dust. Kinda like the real MD80 and 727/737 parts. . they have come down in price compared to a couple years ago as more are being salvaged. Of course I could be wrong, just my thoughts and it won't cost you anything to wait for a better deal or use a CH yoke temporarily mounted to the control column head. That was the original plan until several of us found Lear yokes. (Posted by Ron Rollo on 11-29-11) Hey Alan, one other thought for you, there is a difference between the pilot's side yoke and the co pilot's yoke. They are a mirror image of each other. So if your going to spend big bucks for a Lear35 yoke, at least get the Pilot's side yoke AND make sure it comes with all the hardware, especially the hat switch. (Posted by Alan Norris on 11-30-11) Okay, they came up with another yoke off a Lear35. $450 less the trim switch. I guess that's the valuable switch that is salvaged because of its scarcity. Is it somewhat like a regular spring loaded slider or rocker switch? (Posted by Shane Barnes on 11-30-11) Hey Alan, the price is not bad if you get the two switches shown (push buttons) and most likely there is one more that you can't see in the photo that is mounted to the back of the grip. Might go for that yoke if you are comfortable with the price. If you can find a Cessna trim switch (hat switch) it is similar to the Lear design minus a push button switch built into the top of it then you could modify the switch to work for trim. A four way hat switch will work for the trim. Eric and I talked about this switch earlier this evening. The center push button switch on the hat switch of the real Lear trim switch is not implemented in FS but it can be implemented with a little hardware logic. I have seen a switch that I think will work and I think by adding a short length of tubing it will give the HAT switch the look/height of the Lear45 if you want the HAT switch to look the part of the Lear trim switch. (Posted by Eric Tomlin on 11-30-11) That looks great! Too bad the trim switch will be pulled out as it's the main one you require on a yoke! But, for that amount it's not bad. The trim switch is a 4 way switch. The N and S positions are for up and down pitch trim with the E and W being for Aileron trim. These are activated once you press the center button down and hold, plus the fwd/aft or left/right motion. (Posted by Ron Rollo on 11-30-11) Hey Alan, I think it is a good deal, probably the best you will find any time soon. Before I got my hands on my two yokes I had put a lot of thought into making my own trim switch. Mouser sells a nice little hat switch with a center push button that would be the center of your design. It can be done, you'll just have to wrap your mind around it to get it done. (Posted by Alan Norris on 12-18-11) Well I got that yoke and it came without the top hat switch and the lower of the two push buttons on the RHS. I know what the top hat switch does (pitch and rudder trim). Does anyone happen to know the following switch functions: LHS behind the grip -- cancel autopilot? LHS bottom -- PTT? RHS top?RHS bottom? Also -- someone mentioned a 4-way switch with a push button that Mouser offers. Any idea what the part number is. One more thing, does anyone have a part number for the missing push button (I assume it's a PB) on the RHS of my yoke? The yoke is coated with thick black plastic that has a couple of nicks and gouges in it. What is everyone doing to refinish theirs -- strip the plastic or coat over the top after scuffing it? (Posted by Ron Rollo on 12-18-11) I plan on stripping my yokes of all the hardware and having the yokes sand blasted. Then they will be powder coated with a textured flat black paint. See this tutorial thread HERE As for the push buttons, I will wire them all up and at least have a plug for everything. Later on if I need it, I will have it. If not, it will go unused, no big deal. At least I won't have to dig inside the yokes again. (Posted by Shane Barnes on 12-20-11) The push button switches are Mason brand switches. Unknown part number at this time. I plan on leaving mine black and living with the small nicks and gouges . . gives it character. I started to paint it with textured paint to give the appearance of the real 45 yoke but the textured paint I have used on a few things in my generic sim gets dirty over time from repeated contact with your hands and the textured surface makes it very hard to clean. I guess I could fly with white gloves on! (Posted by Alan Norris on 12-20-11) I just got a PDF from Lear35/36 with the various yoke switches (with different switch options). Hope this is helpful: To see the rest of the Learjet 35/36 Yoke document, click HERE One thing that puzzles me is that the parts catalog lists these switches (listed with their locations on the yoke) -- not sure exactly what they all do: Trim & Trim Arm Switch (left top -- the one that was stripped from my yoke before they shipped it) Master Autopilot Release, Nose Steering Primary Pitch Trim Cut Out Switch (left bottom) Microphone Control (presumably the PTT switch) (left rear) Roll and Pitch Maneuver Switch (right top) Autopilot Pitch Release and Primary and Secondary Flight Director Sync Switch (right bottom -- missing one mine) The switches I have at the right top, the right bottom and right rear are all similar in that they have four terminals. Now the functions can be different from plane to plane so I'm not sure what they do. For instance the one that was at the right top on mine has only two terminals connected but is spring loaded side to side, The one at the left rear has only two connected and is NO (PTT). The one at the left bottom has all terminals connected and two are NC and two are NO but one of the wires was connected to another switch. UPDATE: I lucked out on finding the company that supplies these switches -- both are not the one cited in the parts manual. They may have gone out of business or been bought out. I did get quotes from Bombardier's parts department. Here they are: Master Autopilot, Nose Steering Primary Pitch Trim Cut Out Switch $45 Roll and Pitch Maneuver Switch $31.50 Trim and Trim Arm switch $1,287 (Posted by Will Sasse on 12-21-11) PTT, Autopilot cancel, & Roll Pitch Sync (Maneuver) can be any momentary button switch, at least in functionality - if not appearance! On the real LJ the trim switch will be twin action, either split button, or push-in then rotate to activate. the first action is to prevent accidental activation of the trim (resulting in really bad control forces for the pilot). I do not think it necessary to model the twin action in the sim, so any 4-way hat switch body would do. The Roll & Pitch Maneuver is probably the Control Wheel Steering (CWS) button, again a momentary button, which syncs the Flight Director to the current aircraft attitude - part of the autopilot. As to the momentary with many connections, it depends on what equipment was installed in the aircraft the yoke came from. Without some clue I an clueless as to what they could be.... It's possible the common connection could be ground/neutral? NC = Normally Closed, NO = Normally Open: Again, I think it would depend what it was connected to as to which terminals were used for what? Reference real Lear35 yokes: I squeezed into a real L35 today and had the yoke switches explained to me. Goes like this.... Left/Front/Top: 4-way Electric trim (elevator & aileron)- this we knew. The interesting part is that the central button function on the trim rocker varies depending on whether the autopilot is engaged or not. When A/P engaged, central button acts as an A/P disconnect button. There is no need to push it to activate electric trim with A/P engaged. With A/P disengaged you must push this button to activate electric trim. Left/Front/Lwr: Nose Wheel Steering Activate & A/P disconnect. On takeoff, the pilot holds this button in to retain nose wheel steering via rudder pedals until airspeed is sufficient for rudder effectiveness - this speed is calculated by pilots pre takeoff. For Taxiing purposes there is another button on the center console to active/deactivate nose wheel steering. Left/Rear: PTT Right/Front/Top: A/P disconnect Right/Front/Lwr: Pitch Sync (Control Wheel Steering). I don't know if any of this translates into the L45, but it explains the functions of your L35 switches. (Posted by Eric Tomlin on 12-23-11) Here's a LJ45 Yoke: All flight control trim motors and electrical servos can be disabled by depressing and holding either control wheel master switch (MSW) in the event of a malfunction causing control inputs. Autopilot Pitch Servo Autopilot elevator operation is provided by the autopilot pitch servo actuator that is connected to the elevator aft sector assembly (Figure 15-2). The pitch servo actuator is a two direction torque motor. It incorporates an electrical clutch that engages only when the autopilot is engaged. If a system malfunction causes the servo to produce an undesired elevator movement, the crew can disengage the servo by disengaging the autopilot or by depressing either control wheel master switch (MSW). Depressing and holding the touch control steering (TCS) button will also disengage the clutch while held, but does not disengage the autopilot (Figure 15-3). Autopilot Roll Servo The ailerons are positioned by a roll servo when the autopilot is in use. The autopilot roll servo is a two direction torque motor mounted within the wing/fuselage fairing and is coupled via a closed loop cable to the aft aileron control quadrant assembly in the center wing area (Figure 15-6). The roll servo incorporates an electrical clutch that engages only when the autopilot is engaged. In the event of a malfunction, the servo can be manually overridden by the pilot or disconnected by disengaging the autopilot or by depressing either Control Wheel Master Switch (MSW). Depressing and holding the Touch Control Steering (TCS) button also disengages the roll servo clutch, but does not disengage the autopilot (Figure 15-3). Aileron Trim An aileron trim tab is an integral part of the left-hand aileron surface (Figures 15-6 and 15-7). The Control Wheel Trim Switches (CWTS), located on the outboard horn of each pilot's control wheel (Figure 15-3) control the aileron trim tab actuator motor. Depressing the arming button in the center of the trim switch and simultaneously moving the barrel of the switch left or right energizes the trim tab motor, which transmits motion to the trim tab through dual connecting rods. The pilot's trim switch has priority over the copilot's trim switch. The switch that's associated with Nose Wheel Steering simply connects/disconnects that system, not actually steering the nose wheel and this only applies to a non- LJ45 as far as connecting it (if I read Will's post correctly). In the LJ45, you turn the Nose Steering on via a switch on the System Test Panel. The way it works is listed below. For the LJ45, you can turn this system off by either the switch itself or by depressing the MSW. Regarding the checklists advance button- that checklist feature is an option and is displayed on the MFD (DU3 typically). NOSE WHEEL STEERING SYSTEM-GENERAL The digital nose wheel steering (NWS) system is a steer-by-wire system that provides nose wheel deflections up to a maximum of 60 degree left or right for maneuvering the airplane on the ground. The system provides variable steering authority based on the airplane’s groundspeed and rudder pedal inputs by the crew. A steering command based upon pedal position and force, nose strut position, and aircraft speed is calculated by the NWS controller (computer). This command is relayed to a DC motor (servo actuator) on the top of the nose strut, which positions the nose wheel via a nose wheel strut gearbox. The NWS system can be Armed and Disarmed with the momentary action NOSE STEER switch on the GEAR/HYD control panel. The NOSE STEER switch will illuminate “ON” when the following conditions occur: • Both system DC power sources are available to the computer • The nose gear is down and locked • No system faults or failures are detected Once Armed, engagement is possible when WOW signals indicate the aircraft is on the ground and information from the wheel speed transducers is available. “Engaged” is described as the operating mode of the NWS system in which the system has been Armed, power is applied to the Servo Actuator and nose wheel movement is being controlled via the NWS computer command. NWS engagement is automatic when the system is armed and the right conditions exist. Engagement is not annunciated in the cockpit. The NWS system can be [b]Disarmed/Disengaged[/b] by momentarily depressing the NOSE STEER switch/indicator or either Control Wheel Master Switch (MSW). The steering authority decreases from a maximum 60 degrees authority at the beginning of takeoff roll and gradually decreases to 7 degrees authority at approximately 70 KIAS as the airplane accelerates for takeoff. The authority limit then remains at 7 degrees to liftoff. On landing, steering authority will initially be limited to 7 degrees left or right after touchdown and as the airplane decelerates, the authority will gradually increase to 60 degrees at the lowest ground speeds. Fade-in is provided to ensure smooth transition from the disengaged to the engaged mode and allows the pilot adequate time to respond to steering effects on the aircraft. The fade-in gradually increases steering rate over a few seconds until the maximum rate of 22 degrees per second has been reached. The steering system has an out-of-range recovery feature. If the system is engaged out of the normal operating range of 60 degrees left or right, the system will drive the wheel at 35 degrees/second in a direction, which represents the shortest path to an operational range. NORMAL OPERATION The nose wheel steering system is normally selected ON prior to taxi by momentarily depressing the NOSE STEER switch. When the system is armed, “ON” will be illuminated in the NOSE STEER switch/indicator. To disarm/disengage the NWS on the ground, momentarily depress either control wheel master switch (MSW) or momentarily depress the NOSE STEER switch. Depressing either wheel master switch while in flight does not cause the NWS to disarm, but it can be disarmed in flight after the landing gear is lowered by momentarily depressing the NOSE STEER switch. The nose steering should remain engaged throughout takeoff. After lift-off, the nose wheel steering computer commands a 2 second nose centering signal, then disconnects power to the servo actuator. When the landing gear is retracted, the NOSE STEER “ON” legend will extinguish. When the nose gear is down and locked for landing, the “ON” legend will illuminate in the NOSE STEER switch/indicator if power to the nose steer computer has not been interrupted in the interim. The system is armed when the “ON” legend is illuminated and when the aircraft is on the ground the nose wheel steering will engage. This feature is NOT modeled in FSX. However, some of it can be modeled via Internal Variables in the SYS card software InterfaceIT. It can be made much more complete in a System software such as JETSystems that has been slowly worked on for a while now, but this particular system hasn't been worked on yet other than by me personally using InterfaceIT. This is another great example of how CRUCIAL it is to have a copy of the aircraft manual when you're building a flight simulator and expect any kind of real functionality beyond "kick the tires and light the fires" (Posted by Will Sasse on 12-23-11) I now understand the left hand lower switch is the Yoke Master which is why it's wired for NO and NC circuits. Still, having a concise description of the yoke switch functions and how the Master switch interacts would be nice (and having it in one place in the manual too). Still having a hard time grasping TCS. When would we use it? (Posted by Eris Tomlin on 12-23-11) Touch Control Steering- Scenario: ATC: N45LJ, turn twenty degrees left NOW for traffic! N45LJ: Roger, twenty left for traffic So...your AP is ON and you could reach up and fumble with the HDG knob to move it 20 degrees left, but wait...you're flying with the FMS via the NAV function. Drat! Do I fiddle with the thingamajig, or the diddlybob? You do neither. You press the TCS button which acts as a clutch to the autopilot servo and it allows you to move the yoke move in Roll and Pitch regimes without turning off the autopilot. Once released the AP takes over again. (Posted by Alan Norris on 01-09-12) I got one of the four way hat switches from Mouser and have wired it up. It's O.D. is smaller than that in the yoke but if you get a nylon spacer with a 1" O.D. and open up the I.D. to fit the switch it works just fine. Not a lot of movement on the switch but it works. Does anyone have a source for the push button switches as I'm missing two? My yoke didn't have a red button for the master cancel but I did notice a red one on someone's yoke. I guess there are variations from yoke to yoke. For instance, on the photo of the yoke with the red cancel button, the switch on the top right seemed to be a standard switch. Here is a photo of mine which has a side to side function ( I think there may have been a boot of some sort at one time but it seems to have been lost as the internals are visible). (Posted by Shane Barnes on 01-11-12) Hey Alan, the yoke body is the same from the 35 to the 45 but the number of switches and colors are differing. Just remember to look at a photo of the Lear45 yoke and determine what switches and colors you need and where they are located on the yoke. To duplicate the Lear 45 yoke you will need the following switches: 2 red switches, one for each yoke. 6 black switches, three on each yoke. One of these will be on the backside of the yoke. And of course two hat switches, one for each yoke. Here is a photo of my pilot side yoke: And here is the co-pilot side: Notice the red switch is on the outboard side of each yoke? (Posted by Alan Norris on 01-07-12) I just snagged a brand new pitch trim switch off eBay for my yoke for $114. Anyone need the one I installed (top hat switch -- typically found on joysticks)? The part number is good for the real Lear switch -- MASON 403-4300 I checked with a company from whom I purchased my yoke and chronometers and they have the pitch trim switches in an "as removed" condition for $500! Thankfully I got mine for a more affordable price. Here's a shot of the switch wired and installed. It's funny but the left and right rudder trim is identified as RWD and LWD -- rightward and leftward maybe. Also that switch looks like it's gray but in fact it's black. (Posted by Shane Barnes on 09-08-12) That is the first one I have seen on eBay for sale and I have been watching a long time. I thought Alan needed one when I pointed it out to him. Alan, I really considered buying it myself to keep as a spare but then I thought of you and you only needed one. You are also a lot closer to flying than I am! If you have any yoke or switch related questions, please post here! Hi All - Long time since there were discussions on yokes for our cockpits. It's quite difficult and expensive to secure real yokes. A couple things I have noticed about our current lower price options: 1. The Lear yoke rotates about the top of the main body of the yoke. What many of us are finding when using CH or Saitek yokes is that the yoke sits several inches higher than the real yoke and for those of us without real or adjustable seats, we are finding the yoke to be uncomfortably high. Thoughts? Hi All - Long time since there were discussions on yokes for our cockpits. It's quite difficult and expensive to secure real yokes. A couple things I have noticed about our current lower price options: 1. The Lear yoke rotates about the top of the main body of the yoke. What many of us are finding when using CH or Saitek yokes is that the yoke sits several inches higher than the real yoke and for those of us without real or adjustable seats, we are finding the yoke to be uncomfortably high. Thoughts? I agree, the control yokes is one of the last areas of our build that we need to find an alternative solution for in case a builder either can not find a set of real Lear yokes or can not afford them. My thoughts? One quick and affordable solution would be for me to provide a set of columns that are a couple inches shorter to better accommodate the CH yoke and Saitek yoke option. I was not aware that the difference was such that it is something that we needed to accommodate for. This is not a problem. I would love to replicate the yokes using plugs and molds. My solution would be to use a front and rear mold and fiberglass. Then bond the front and rear together. This would be a lot of finishing work and I worry about what the cost of them would end up being. If anywhere near the cost of the real Lear yokes, it would not be worth the effort. Another option would be to 3D scan a couple yokes (CPT side and FO side because they are mirror images of each other) and have them built up in a 3D printer. Certainly doable and a lot of the final finishing work would be eliminated. The question again is the cost but I bet more affordable than the fiberglass option or the real deal. As a measuring stick, right now you can get a set of yokes for just under $1,200. But this does not include the buttons and the trim switches. You would also want to spend around $100 to have them sand blasted and powder coated. Also, if you look long enough and are lucky, you can actually find real Lear40/45 yokes. Maciej found a set a couple years back. They might start becoming more available in the next couple years. For the record, there is a slight difference between the earlier Lear yokes and the Lear40/45 yokes, but only experts can tell the difference! I agree, the control yokes is one of the last areas of our build that we need to find an alternative solution for in case a builder either can not find a set of real Lear yokes or can not afford them. My thoughts? One quick and affordable solution would be for me to provide a set of columns that are a couple inches shorter to better accommodate the CH yoke and Saitek yoke option. I was not aware that the difference was such that it is something that we needed to accommodate for. This is not a problem. I would love to replicate the yokes using plugs and molds. My solution would be to use a front and rear mold and fiberglass. Then bond the front and rear together. This would be a lot of finishing work and I worry about what the cost of them would end up being. If anywhere near the cost of the real Lear yokes, it would not be worth the effort. Another option would be to 3D scan a couple yokes (CPT side and FO side because they are mirror images of each other) and have them built up in a 3D printer. Certainly doable and a lot of the final finishing work would be eliminated. The question again is the cost but I bet more affordable than the fiberglass option or the real deal. As a measuring stick, right now you can get a set of yokes for just under $1,200. But this does not include the buttons and the trim switches. You would also want to spend around $100 to have them sand blasted and powder coated. Also, if you look long enough and are lucky, you can actually find real Lear40/45 yokes. Maciej found a set a couple years back. They might start becoming more available in the next couple years. For the record, there is a slight difference between the earlier Lear yokes and the Lear40/45 yokes, but only experts can tell the difference! I would think to get the heavy feel you may want to cast them from resin. They don't need to be hollow, but only have a channel in them to route wires from the switches. If we are able to cast a replica, we can also replace the expensive switches with a cheaper version. For the columns, for those that already have the column kits, can they be shortened without completely ruining them? For instance, can the coupler at the bottom be removed so we can cut an inch or two off? I briefly tried to pull mine off to see but it was quite snug. Not sure if you used PVC glue on that joint or not. I would think to get the heavy feel you may want to cast them from resin. They don't need to be hollow, but only have a channel in them to route wires from the switches. If we are able to cast a replica, we can also replace the expensive switches with a cheaper version. For the columns, for those that already have the column kits, can they be shortened without completely ruining them? For instance, can the coupler at the bottom be removed so we can cut an inch or two off? I briefly tried to pull mine off to see but it was quite snug. Not sure if you used PVC glue on that joint or not. No glue or PVC cement. I did bang them pretty good into each other and then made sure that the fit was square and level. It should be possible to decouple them from one another with a mallet and a wooden block. If I ever get my sim plate cleaned up some, I will definitely look into making some yokes from scratch. We have a decent solution for the very expensive trim switches already. Check it out HERE No glue or PVC cement. I did bang them pretty good into each other and then made sure that the fit was square and level. It should be possible to decouple them from one another with a mallet and a wooden block. If I ever get my sim plate cleaned up some, I will definitely look into making some yokes from scratch. We have a decent solution for the very expensive trim switches already. Check it out HERELear Yokes and Switches Discussion
![]()

![]()
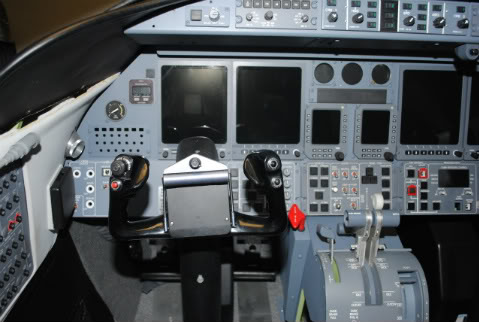
2. Ron's column length is based on use of a real yoke
3. The CH and Saitek yokes pivot point is much lower on the main body of the yoke
I was curious if anyone out there with a real 35/40 yoke is willing to create a mold so we can cast replicas. We have some amazing skills out there and I think this would be a next logical step for the flight controls.
2. Ron's column length is based on use of a real yoke
3. The CH and Saitek yokes pivot point is much lower on the main body of the yoke
I was curious if anyone out there with a real 35/40 yoke is willing to create a mold so we can cast replicas. We have some amazing skills out there and I think this would be a next logical step for the flight controls.![]()
![]()
![]()
2017-10-10