


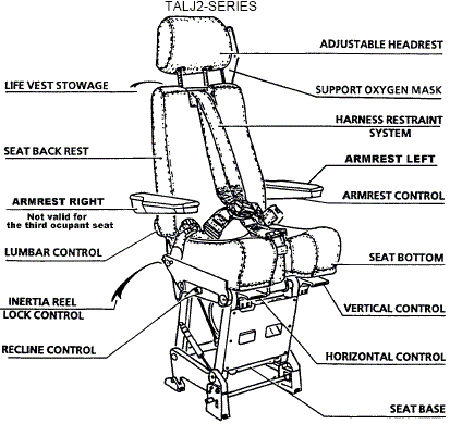
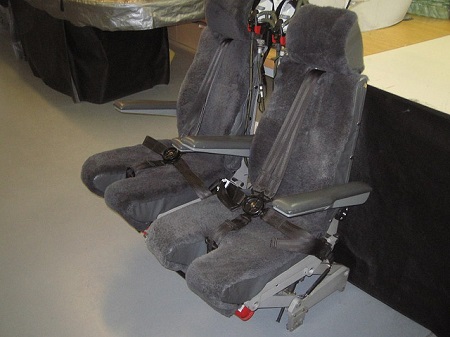
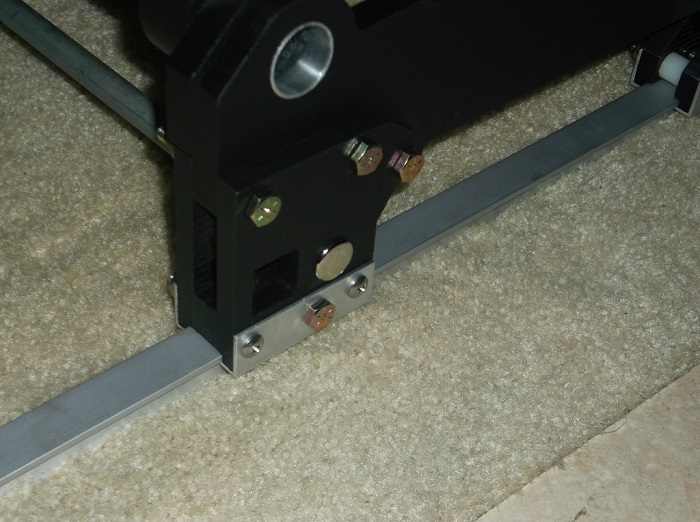
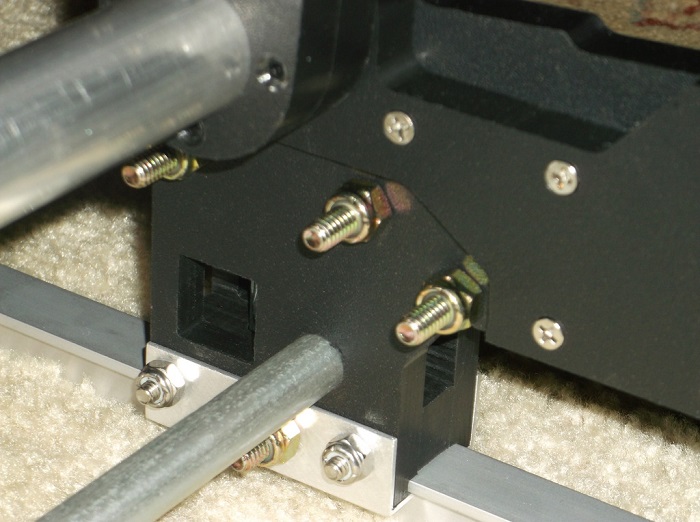
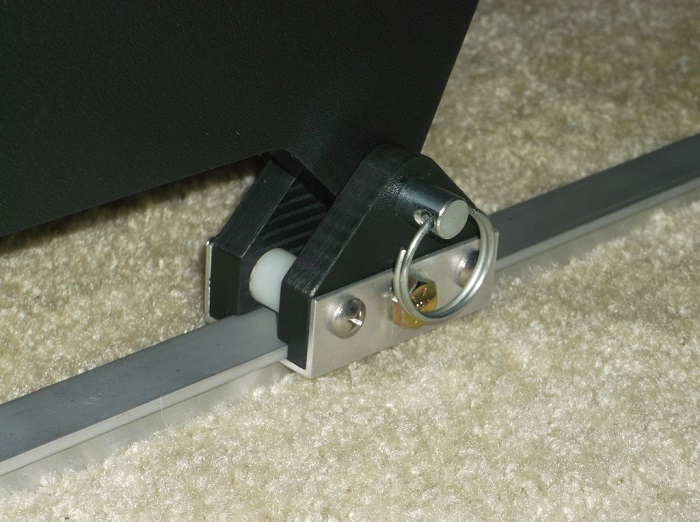
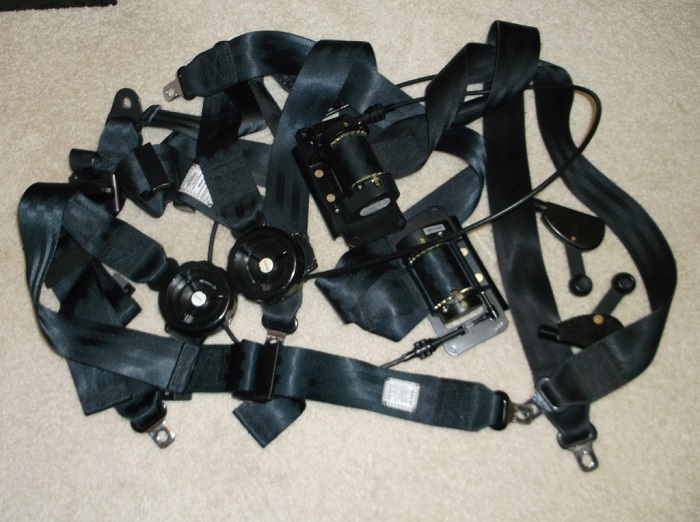
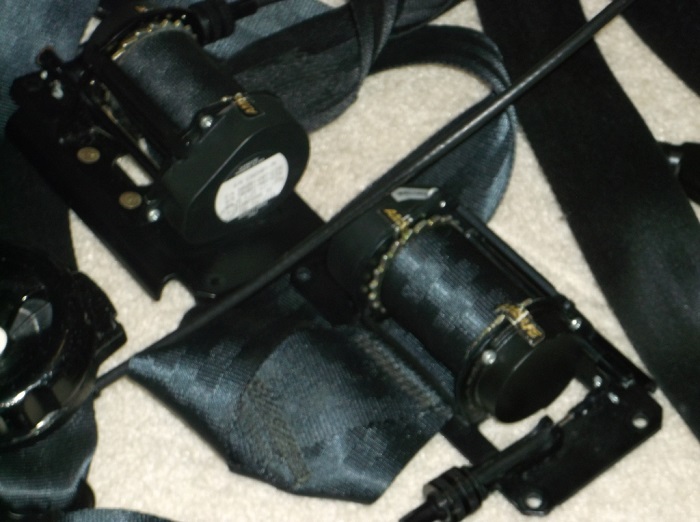
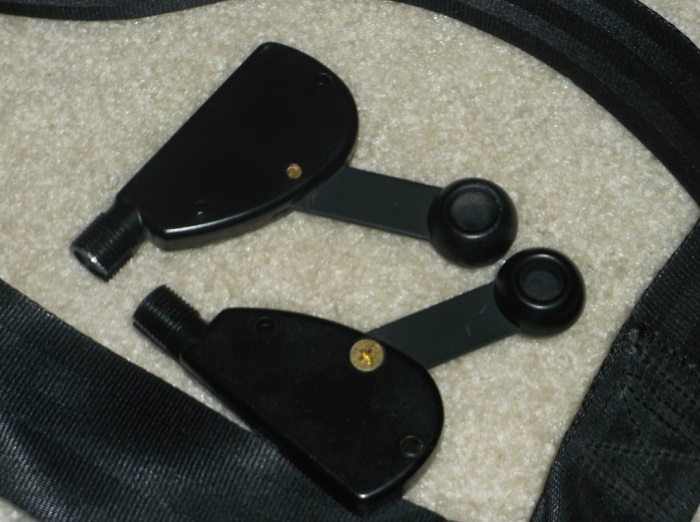
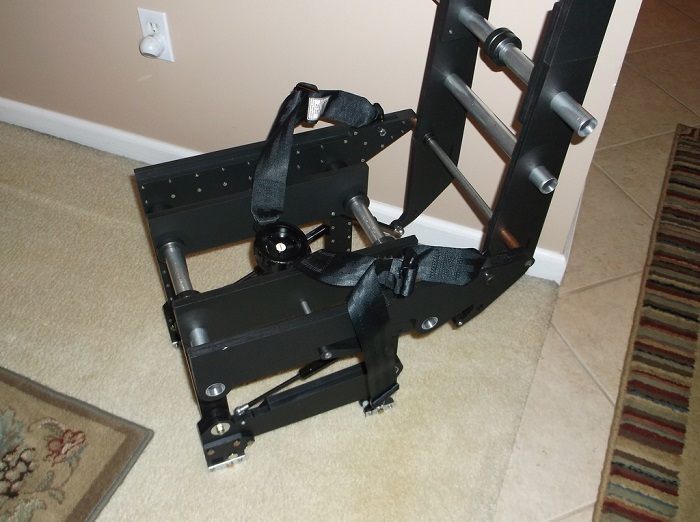
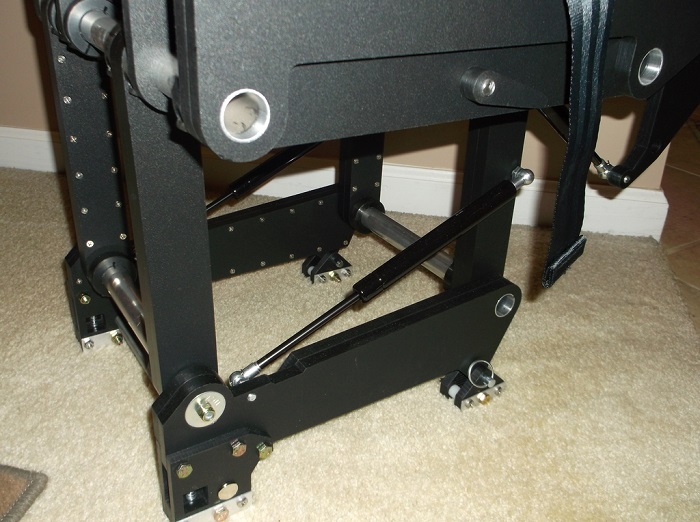
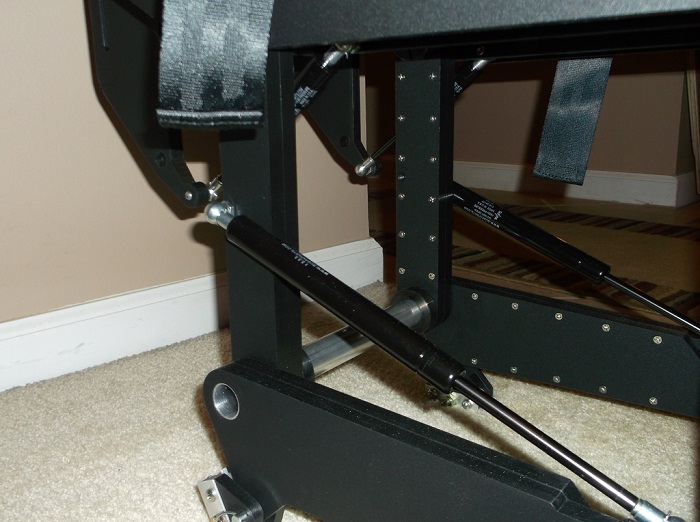
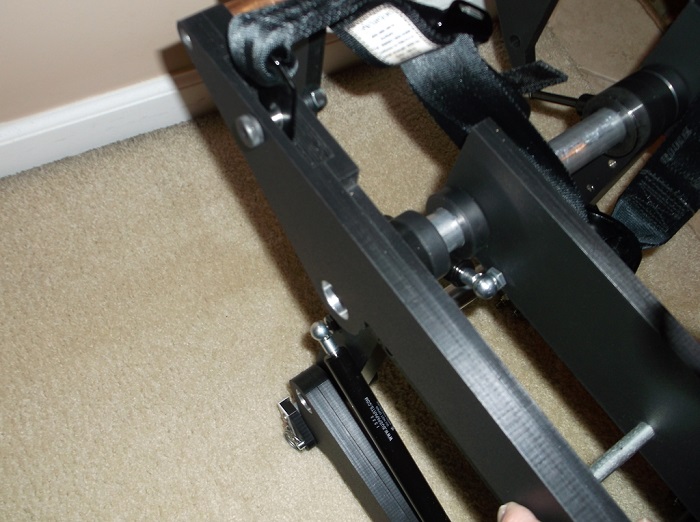
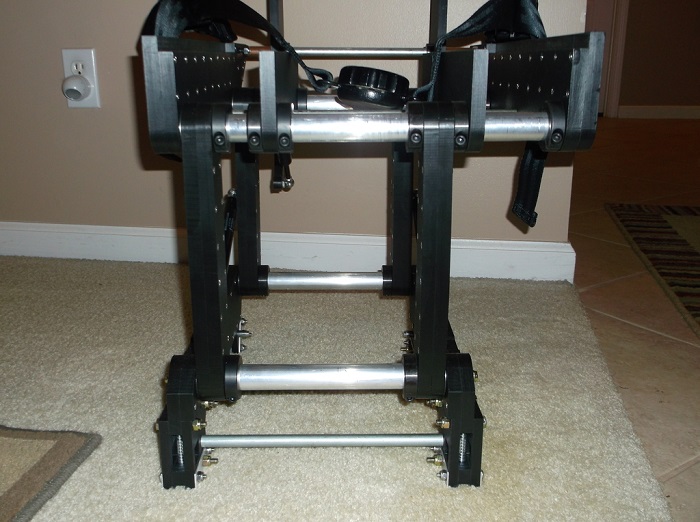
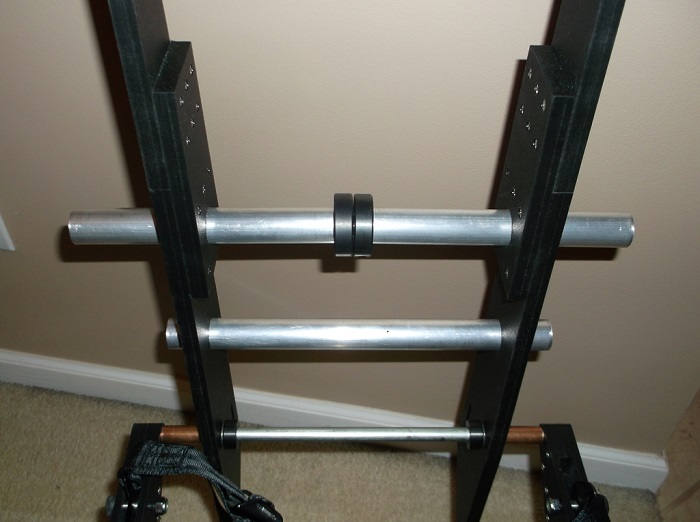
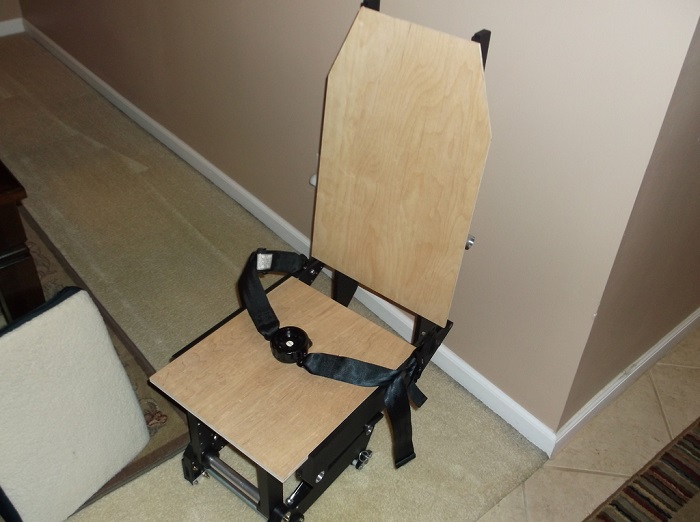
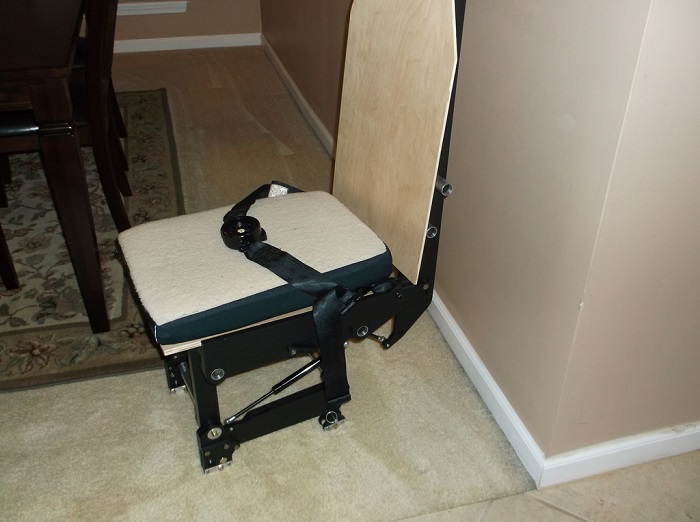
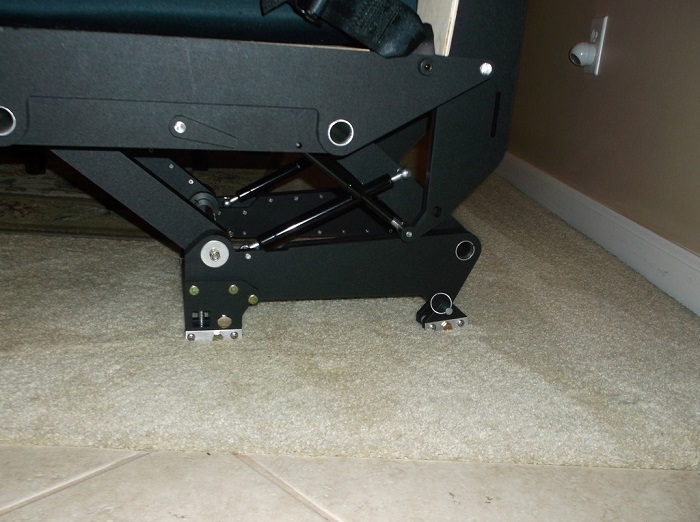
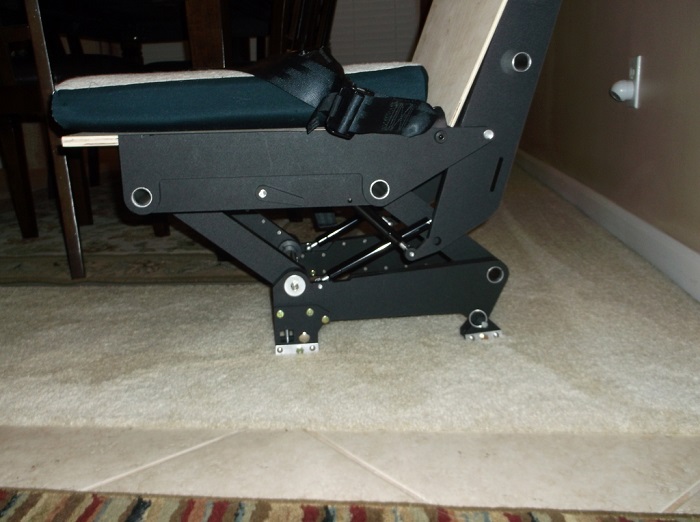
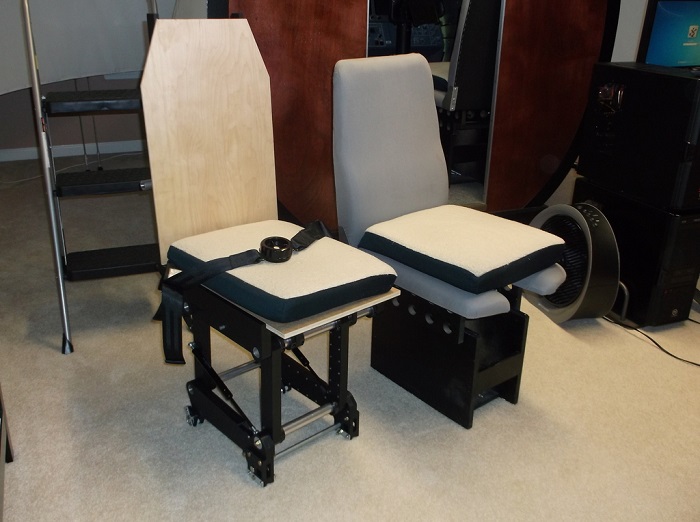
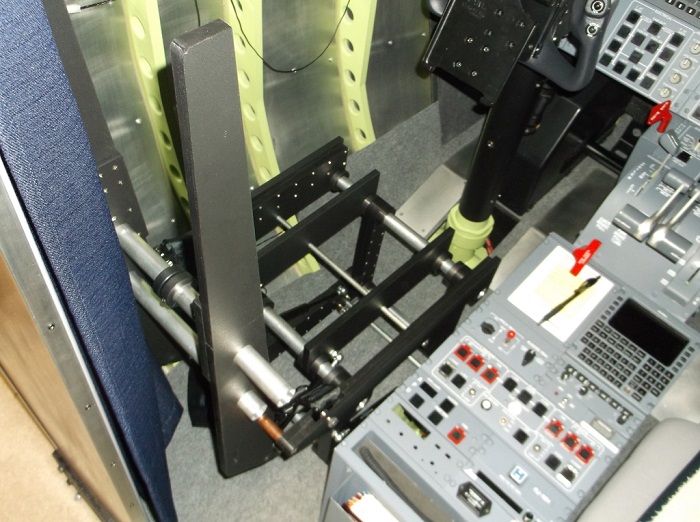
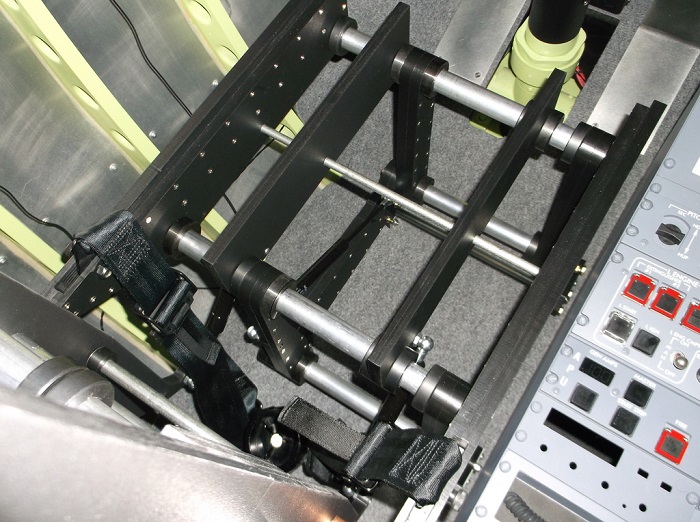
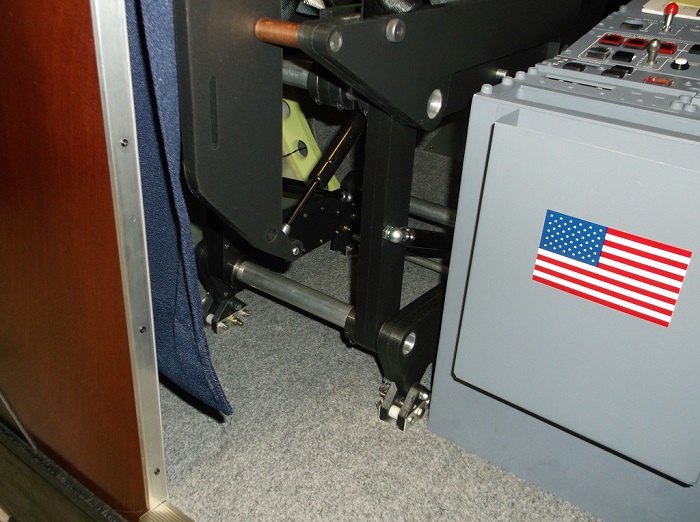
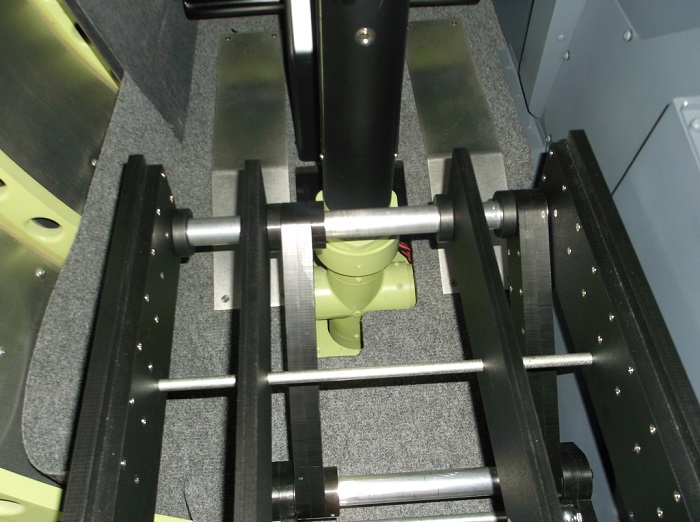
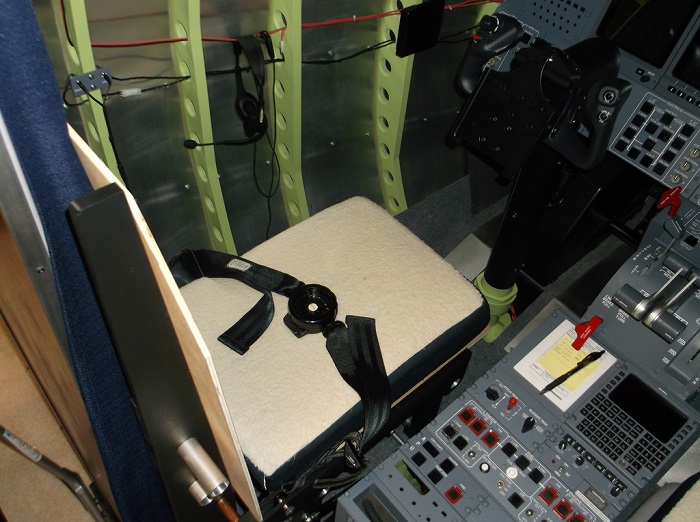
(Original thread started on 10-26-15 by Ron Rollo) If you have been following my build for the past eight years, somewhere along the way you have probably seen where I have had plans to build my own seats. Back several years ago, I put together a set of "temporary seats" which have severed their purpose well by allowing me to test fly the sim over the past few years. Now that I have 95% of the avionics complete, it's time to replace the temporary seats with something that better fits the project. I have gone back and forth with the idea of using 737 seats versus building them from scratch. The one thing that I was having a hard time accepting is that the Boeing seats don't fit perfectly in the Lear45 sim. Who would expect that anyway? Don't get me wrong, the 737 seats are a great alternative and they do fit well enough to work but if you know me, there are some things, sometimes very small things, that I can't settle for or let go. Therefore, I have decided to build my own Lear45 replica seats from scratch! I am always up for a great challenge! I will also document as much as I can about this process in case anyone else wants to go down this road. I may also offer parts in kit form but lets see how the initial seats turn out first. By the way, there has been at least one set of Lear45 seats available as far as we know. They were asking $15,000 per seat. ($30,000 for a seat of used seats pulled from a wreck!?) In the future, 10 or 15 years into the future, we may see that the Lear45 seats are more obtainable to us sim builders. But until that day comes, we are stuck with 5 gallon paint buckets, 737 seats or making something on our own. My goal is to build a very convincing Lear45 seat. We have recently learned that there are two certified seats that can be fitted into the Lear45 but to date, I have only seen photographic evidence of the TALJ2-Series seat: Here are a pair of TALJ2 seats that have been pulled out of a Lear45: One of the challenges is to find information on the seats. There is just nothing out there. Falling short of taking a field trip into the flight deck of a Lear45, I had to rely on a few photos and very limited documentation. I did not have any solid measurements. I used the same method as I did with the shell. (Don't ask.) My goal is to make the seats looks as close as possible to the real thing and operate exactly like the real thing. (If your not sure what to expect, take a look at the first illustration in this thread.) The one thing that my seats will not be is certified for real flight. But with that said, they will be so strong that there will not be a weight limit on them. Trust me on this, my preliminary testing of materials and construction are surpassing even my expectations of what I was hoping for! I started planning and drawing in CAD about three weeks ago. Three days ago, I finally felt like I had a design that could work and we began cutting parts. I have my father, Ron Rollo Sr. helping with building up the prototype pilot side seat. So far after three days of cutting and building, I am very pleased with the direction the seat design is going. Although there have been several adjustments along the way which is to be expected. So let me show you some photos of the prototype seat construction so far: These are photos of the rail system and the anti G system. You will also note that I am building the prototype out of black polly. The final version of the Captain and FO seats will be done in gray polly which should match the color of the real seats near perfectly. More photos next Wednesday! By the way, my time line goal is to have a set of fully operational seats in the sim by April 2016 which will more than likely be the month that I will be hosting the Hangar45 Meet and Greet. We will see if I can stay on par with this time line. (Posted by Alan Norris on 10-27-15) You are one brave soul sir but I salute you. If anyone can do it -- it's you (and your dad of course). (Posted by Ron Rollo on 10-27-15) Thanks guys for the kind words and support. I am already past the point of no return. The seats may fall short of all my hopes and dreams but for sure they are going to exceed what I currently have. I also lucked up and found a set of Amsafe five point seat belts that are used in the Lear45. I say lucky because they were the only ones at the time available in the whole world at a reasonable price. They came with the inertia reels and the lock/unlock levers. Everything is in very good condition. The seat belts were the one thing related to the seats that I wanted to see if I could find the real parts on and I did, the icing on the cake! Here are a few photos of the seat belts. Two authentic sets of five point belts: Closer look at the inertia reels: And a closer look at the lock/unlock levers. There is a bit of a story with these but I will tell you about it later! (Original thread started on 10-26-15 by Ron Rollo) If you have been following my build for the past eight years, somewhere along the way you have probably seen where I have had plans to build my own seats. Back several years ago, I put together a set of "temporary seats" which have severed their purpose well by allowing me to test fly the sim over the past few years. Now that I have 95% of the avionics complete, it's time to replace the temporary seats with something that better fits the project. I have gone back and forth with the idea of using 737 seats versus building them from scratch. The one thing that I was having a hard time accepting is that the Boeing seats don't fit perfectly in the Lear45 sim. Who would expect that anyway? Don't get me wrong, the 737 seats are a great alternative and they do fit well enough to work but if you know me, there are some things, sometimes very small things, that I can't settle for or let go. Therefore, I have decided to build my own Lear45 replica seats from scratch! I am always up for a great challenge! I will also document as much as I can about this process in case anyone else wants to go down this road. I may also offer parts in kit form but lets see how the initial seats turn out first. By the way, there has been at least one set of Lear45 seats available as far as we know. They were asking $15,000 per seat. ($30,000 for a seat of used seats pulled from a wreck!?) In the future, 10 or 15 years into the future, we may see that the Lear45 seats are more obtainable to us sim builders. But until that day comes, we are stuck with 5 gallon paint buckets, 737 seats or making something on our own. My goal is to build a very convincing Lear45 seat. We have recently learned that there are two certified seats that can be fitted into the Lear45 but to date, I have only seen photographic evidence of the TALJ2-Series seat: Here are a pair of TALJ2 seats that have been pulled out of a Lear45: One of the challenges is to find information on the seats. There is just nothing out there. Falling short of taking a field trip into the flight deck of a Lear45, I had to rely on a few photos and very limited documentation. I did not have any solid measurements. I used the same method as I did with the shell. (Don't ask.) My goal is to make the seats looks as close as possible to the real thing and operate exactly like the real thing. (If your not sure what to expect, take a look at the first illustration in this thread.) The one thing that my seats will not be is certified for real flight. But with that said, they will be so strong that there will not be a weight limit on them. Trust me on this, my preliminary testing of materials and construction are surpassing even my expectations of what I was hoping for! I started planning and drawing in CAD about three weeks ago. Three days ago, I finally felt like I had a design that could work and we began cutting parts. I have my father, Ron Rollo Sr. helping with building up the prototype pilot side seat. So far after three days of cutting and building, I am very pleased with the direction the seat design is going. Although there have been several adjustments along the way which is to be expected. So let me show you some photos of the prototype seat construction so far: These are photos of the rail system and the anti G system. You will also note that I am building the prototype out of black polly. The final version of the Captain and FO seats will be done in gray polly which should match the color of the real seats near perfectly. More photos next Wednesday! By the way, my time line goal is to have a set of fully operational seats in the sim by April 2016 which will more than likely be the month that I will be hosting the Hangar45 Meet and Greet. We will see if I can stay on par with this time line. (Posted by Alan Norris on 10-27-15) You are one brave soul sir but I salute you. If anyone can do it -- it's you (and your dad of course). (Posted by Ron Rollo on 10-27-15) Thanks guys for the kind words and support. I am already past the point of no return. The seats may fall short of all my hopes and dreams but for sure they are going to exceed what I currently have. I also lucked up and found a set of Amsafe five point seat belts that are used in the Lear45. I say lucky because they were the only ones at the time available in the whole world at a reasonable price. They came with the inertia reels and the lock/unlock levers. Everything is in very good condition. The seat belts were the one thing related to the seats that I wanted to see if I could find the real parts on and I did, the icing on the cake! Here are a few photos of the seat belts. Two authentic sets of five point belts: Closer look at the inertia reels: And a closer look at the lock/unlock levers. There is a bit of a story with these but I will tell you about it later! UPDATE: My father and I only had three days to get some stuff done. The first day was spent remaking several of the parts that we already had in the first version. So the photos that you see below have 50% new parts from the week before. The main change that we made was increasing the length from front to back by one inch. Here are the updated photos! We have 80% of the main frame work and movements complete at this point: I am using gas shocks like the real seats have. The lift shocks are 20 pounds of force and the recline shocks are 15 pounds of force. I had to take a best guess when I ordered them but it turns out that I am very close if not right on the money: This seat is another example of a Rubix Cube. It is like a puzzle and it takes a bit of studying it to figure out all the movements and where things go. The hard part was only using a few limited photos and guessing about the parts that I could not see. As it turns out, building the prototype is helping me prove what I had in mind: We are using two pieces of .5" Polly board to make most of the major parts of the seats. Take note of the seat belt notch. I notched one piece .25" deep and the other piece .25" deep for a total pocket size of .5" wide: This is one of the biggest reasons I wanted to try to build a set of seats from scratch. The offset! This is the pilots side seat looking at it from the front. The curvature of the air frame bends under the left side of the seat is the best way to describe why the Lear45 seats are designed in this manor. Larger aircraft like the Boeing 737 do not have this problem. Also note that the seat from the cushion base up is going to be perfectly symmetrical. Only the seat base is offset to compensate for the tight floor space: This area is brand new as of today and is probably going to change to some degree. This is the seat backer supports, the lumbar tube and the armrest pivot tubes. They are designed to pull out and fold down. Still a lot of work in this area: I am currently planning on using Birch wood for the seat support and the back support. The seat support is using .5" thick Birch and the backer support is using .25" thick Birch. The seat base fits into a neat little pocket and has a total of four supports holding the weight of the pilot: Now I am getting carried away! Seat cushion and seat belts already? Actually it is all about the testing and fitting. This came in handy while trying to figure out how wide the frame work should be. We know that from photos that Scott Wagner took several years ago that the seat cushions were 17" wide. But the seat frame work is less than that. I settled on a seat frame of 15 inches wide after talking to Shane about it for a bit: Here is a neat photo of the seat in it's lowest setting. The vertical range is about 3.5" of adjustment: This photo shows the seat back reclined back while the seat is in it's lowest vertical setting. Please note that the locking mechanisms are not in place yet so things want to snap back to their natural state based on the gas shocks: This is just the prototype so what you see here may change but only for the better! I'll have some more photos next Wednesday evening. Thanks to my dad, Ron Sr. for helping me out with this major project! (Posted by Will Sasse on 11-04-15) 5 point harness in a non-motion sim? I'm sure the FAA would be proud! Great looking work.... when you've got it sorted I'll gladly help you debug your construction process. (Posted by Alan Norris on 11-05-15) Great work Ron. Do you have the Bungee cords on hand that put the seat back to the highest position when the lock is released? UPDATE: My father and I only had three days to get some stuff done. The first day was spent remaking several of the parts that we already had in the first version. So the photos that you see below have 50% new parts from the week before. The main change that we made was increasing the length from front to back by one inch. Here are the updated photos! We have 80% of the main frame work and movements complete at this point: I am using gas shocks like the real seats have. The lift shocks are 20 pounds of force and the recline shocks are 15 pounds of force. I had to take a best guess when I ordered them but it turns out that I am very close if not right on the money: This seat is another example of a Rubix Cube. It is like a puzzle and it takes a bit of studying it to figure out all the movements and where things go. The hard part was only using a few limited photos and guessing about the parts that I could not see. As it turns out, building the prototype is helping me prove what I had in mind: We are using two pieces of .5" Polly board to make most of the major parts of the seats. Take note of the seat belt notch. I notched one piece .25" deep and the other piece .25" deep for a total pocket size of .5" wide: This is one of the biggest reasons I wanted to try to build a set of seats from scratch. The offset! This is the pilots side seat looking at it from the front. The curvature of the air frame bends under the left side of the seat is the best way to describe why the Lear45 seats are designed in this manor. Larger aircraft like the Boeing 737 do not have this problem. Also note that the seat from the cushion base up is going to be perfectly symmetrical. Only the seat base is offset to compensate for the tight floor space: This area is brand new as of today and is probably going to change to some degree. This is the seat backer supports, the lumbar tube and the armrest pivot tubes. They are designed to pull out and fold down. Still a lot of work in this area: I am currently planning on using Birch wood for the seat support and the back support. The seat support is using .5" thick Birch and the backer support is using .25" thick Birch. The seat base fits into a neat little pocket and has a total of four supports holding the weight of the pilot: Now I am getting carried away! Seat cushion and seat belts already? Actually it is all about the testing and fitting. This came in handy while trying to figure out how wide the frame work should be. We know that from photos that Scott Wagner took several years ago that the seat cushions were 17" wide. But the seat frame work is less than that. I settled on a seat frame of 15 inches wide after talking to Shane about it for a bit: Here is a neat photo of the seat in it's lowest setting. The vertical range is about 3.5" of adjustment: This photo shows the seat back reclined back while the seat is in it's lowest vertical setting. Please note that the locking mechanisms are not in place yet so things want to snap back to their natural state based on the gas shocks: This is just the prototype so what you see here may change but only for the better! I'll have some more photos next Wednesday evening. Thanks to my dad, Ron Sr. for helping me out with this major project! (Posted by Will Sasse on 11-04-15) 5 point harness in a non-motion sim? I'm sure the FAA would be proud! Great looking work.... when you've got it sorted I'll gladly help you debug your construction process. (Posted by Alan Norris on 11-05-15) Great work Ron. Do you have the Bungee cords on hand that put the seat back to the highest position when the lock is released? (Posted by Ron Rollo on 11-05-15) Thanks guys for the support and comments. I am really excited about how the seats are turning out. I just wish I had more time to get them completed in a snap! To answer your question Alan, neither this seat design nor does the real Lear45 seats use Bungee cords. The two 20 pound gas shocks are what lift the seats back up to full height. Randy, so far the seats are not comfortable at all. But there is nothing but a foam cushion to sit on at this point. I am going to stay hot and heavy on the seats because as I said somewhere in one of these post, I am planning a Hangar45 day here in Jacksonville Florida sometime in April 2016. Everyone in the hangar will be invited. There are three areas that I must complete: Seats, visuals and audio headsets. At least all three areas need to be at a grade of 95% or higher. I did some more test fitting, this time in the sim itself! First, here is a photo of the new replica seat next to the old temporary seat. (Click HERE to see more about the temporary seat.) At first glance, I was afraid that I did not make the new seat tall enough. That though melted away once I sat on the seat in the sim. As it is right now, I have almost two inches of height over the old seat and I don't even have the thicker cushions on them yet: Here is the frame work in the sim. Everything is going to fit perfectly! This is about as close as the seat is going to get to the center pedestal due to the locking pin at the right rear foot: Hopefully next week I can get the seat rails built up and a set installed at least on the Captain side of the sim: The seats will line up perfectly on the columns as long as you used the column spacing that I recommend which is 28" on center. This photo does not do the alignment any justice: And a photo of the temp cushion and seat belt in place. I did a short test flight and found that I was sitting about 1.5" above my optimum eye point. This is actually good because someone shorter than 5' 8" will be at or at least closer to the eye point and people taller than 5' 8" will be able to adjust the seat lower to meet the eye point: More updates to come to the exciting start to the replica seats! (Posted by Terry Collins on 11-14-15) Great work Ron, I can see that you are putting a lot of thought into getting this to be as realistic as possible! Impressive stuff. (Posted by Ron Rollo on 11-05-15) Thanks guys for the support and comments. I am really excited about how the seats are turning out. I just wish I had more time to get them completed in a snap! To answer your question Alan, neither this seat design nor does the real Lear45 seats use Bungee cords. The two 20 pound gas shocks are what lift the seats back up to full height. Randy, so far the seats are not comfortable at all. But there is nothing but a foam cushion to sit on at this point. I am going to stay hot and heavy on the seats because as I said somewhere in one of these post, I am planning a Hangar45 day here in Jacksonville Florida sometime in April 2016. Everyone in the hangar will be invited. There are three areas that I must complete: Seats, visuals and audio headsets. At least all three areas need to be at a grade of 95% or higher. I did some more test fitting, this time in the sim itself! First, here is a photo of the new replica seat next to the old temporary seat. (Click HERE to see more about the temporary seat.) At first glance, I was afraid that I did not make the new seat tall enough. That though melted away once I sat on the seat in the sim. As it is right now, I have almost two inches of height over the old seat and I don't even have the thicker cushions on them yet: Here is the frame work in the sim. Everything is going to fit perfectly! This is about as close as the seat is going to get to the center pedestal due to the locking pin at the right rear foot: Hopefully next week I can get the seat rails built up and a set installed at least on the Captain side of the sim: The seats will line up perfectly on the columns as long as you used the column spacing that I recommend which is 28" on center. This photo does not do the alignment any justice: And a photo of the temp cushion and seat belt in place. I did a short test flight and found that I was sitting about 1.5" above my optimum eye point. This is actually good because someone shorter than 5' 8" will be at or at least closer to the eye point and people taller than 5' 8" will be able to adjust the seat lower to meet the eye point: More updates to come to the exciting start to the replica seats! (Posted by Terry Collins on 11-14-15) Great work Ron, I can see that you are putting a lot of thought into getting this to be as realistic as possible! Impressive stuff. Hi Ron, I purchased Alan's seat. Since it's not a Lear seat, it really doesn't fit. I want to rebuild the left "leg" one foot to the outside of the right leg. Also a more substantial front leg on both sides.. Your photos are a real help. One item not shown in the photos is the method of a "stop" once the distance from the yoke/pedals is chosen. As you show the "track", it seems the seat is not fixed. Can you put the photo. Or if I missed it, inform me. Thanks. Hi Ron, I purchased Alan's seat. Since it's not a Lear seat, it really doesn't fit. I want to rebuild the left "leg" one foot to the outside of the right leg. Also a more substantial front leg on both sides.. Your photos are a real help. One item not shown in the photos is the method of a "stop" once the distance from the yoke/pedals is chosen. As you show the "track", it seems the seat is not fixed. Can you put the photo. Or if I missed it, inform me. Thanks. Hi Dave, I did not get that far before I got derailed on the seat progress a few years ago. So I do not have any photos of stops. But Alan did do a good job of documenting his efforts of what he did when he had his seat and fit it into his half shell. Take a look at his thread if you have not yet seen it HERE Hi Dave, I did not get that far before I got derailed on the seat progress a few years ago. So I do not have any photos of stops. But Alan did do a good job of documenting his efforts of what he did when he had his seat and fit it into his half shell. Take a look at his thread if you have not yet seen it HERE Sorry, I lost the subscription. I didn't care for Alan's solution (no offense Alan if you happen to see this). I am building new supports and putting them on seat slides. All other functions are contained in the upper portion of the seat. Sorry, I lost the subscription. I didn't care for Alan's solution (no offense Alan if you happen to see this). I am building new supports and putting them on seat slides. All other functions are contained in the upper portion of the seat. Replica Seats (TALJ2–Series) by Project45
![]()
![]()
![]()
![]()
![]()
![]()
2017-10-10