


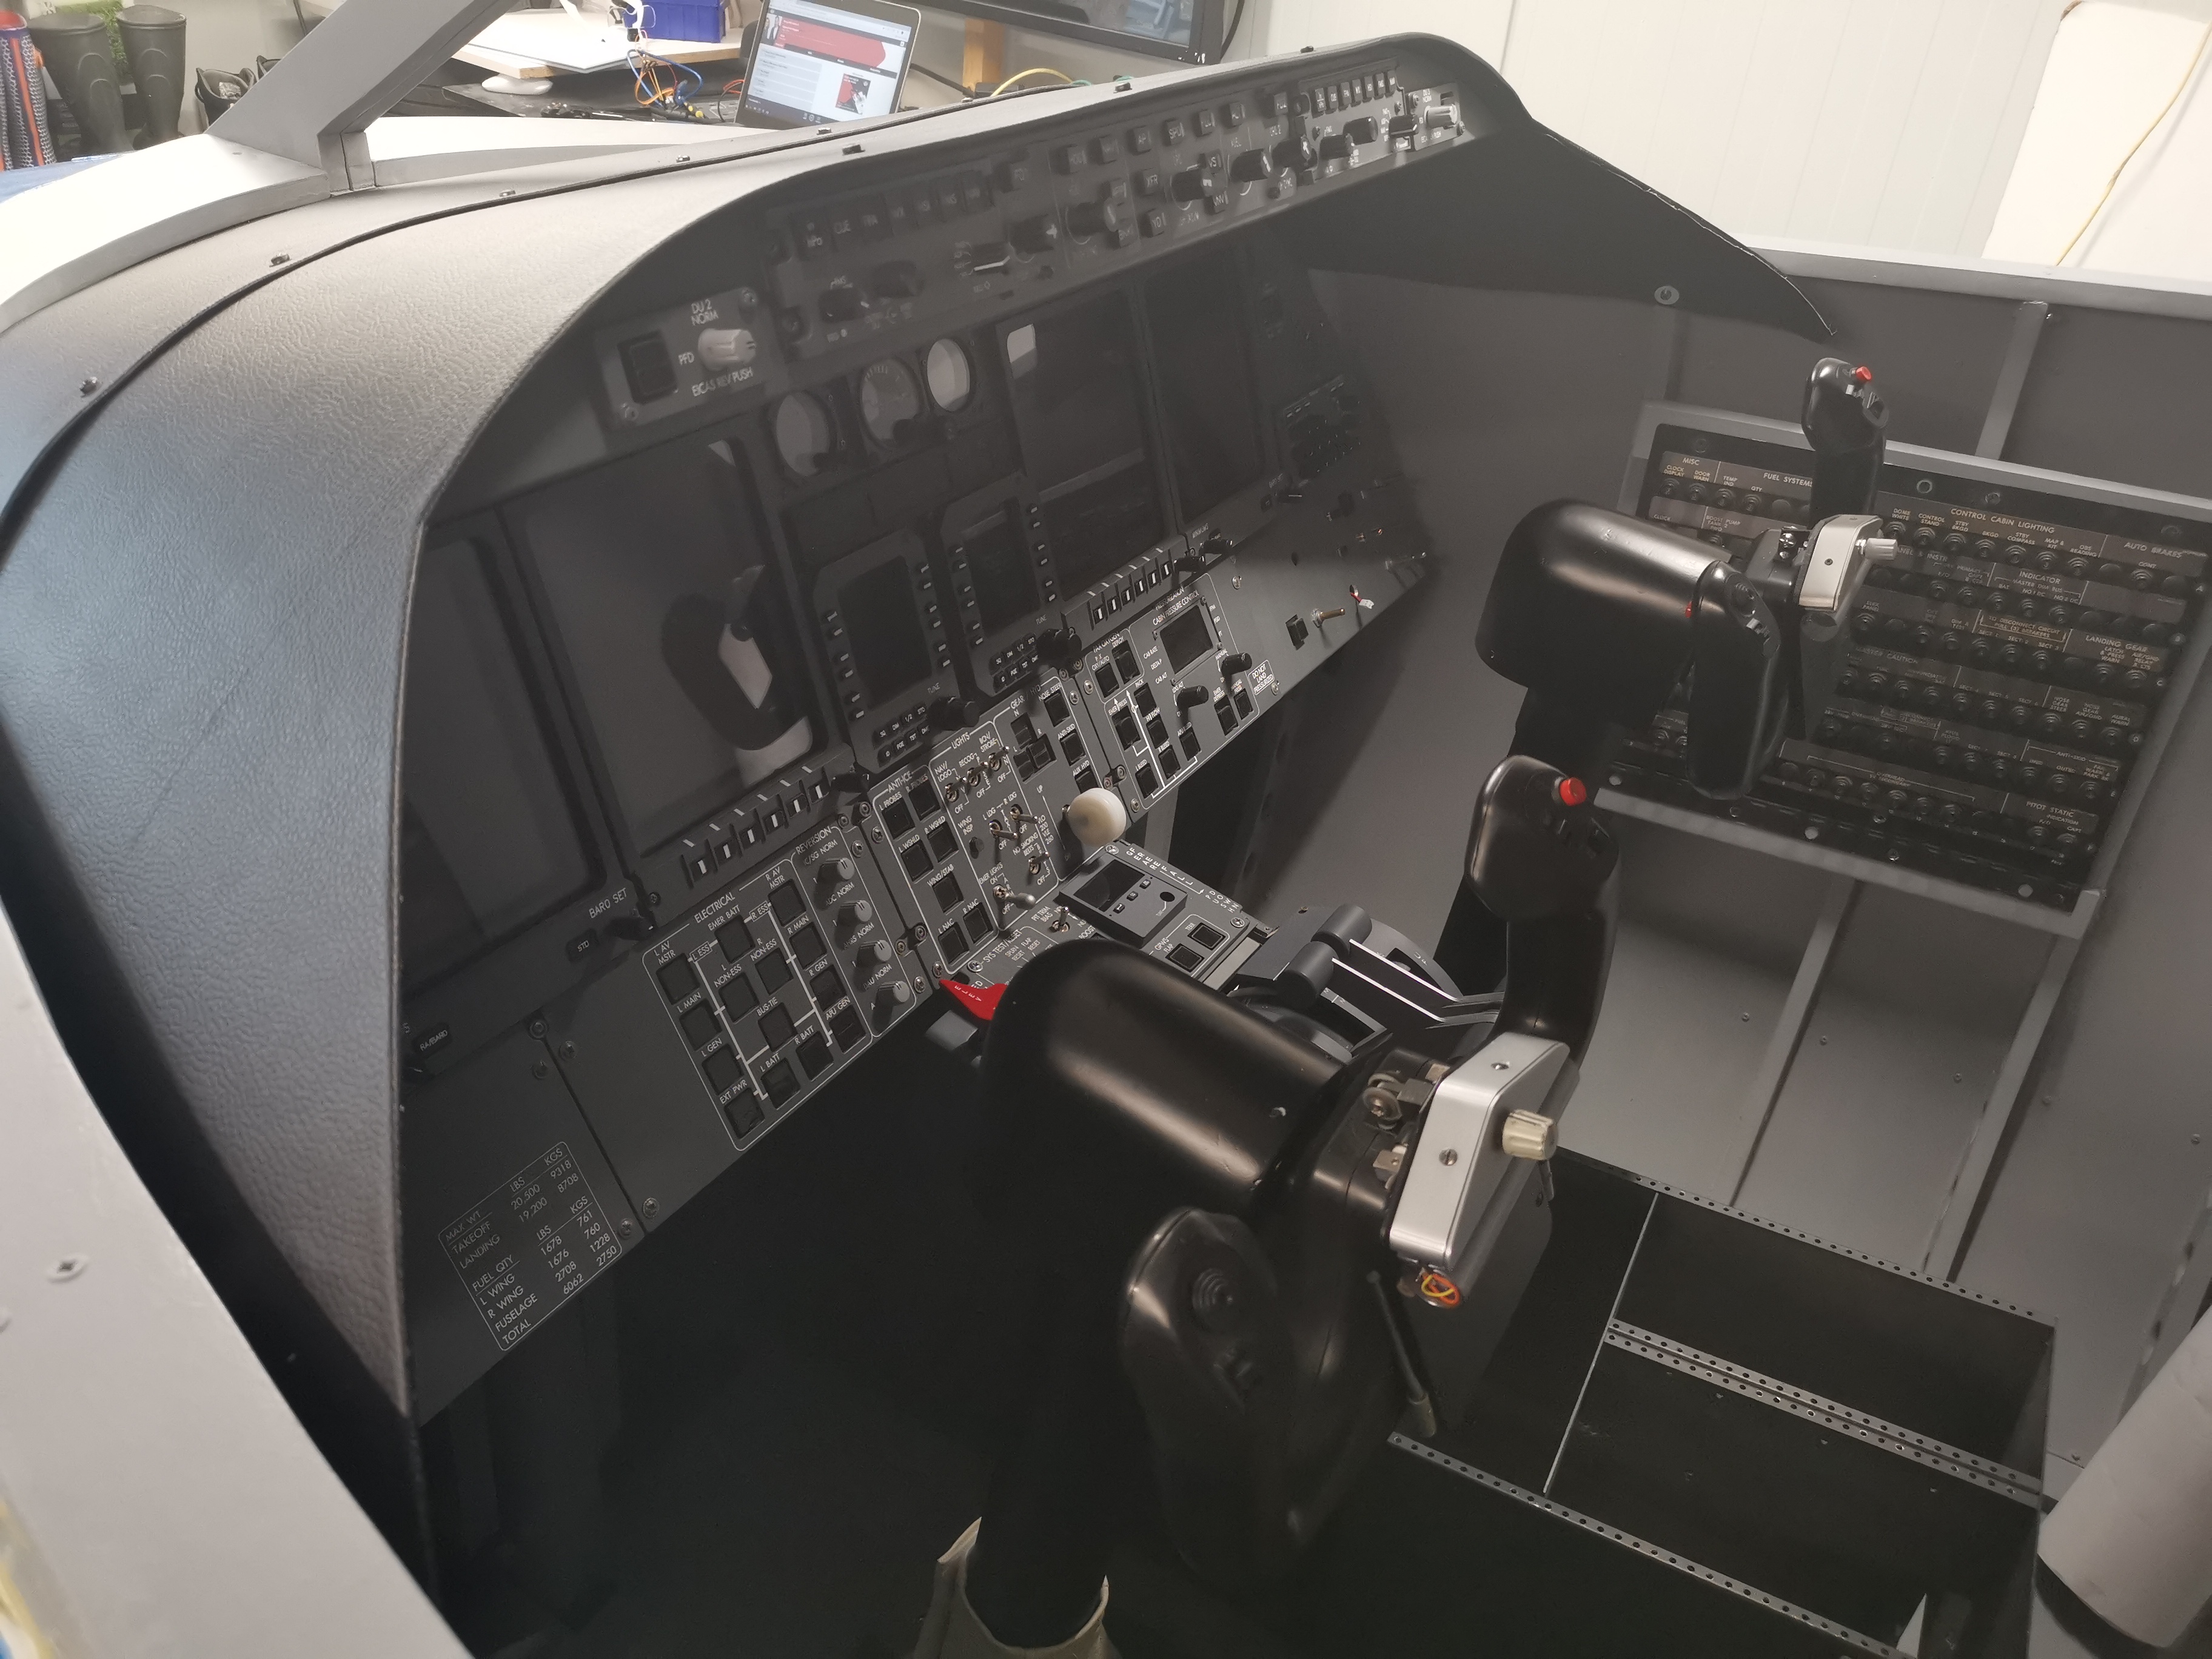
I have mounted 2 OEM Boeing 737 fuse panels in my Learjet shell I know i can make a fortune these days for those fuse panels, but i decided to use 2 of them in the lear because they look similar to the Learjet fusepanels. I have mounted 2 OEM Boeing 737 fuse panels in my Learjet shell I know i can make a fortune these days for those fuse panels, but i decided to use 2 of them in the lear because they look similar to the Learjet fusepanels. Wow, those CB panels look great and if I had them, I would be tempted to use them as well! They look very close to the correct size too. Also, the Boeing 737 and the Lear45 are very similar when it comes to equipment. Well, more in common than say the 747 or a single prop engine. I would bet tat they share at least 90% of the same CB labels. Another option you have at your disposal is to use the CBs with a replica Lear45 panel. Each one of those CBs are worth their weight in gold. Wow, those CB panels look great and if I had them, I would be tempted to use them as well! They look very close to the correct size too. Also, the Boeing 737 and the Lear45 are very similar when it comes to equipment. Well, more in common than say the 747 or a single prop engine. I would bet tat they share at least 90% of the same CB labels. Another option you have at your disposal is to use the CBs with a replica Lear45 panel. Each one of those CBs are worth their weight in gold. I finished my glareshield. I finished my glareshield. I have started with panels for the pedestral. I mounted an Arduino Nano to interface with Air Manager so it is even plug and play. I have started with panels for the pedestral. I mounted an Arduino Nano to interface with Air Manager so it is even plug and play. I have to do some coding and connecting, but it is functioning. I did not use seperate LED's for indication, but this is displayed on the oled screen. hmm i see now i have mounted the buttons upside down...:S I have to do some coding and connecting, but it is functioning. I did not use seperate LED's for indication, but this is displayed on the oled screen. hmm i see now i have mounted the buttons upside down...:S Nice work Roel! It is always cool to see other ways to make something work. Sometimes I get ideas form work like this. I was thinking about separating the OLED screen from the PCB too. As a matter of fact, I did have to separate the two in order to shave off the tabs at the bottom. It's funny, I missed that you had the buttons upside down and reversed too until I read that you missed it! LOL Nice work Roel! It is always cool to see other ways to make something work. Sometimes I get ideas form work like this. I was thinking about separating the OLED screen from the PCB too. As a matter of fact, I did have to separate the two in order to shave off the tabs at the bottom. It's funny, I missed that you had the buttons upside down and reversed too until I read that you missed it! LOL I have been busy with some panels. I am planning for all pedestral panels to mount Ardduino's right on the panels, this makes them modular and only 1 USB cable is lead to the front to a PC. This panel is all coded with Arduino and uses the Air Manager messageport to interface. I looked the internet for a solution to create a rotary switch with push button (since a ready made couldn't be found for a reasonably pricing) , but little information was there to find. So i created one myselve. Oh yes, ...still waiting for a right button for the test panel I have been busy with some panels. I am planning for all pedestral panels to mount Ardduino's right on the panels, this makes them modular and only 1 USB cable is lead to the front to a PC. This panel is all coded with Arduino and uses the Air Manager messageport to interface. I looked the internet for a solution to create a rotary switch with push button (since a ready made couldn't be found for a reasonably pricing) , but little information was there to find. So i created one myselve. Oh yes, ...still waiting for a right button for the test panel Also my APU panel is finished. I believe what is displayed should be the Amps, but i only can read Volts out of the sim?! Another thing is i have been looking a while for a solution for the switch guards. Also my APU panel is finished. I believe what is displayed should be the Amps, but i only can read Volts out of the sim?! Another thing is i have been looking a while for a solution for the switch guards. Hi Roel, Your project is coming along great! You will be up and flying in no time. I found a couple photos of my solution to the System Test switch rotary with a push function. It was buried in this thread HERE Here are a couple photos: It's the same principle as what you have done. The trick is to use a 4-40 tap into the plastic backer and thread the four rods into the backer. I need to document this custom switch better. By the way, this is the same method I use for the REV panels. Your engraving looks great by the way. It is hard to tell that your panels are engraved with a cnc compared to a laser. Great work there! Yes, the switch guards are a challenge. Several of us ended up using a clear AML guard and painting it to look like a red guard. I don't think we even had the option to buy red guards so a custom solution was the only option. Quick question for clarity, are you using Jet45 v1 for your avionics and using Air Manager to interface? Hi Roel, Your project is coming along great! You will be up and flying in no time. I found a couple photos of my solution to the System Test switch rotary with a push function. It was buried in this thread HERE Here are a couple photos: It's the same principle as what you have done. The trick is to use a 4-40 tap into the plastic backer and thread the four rods into the backer. I need to document this custom switch better. By the way, this is the same method I use for the REV panels. Your engraving looks great by the way. It is hard to tell that your panels are engraved with a cnc compared to a laser. Great work there! Yes, the switch guards are a challenge. Several of us ended up using a clear AML guard and painting it to look like a red guard. I don't think we even had the option to buy red guards so a custom solution was the only option. Quick question for clarity, are you using Jet45 v1 for your avionics and using Air Manager to interface? that is about the same solution for the rotary pushbutton like what i made up. Yes this panel also is one of the part i could take over from a guy in Germany, they are professionaly engraved. Well when i use FSUIPC to interface to the Jet45 i still need other software, because Air Manager does not has the option to use FSUIPC. But...didn't tried that so far. that is about the same solution for the rotary pushbutton like what i made up. Yes this panel also is one of the part i could take over from a guy in Germany, they are professionaly engraved. Well when i use FSUIPC to interface to the Jet45 i still need other software, because Air Manager does not has the option to use FSUIPC. But...didn't tried that so far. Roel's Learjet 45 simulator
![]()
A few years ago i was able to buy them from a real producent of Boeing 737 simulators here in holland.
They don't use the fusepanels because they install there own , fully managed, fuse panels.
I got a complete back wall of these panels for very little money, about 200 euro!! including rudder panels glareshield and some other small stuff.
It was great to visit this company and look how they create the real stuff.
Too bad they have never sold anything since.
Also OEM parts look very great!
Maybe i will wire some up to disconnect power 🙂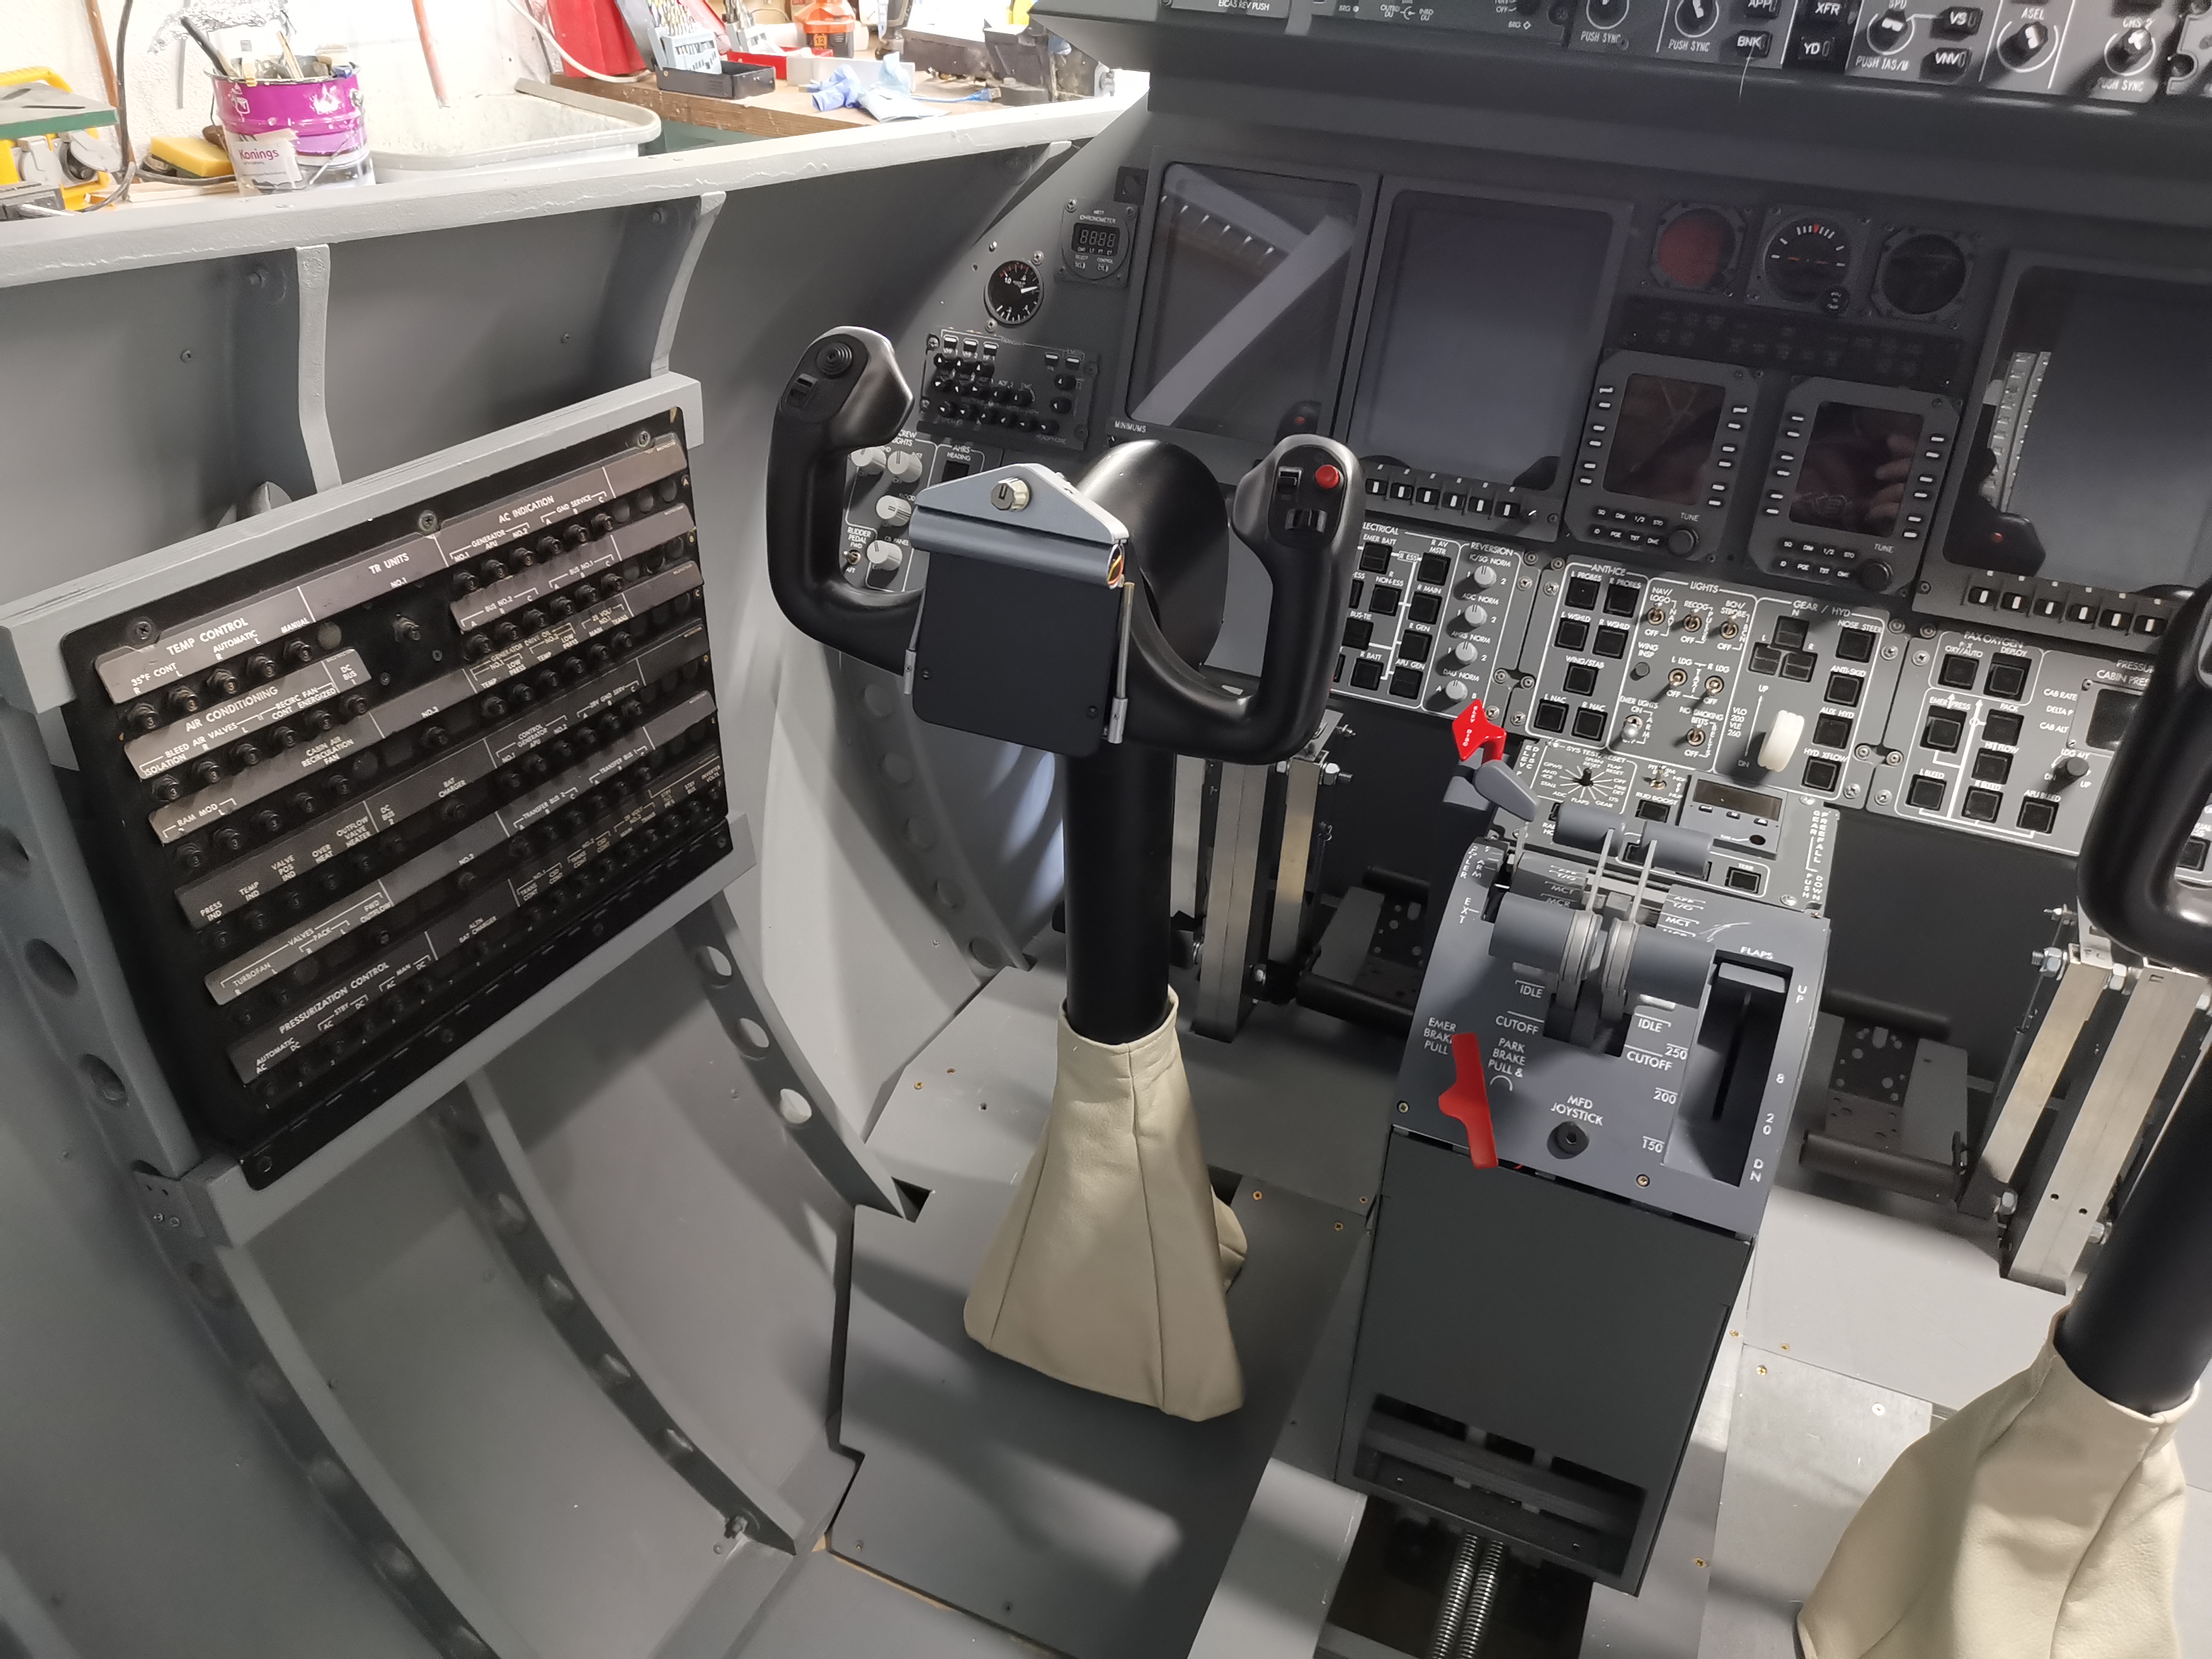
A few years ago i was able to buy them from a real producent of Boeing 737 simulators here in holland.
They don't use the fusepanels because they install there own , fully managed, fuse panels.
I got a complete back wall of these panels for very little money, about 200 euro!! including rudder panels glareshield and some other small stuff.
It was great to visit this company and look how they create the real stuff.
Too bad they have never sold anything since.
Also OEM parts look very great!
Maybe i will wire some up to disconnect power 🙂![]()
![]()
I have created a mold from wood i used for the mip; exact radius was cut out so that's convenient.
With the mold i have created polyester glareshield parts, 2 in fact for easy removal.
On the polyester glareshield i glued skai leather.
There are some imperfections i saw which i should have fixed with bondo, but overal i am happy.
I have created a mold from wood i used for the mip; exact radius was cut out so that's convenient.
With the mold i have created polyester glareshield parts, 2 in fact for easy removal.
On the polyester glareshield i glued skai leather.
There are some imperfections i saw which i should have fixed with bondo, but overal i am happy.![]()
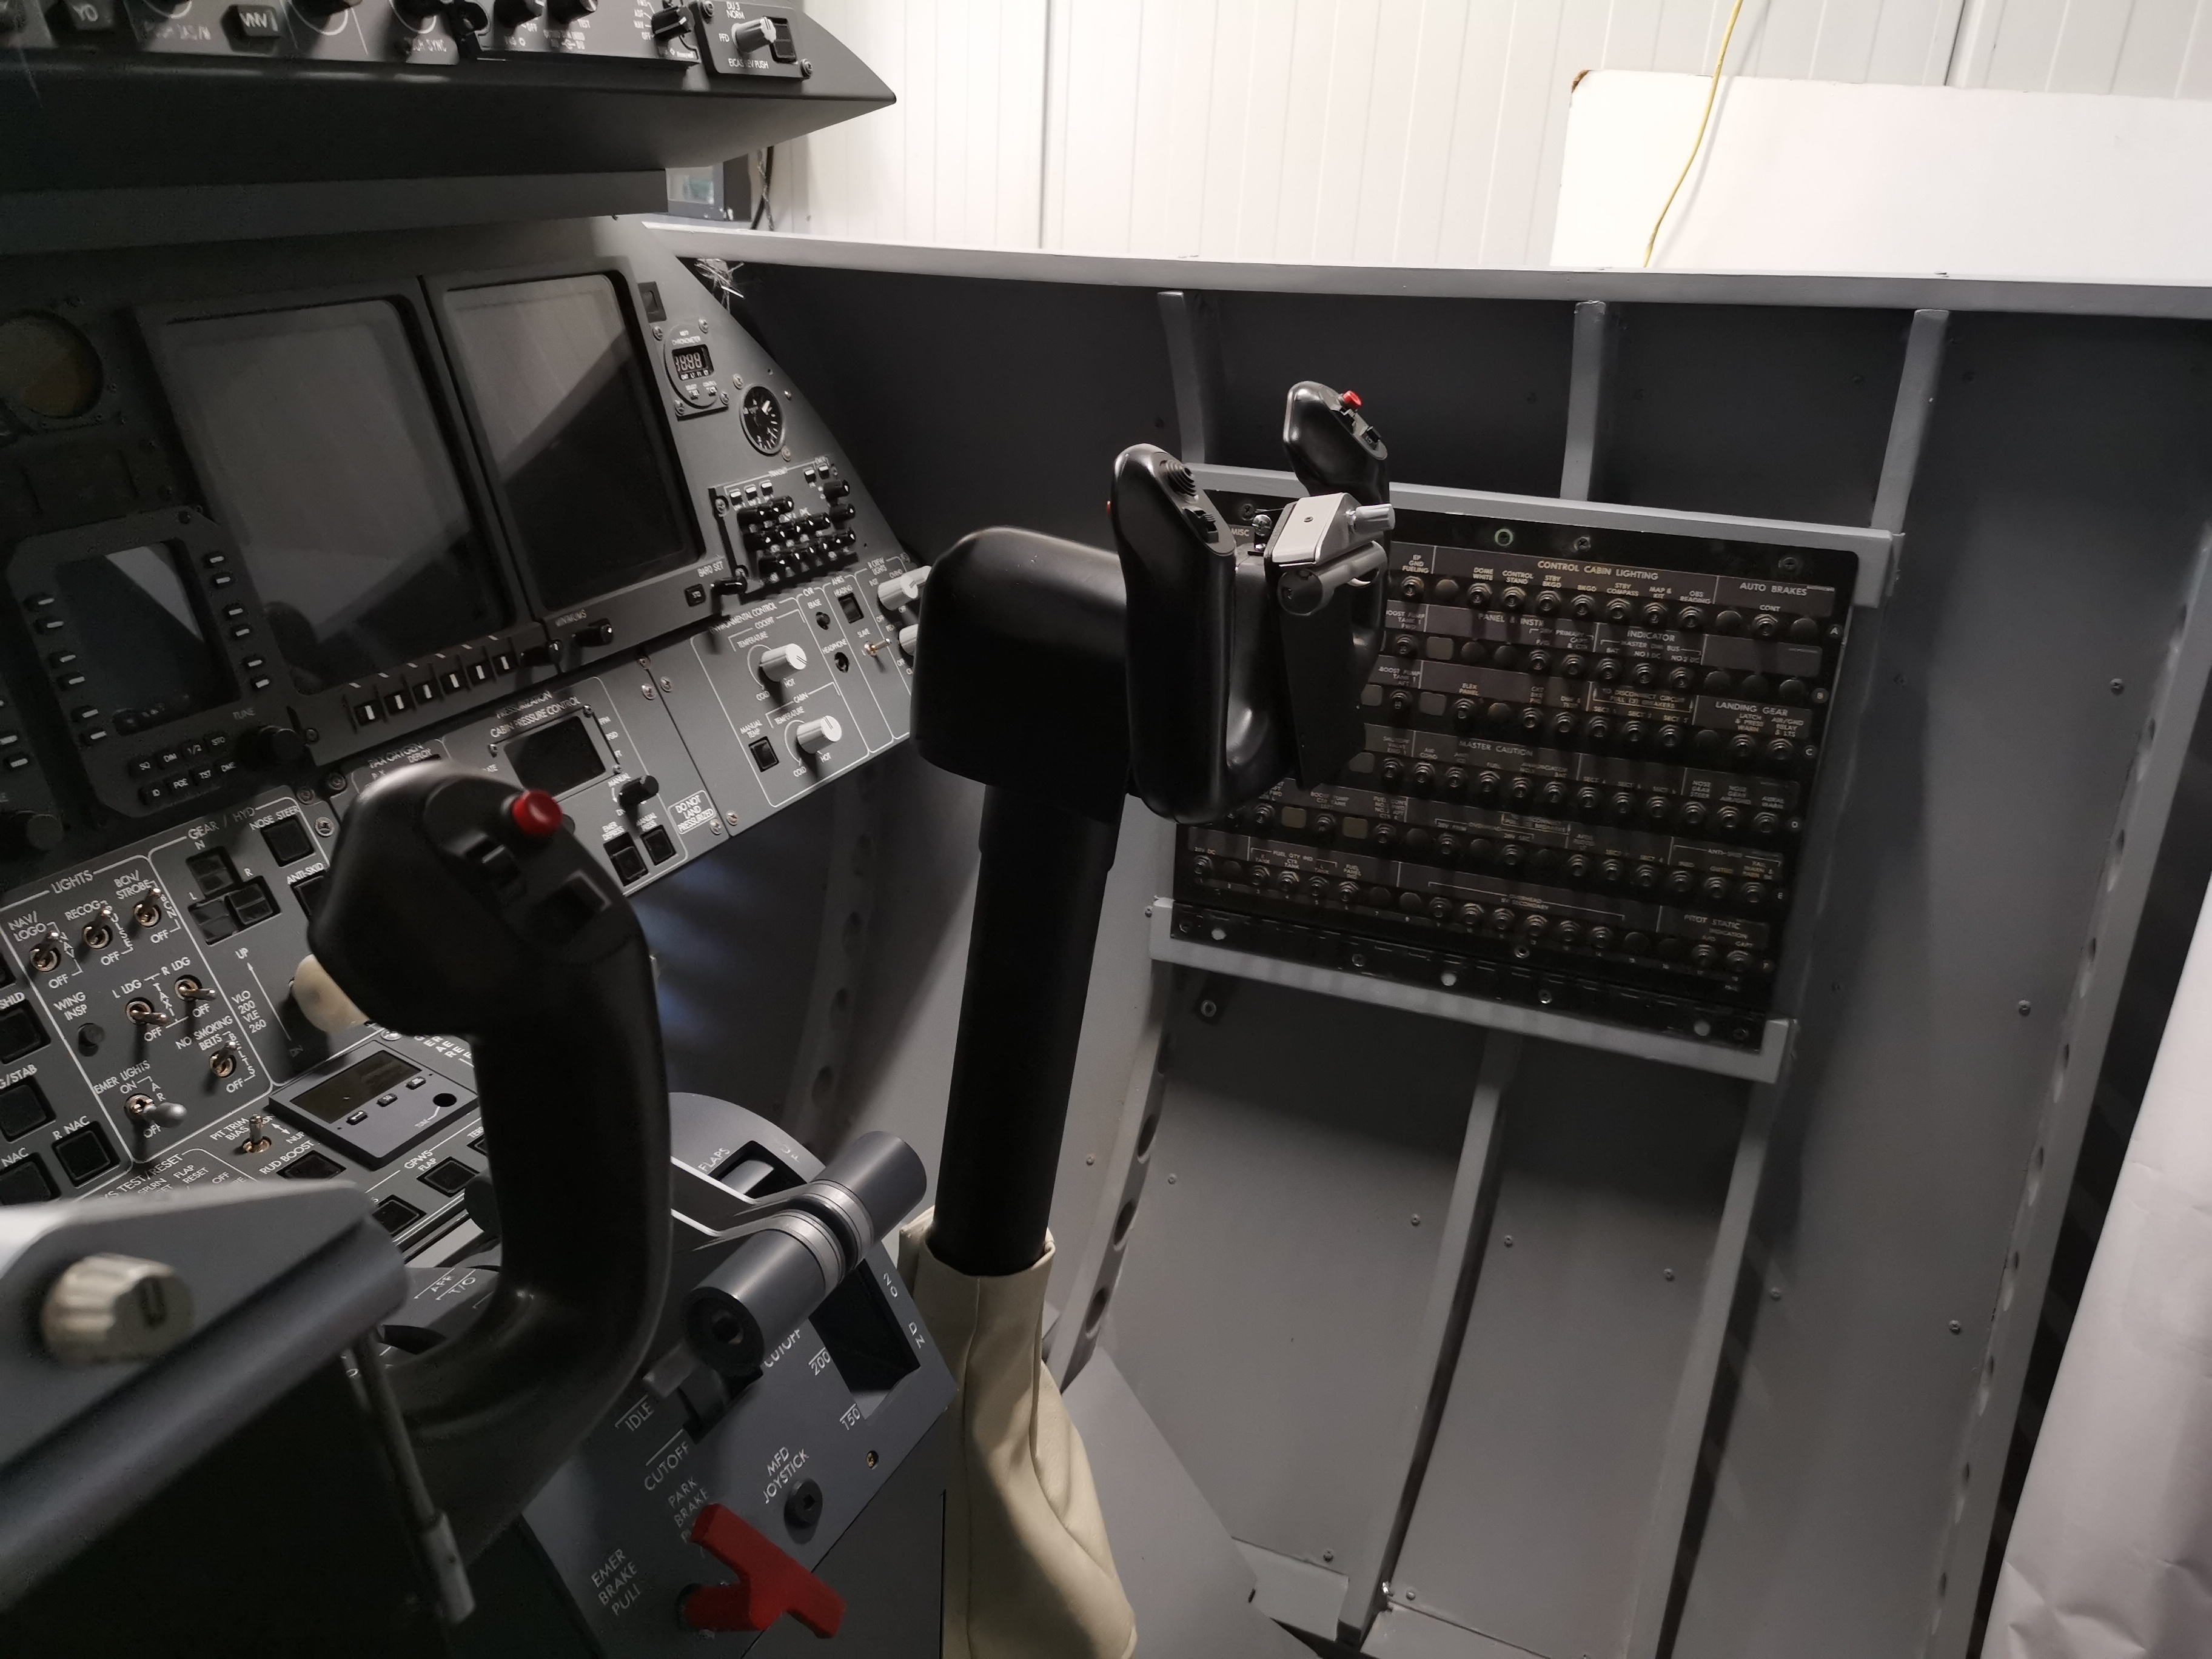
Trim panel is finished.
I used a joystick controller switch for the pitch trim, but had some trouble finding a switch which auto centered, so i went to work with springs and stuff.
I touches micro switches on the far ends and auto centers because of the springs.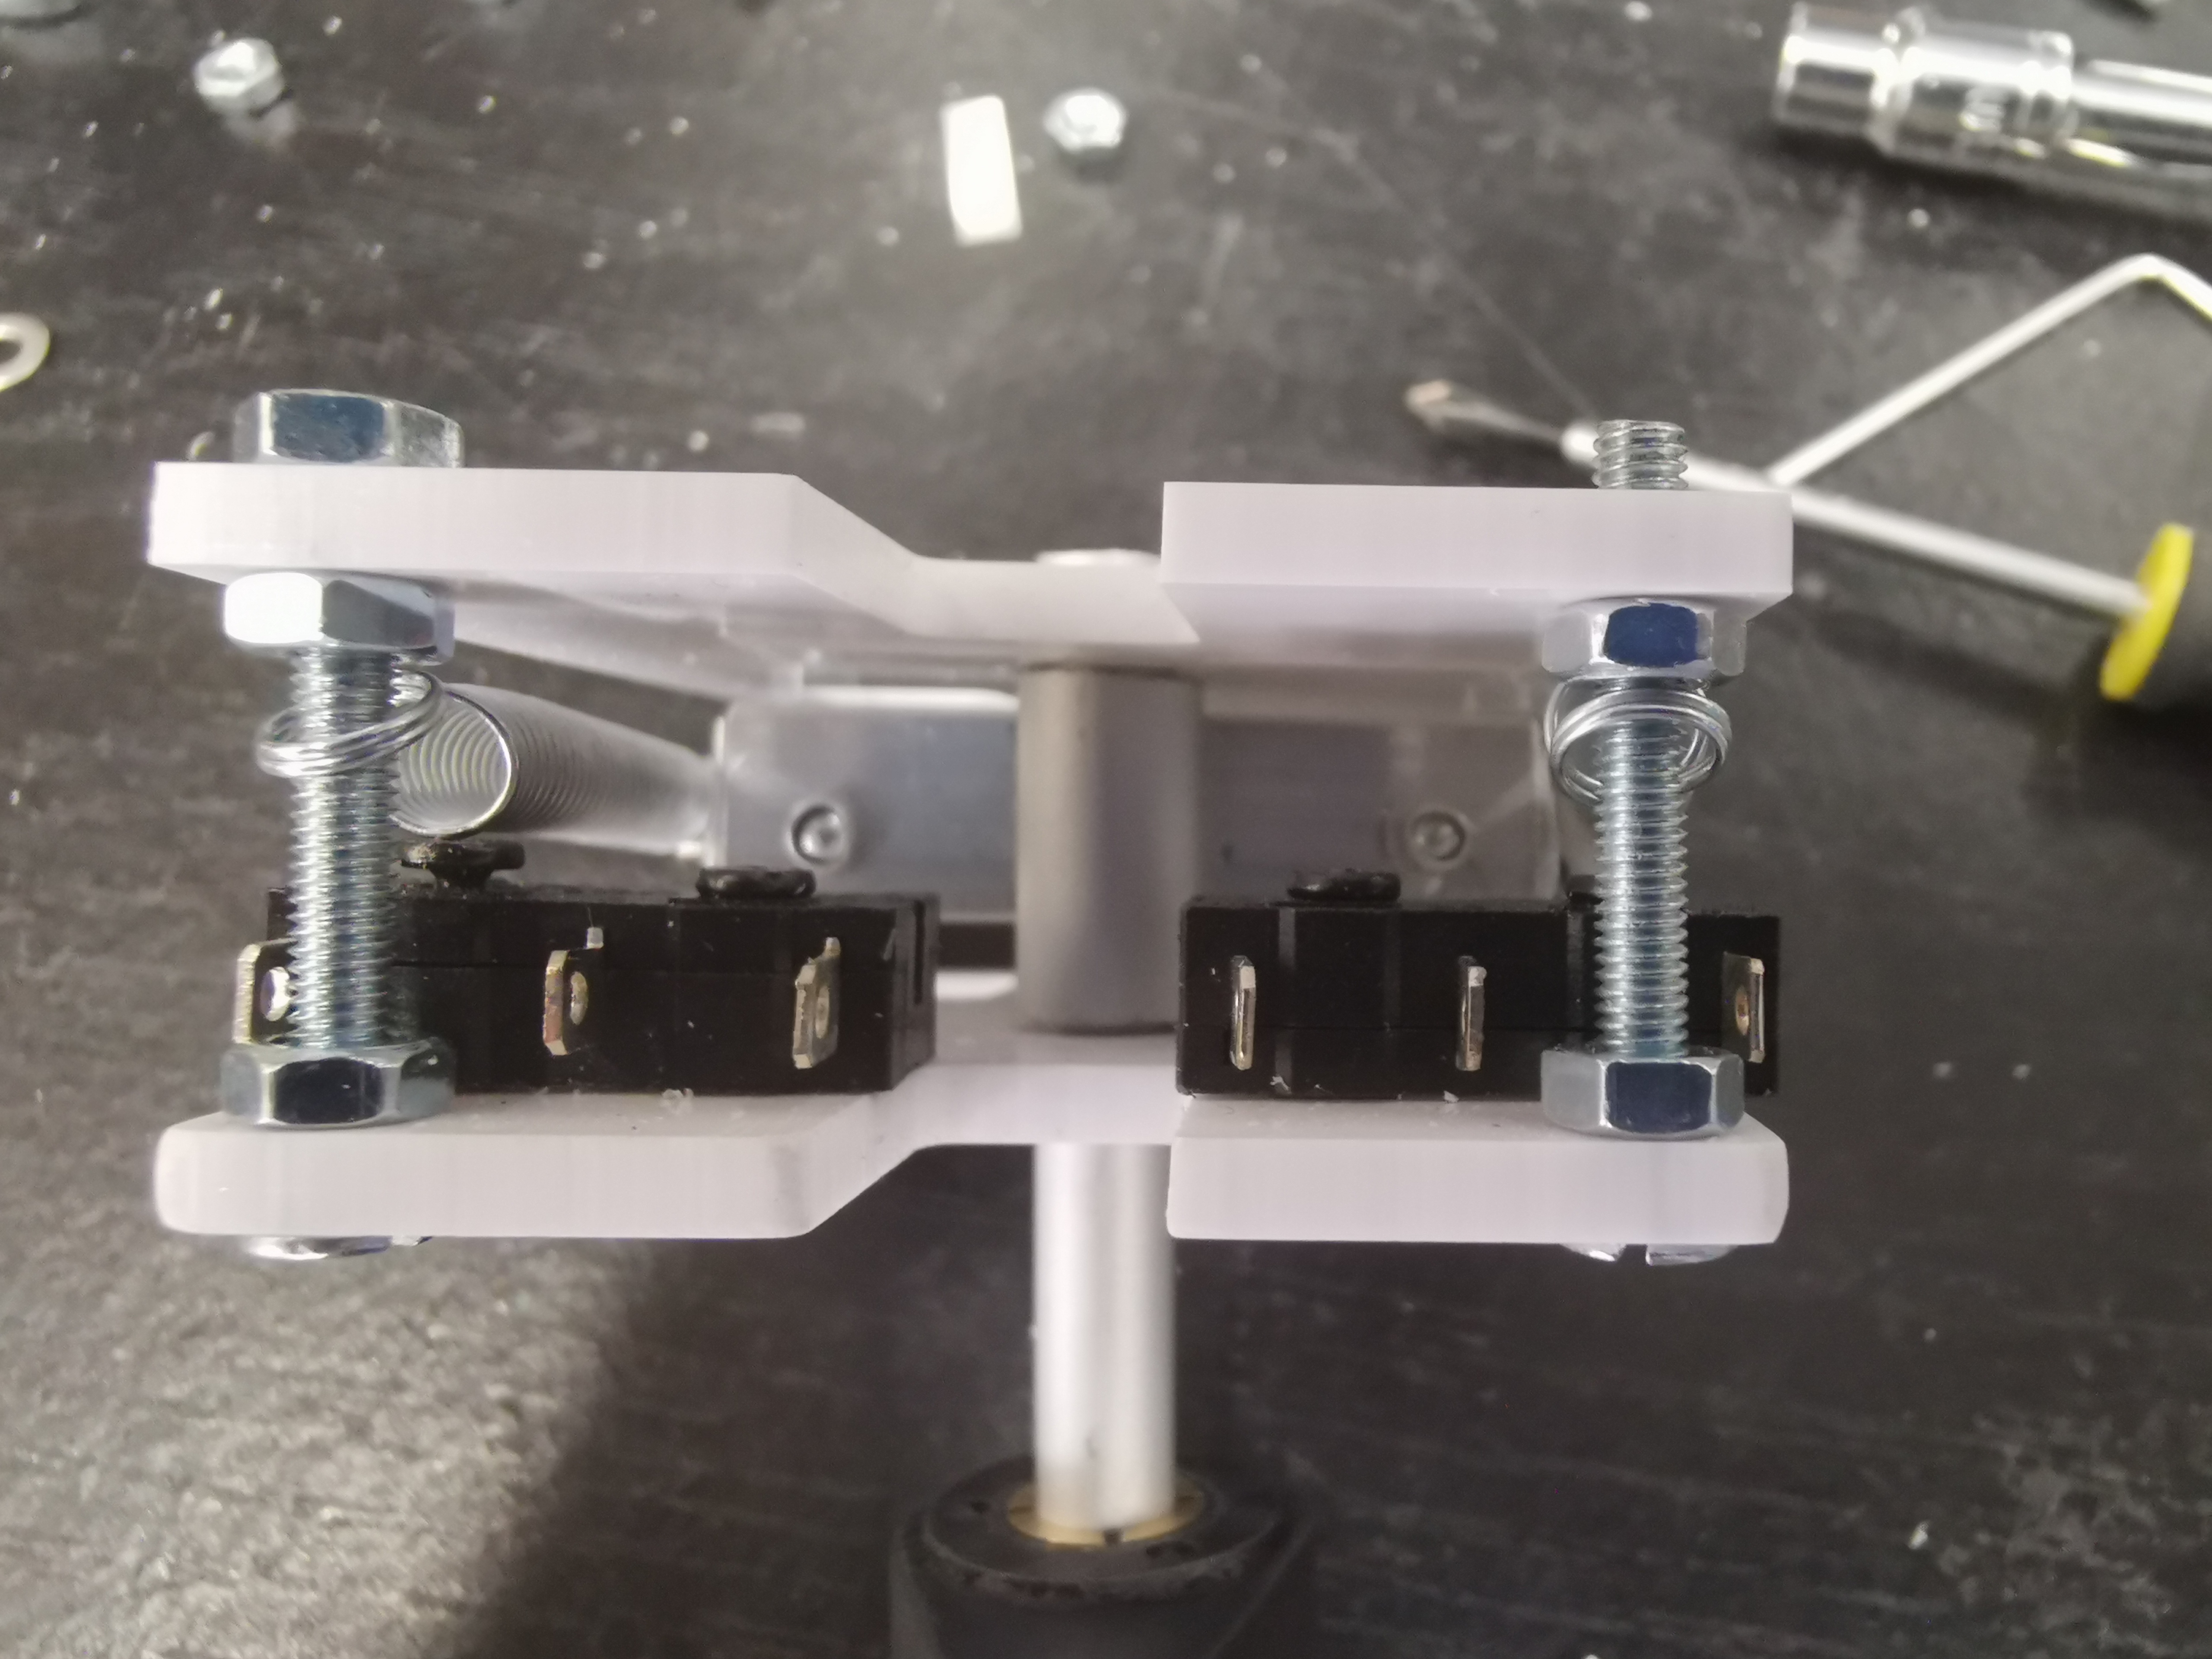

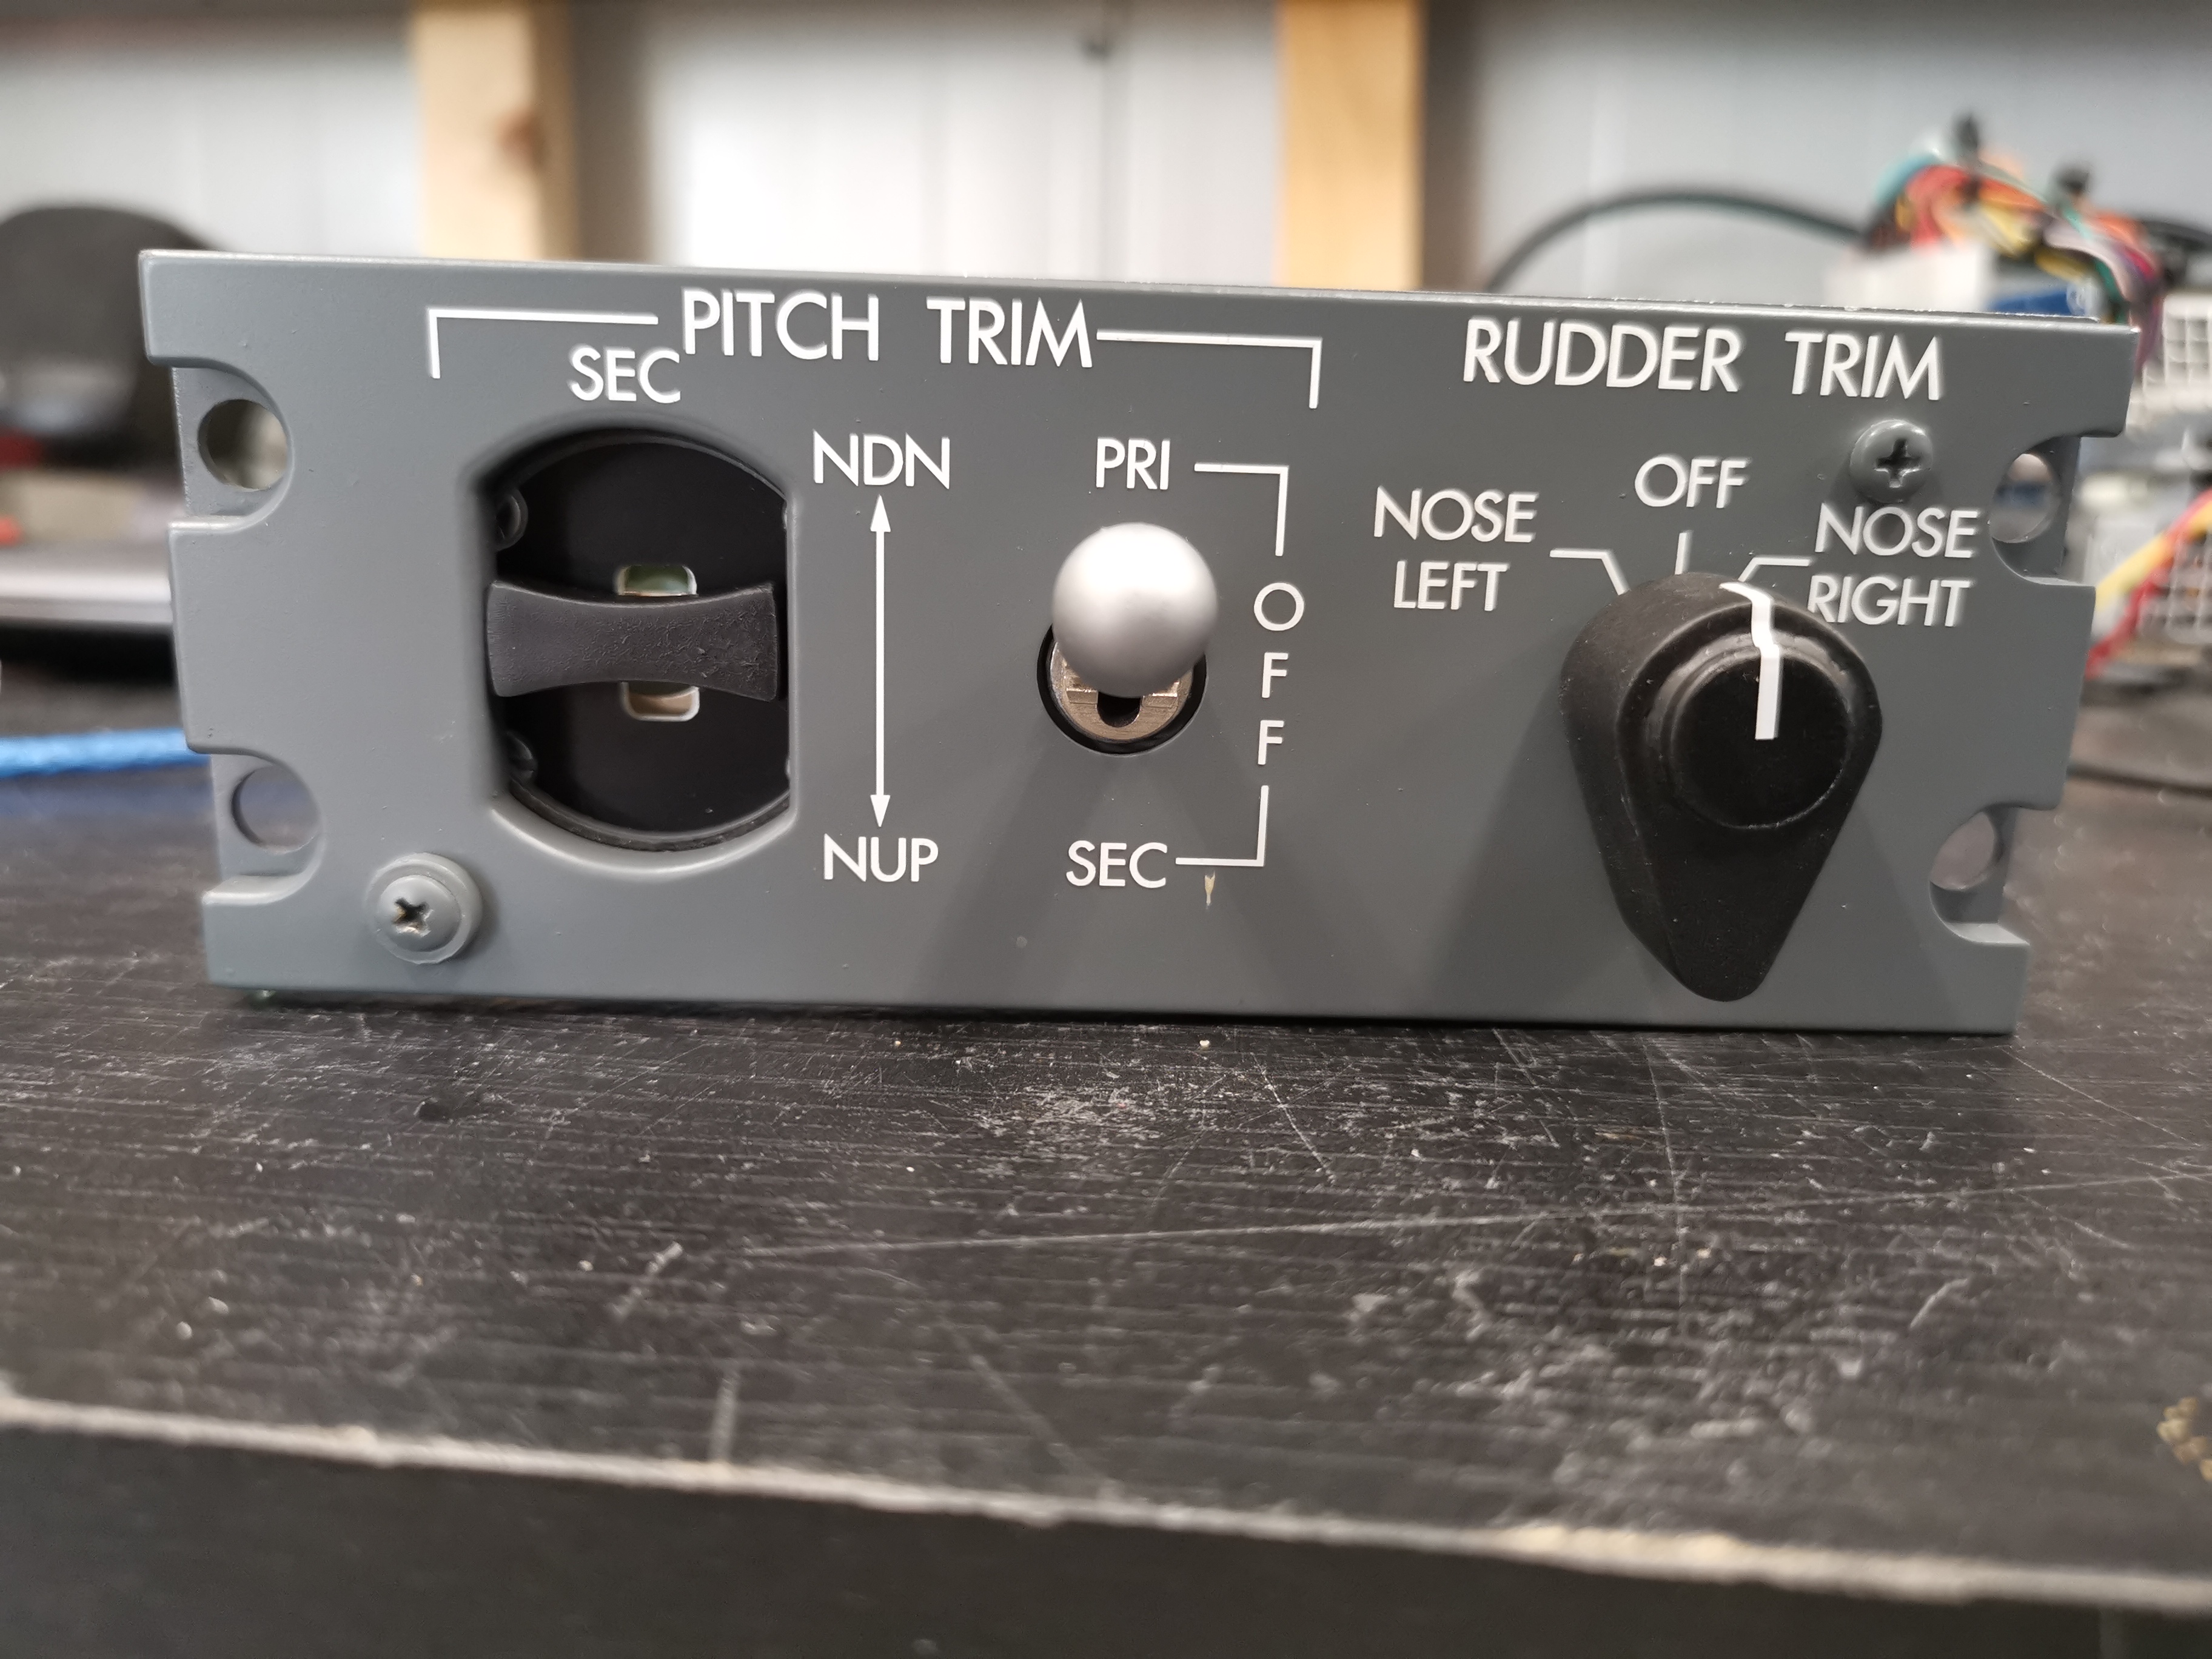
Trim panel is finished.
I used a joystick controller switch for the pitch trim, but had some trouble finding a switch which auto centered, so i went to work with springs and stuff.
I touches micro switches on the far ends and auto centers because of the springs.![]()
 Also my CDR display is allmost finished.
Because of this the display is smaller but still looks ok.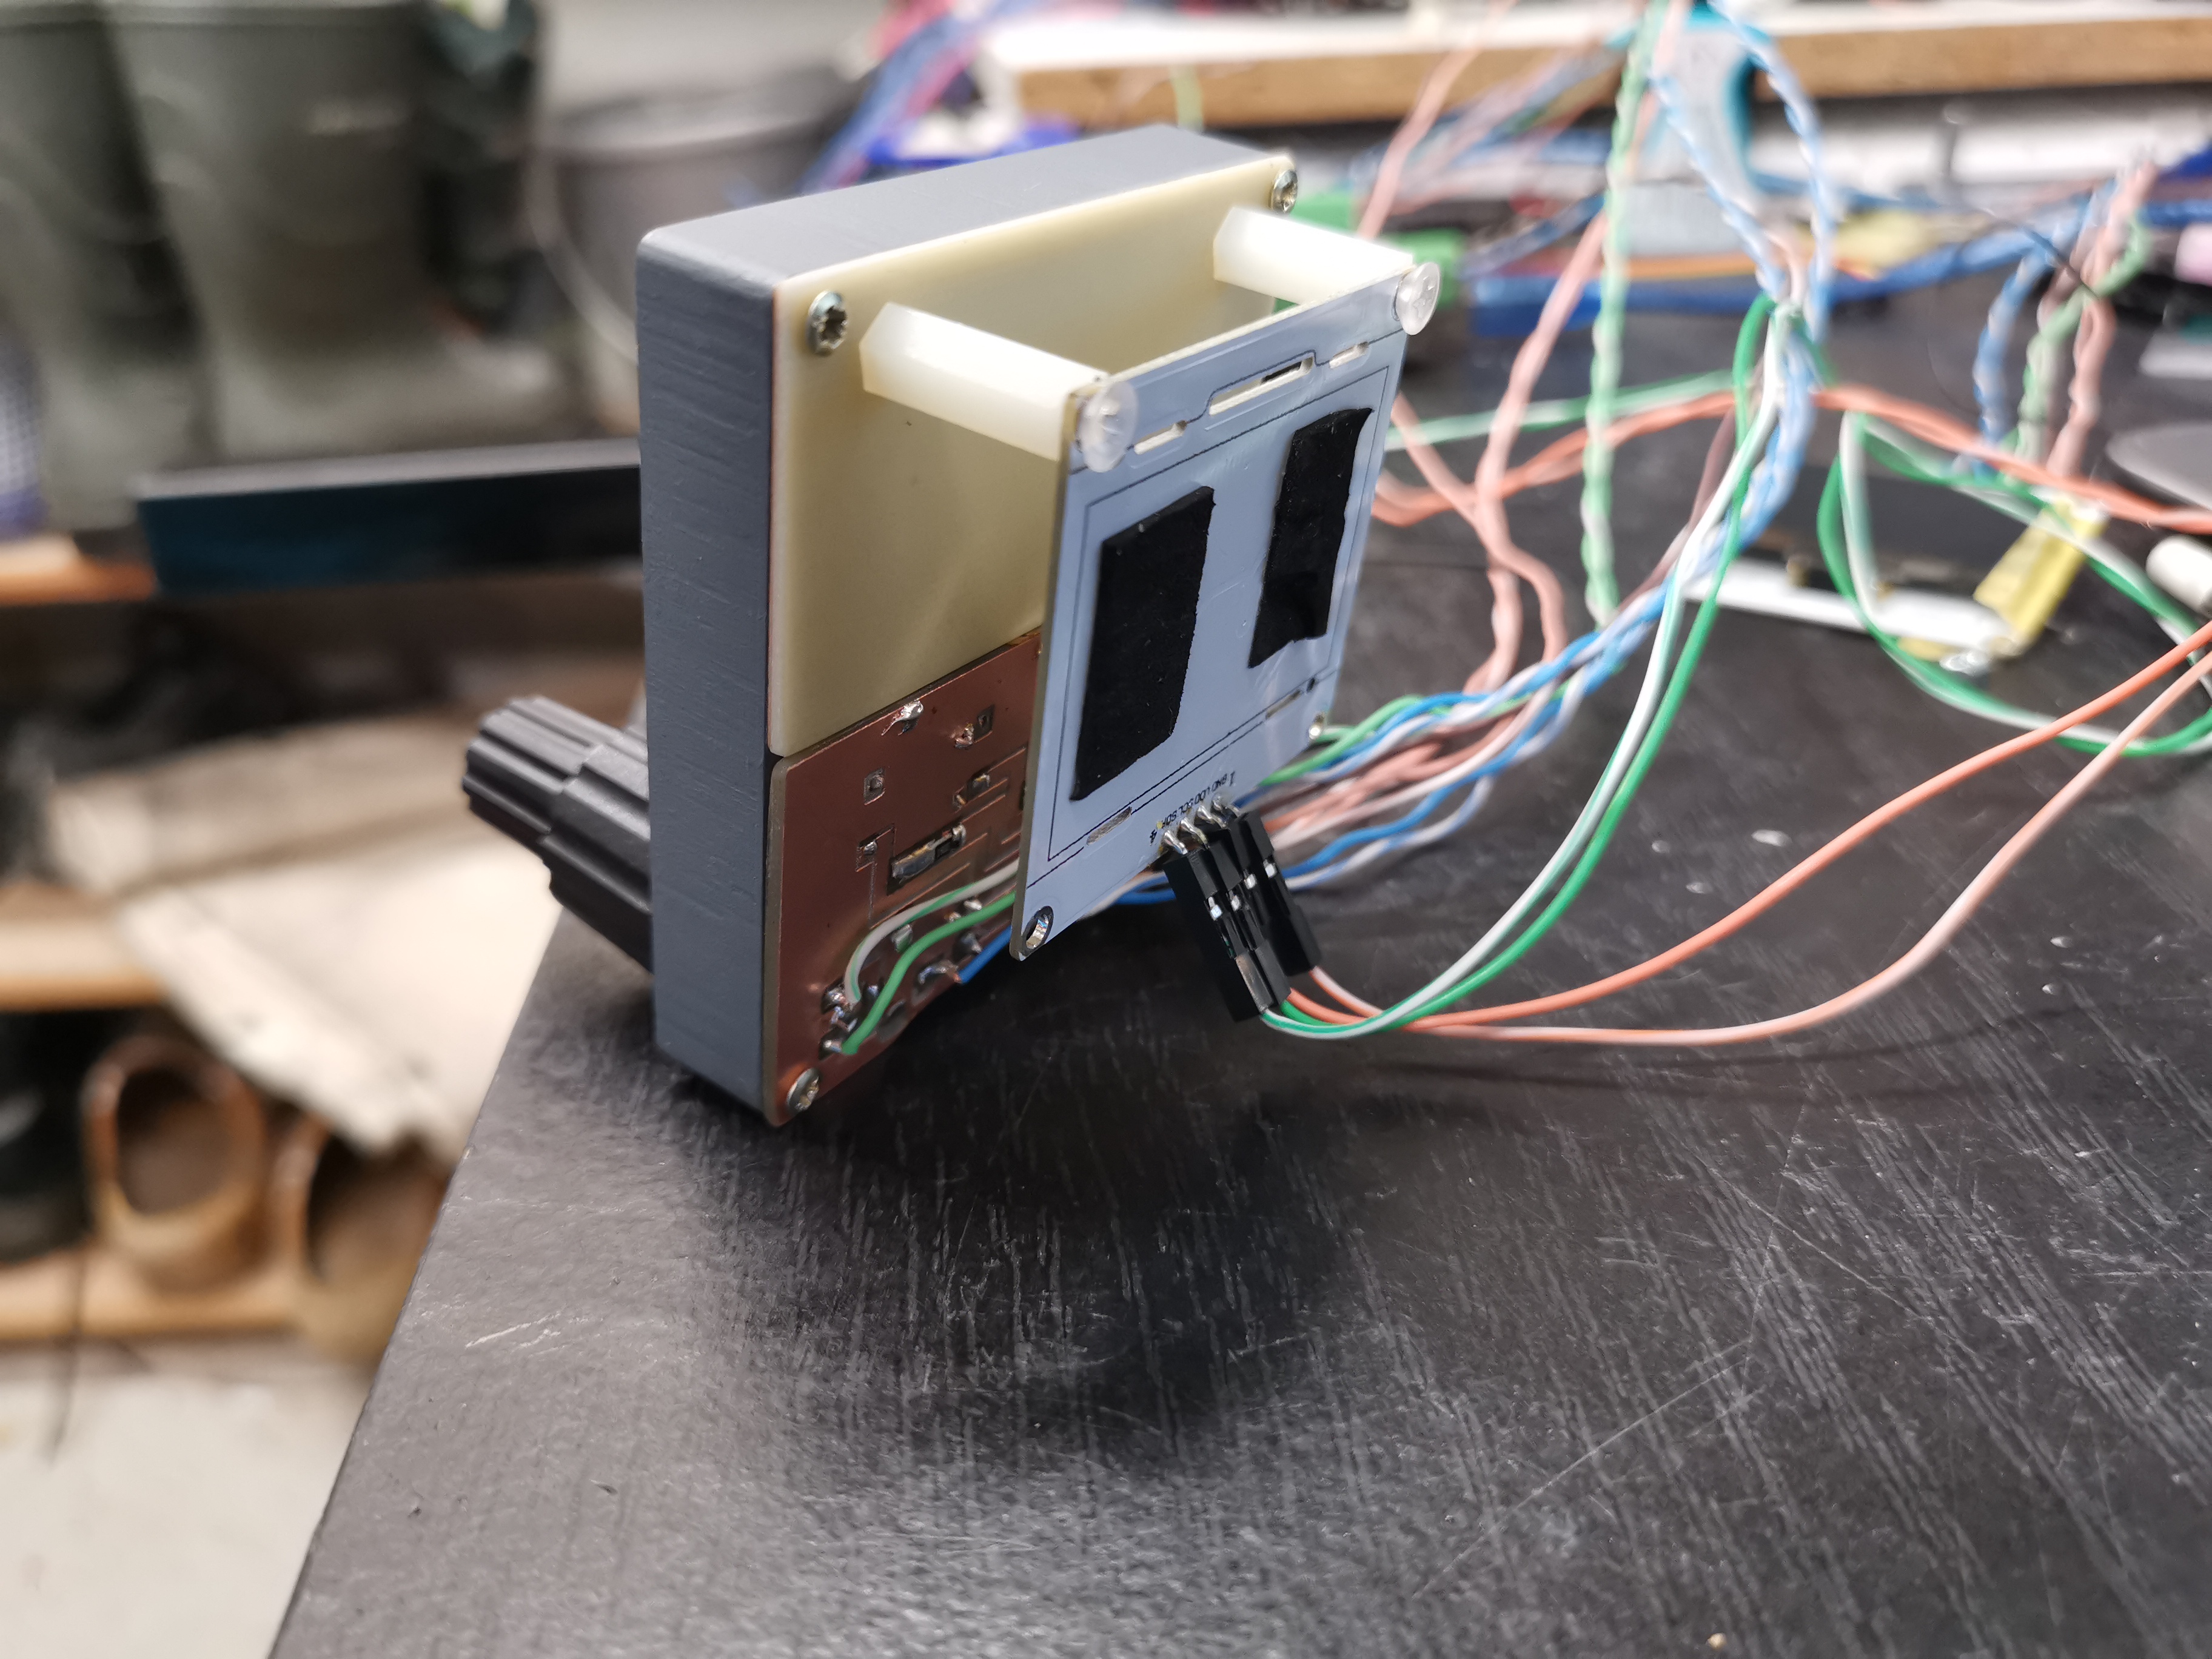 Also my CDR display is allmost finished.
Because of this the display is smaller but still looks ok.![]()
![]()
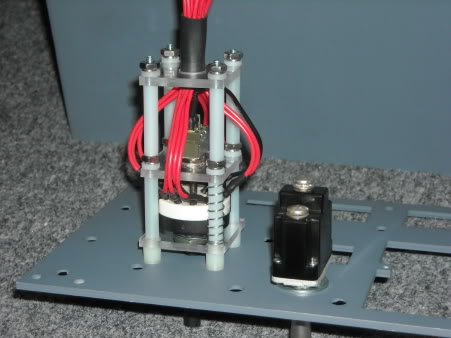
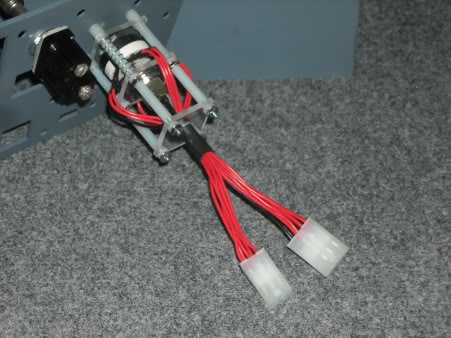
My Sytem test panel with the CDR display is finished.
I have used an Arduino Mega 2560 mounted on the back.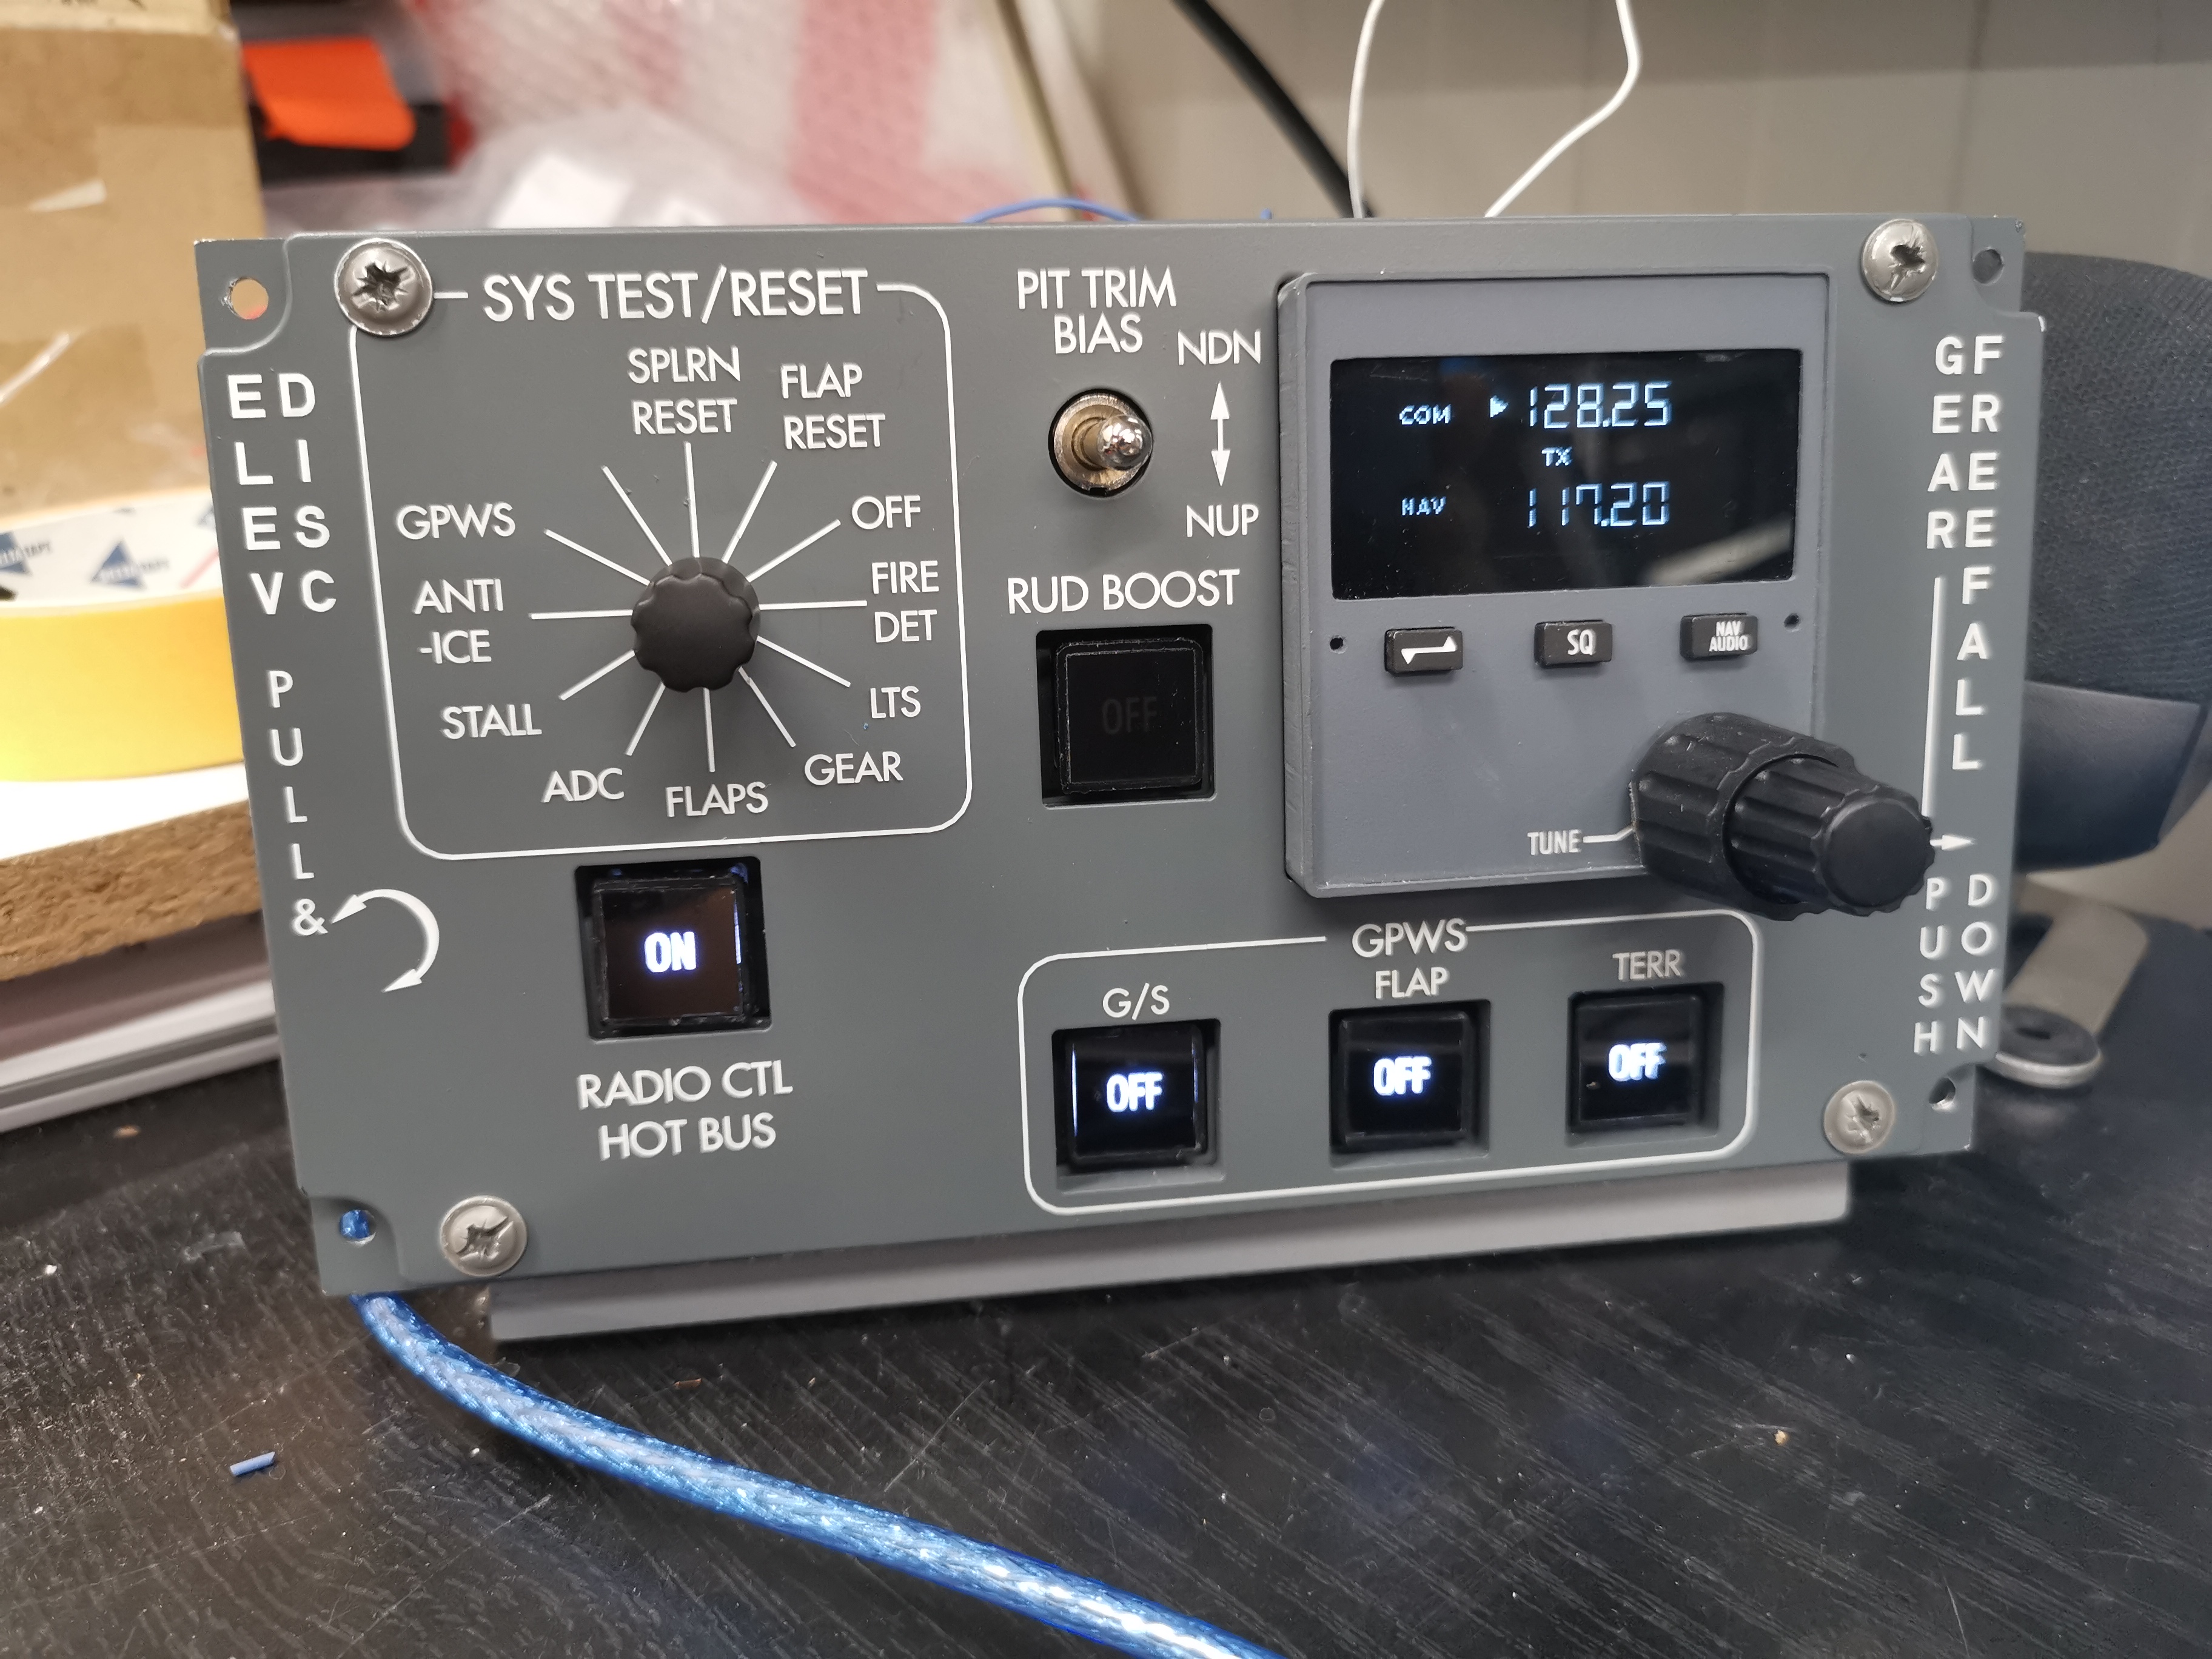
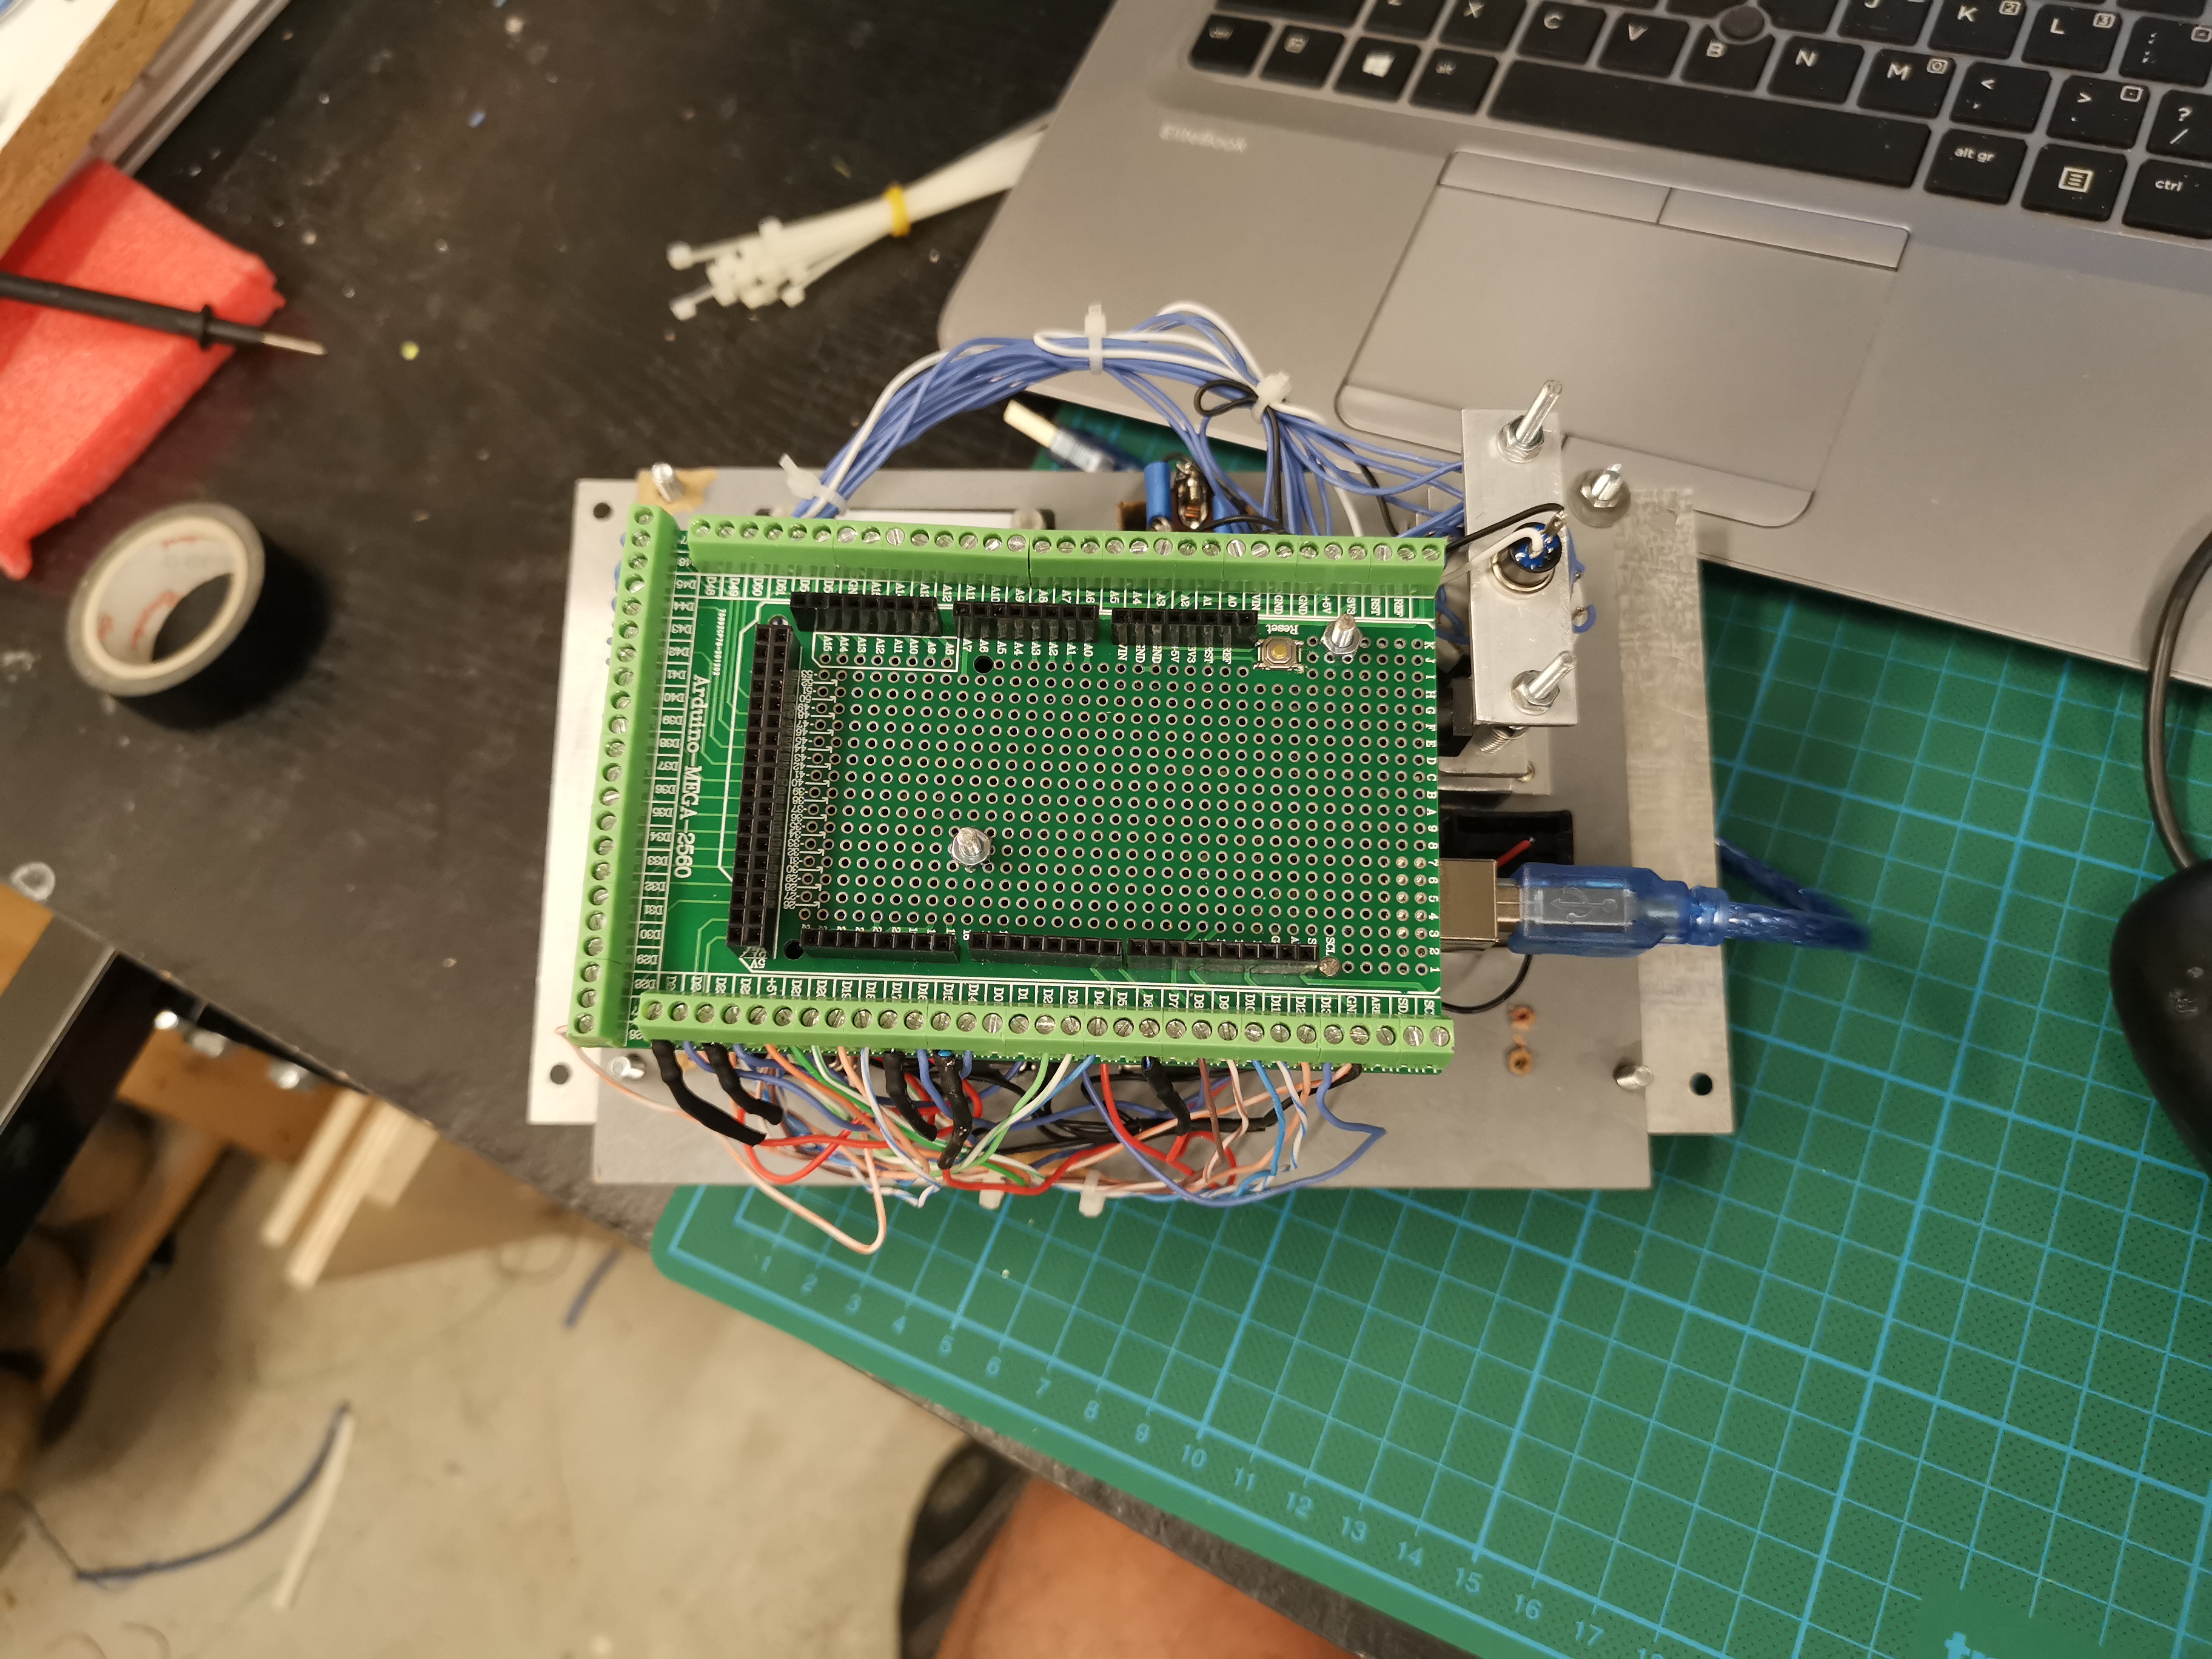
According to the size of the panel and number of switches and stuff a different Arduino is used.
In the latest version of Air Manager much more hardware is supported; also the TM1637 7 segment displays, used in my Davtron clocks, this makes it easier to interface because there is no Arduino coding left to do.
I might change this too.
The entire 12 pole rotary slides along 2 m3 threaded ends with springs and touches a push button.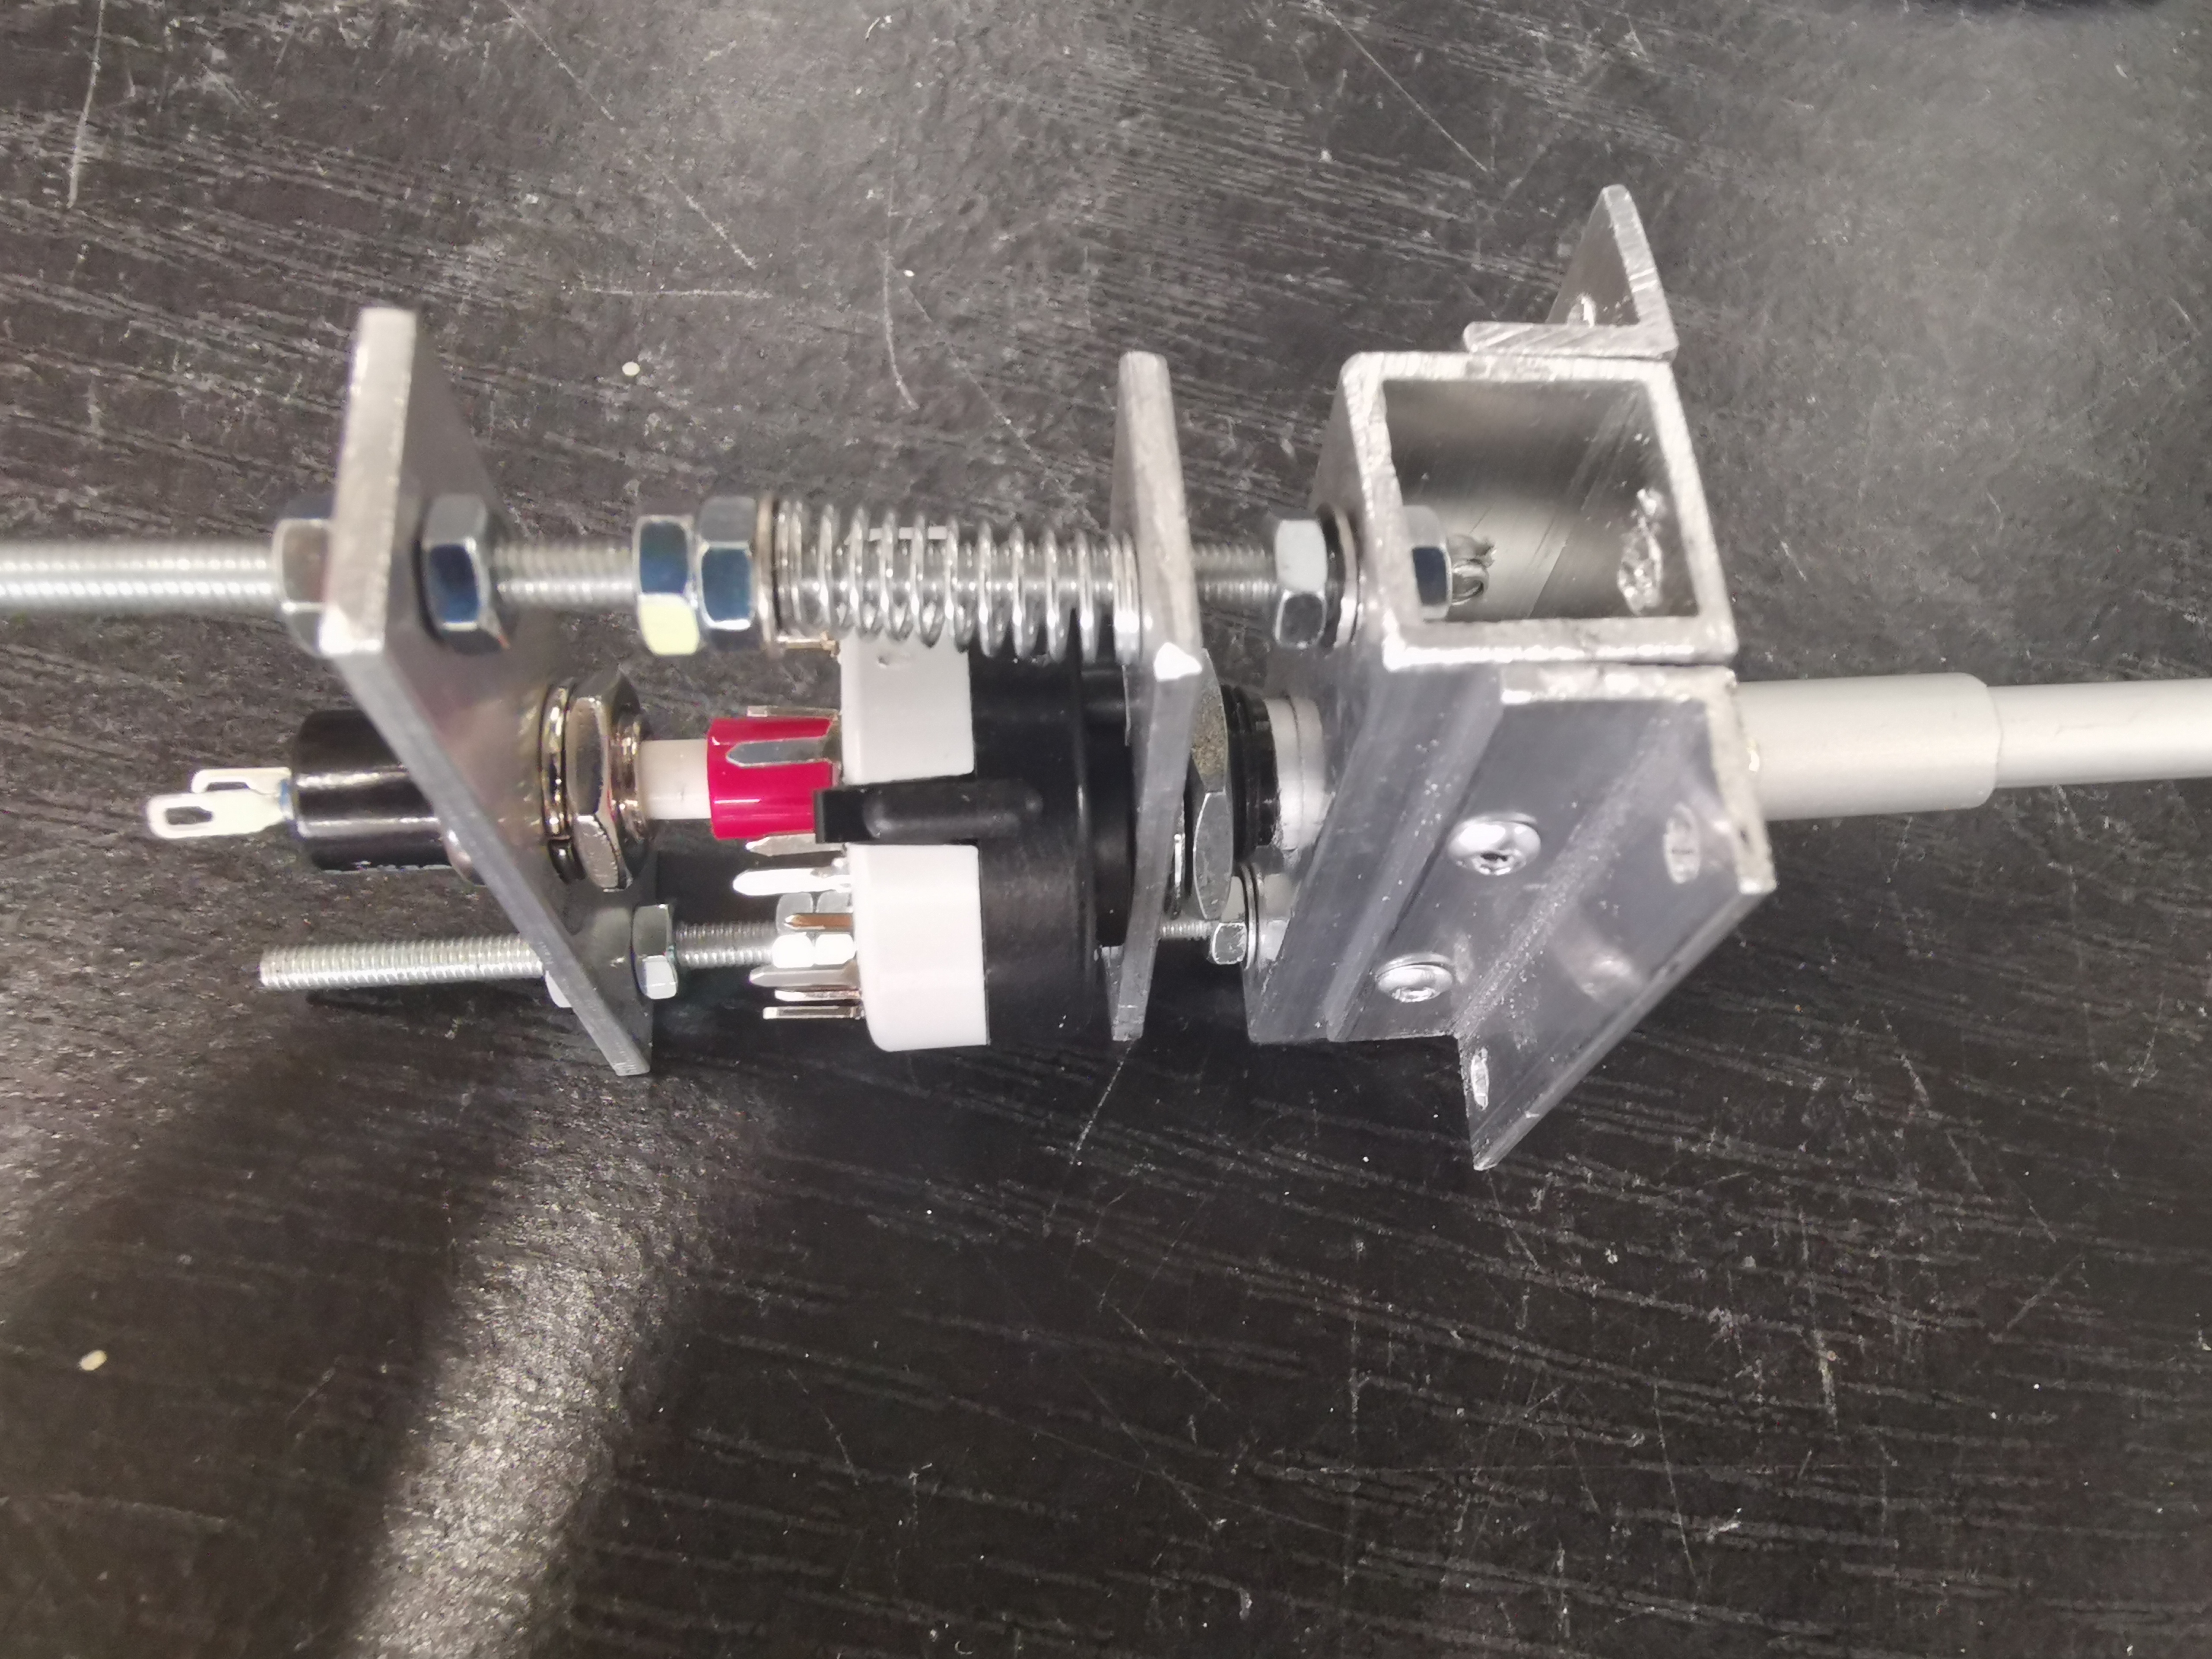
My Sytem test panel with the CDR display is finished.
I have used an Arduino Mega 2560 mounted on the back.
According to the size of the panel and number of switches and stuff a different Arduino is used.
In the latest version of Air Manager much more hardware is supported; also the TM1637 7 segment displays, used in my Davtron clocks, this makes it easier to interface because there is no Arduino coding left to do.
I might change this too.
The entire 12 pole rotary slides along 2 m3 threaded ends with springs and touches a push button.![]()
This is an all Air Manager interfaced panel with an Arduino Nano mounted on the back.
I used a modified MAX7219 7 segment panel.
Only a 3 digit module is placed on the panel and i connected wiring from the 7 segment to the MAX7219 board.
This works great!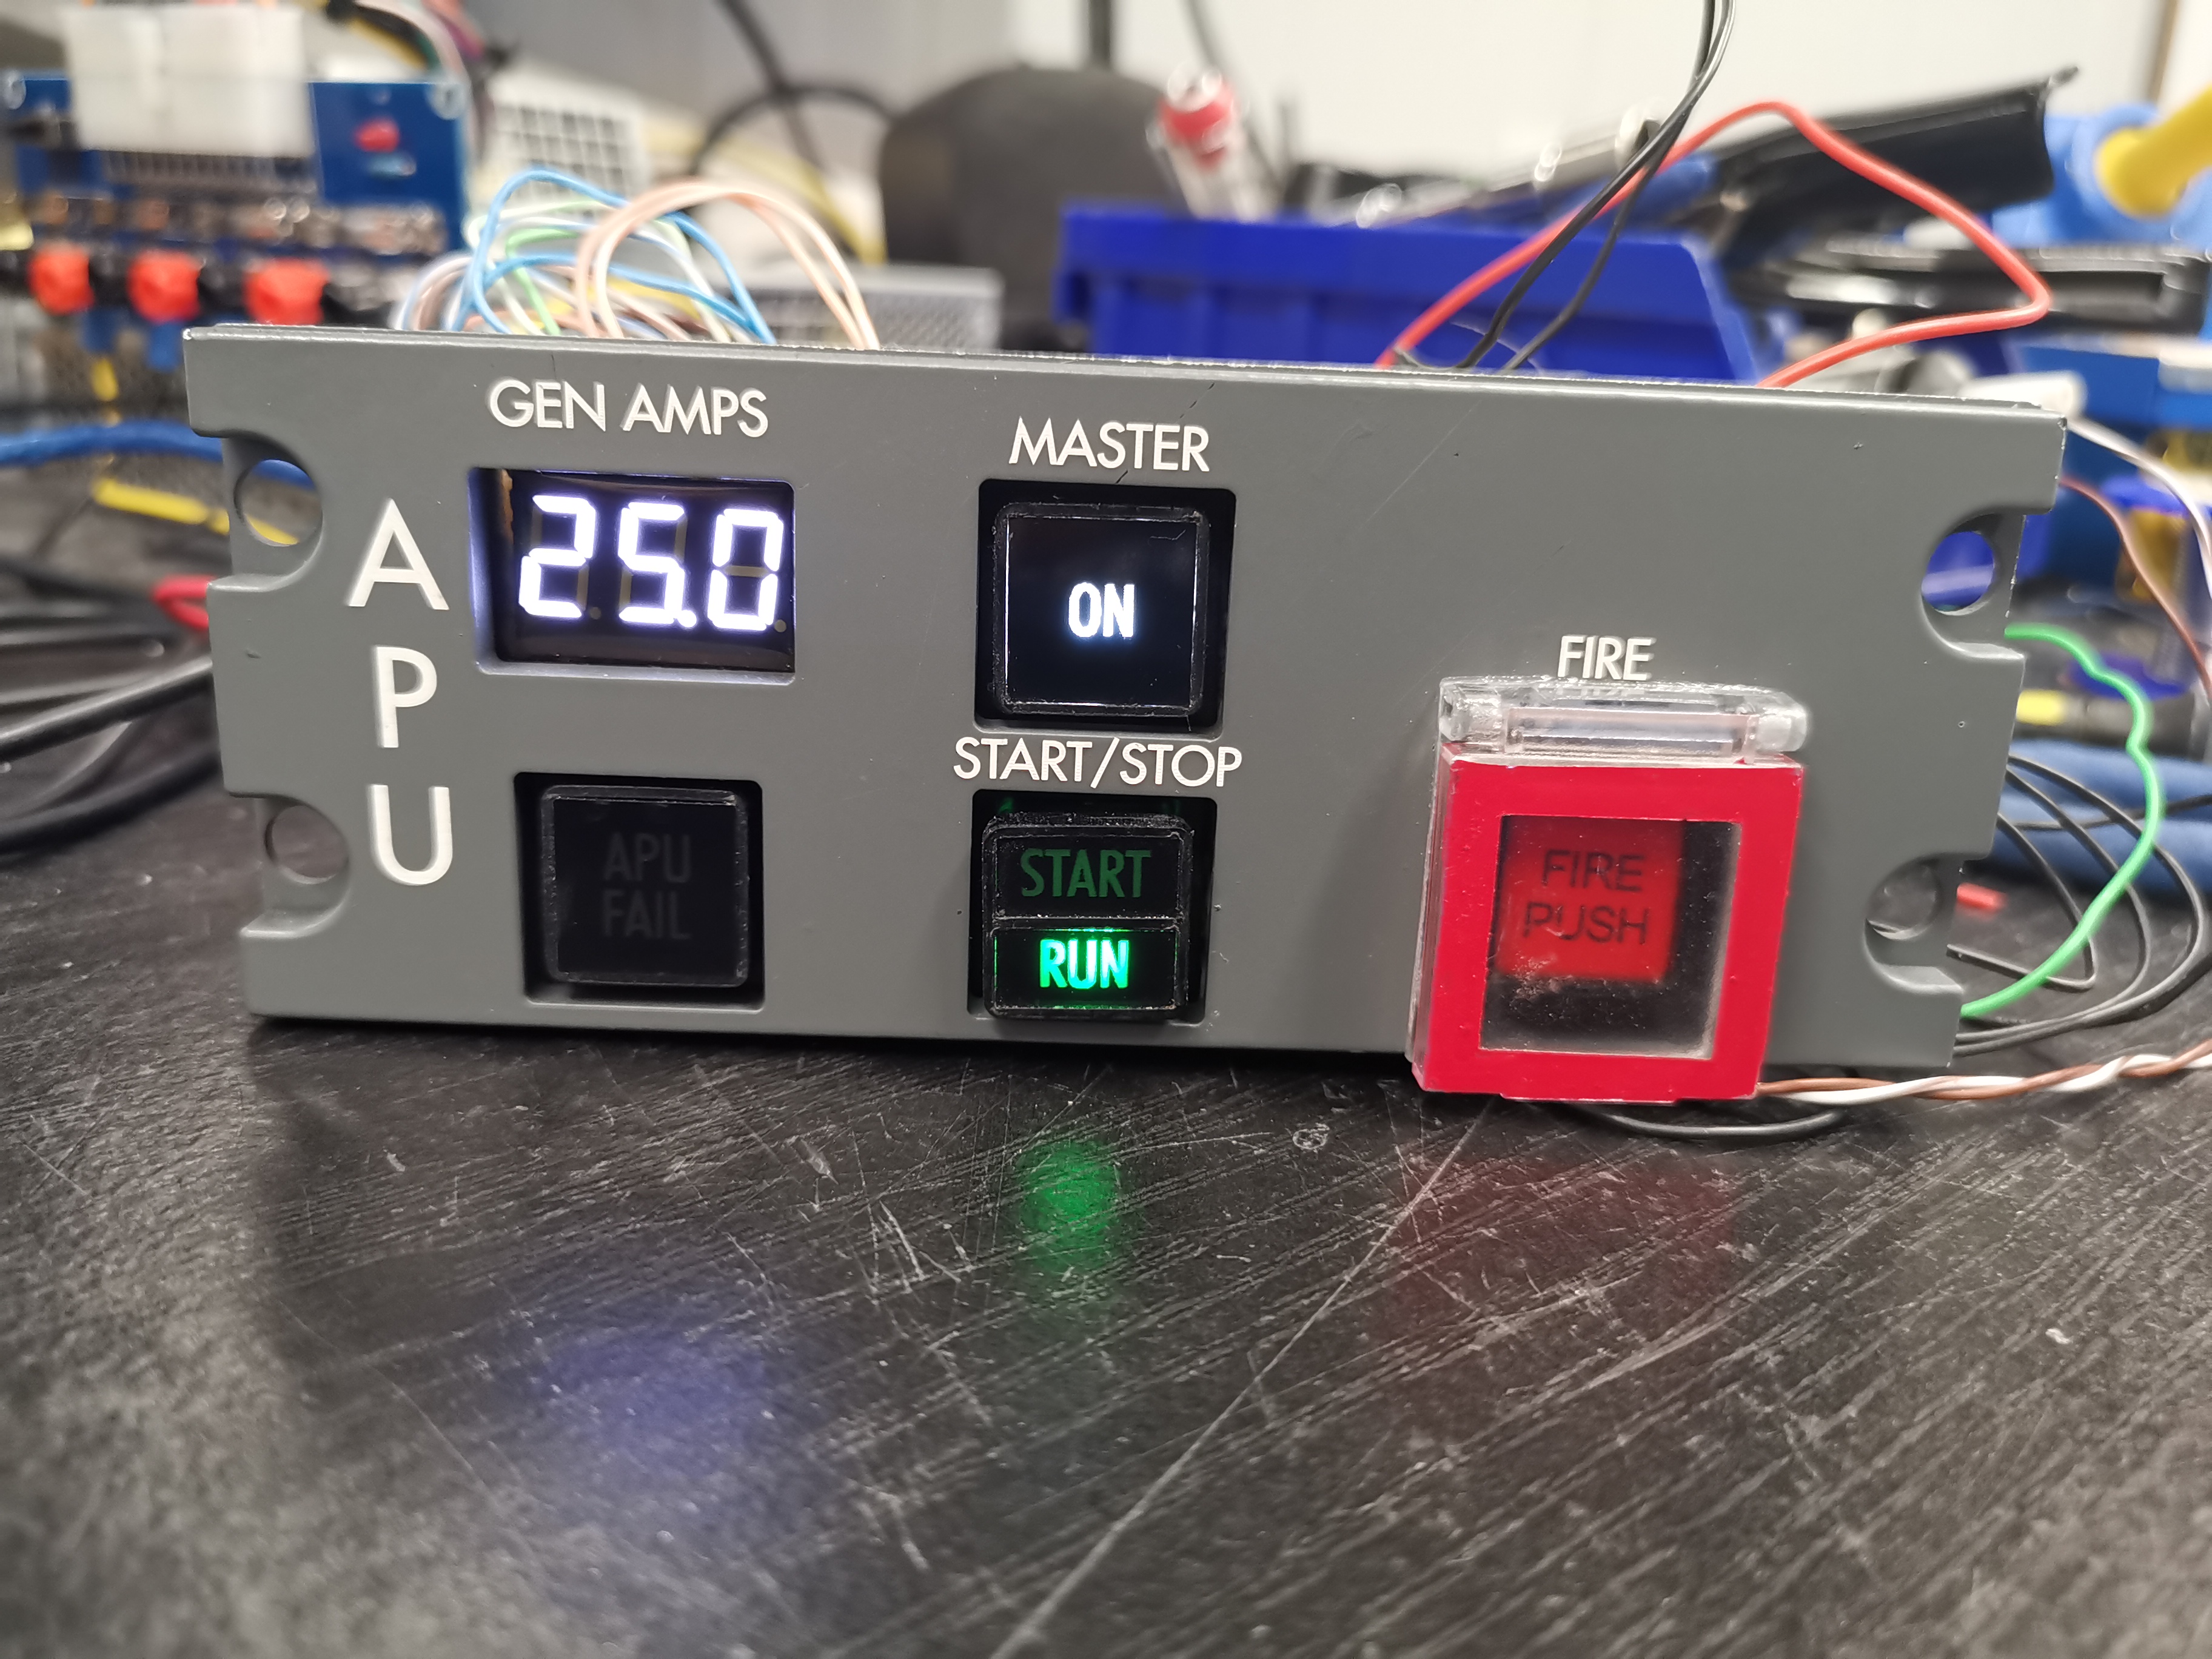
But as far as i can read in manuals it is functioning as it should be.
Only, there is also no simconnect command to set off the fire extingusher for the APU.
So for now if there is a fire only the red light on the push button is lighted .
The real stuff is hard to find and are priced ridiciously, so i found some cheap 16mm guards.
I CNC'ed the back open , painted a red edge on the front and glued it on the panel.
It is not as nice as the real guards but i am satisfied with it.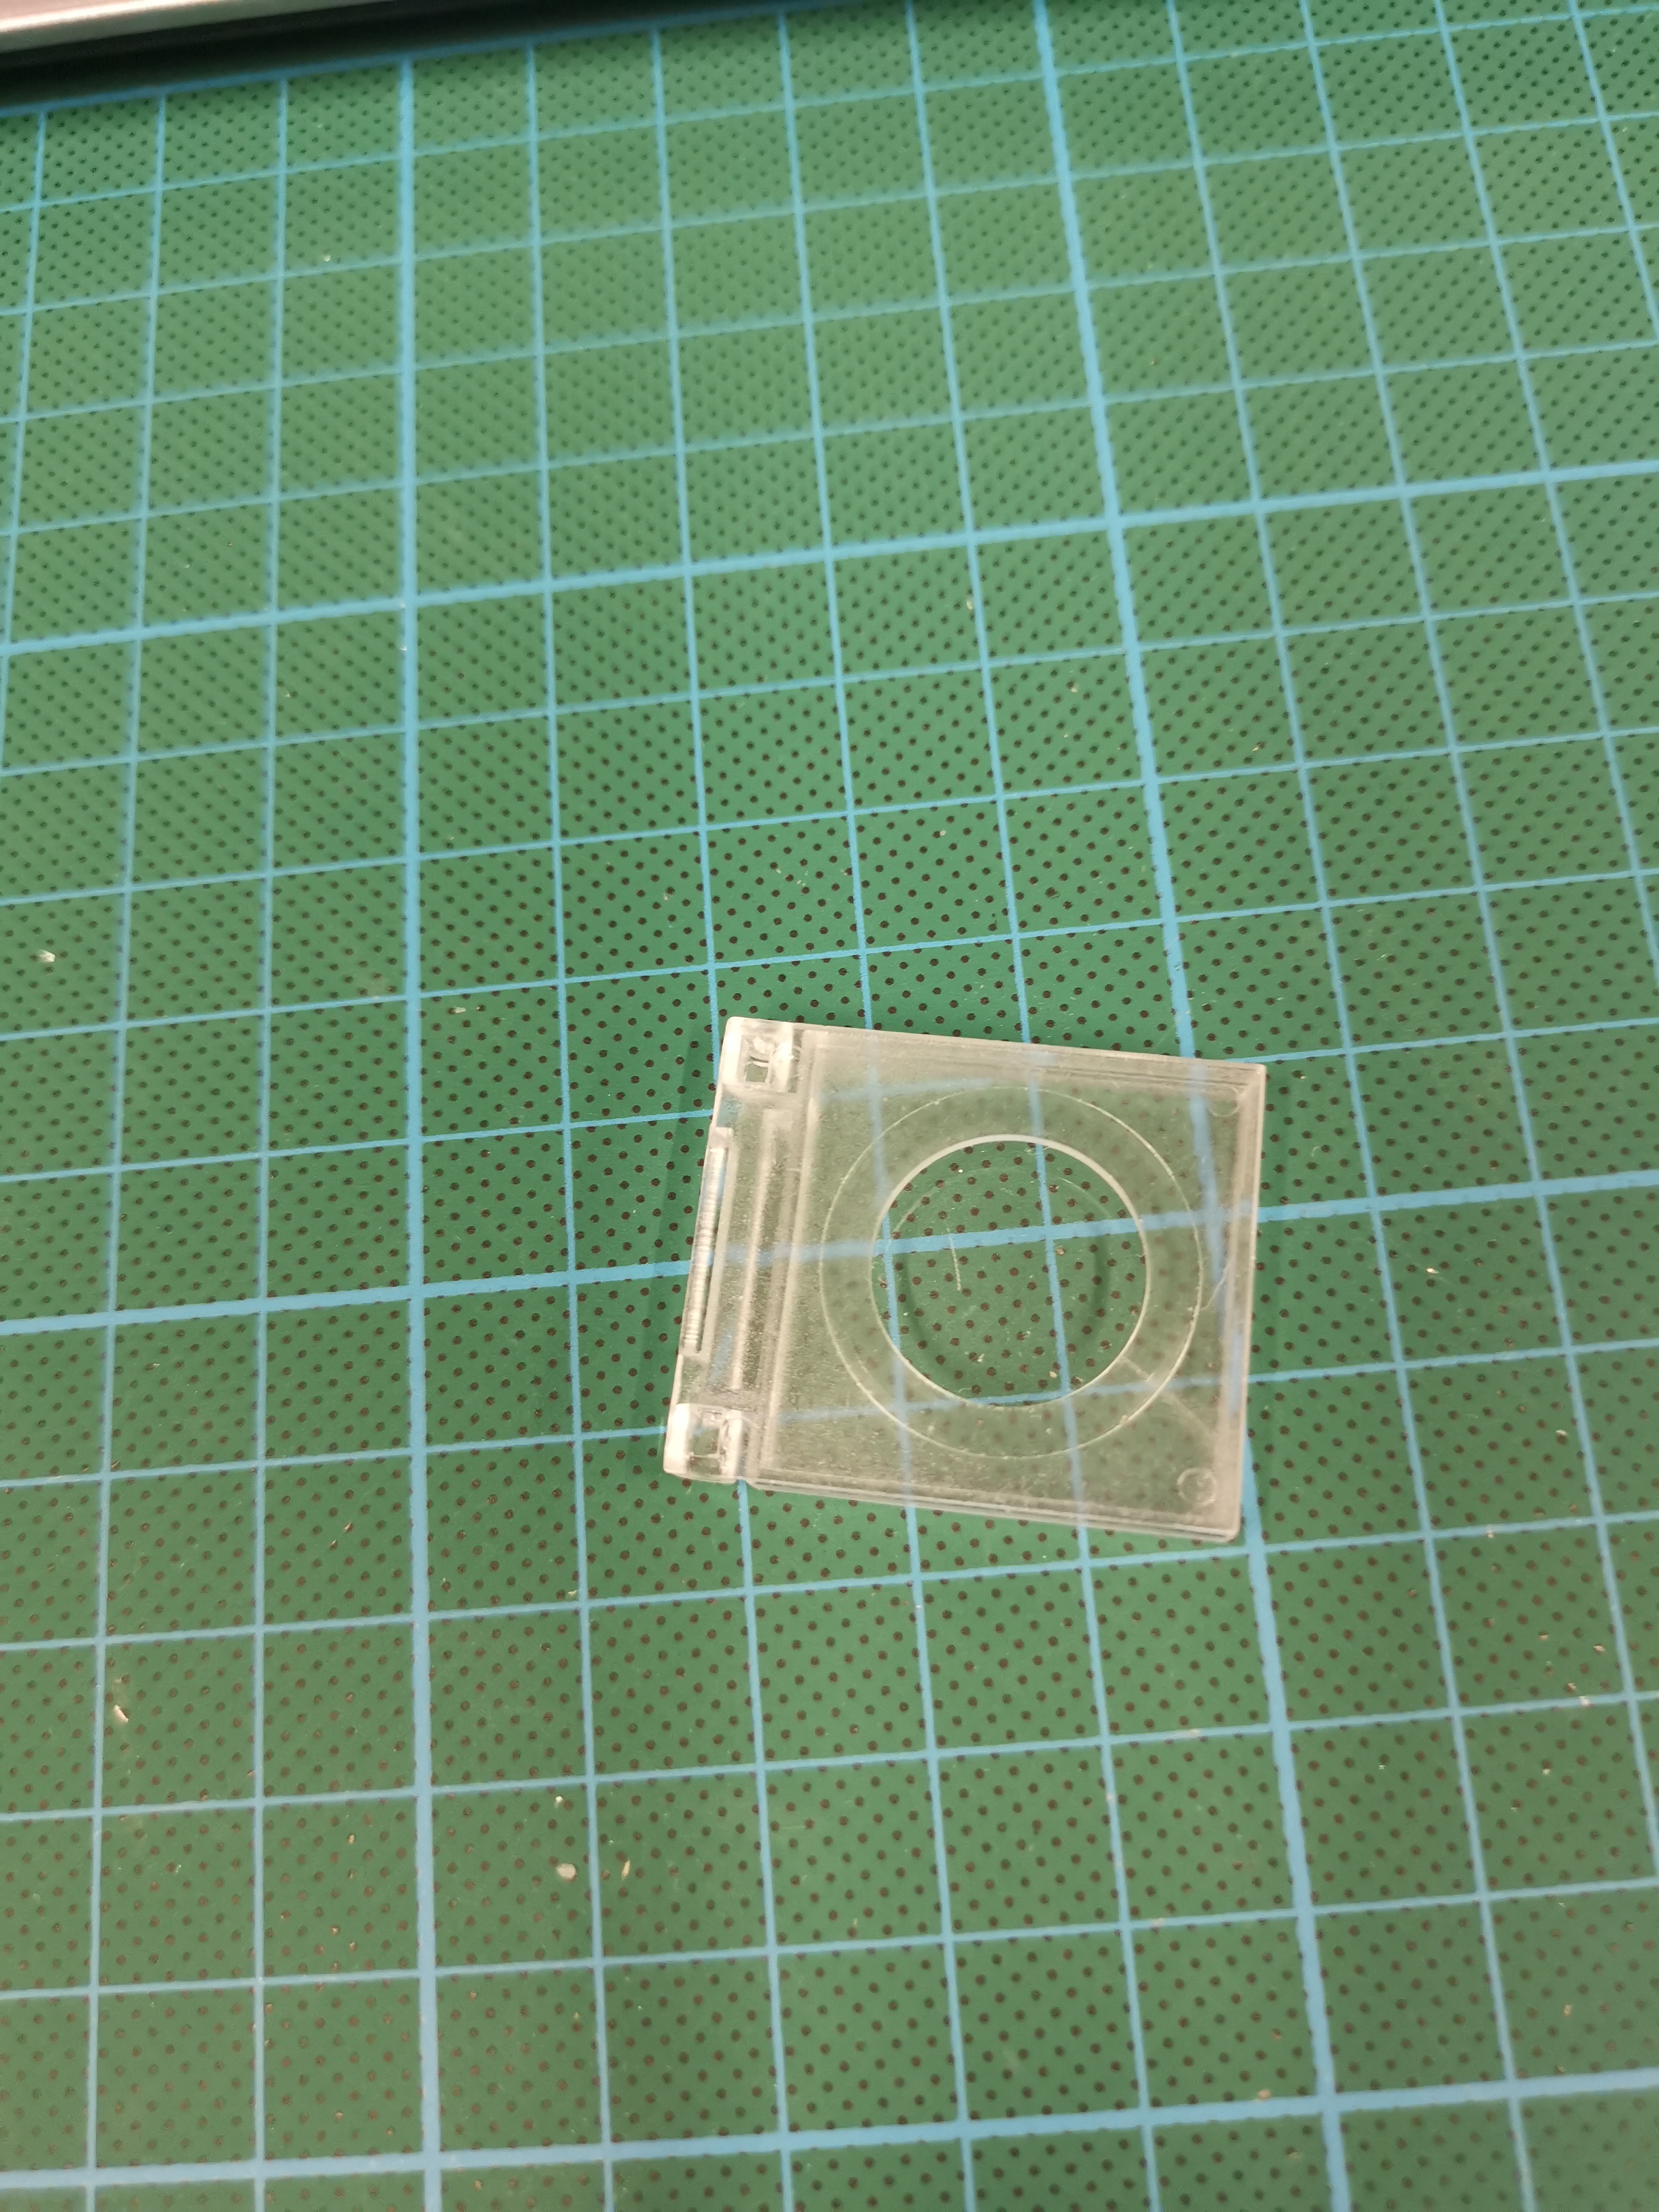
This is an all Air Manager interfaced panel with an Arduino Nano mounted on the back.
I used a modified MAX7219 7 segment panel.
Only a 3 digit module is placed on the panel and i connected wiring from the 7 segment to the MAX7219 board.
This works great!
But as far as i can read in manuals it is functioning as it should be.
Only, there is also no simconnect command to set off the fire extingusher for the APU.
So for now if there is a fire only the red light on the push button is lighted .
The real stuff is hard to find and are priced ridiciously, so i found some cheap 16mm guards.
I CNC'ed the back open , painted a red edge on the front and glued it on the panel.
It is not as nice as the real guards but i am satisfied with it.![]()
![]()
I didn't found that one on the site :S
Too bad they don't make them anymore.
Other aircraft they do, but not the lear 45.
So for that i still use Mobiflight.
But, a guy on the AM forum came with the option to use a dummy gauge in Prepar3d what you can use to create LVars and then translate that to FSUIPC.
Forum NavigationRoel's Learjet 45 simulator
![]() #131 · May 2, 2021, 8:31 am
#131 · May 2, 2021, 8:31 am![]() #132 · May 2, 2021, 9:46 am
#132 · May 2, 2021, 9:46 am![]() #133 · May 9, 2021, 5:08 am
#133 · May 9, 2021, 5:08 am![]() #134 · June 18, 2021, 2:58 pm
#134 · June 18, 2021, 2:58 pm![]() #135 · June 18, 2021, 3:03 pm
#135 · June 18, 2021, 3:03 pm![]() #136 · June 18, 2021, 8:35 pm
#136 · June 18, 2021, 8:35 pm![]() #137 · July 14, 2021, 4:11 am
#137 · July 14, 2021, 4:11 am![]() #138 · July 14, 2021, 4:39 am
#138 · July 14, 2021, 4:39 am![]() #139 · July 14, 2021, 6:57 am
#139 · July 14, 2021, 6:57 am![]() #140 · July 14, 2021, 7:24 am
#140 · July 14, 2021, 7:24 am
2017-10-10