


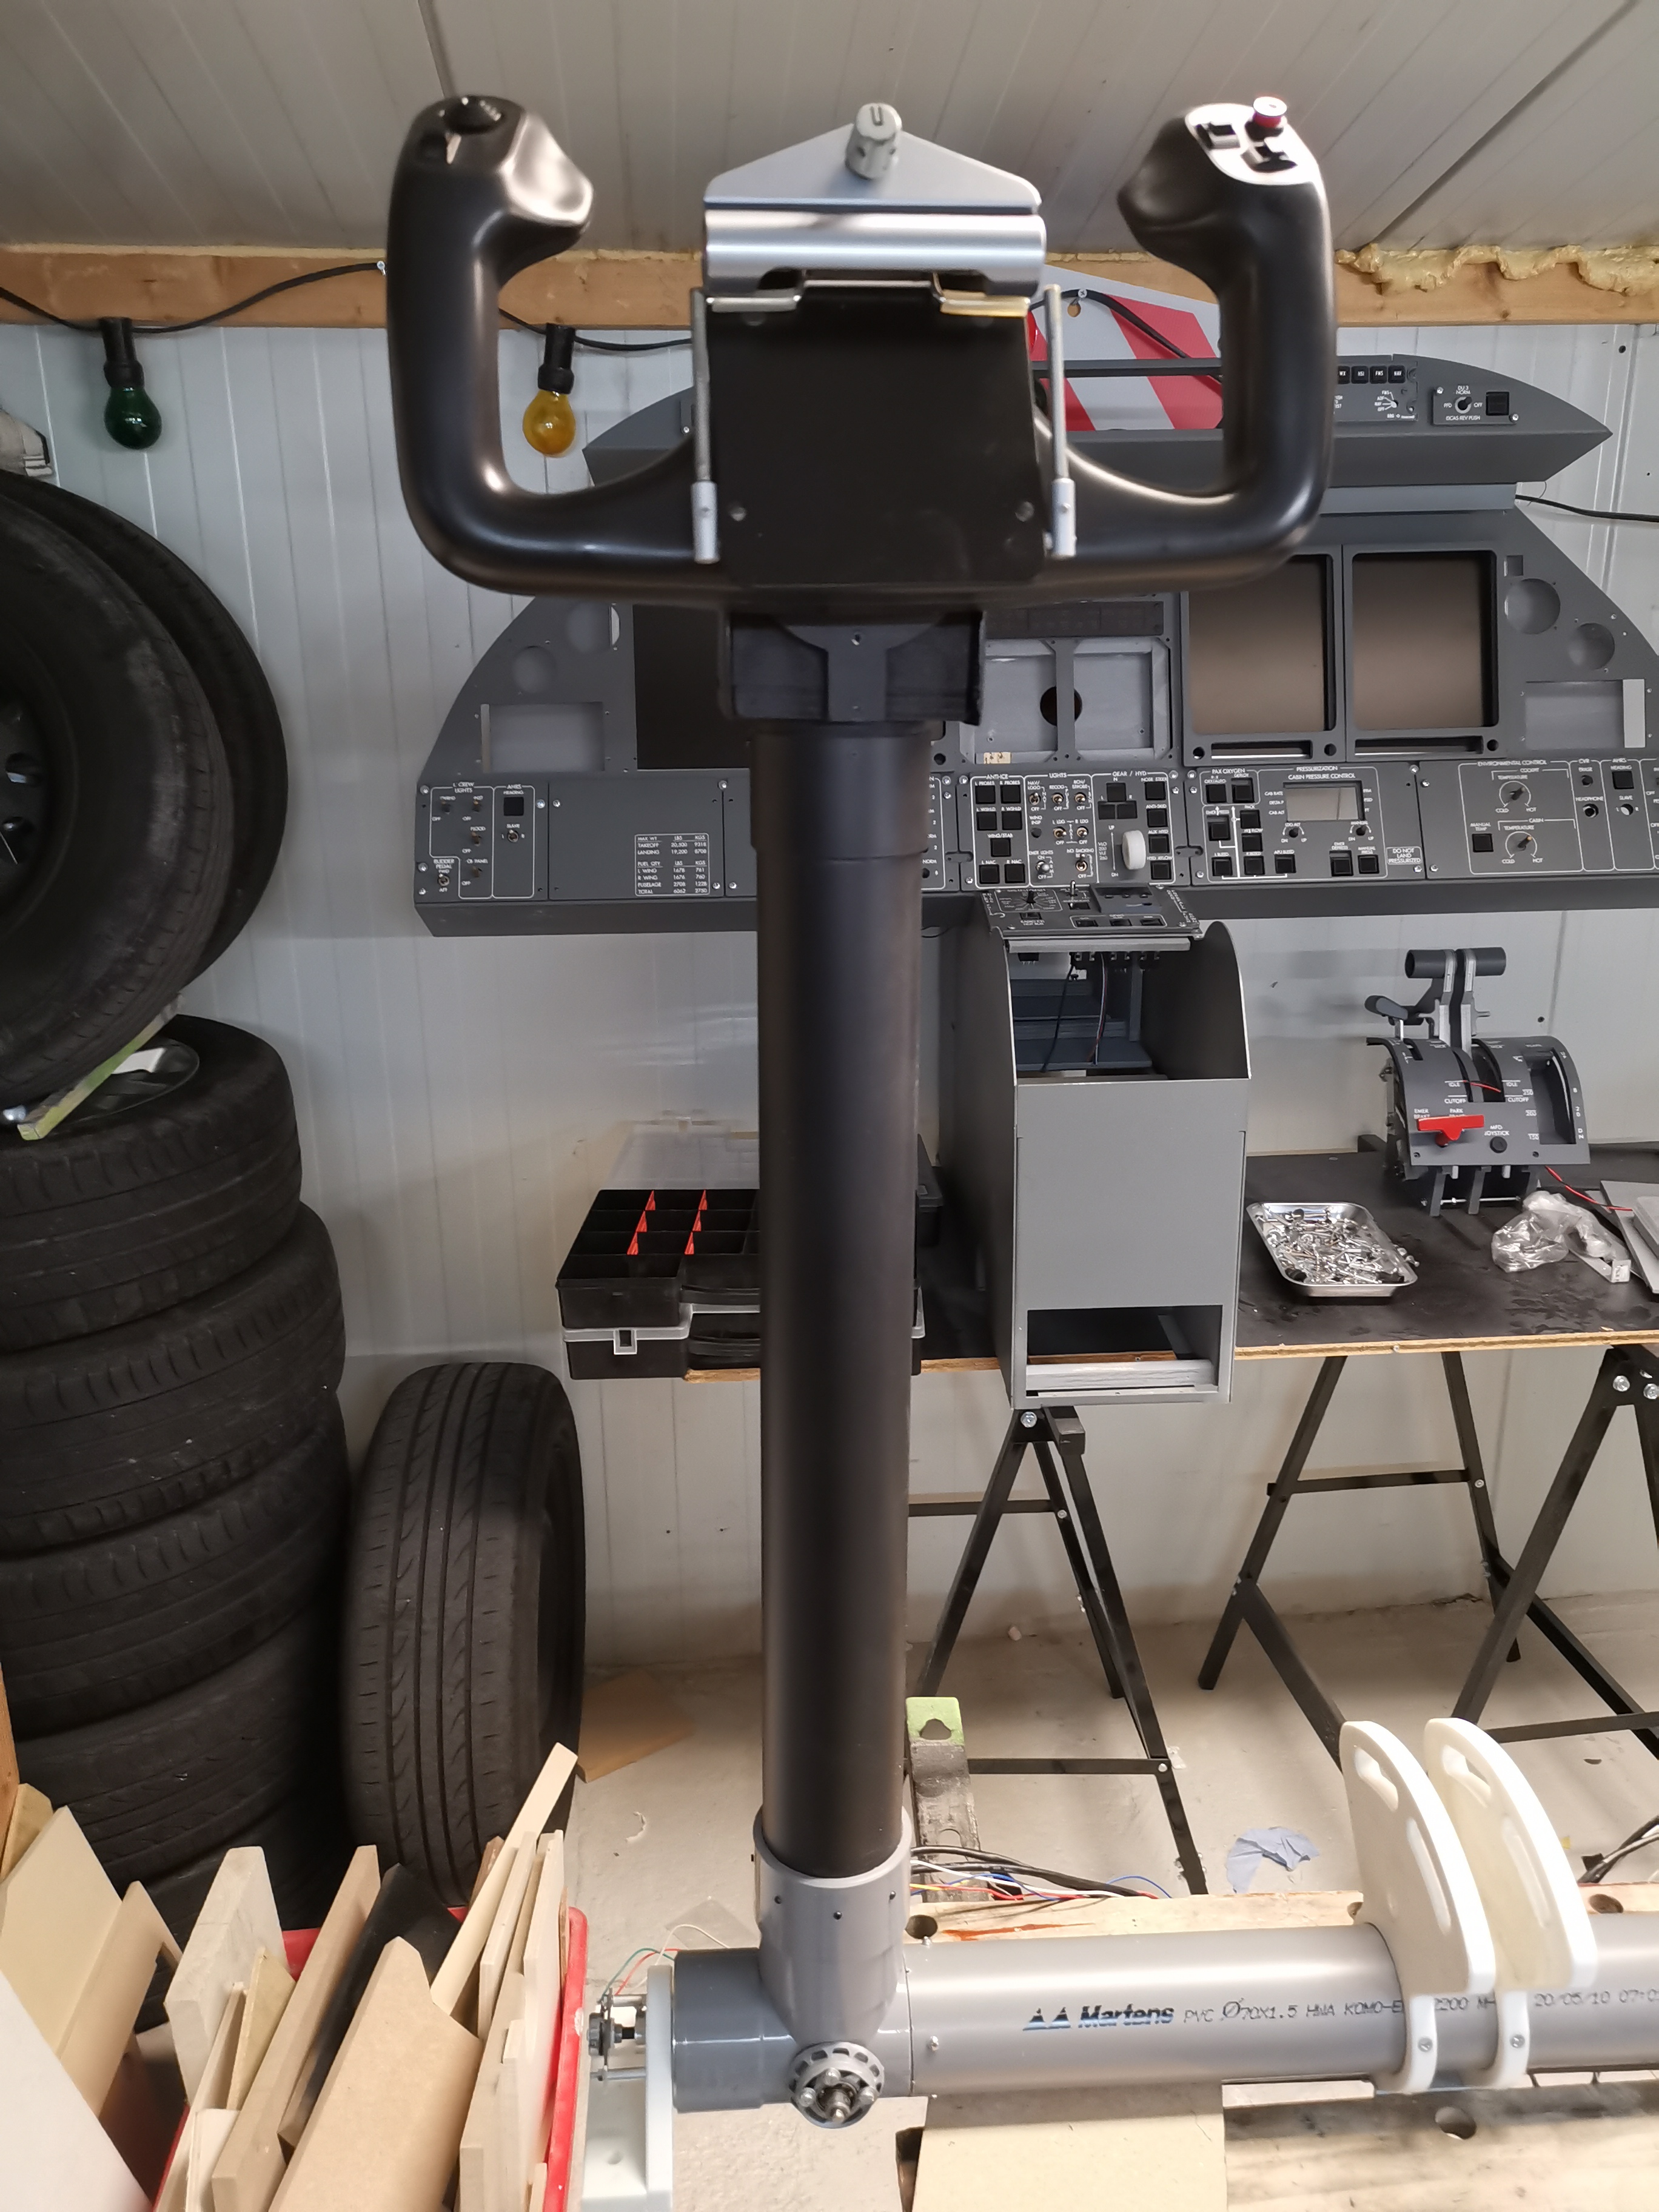
Nice work Roel . . . I think seeing the interior start to take shape is one of the most enjoyable moments when building the Lear! Shane Nice work Roel . . . I think seeing the interior start to take shape is one of the most enjoyable moments when building the Lear! Shane My Yoke system is nearly finished now. For the cross over I use Dyneema ropes. The are used on sailing boats and are as strong as steel , don't stretch but are silent and more flexible then steel wires. I milled round disks preventing the ropes running out of the wheels when mounting it all. All wiring is done to. So satisfied about the result, I do think I will make a cover below the Saitek. I was planning to connect the Yoke with an Open Cockpit USB Axis card. https://youtu.be/2PmD_pa5Qgg Yoke system in action... Up for the next project. 😉 My Yoke system is nearly finished now. For the cross over I use Dyneema ropes. The are used on sailing boats and are as strong as steel , don't stretch but are silent and more flexible then steel wires. I milled round disks preventing the ropes running out of the wheels when mounting it all. All wiring is done to. So satisfied about the result, I do think I will make a cover below the Saitek. I was planning to connect the Yoke with an Open Cockpit USB Axis card. Yoke system in action... Up for the next project. 😉 Since my OC USB Axis card isn't supported on Windows 10 and haven't heard from my Spanish OC friends I have decided to use Arduino to interface analog POT meters. I couldn't find anything in here about this little Arduino, but it seemed to be a really great joystick interface card, which I can connect multiple POT meters and buttons. So I made a little proof of concept to connect my yoke's and rudder pedals to. https://youtu.be/74G0FDZ-4bk Since my OC USB Axis card isn't supported on Windows 10 and haven't heard from my Spanish OC friends I have decided to use Arduino to interface analog POT meters. I couldn't find anything in here about this little Arduino, but it seemed to be a really great joystick interface card, which I can connect multiple POT meters and buttons. So I made a little proof of concept to connect my yoke's and rudder pedals to. Hey Roel, Outstanding work and great proof of concept! You actually may be ahead of the flight sim curve when it comes to interface cards. A lot of sim builders are moving to Arduino cards. As a matter of fact, Arduino is the master plan forward with the Lear45 sim. Jason Hite with FlightDecksoft plans on using nothing but Arduino Nano and Arduino Mega cards for all the reasons you have pointed out. He also plans to make available the sketches for each Arduino which will save us all a ton of time! The one area Jason was not planning to use Arduino was with the potentiometer controlled flight controls, like you have now proven. So in theory, it is possible to run our sims almost exclusively with Ardunio cards! Jason is getting really close to releasing the next version of Jet45 AAS which will include all of the Arduino controlled modules, like FGC, RMU, EFIS and the Display Units. It is a really exciting time to be building a sim. Keep up the great work and you are definitely on the right track using the Arduino cards. Hey Roel, Outstanding work and great proof of concept! You actually may be ahead of the flight sim curve when it comes to interface cards. A lot of sim builders are moving to Arduino cards. As a matter of fact, Arduino is the master plan forward with the Lear45 sim. Jason Hite with FlightDecksoft plans on using nothing but Arduino Nano and Arduino Mega cards for all the reasons you have pointed out. He also plans to make available the sketches for each Arduino which will save us all a ton of time! The one area Jason was not planning to use Arduino was with the potentiometer controlled flight controls, like you have now proven. So in theory, it is possible to run our sims almost exclusively with Ardunio cards! Jason is getting really close to releasing the next version of Jet45 AAS which will include all of the Arduino controlled modules, like FGC, RMU, EFIS and the Display Units. It is a really exciting time to be building a sim. Keep up the great work and you are definitely on the right track using the Arduino cards. Thanks Ron! Below i have my POC sketch. I don't know if you guys know this site, but it is very helpfull . https://github.com/MHeironimus/ArduinoJoystickLibrary #include <Joystick.h> // Reference the Joystick Library. // Create Joystick unsigned int xAxis = 0; // Set "initAutoSendState" to true for "Auto Send" mode or false for "Manual Send" mode. const bool initAutoSendState = true; void setup() { // Initialize Joystick Library } // Constant that maps the phyical pin to the joystick button. // Last state of the button void loop() { // Read pin values delay(50); xAxis = analogRead(A0)/4; Joystick.setXAxis(xAxis); //Joystick.setState(); // this updates the "Joystick" library and Thanks Ron! Below i have my POC sketch. I don't know if you guys know this site, but it is very helpfull . https://github.com/MHeironimus/ArduinoJoystickLibrary #include <Joystick.h> // Reference the Joystick Library. // Create Joystick unsigned int xAxis = 0; // Set "initAutoSendState" to true for "Auto Send" mode or false for "Manual Send" mode. const bool initAutoSendState = true; void setup() { // Initialize Joystick Library } // Constant that maps the phyical pin to the joystick button. // Last state of the button void loop() { // Read pin values delay(50); xAxis = analogRead(A0)/4; Joystick.setXAxis(xAxis); //Joystick.setState(); // this updates the "Joystick" library and All I can say is , Yippeee, because Interface IT are the interface cards from FDS and they have been the primary choice for us in the Forum since I started in 2011. I can tell you now that they give me 80% of my grief and with the work Jason is doing to replace them with arduinos is a win for all of us. I can tell you when you jump in that plane and want to go flying then find a software glitch with a large section of your controls off-line it is no fun to climb out and have to either 1/ restart Interface IT 2/ restart Wideclient 3/ Reboot computer Bring it on........yesterday. Keep at it Roel. Doing us all a favour. Cheers Mark S, Mark C & Peter N All I can say is , Yippeee, because Interface IT are the interface cards from FDS and they have been the primary choice for us in the Forum since I started in 2011. I can tell you now that they give me 80% of my grief and with the work Jason is doing to replace them with arduinos is a win for all of us. I can tell you when you jump in that plane and want to go flying then find a software glitch with a large section of your controls off-line it is no fun to climb out and have to either 1/ restart Interface IT 2/ restart Wideclient 3/ Reboot computer Bring it on........yesterday. Keep at it Roel. Doing us all a favour. Cheers Mark S, Mark C & Peter N Hi Roel, Wow, nice work on the Arduino sketch! You are definitely one of the leaders in the Hangar when it comes to Arduino and fully understanding how they work. You can teach us a thing or two about how Arduino interface cards work and it is a whole lot easier for use to understand when we are applying your work to our Lear45 projects. You should start a thread in the Members Software forum and call it something like "Roel's Ardunio Tutorial" or "Roel's Arduino Sketches". You can find the main page to the Members Software HERE (And when you go to the Members Software page, you will see that it has been 2 years since we have had anyone active in that area, so this would be an excellent kick start to the Ardunio solution) Once you get the introduction of your new thread started, cut and paste the information you have above in your new thread. Then you can add to it as you come up with new Arduino sketches and everyone can easily find them and learn from your work. I am always intrigued by software development, probably because it is still such a mystery to me! LOL Hi Roel, Wow, nice work on the Arduino sketch! You are definitely one of the leaders in the Hangar when it comes to Arduino and fully understanding how they work. You can teach us a thing or two about how Arduino interface cards work and it is a whole lot easier for use to understand when we are applying your work to our Lear45 projects. You should start a thread in the Members Software forum and call it something like "Roel's Ardunio Tutorial" or "Roel's Arduino Sketches". You can find the main page to the Members Software HERE (And when you go to the Members Software page, you will see that it has been 2 years since we have had anyone active in that area, so this would be an excellent kick start to the Ardunio solution) Once you get the introduction of your new thread started, cut and paste the information you have above in your new thread. Then you can add to it as you come up with new Arduino sketches and everyone can easily find them and learn from your work. I am always intrigued by software development, probably because it is still such a mystery to me! LOL The leonardo board will work as well for this. The main consideration is the chip on the board. the ATmega 32u4 chip is the one to look for to be recognized as a keyboard/mouse ( good for the FMC) or joystick with the proper library installed The leonardo board will work as well for this. The main consideration is the chip on the board. the ATmega 32u4 chip is the one to look for to be recognized as a keyboard/mouse ( good for the FMC) or joystick with the proper library installed Yes that is a good idea Ron. I am happily willing to share my interfacing experiences in here! I will start my topic soon. You are right Jamie, the Arduino Leonardo is also an option, same chip. I believe the micro pro is now exactly the same as Leonardo. The Leonardo used to be a bit bigger. Yes that is a good idea Ron. I am happily willing to share my interfacing experiences in here! I will start my topic soon. You are right Jamie, the Arduino Leonardo is also an option, same chip. I believe the micro pro is now exactly the same as Leonardo. The Leonardo used to be a bit bigger. It has been a while since I posted a project update, I have been sick for a few weeks, a nasty flew, but still I have finished one rudder pedal ... almost. Since I do not have machinery to bend or cut metal, I decided to construct the rudder pedals from aluminum profiles and out of the shelve parts for the hardware store all nutted and riveted together. Most work is in thinking how to construct the mechanism and again this site has been very helpful! https://youtu.be/QYB9b6-qias I still have to paint it . It has been a while since I posted a project update, I have been sick for a few weeks, a nasty flew, but still I have finished one rudder pedal ... almost. Since I do not have machinery to bend or cut metal, I decided to construct the rudder pedals from aluminum profiles and out of the shelve parts for the hardware store all nutted and riveted together. Most work is in thinking how to construct the mechanism and again this site has been very helpful! I still have to paint it .Roel's Learjet 45 simulator
![]()
![]()
Still working on a copy of my chart holder.
I created covers the same way as creating the shell; with fiber glass that is.
This took a while , but the result is satisfying.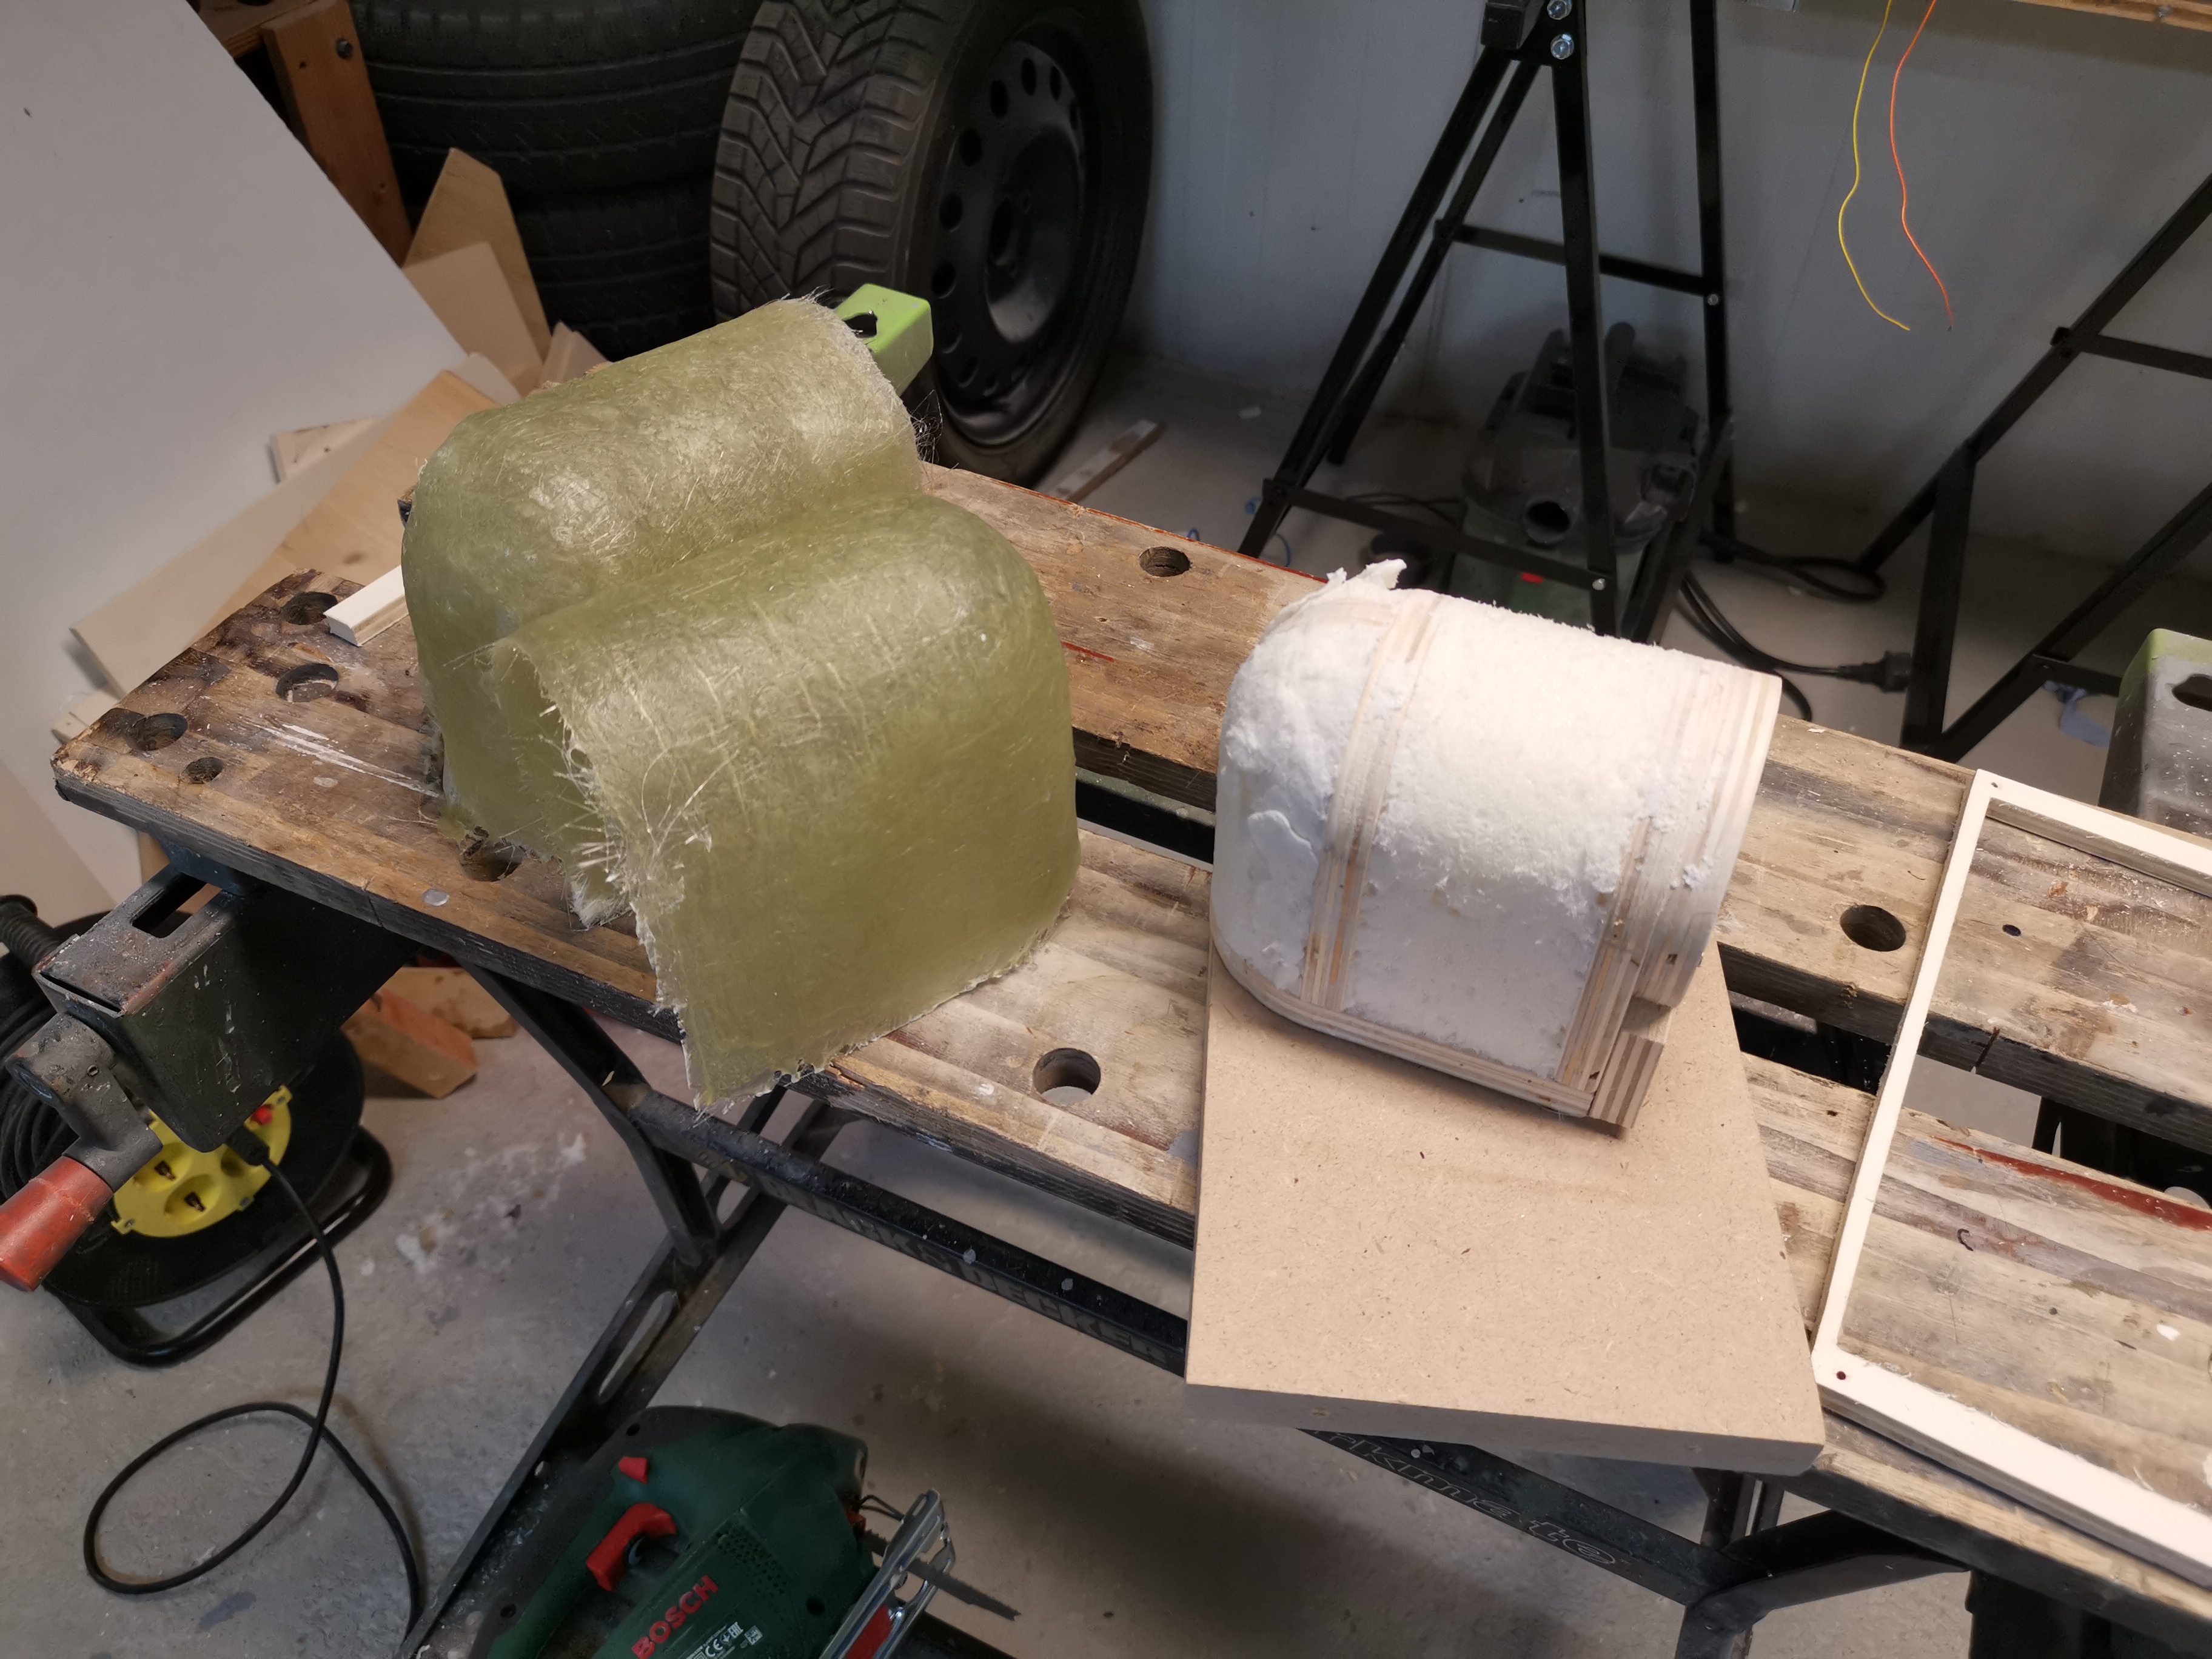
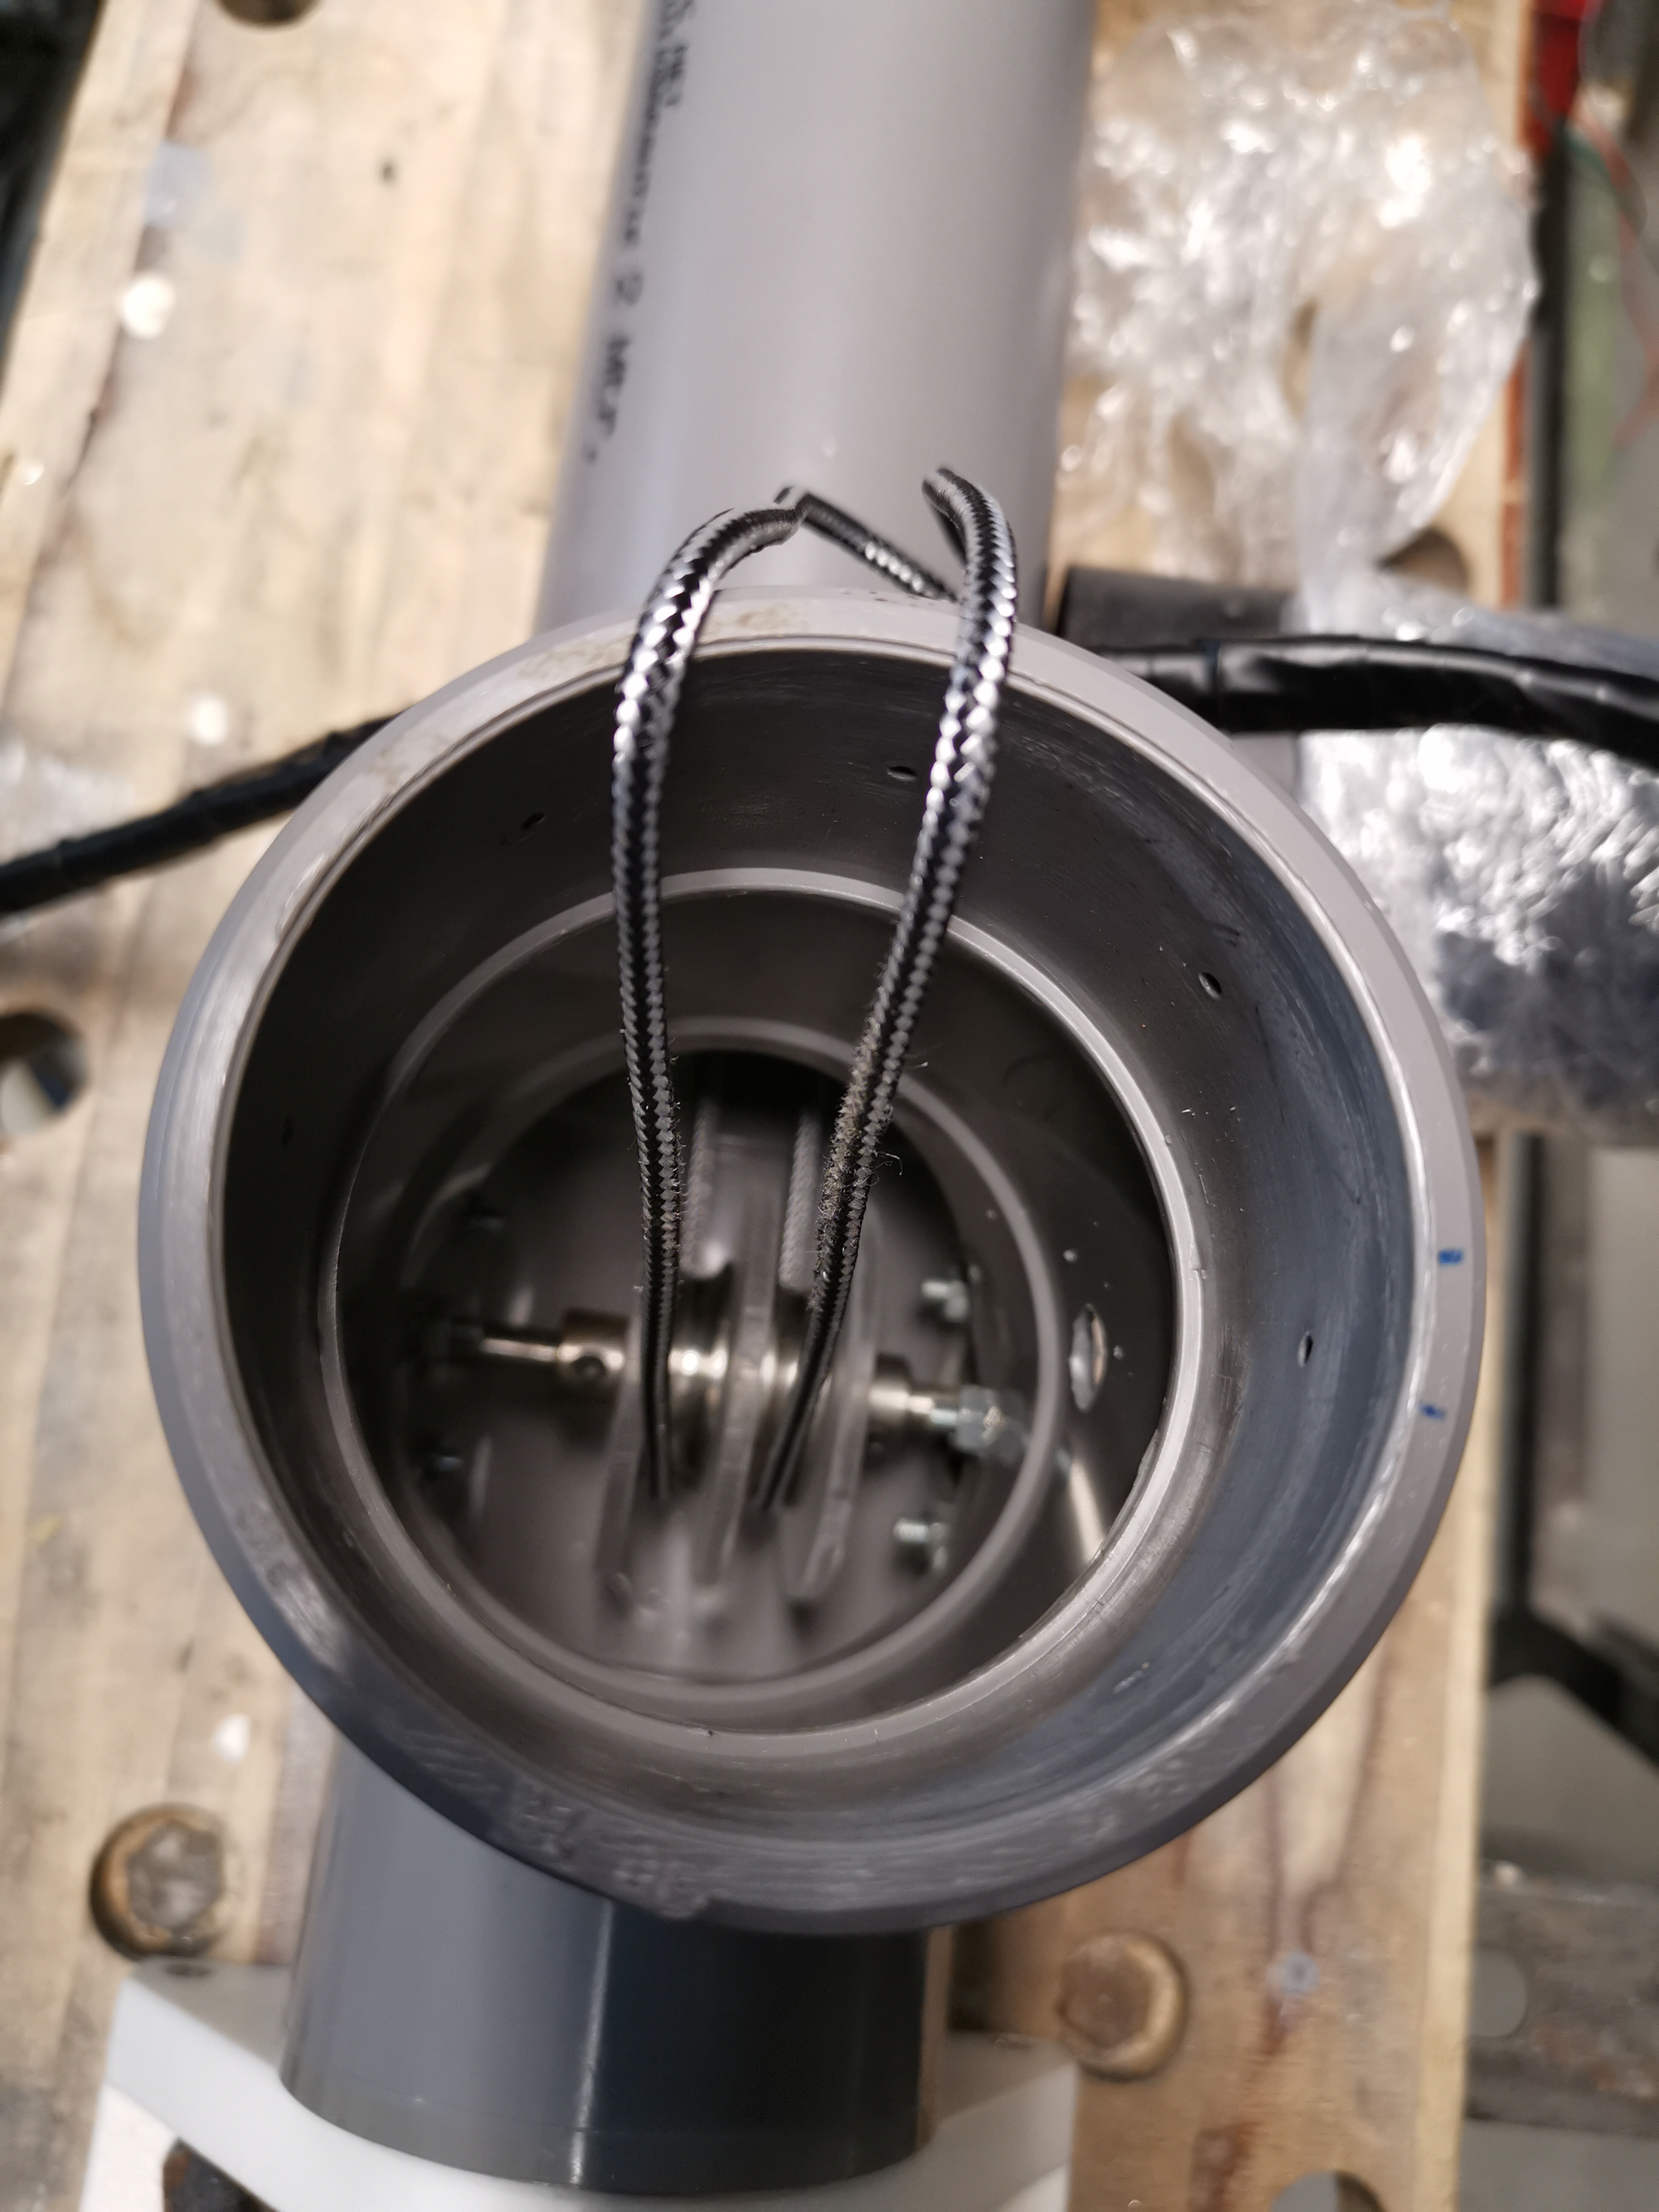
But unfortunately this card doesn't run with Windows 10 anymore ...
There was an updated IC available but these OC guys charge ridiculous prices to ship a small item like that!!
Price would be the same as an entire new card.
So i am also saying goodbye this this card and ordered a Arduino micro for this.
Still working on a copy of my chart holder.
I created covers the same way as creating the shell; with fiber glass that is.
This took a while , but the result is satisfying.
But unfortunately this card doesn't run with Windows 10 anymore ...
There was an updated IC available but these OC guys charge ridiculous prices to ship a small item like that!!
Price would be the same as an entire new card.
So i am also saying goodbye this this card and ordered a Arduino micro for this.![]()
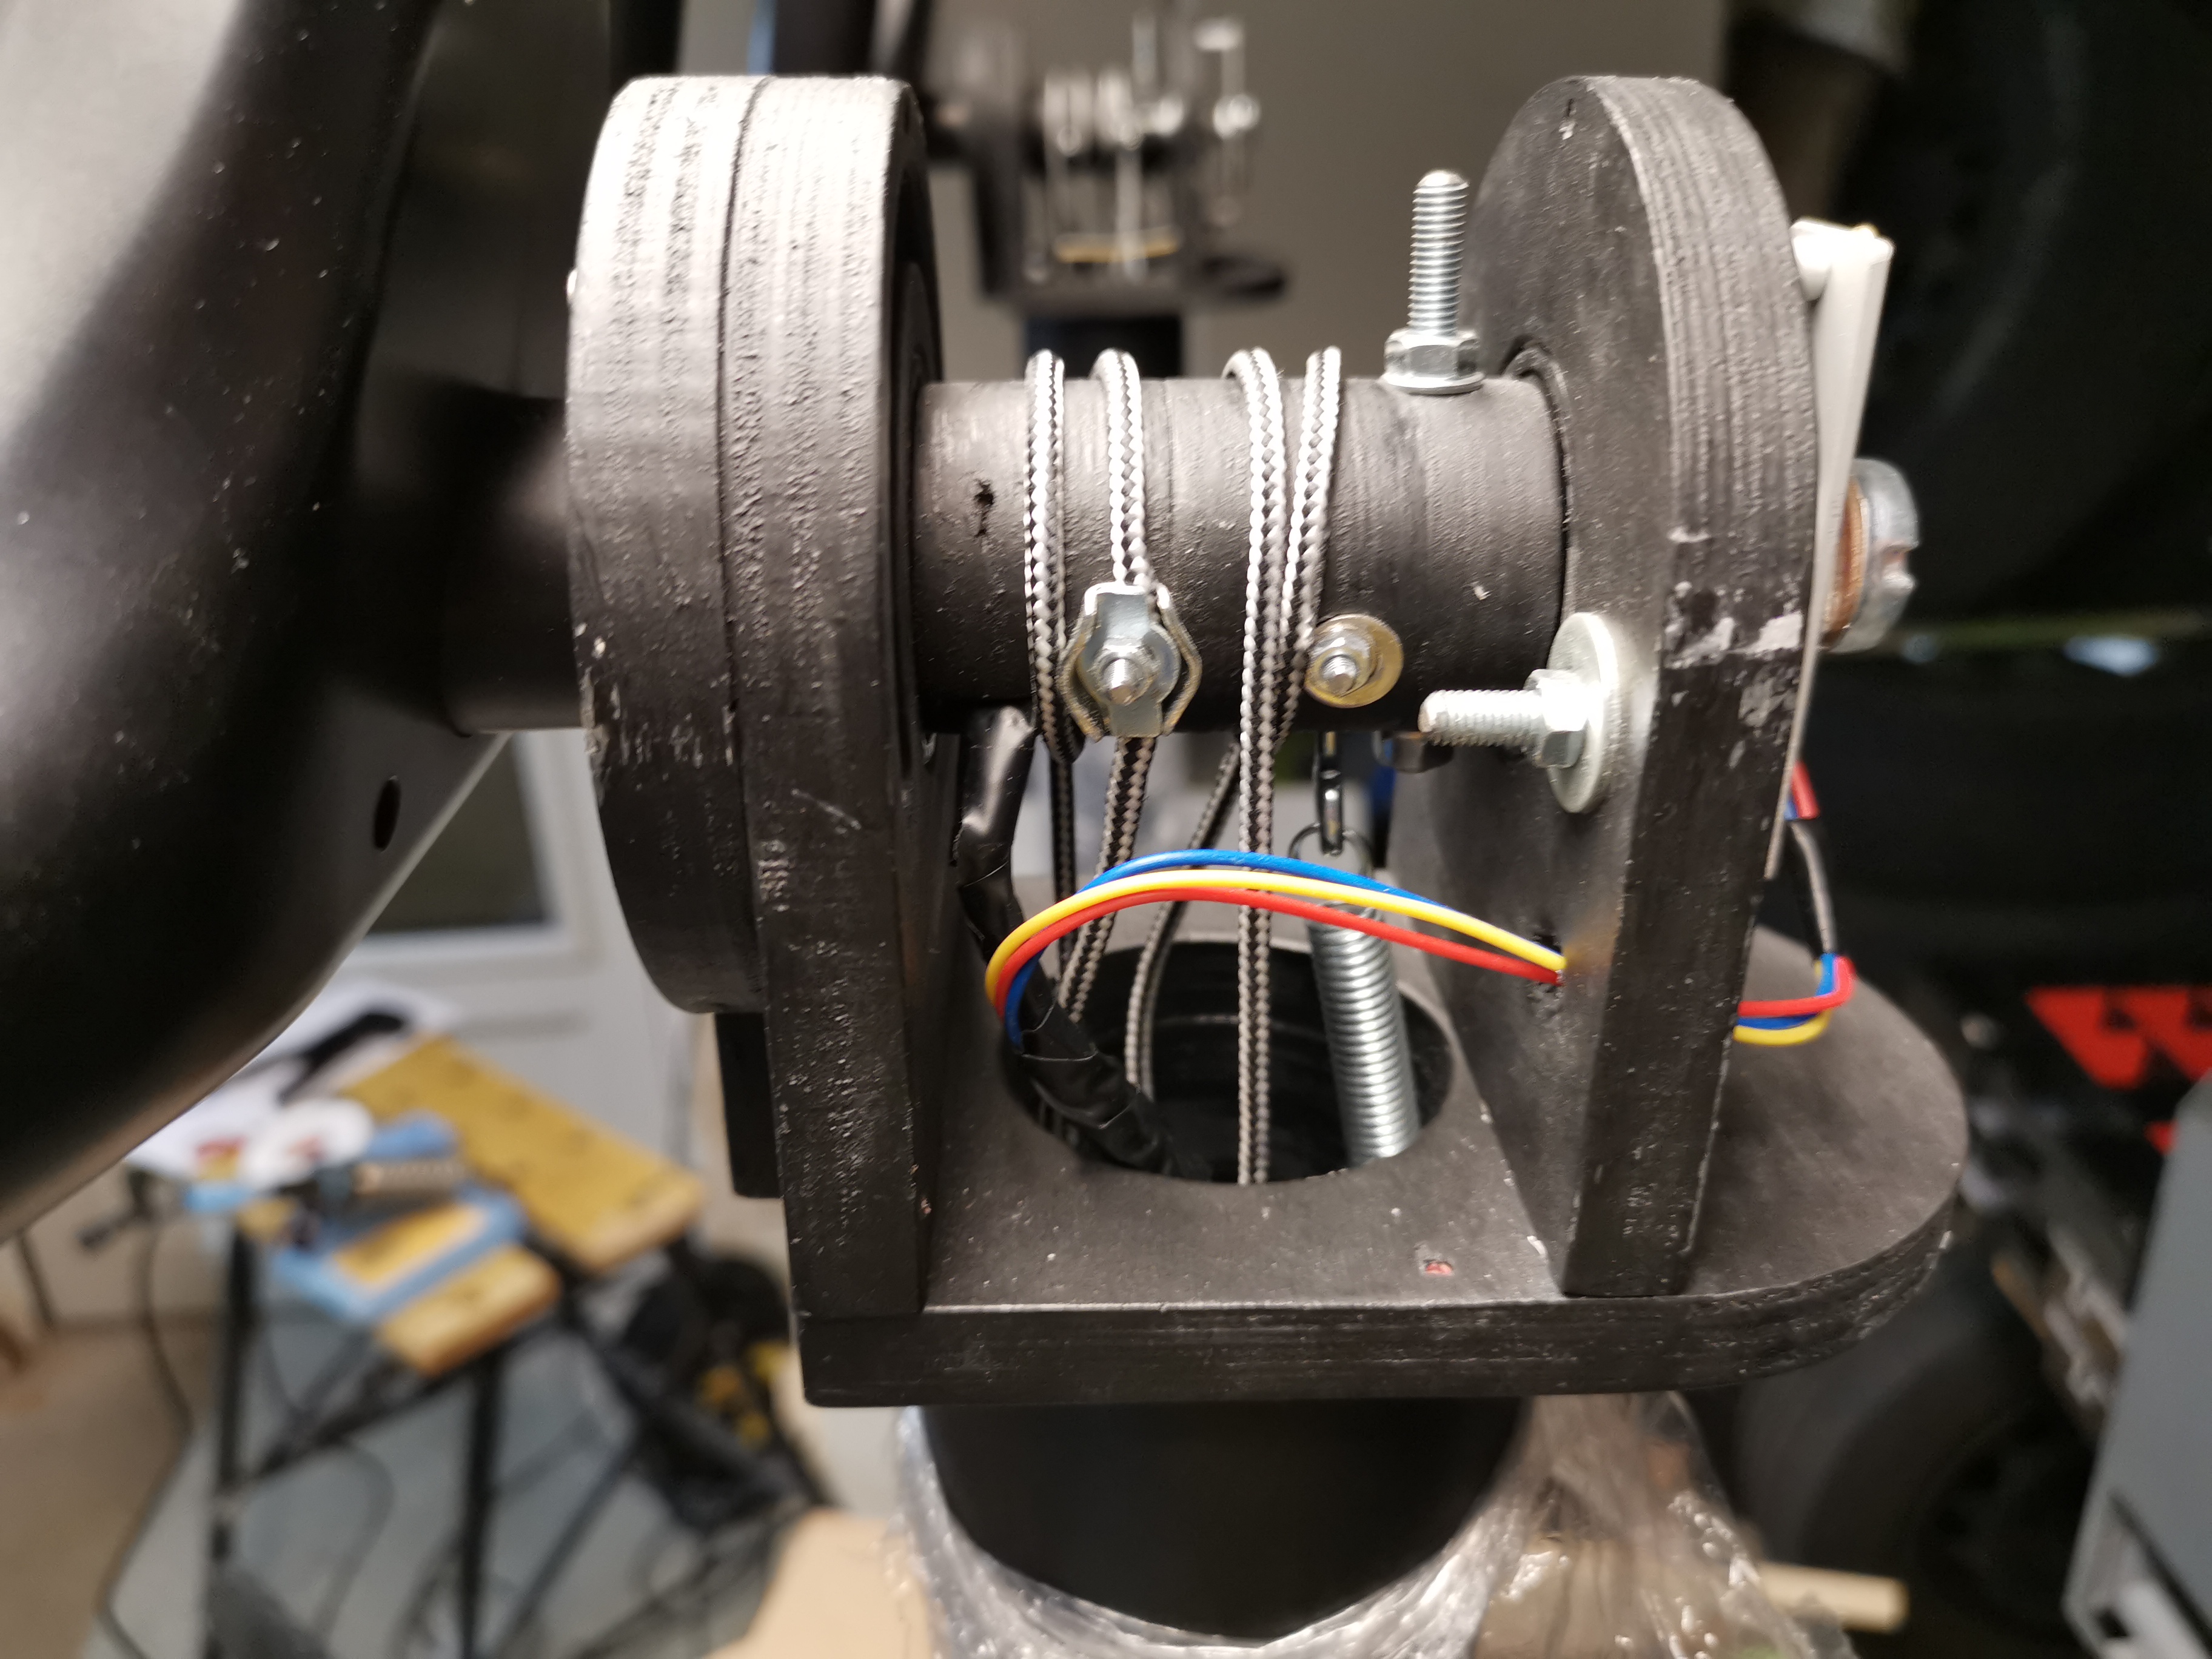
Mobiflight also doesn't support analog POT meters and are not going to.
Recently i discovered the Arduino Leonardo / Micro which is presented in Windows as a Joystick!!
it is cheap and very small.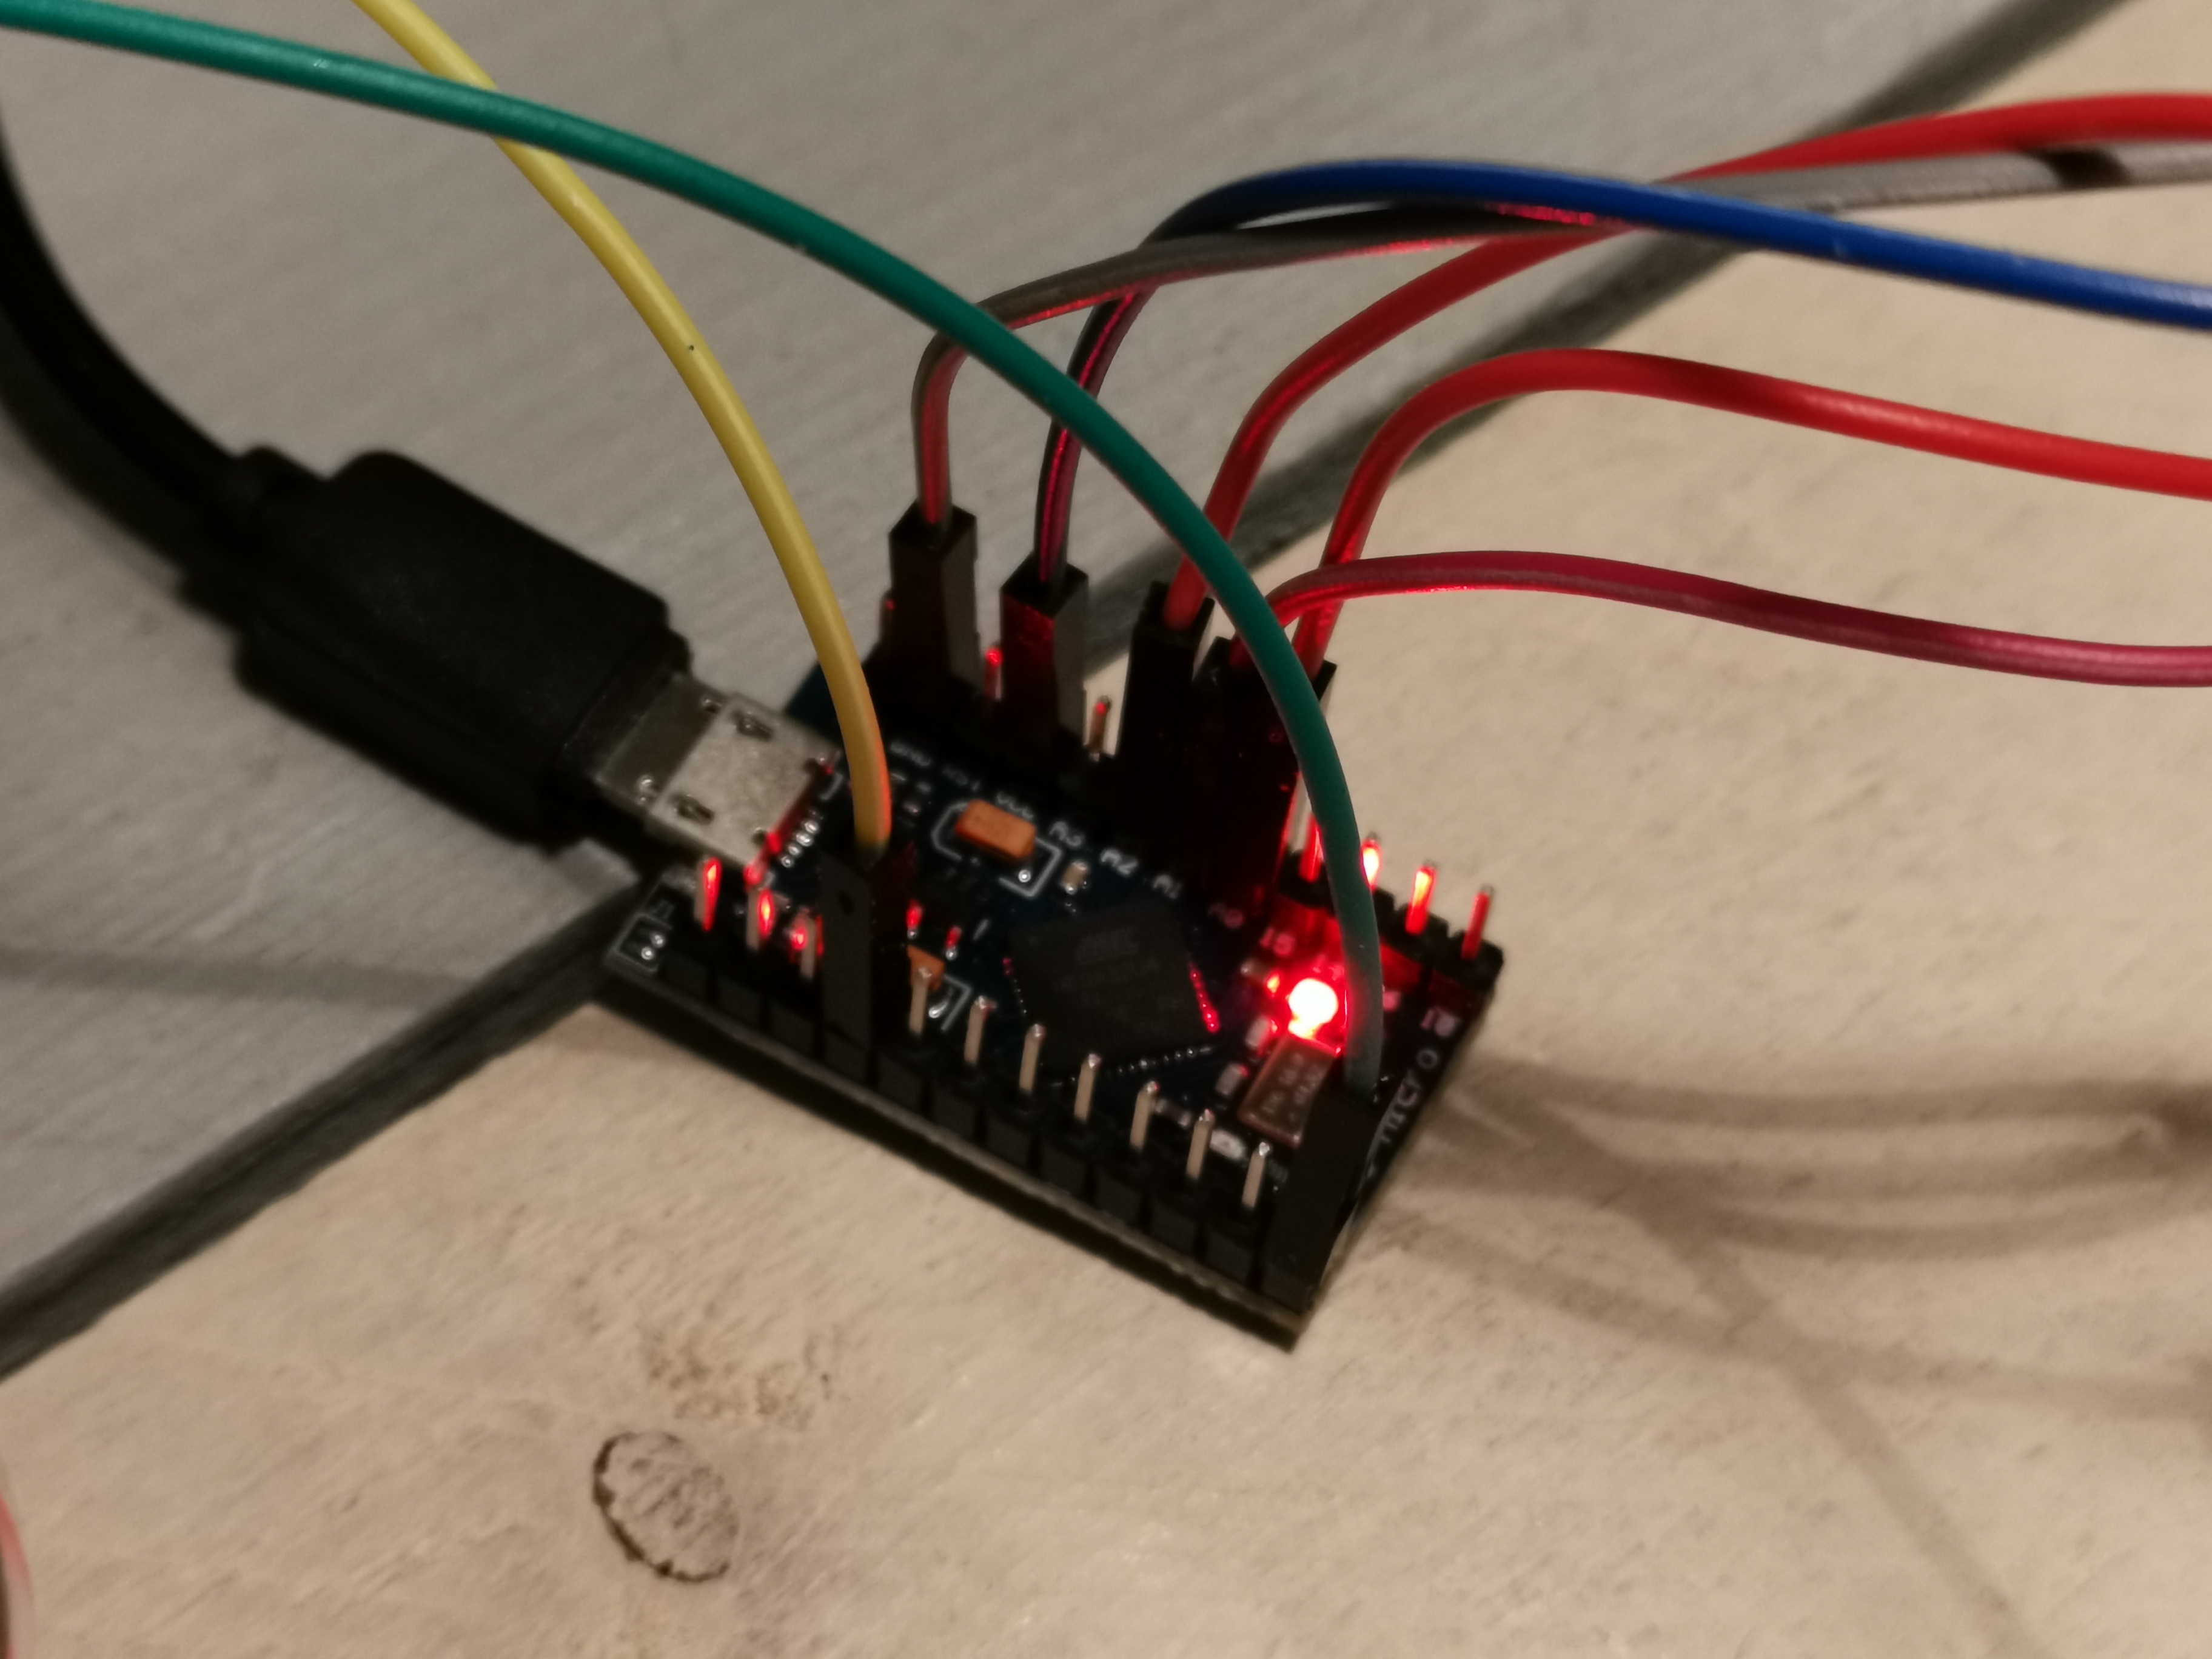
Mobiflight also doesn't support analog POT meters and are not going to.
Recently i discovered the Arduino Leonardo / Micro which is presented in Windows as a Joystick!!
it is cheap and very small.![]()
![]()
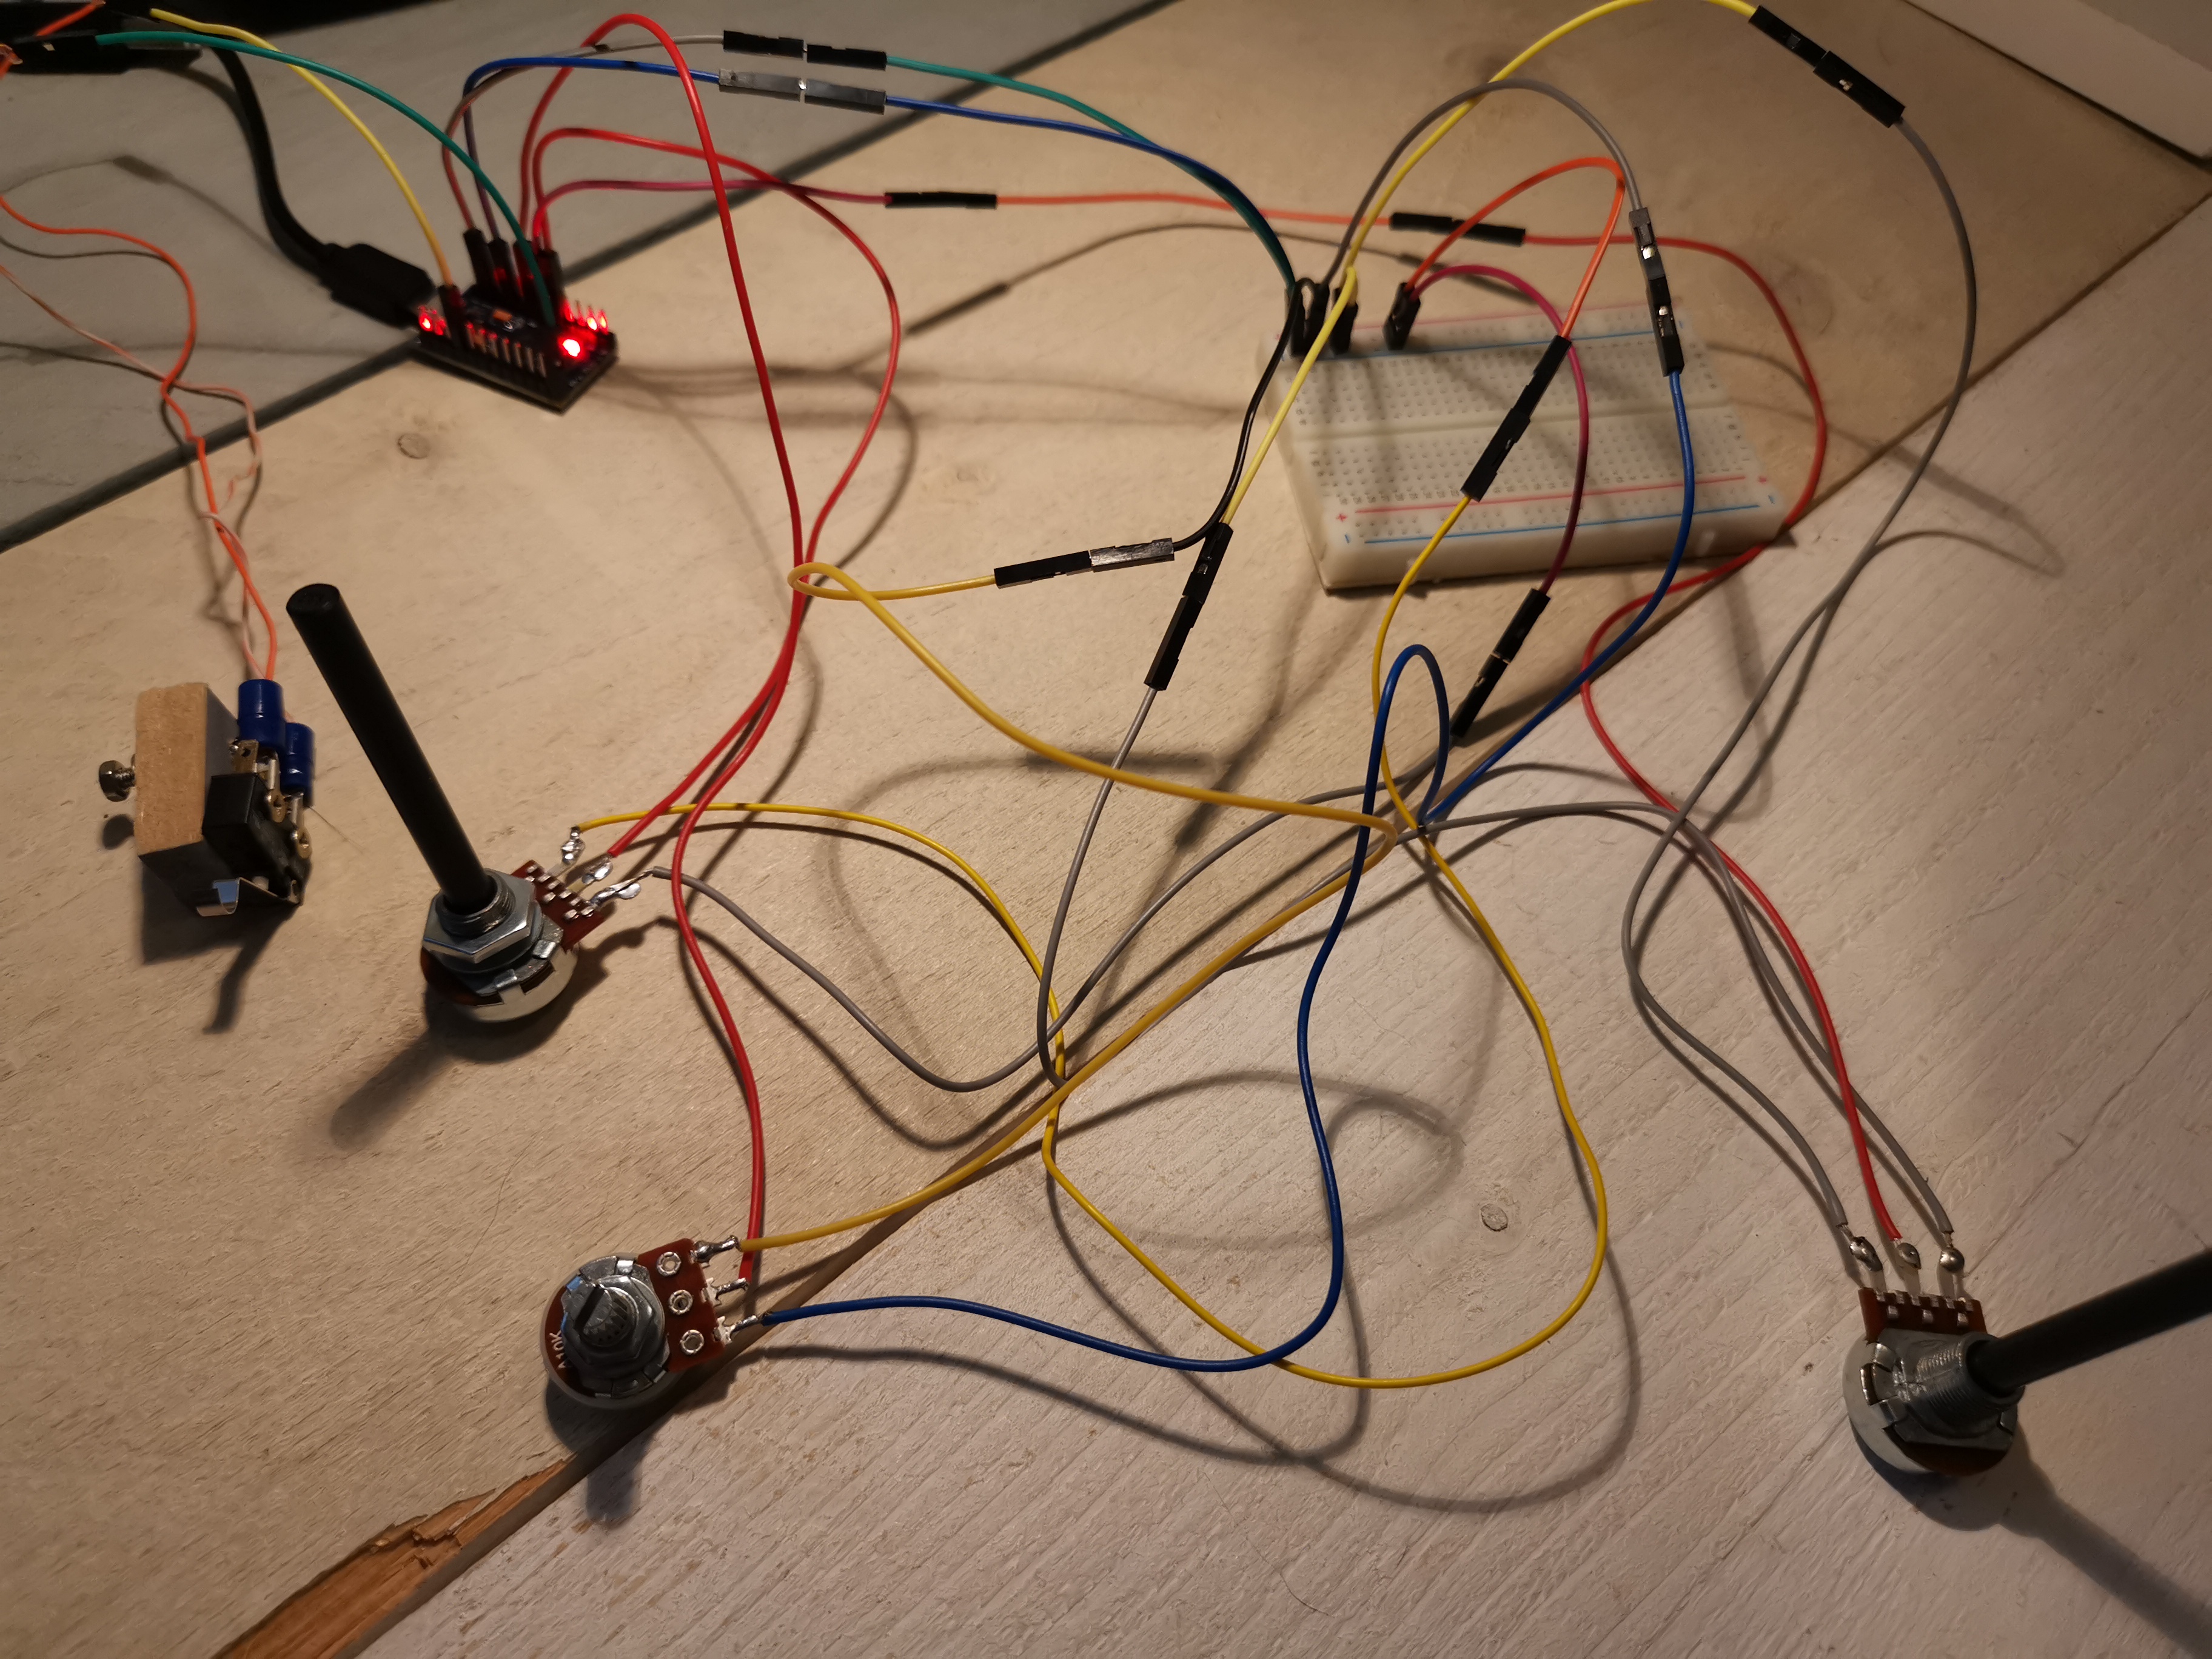
Yes, Arduino is definitly the future!
I am curious about that Jason is building!
It is simple with 3 POT meters connected from pin A0 to A2 and a switche connected to pin 9 of the Arduino Micro.
Pretty easy and straight forward.
Joystick_ Joystick;
unsigned int yAxis = 0;
unsigned int zAxis = 0;
//const bool testAutoState = false;
// Initialize Button Pins
pinMode(9, INPUT_PULLUP);
pinMode(10, INPUT_PULLUP);
pinMode(11, INPUT_PULLUP);
pinMode(12, INPUT_PULLUP);
Joystick.begin();
const int pinToButtonMap = 9;
int lastButtonState[4] = {0,0,0,0};
for (int index = 0; index < 4; index++)
{
int currentButtonState = !digitalRead(index + pinToButtonMap);
if (currentButtonState != lastButtonState[index])
{
Joystick.setButton(index, currentButtonState);
lastButtonState[index] = currentButtonState;
}
}
xAxis = map(xAxis,0,255,-127,127);
yAxis = analogRead(A1)/4;
yAxis = map(yAxis,0,255,-127,127);
zAxis = analogRead(A2)/4;
zAxis = map(zAxis,0,255,-127,127);
Joystick.setYAxis(yAxis);
Joystick.setZAxis(zAxis);
// therefore your computer of all the current
// joystick and button states determined above
// all at once. YOU ONLY NEED TO USE THIS LINE
// IF const bool initAutoSendState = FALSE (the
// code for initAutoSendState is a few lines
// above the "setup" section of code)
}
Yes, Arduino is definitly the future!
I am curious about that Jason is building!
It is simple with 3 POT meters connected from pin A0 to A2 and a switche connected to pin 9 of the Arduino Micro.
Pretty easy and straight forward.
Joystick_ Joystick;
unsigned int yAxis = 0;
unsigned int zAxis = 0;
//const bool testAutoState = false;
// Initialize Button Pins
pinMode(9, INPUT_PULLUP);
pinMode(10, INPUT_PULLUP);
pinMode(11, INPUT_PULLUP);
pinMode(12, INPUT_PULLUP);
Joystick.begin();
const int pinToButtonMap = 9;
int lastButtonState[4] = {0,0,0,0};
for (int index = 0; index < 4; index++)
{
int currentButtonState = !digitalRead(index + pinToButtonMap);
if (currentButtonState != lastButtonState[index])
{
Joystick.setButton(index, currentButtonState);
lastButtonState[index] = currentButtonState;
}
}
xAxis = map(xAxis,0,255,-127,127);
yAxis = analogRead(A1)/4;
yAxis = map(yAxis,0,255,-127,127);
zAxis = analogRead(A2)/4;
zAxis = map(zAxis,0,255,-127,127);
Joystick.setYAxis(yAxis);
Joystick.setZAxis(zAxis);
// therefore your computer of all the current
// joystick and button states determined above
// all at once. YOU ONLY NEED TO USE THIS LINE
// IF const bool initAutoSendState = FALSE (the
// code for initAutoSendState is a few lines
// above the "setup" section of code)
}![]()
![]()
![]()
![]()
![]()
But after some weeks of puzzling I am satisfied.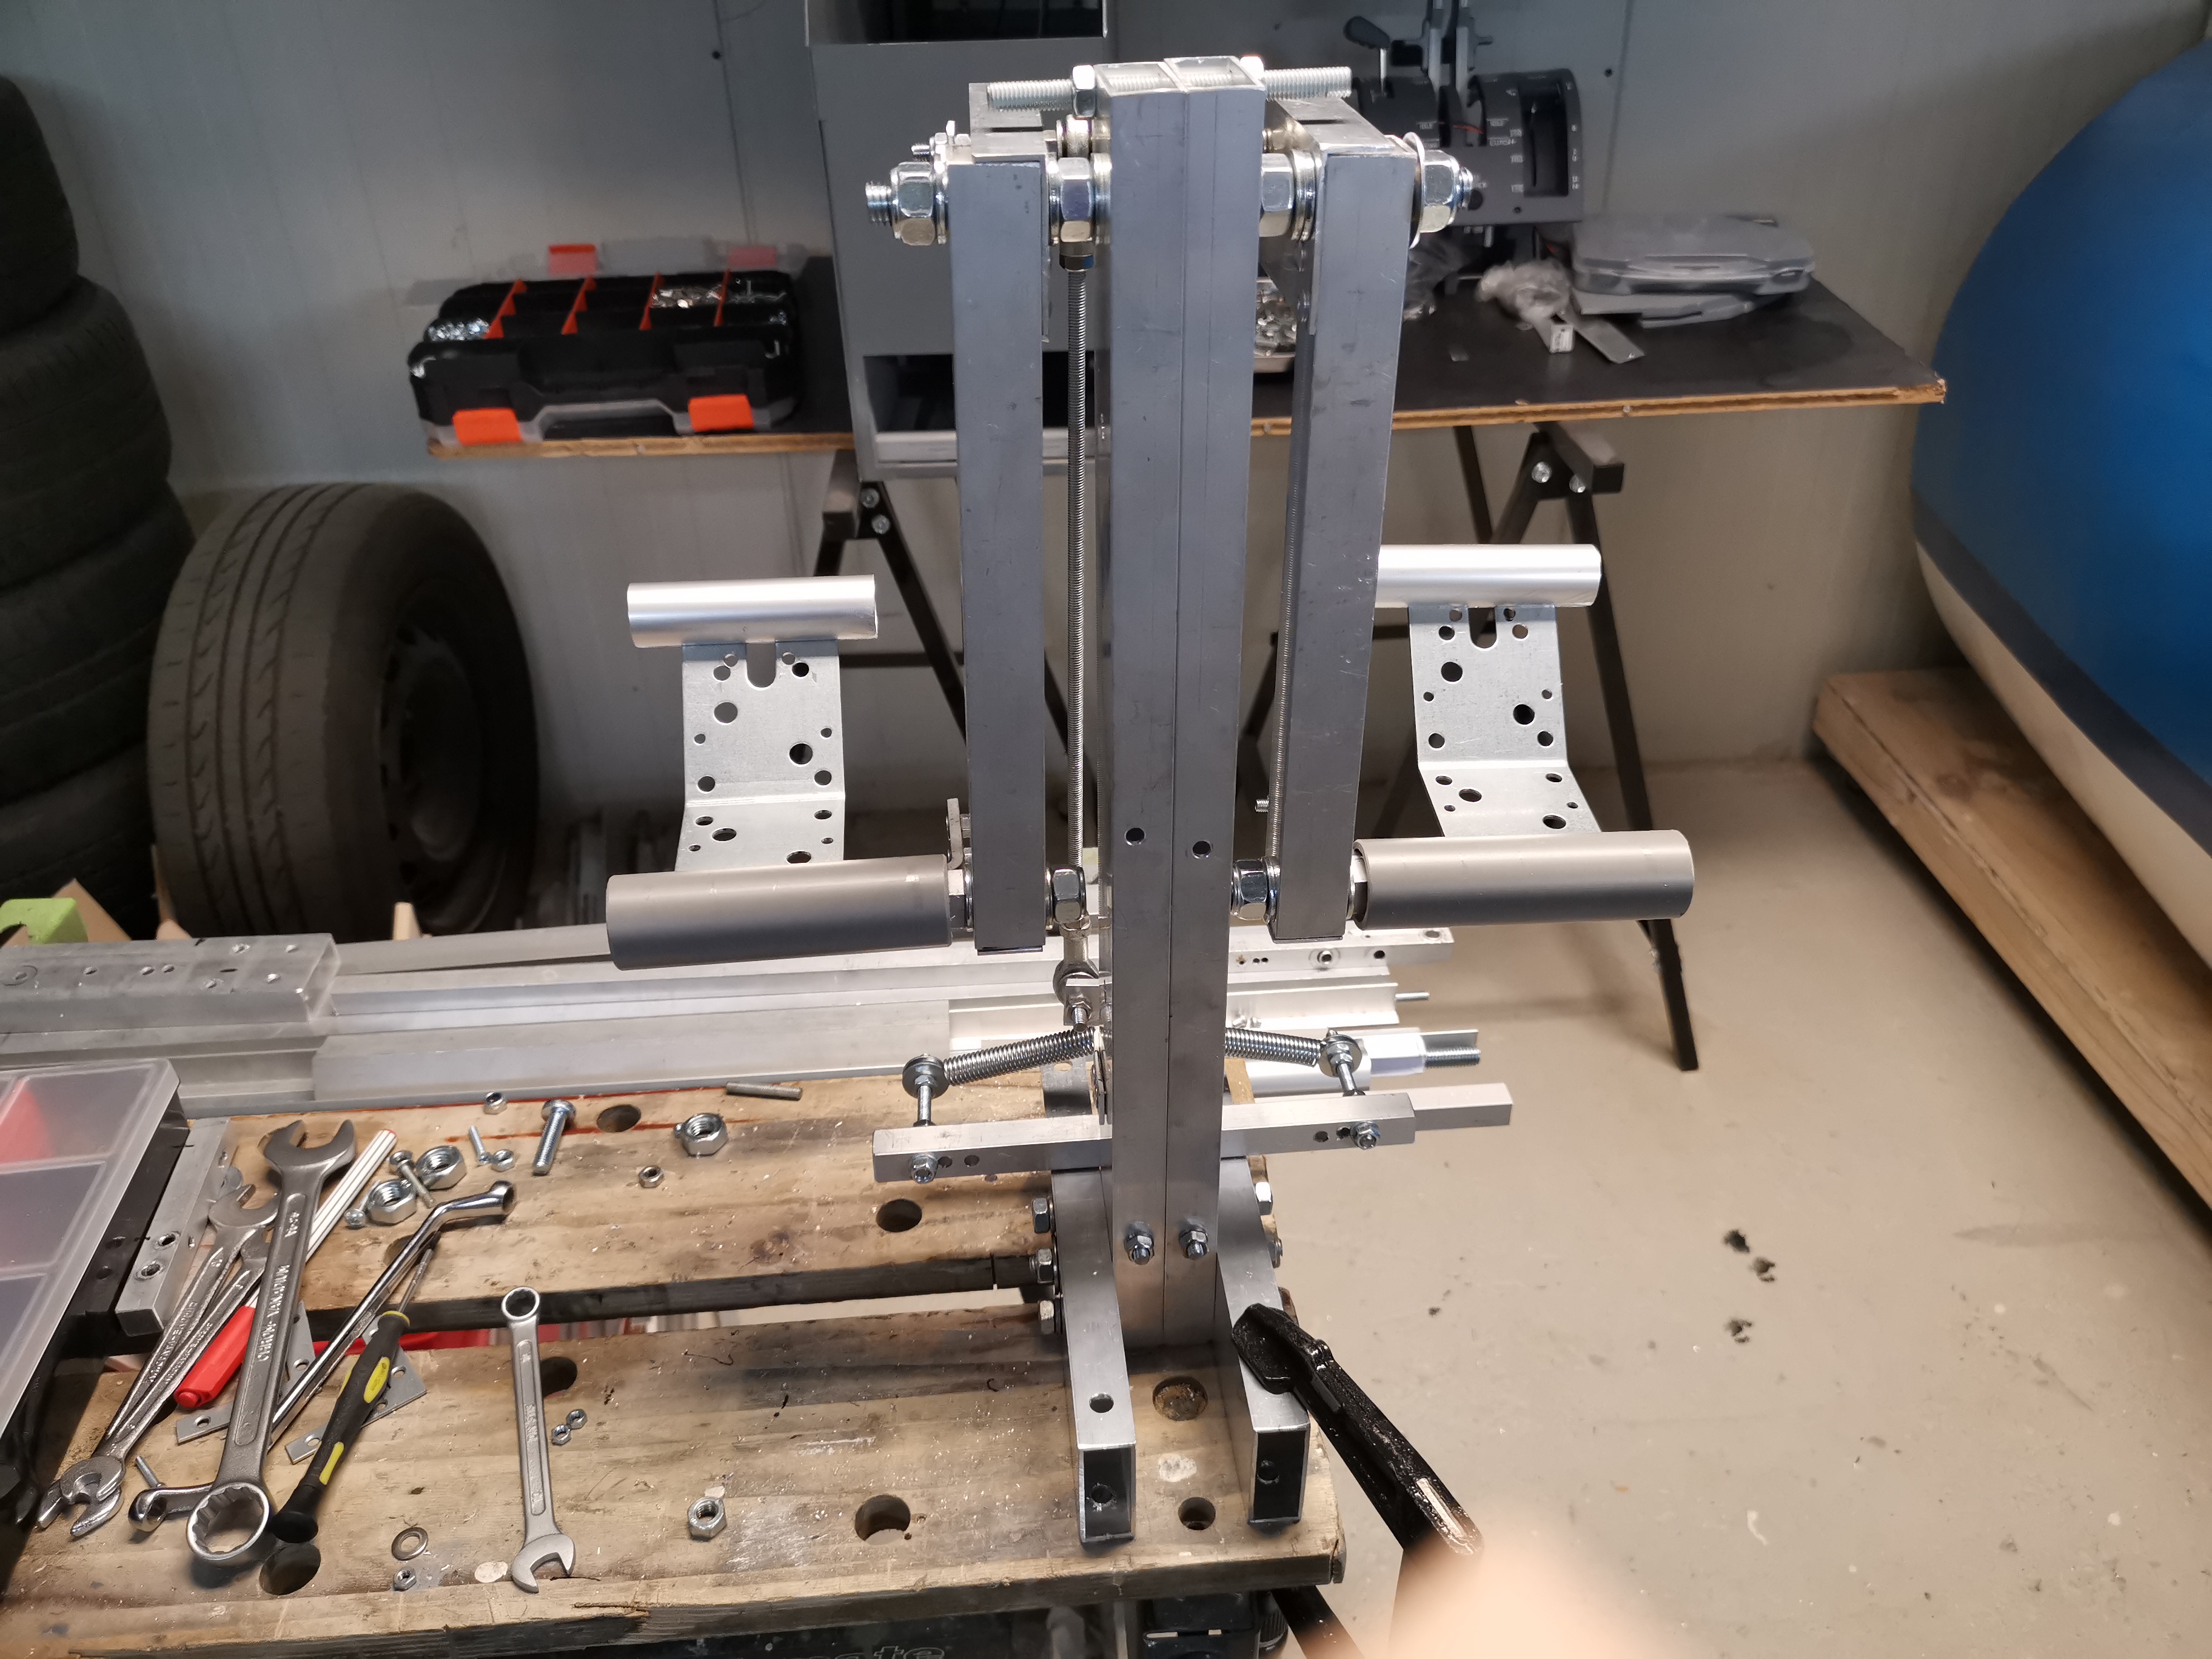
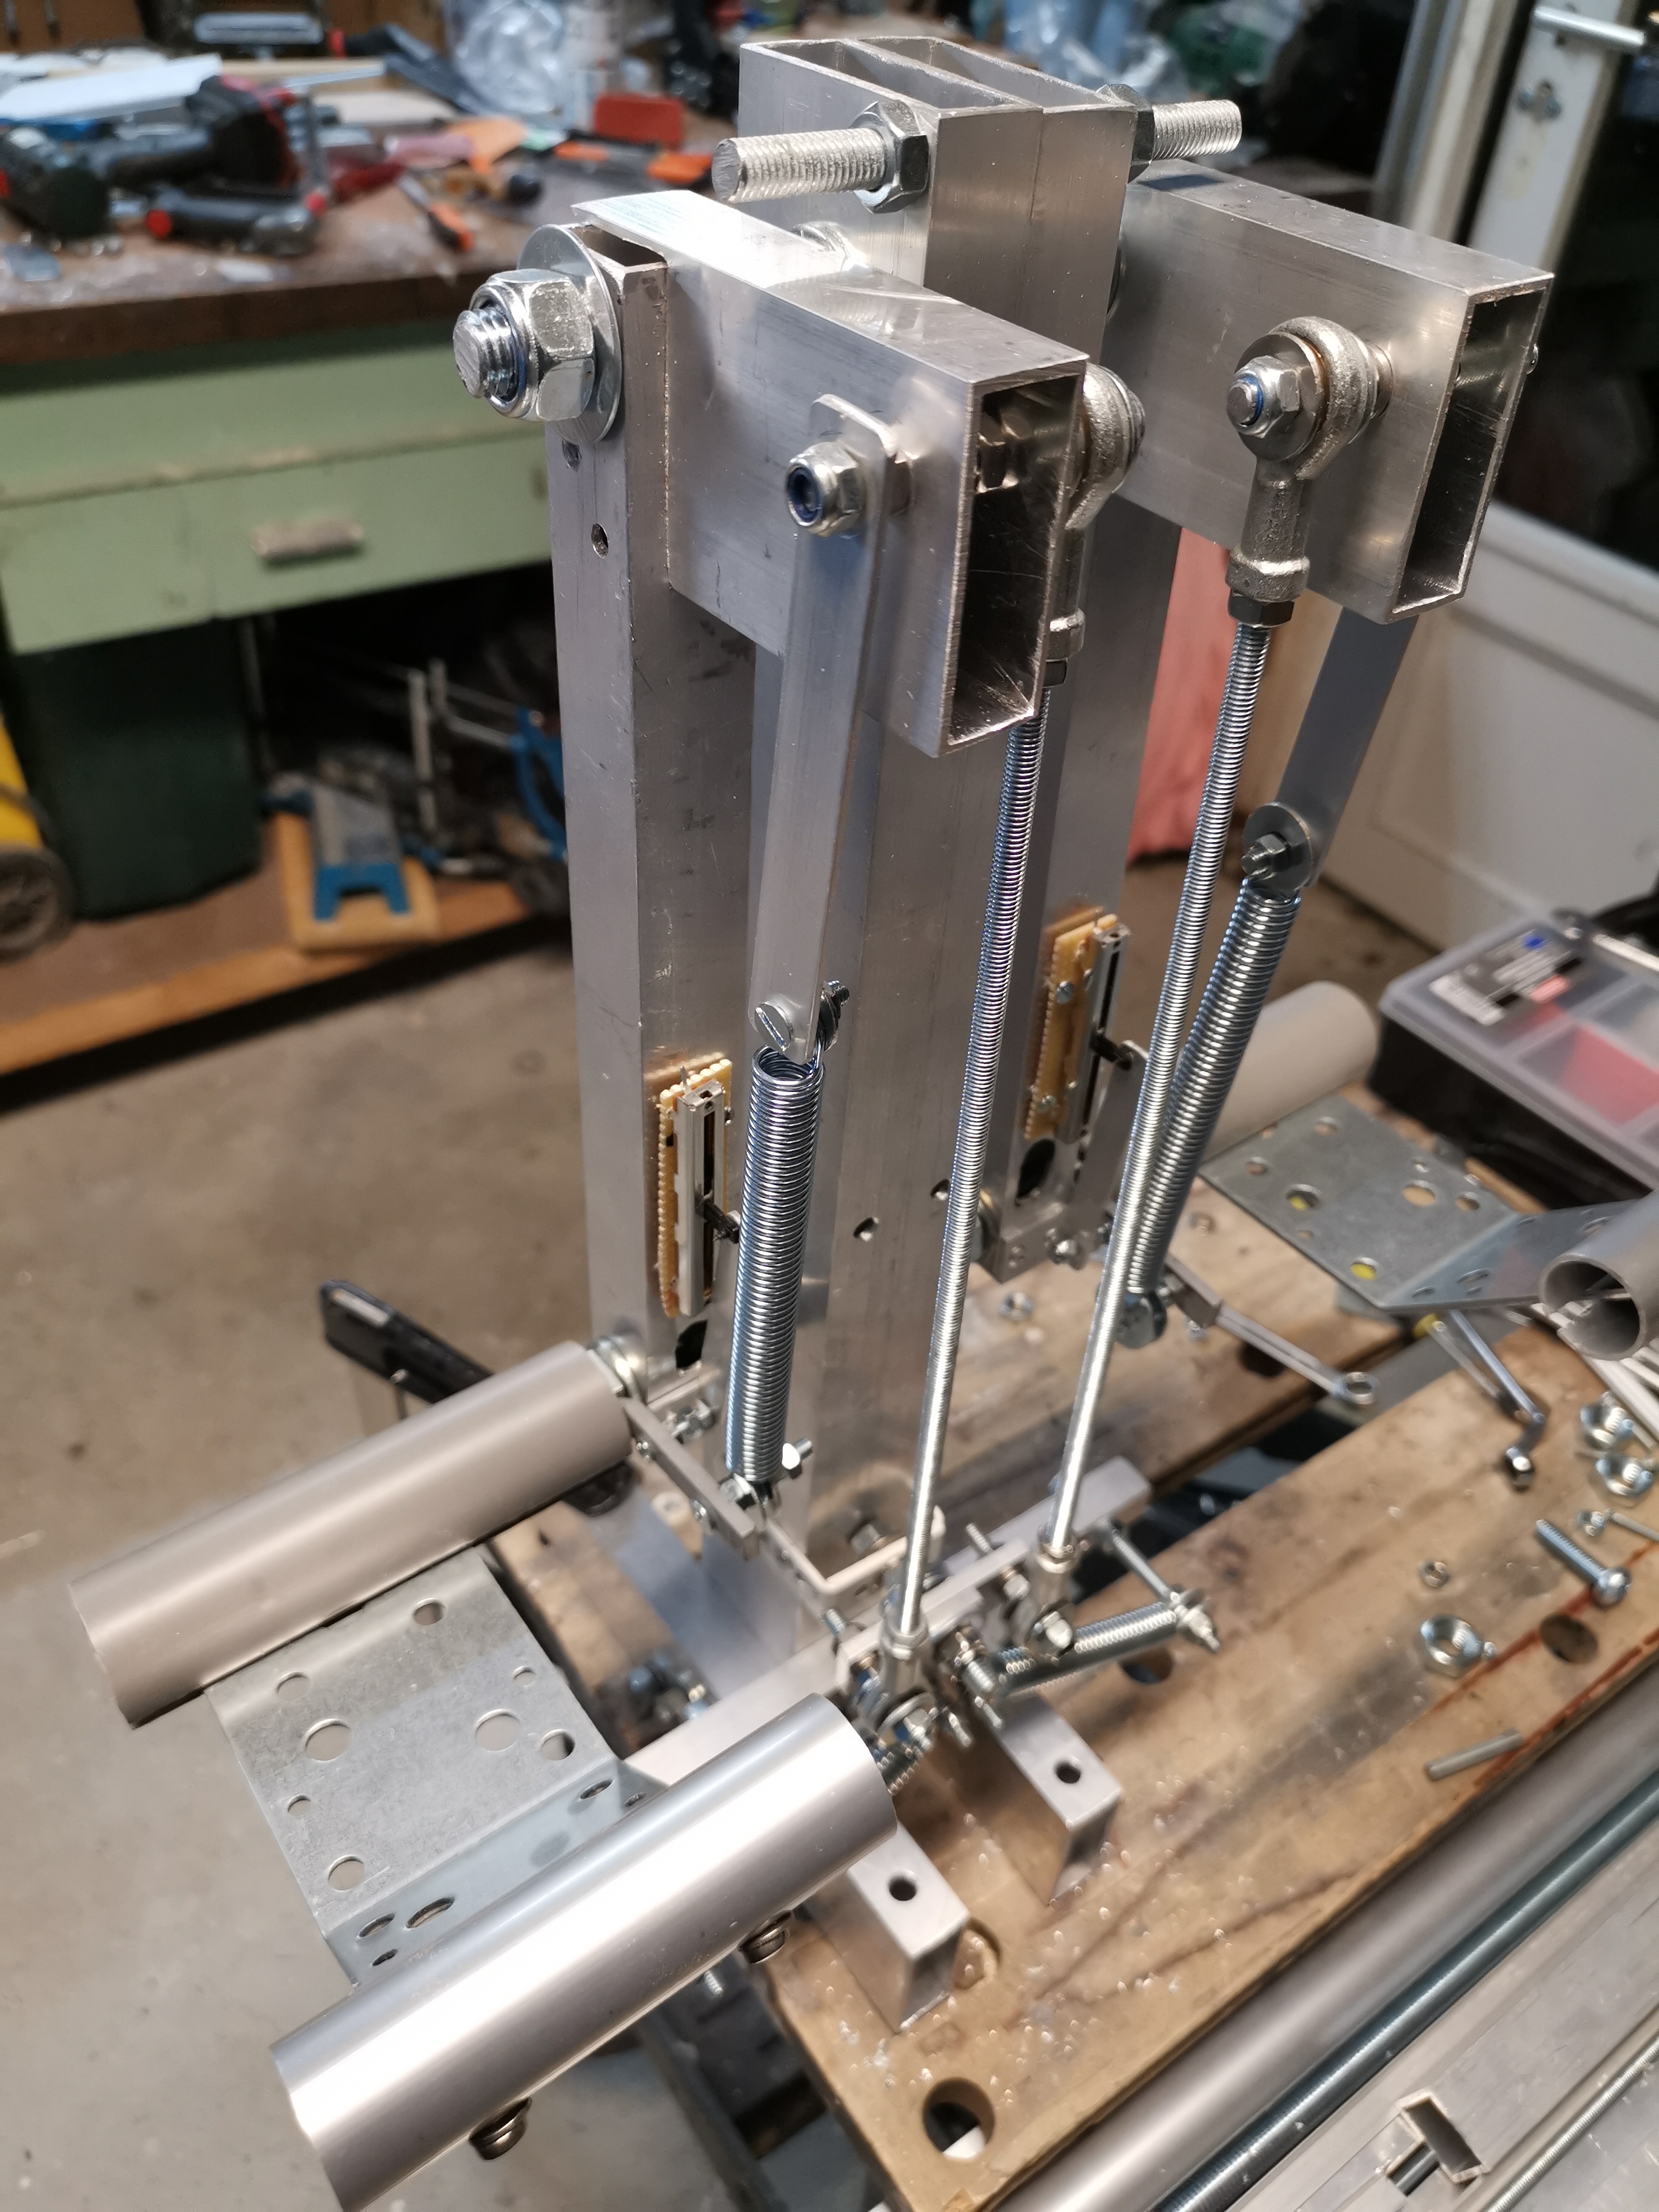
Creating the second one will be much faster since I can copy it from this one.
But after some weeks of puzzling I am satisfied.
Creating the second one will be much faster since I can copy it from this one.
Forum NavigationRoel's Learjet 45 simulator
![]() #71 · December 23, 2019, 9:12 pm
#71 · December 23, 2019, 9:12 pm![]() #72 · January 5, 2020, 10:45 am
#72 · January 5, 2020, 10:45 am![]() #73 · January 20, 2020, 1:32 pm
#73 · January 20, 2020, 1:32 pm![]() #74 · January 21, 2020, 6:55 am
#74 · January 21, 2020, 6:55 am![]() #75 · January 21, 2020, 12:37 pm
#75 · January 21, 2020, 12:37 pm![]() #76 · January 21, 2020, 8:37 pm
#76 · January 21, 2020, 8:37 pm![]() #77 · January 22, 2020, 7:01 am
#77 · January 22, 2020, 7:01 am![]() #78 · January 22, 2020, 11:30 am
#78 · January 22, 2020, 11:30 am![]() #79 · January 22, 2020, 3:16 pm
#79 · January 22, 2020, 3:16 pm![]() #80 · February 29, 2020, 3:32 am
#80 · February 29, 2020, 3:32 am
2017-10-10