


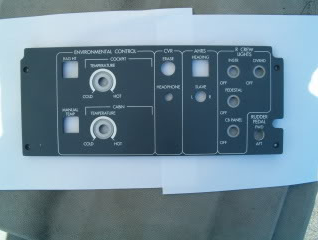
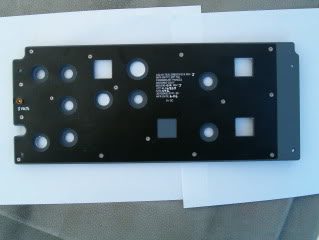
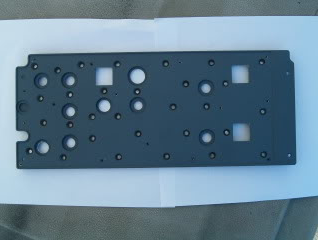
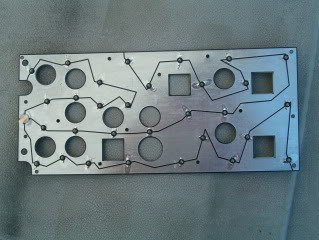
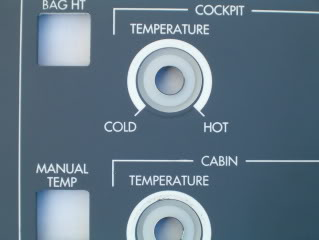
(Original thread started on 03-19-10 by Shane Barnes) Here are some observations I have made about the light plates (front plates) for the Lear. The following photos were taken from a real environmental plate removed from a 2005 Lear45: The "clad board" is .035 inch thick: The photo below is a closeup of the openings for one of the square switches and an opening for a toggle: Note that the top of the square opening is painted white, the other three sides of the opening are grey, also the round opening for a toggle is painted white all the way around the opening. I have noticed this is the same on all of the real panels that I have. The photo below is a closeup of the temperature control's It appears that the panel is a clear material similar to Plexi: It appears that the panel is painted a silver reflective color near the areas where the lights are embedded, then a white coating is applied, followed by the final grey coating. The letters are engraved in the grey coating exposing the white coating. The area beneath the trans illuminated knobs are milled down until the clear Plexi is showing. This photo below is of one of the smaller holes for one of the lights, these are the holes that have the silver paint showing: The sides of the hole have a blue tint to them. I don't know how that color is applied. I can't tell but it may be an insert that is placed in the hole. Maybe this has something to do with the color of the lighting. The panel is .245 to .250 inch thick. At first I thought the lights lined up with the text but the holes for the lights on the back of the panel do not line up with the text. I think that the light is transmitted thru the clear material, and I think the silver coating in the area of the hole for the light is to reflect the light back into the clear material. I really like how the design illuminates the trans illuminated knobs by simply milling off the grey and white paint on the panel allowing the light to emit underneath the knobs thus providing the illumination up thru the knob. I hope this information will help when members start to make the front panels. (Posted by Vince C. on 03-20-10) The "caps" present in the plate are blueish transparent caps with a silver top. Those are both hot spots savers by blocking the light from going directly to the panel and have brighter parts of the text than others. There are also light diffusers/color tuners by making the bulbs light color a bit less yellowish and more red side of the spectrum. I had this research on my own TQ plate back in the past. You won't be able anyway to replicate such a complex panel in any way because of the paint types and the laser methods used to engrave the text. The light diffusion method for the transflective knobs instead is something that I'm already using for the electrical panel and I will as well for the others that will need. This is something applied to all the panels and not only the TQ plate. You can see that also in the lower MIP Panels one side (the top one) of the PB holes are white. This helps flowing of a small part of light toward the button to make easier to find and press them while in the dark. Many vendors have laser engravers but none of them makes Learjet panels, so the advertising in this case is almost useless. Also none of the vendors sell panels made exactly like real ones. Even with laser engravers the technique to remove just microns of paint isn't available in the cheap (sub 30K $) laser machines and for simplification purposes all of them use LEDs instead of wheat of grain bulbs, so they have a quite different way to backlight then the one we are discussing here. I hope you'll understand. (Posted by Vince C. on 03-19-11) My opinions about back lighting methods and final quality results are: 1. The real way: Full transparent acrylic panels, over paint in white and then in final color. Engraving achieved with a YAG Professional laser (a common laser can't help give good results). A very small inlay in the back of the panel to allow a clad board to be placed in the back. Incandescent grain of Wheat bulbs used to for full diffused lighting. Final Quality: PROs: EXCELLENT. Best diffusion, more like real light color. CONS: High power drain and more difficult panel dimming solutions. 2. A Hybrid solution: White acrylic panels, over paint in color. Engraving achieved with a common laser engraver or CNC bit. A full inlay in the back of the panel (all the portion that has engravings on top). Backlighting with LEDs or Grain of wheat bulbs placed directly on the back of the panel or over a clad board. Final Quality: PROS: VERY GOOD. CONS: Light can be not be as much diffused as the first solution. Needs more CNC work to inlay the back. Color of the light often depends on acrylic white type and shade. 3. A Custom solution: White acrylic panels, over paint in color. Engraving achieved with a common laser engraver or CNC bit. A full inlay in the back of the panel (all the portion that has engravings on top). An extra backer 8 to 10mm thick fully inlayed to create a light chamber with the front panel. Parts are then joined together like a sandwich. Backlighting with LEDs placed on a light strip on a side of the internal part of the backer. Final Quality: PROS: VERY GOOD TO EXCELLENT. Light diffusion is excellent since the light is diffused not perpendicular but parallel to the front of the panel. It doesn't need any particular attention in placing led. Really few LEDs are needed (4 to 6 for a common DIN size panel). CONS: Needs quite more work to be done to fully inlay the front and make the needed backer. Light color depends on acrylic type and shade. After having tried all the possible solutions but the real way (I did also try different methods that weren't good at all so I discarded in this list) I chose to go with the last solution for many of my panels. But any of those will give good results and a nice effect. (Posted by Mark L. on 03-19-11) Vince posted, before I finished typing this, but as you have read with more detail of his process. I did as well for my EFIS and FGC (not finished) and was thinking of doing the same for the lower panels. Using heavier single side copper clad, the switches would mount on those and the panel would be milled where the copper clad would sit flush on the back end of the panel. The appropriate areas would be milled to simulate a backer exists and as Kris stated, using like 3/8" plastic, you could mill to a full .25" thick panel or a little thicker if desired, either way, giving additional room for everything and no alignment issues of the backer and main panel. Kris, as long as you don't reset your 'Home' position when milling, tool changes are nothing. For a particular part if I have 3 tool changes, say .25", .0787 and .0394 bits, I will have 3 separate G-code files, 1 for each bit. When the first job is done, change the tool, load the appropriate G-code file for that part and process and continue on. IMPORTANT! If your bits don't have the plastic ring gauge like Precise bits do, you have to re-zero your bit to the material!! (only the "Z" axis) Where it gets tricky is if you have to flip the part over and mill where it has to line up with the previous side! That's where I figure out where I can place registration holes outside of the part preferably, but sometimes within the part using a area that can and will be milled out larger than the registration hole. These holes are drilled thru the material into the sacrificial board using the CNC during the initial cutting on the first side. Sometimes because of depth, I may use my regular cordless drill to finish the hole into the CNC bed. I then use some steel .125 pins (careful not to accidentally leave in the material after flipping and clamping where your router/bit will hit it!) to allow me to flip the material over and using the registration pins, I'm usually within a few thousandths of exactly where I need to be to mill the back side. Just note, the these holes need to be planned so that when you flip, the alignment will happen. Another trick without pins, is to create registration holes in the material anywhere that is allowable, then flipping your work and then with the inverse G-code file of those registration holes loaded, positioning your bit to those locations manually or maybe a combination of moving the material and the x,y of the router to align with the holes. Then when satisfied, and the bit sitting at one of the holes in the material for this G-code, enter the x, y position noted in you cam file in Mach3 hitting enter after entering each. You should now be able to click home and go to 0,0. Retest by running your registration code to see if it moves to each registration hole exactly. If not realign and repeat the process, also it's advisable to 1, have a separate G-code file for this alignment process for this part. 2, Set your z axis zero position high enough where it won't actually go into the material. Bad things can happen if your alignment is off. This gives you the opportunity to manually stop the job in Mach3 and manually jog to the hole to check alignment. This process is way more involved than I like, so I use my pinning method, quick and easy. You just have create the opposite side file (or at least I do) by copying the first mill side file (cad/cam) to a new file and flipping the contents horizontally or vertically, your call, depends on your preference or the job itself. This gives me a reference via layers that I can hide to use while using CAD and CAM on the backside of the part. The other way is to simply make sure that in the flip side file that you reference that 0,0 home position correctly. Because you are not resetting the home position on the CNC, you are simply flipping the material over, so when you load the G-code to start cutting the flip side, 0,0 of the part better be the same location of where your CNC is sitting at it's 'Home' position, otherwise, you will have a part ready for the trash when it's done. (Posted by Eric Tomlin on 04-13-11) Ron and I have been working to determine the best all-around panel lighting method for COLOR. Personally, I love the real internal lighting color. Not only do I like it because it's prototypical, but because it's pleasing to the eye. It's been a challenge but has been made much easier due to having access to the real panels over the past few weeks. However, there's an understanding that most here have never and will never set foot on board a real LJ45 and you may not care what the color of the internal panel lighting is. I can tell you that the internal lighting of the panels is nothing like what most have seen in aircraft. It's very hard to describe but I can tell you that it's no where near as "orange" as a Boeing panel, but it's not cool white either- at least not an LED style cool white, which is what I will from here on out refer to as "Cold White". Again though, compared to Boeing incandescent, it's definitely "cool" in nature. It's somewhere in between, and if you can imagine, a cream color with a tad of coral pink and dirty blue-gray, then you may imagine it half-way close. But, trust me, it's a beautiful color of lighting. Several folks here are on the waiting list for some of my products. It's my goal to provide the best made part at the most realistic appearance but that design goal can sometimes be problematic when working to prevent a clash with another source, in this case- Ron's products. As we work through our own design goals and share info to try to minimize the difference between the two, I can safely say that we both appreciate folks understanding that we both want to bring the best product regardless of the outcome of where we land in the color spectrum for internal lighting. (Posted by Will Sasse on 04-13-11) As an active real pilot doing shifts at night, spending many hours staring at instruments panels lit in various ways (including LCD panels), what I feel is more important is that the whiter the light, the more tiresome it gets, the harder on the eyes it feels. I find I have to reduce the brightness of screens to at least 30% to make it comfortable at night - but then I like a darker cockpit so I can see more outside. Also, there is a big difference in the external light from the night sky, compared to our projectors / LCD panels. This too affects the perceived 'color' and brightness of the panel lighting. As this is a sim, not something I plan on eight hour legs in, perhaps this is less important. It does need to be something easy on the eyes. The idea of "a cream color with a tad of coral pink and dirty blue-gray" sounds lovely, but I wouldn't bust a gut trying to find it. (Posted by Mark L. on 04-13-11) I've been using the LED's first introduced to me by Vince which are basically a warm white and used in his RMU's. It's easier on the eyes for me compared to cool or cold white in my comparisons. The downside, is I haven't located a source in the USA for what I get from Vince as we don't know who makes them. The last few I've ordered and tried are way towards the cold white. (Posted by Shane Barnes on 04-13-11) I can tell you that the real Lear45 panels are not that bright. In fact, with the lights on in the room, it is hard to tell if the panels are lit up at all. I would say Will has hit it right on the head with the comment about the whiter the light the more tiresome it is. Also makes sense that the brighter the light the more it would affect your night vision. Thanks for that input from a real world observation Will. (Posted by Ron Rollo on 04-13-11) As I have always said, "Nothing is easy with this project!" Grab a couple LEDs and a power pack and light them up! NOT..... I agree and understand everyone's points posted so far but here is the thing that I worry about. I don't want to see several different panel makers with an equal amount of different lighting colors and qualities. I think if there was an easy solution to perfect lighting, we would all want to have it in our sims and we would be implementing it by now! The reality is more than likely each of us will have a few panels from three or even more panel makers. I'm afraid that if Eric comes out with the perfect lighting match, it will be a great achievement, however, we would end up with mismatched lighting with the other panels. My personal goal would be to keep the lighting issue as simple and uniform as possible. I would suggest that we agree on either the warm lighting that we all have available to us. The other alternative would be up to Eric but it would involve passing on the techniques as to how he arrived at the perfect lighting color once he achieves it. I for one am ready to settle on a solution and move forward! (Posted by Will Sasse on 04-14-11) Re-read my post, noticed I forgot to say how I voted and why.... Go with 'Warm White' for the following reasons: - Easy to source, ie: easy to replace by users when needed - After 5 minutes flying, you wont realize they're not quite kosher - They do the same job just as well. Ron and Eric, those of you making these extremely tempting panels, the ease of maintenance by your purchasers should be a consideration... ergo: warm white! For what its worth, that's the nuts & bolts of my choice, and will be the way I go. (Posted by Shane Barnes on 04-14-11) Will has a very good point, ease of maintenance and also to consider sourcing these parts to service the panels at a later date. You know at some point whatever lighting choice is decided on we will have parts to fail so it would be nice to have a part that we can count on being available in the future. (Posted by Alaxus on 04-15-11) I have been spending a bit of time in the Avionics shop at work and what I have noticed is that each component manufacturer uses a different method to light up there panels. I have even noticed that some panels have changed over from incandescent to LED due to a mod. So there are differing colors between the panels. I have been told that there is 3 different light settings in the 737 and when on that lowest, you would only just see the light on the darkest of nights. In any case, red is the best for night vision and blue to white is the worst. I have talked to people with blue lights in their dashes of their cars, they say there eyes get sore real quick. (Posted by Ron Rollo on 04-15-11) I agree Jeff, I can say for sure we want to stay away from blue white. Red for that matter too unless we were building a custom sim NOT prototypical to the Lear45. ATM, it is a matter of finding an LED source that delivers on what they advertise. We have tested what is called a warm white light, but it has a touch of green in it. The funny thing is like what Will said, after a few minutes, you don't even notice it any longer. And that's true! After it is lit up and in my face for a few minutes, I find myself looking at it and asking, "What's wrong with this color?" I have to do a few more mods to the way the lighting all fits into the panel, but later today, I will try to share some photos with you guys so that you can see what I am talking about. Although we can not always judge LED light colors from photos, it is an attempt. WANTED! Looking for a 3 volt, 3mm bright (9,000 MCD or greater) warm white flat top LED with a viewing angle of at least 120 degrees. At a decent price. You would think that's not asking much. (Posted by Vince C. on 04-15-11) White light spectrum is really wide. What manufacturers define as "Warm White" is a wide range that goes from 2000K to 4500K. Lower range has deeper brown/yellow tint while upper range has more neutral/greenish tint. What we should look for to match the real panels? My answer is that anything from 3000 to 4500K is close enough to give a nice effect. What exactly match an incandescent light is 3200K. Please remember that due to the way Both Eric and Ron make their panels a colored transparent printed sheet can be used in sandwich to correct the tint and have it closer to the real one. Based on a few tests I did in the past a 25-30% brown light filter can give excellent white to slight red tint to the front panel. Try printing various tints in squares on a transparent sheet and overlap on top of a LED to find what you like best. An easy fix to mismatched backlit panels! About the LED types, obviously the choice mostly depends on the usage. I chose to only use SMD Led for my project, those can be both used on custom made light strips, a dedicated light copper clad (like a real panel) or soldered over the main components PCB (like my RMU have). The SMD LEDs I have are only 1400-1600 MCD but give really wide and uniform light and a quite neutral tint. Unfortunately I don't have a manufacturer/PN from them since I'm buying those parts from a local store. What I paid is 25c of Euro each. Ron, Mark and Eric have had them in their hands to test. (Posted by Mark L. on 04-17-11) Really here nor there, but for me I prefer the non heat generating LED's over bulbs that will burn out. For me, I'll sacrifice a little realism here and I'm quite content of the look I get on my TQ with the LED's I got from Vince. Just my 2cents worth. (Posted by Ron Rollo on 04-17-11) Mark, a part of me is with you. I have produced 6 sets of 12 volt lighting, and then completed 10 sets of the 5 volt warm lighting only to find that the color was off. I want this to be resolved 6 weeks ago but I am personally still not happy. But getting close! For the record, I too like the LEDs, that has been my plan for years! Maybe we would all be using the SMDs that Vince is using if we had a supply available to us. In fact, I wish that was the case because we all would have followed that lead and this would all be a none issue at this point. But from what I have heard from Eric, there is no SMD that gives off a warm light available to us here in the U.S. And after what I have just been through with the so called Warm light 3mm LED, I am at that point that I will try anything as long as the color is at least in the same family. As for the heat and life concerns: I just ran an experiment for the past eight hours running the incandescent prototype REV panel at full power (5 volts) to see if there would be any obvious failures. Everything passed! The paint and plastic did not melt. As a matter of fact, they got warm, almost hot but not hot enough that I could not touch them. With that said, only time will tell if the plastic will turn brittle and or turn yellow. As for the life of the bulbs, until Eric and I can agree on the perfect bulb, the life of the bulb is up in the air. From the research I have done, I have found that the life range of the various bulbs is from 30 hours up to 50,000. The average is between 15,000 and 25,000 hours. If we can find one in this range, we should be more than fine. (Posted by Vince C. on 04-17-11) What I don't like about the incandescent bulbs is that they produce heat, can burn out easily and need a lot of power. Using them for just a small panel like the REV isn't a problem (PWM dimming it too), but imagine what would happen when you need to source and control at least 2K of them. With a 60mA typical for a 5V bulb this means 120A of current. Let's remember this is a simulator and not a real airplane. If you want a simple comparison let's consider my own RMUs/DUs set. They drain in total less then 500mA at full power with 12V. A 2A 10 Euros 12V power supply (like the one you might use to power your internet router) can then source not only all of them but also the whole glareshield at once. Doing the same with bulbs means you'll have to put them in parallel and only the RMUs/DUs will drain about 4A at 5V, together with the whole glareshield about 10A. Then a dedicated switching power supply will be needed just for them and this wouldn't be a problem but then finding a PWM dimmer for 10A wouldn't be as much easy and cheap. (Posted by Ron Rollo on 04-18-11) I think it is important to try to keep this lighting issue as simple as possible but at the same time strive to achieve a higher lever of realism. At this point, I am not looking for perfection, just something that looks close. (Posted by Eric Tomlin on 04-18-11) Good info there Vince. One thing I really want to point out to those hesitant about incandescent- If these things were so bad, they would never have made it into the panels of 1000's of real aircraft, using the same current, etc. FDS wouldn't sell their panels with the same exact specs and the panels that I have on-hand would be ruined by heat. None of this danger of heat and current is an issue [b]*when the proper specs*[/b] are followed. The real bulbs in the real LJ45 panels are 5v .06 amp @ .15 MSCP. The panel gets warm, sure, but no paint is melted and neither is there any damage on the inside. It's been examined up and down for three weeks now, there's no issue at all with this. The LEDs being ran are 5v LEDs. They are using the same voltage as the traditional bulbs, but put out less heat yes, but the resistors are usually pretty hot. So is the bottom of the LEDs too, so while they put out less heat on top, there's still heat somewhere because as you know, it has to go somewhere. Now, if you use an incandescent bulb that draws much more current and a decent light output, then you would have some thermal issues. However, that's why you choose a component that meets the known performance of other products satisfactorily. At this point, I think it's safe to say that for me, the best over-all solution is an incandescent bulb. It's warm in color, simpler for the customer to replace, simpler to build, and that means that subsequent products down the road can keep decent pricing since the labor is effectively cut down by at least 1/3 due to the simpler installation of bulbs vs. LEDs w/resistor. I've put months into the LED method, and I have several clads that are ready to go with that method but the cold white color has always thrown me off and unlike incandescent, if you simply dim the LEDs the panel isn't quite as evenly illuminated as with dimmed bulbs. This is just what Ive learned through my personal observation and experience and consider the fact that Ive invested $200+ on LEDs and Clad alone just to find that best balance between a good, easy-on-the-eyes color and a cost-effective component. One more thing, I'm finding that if you want LEDs that have the viewing angle, then you don't have the right color. If you find the right color, the viewing angle is bad. If you find both, then the supply is either low and has a long lead time OR you find a great source at a terrific price, but then the quality is suspect, as in the batch Ron just received. Supposedly Kris received the SAME product from the SAME vendor, but it was a DIFFERENT product. How in the heck can we use that as a reliable vendor for panel components? (Posted by Kris Stow on 04-18-11) I'm sticking with the Warm LED method. I received a shipment from you know where, (China). I put them next to the LEDs Ron sent and to my surprise they were a warm white and not white with a hint of green as Ron's light up. Now here lies the problem I'm finding. "its which batch you get". I did however notice one difference, Ron's LED's have a small yellow tip and the ones I got do not. So I'm thinking this is whats causing the green tint. I'm still against the bulb idea for the simple fact is there more expensive, run hotter and just all around more difficult I feel. Now this is only my opinion. I want as close to the real thing as possible but I don't want to go overboard. (Posted by Eric Williams on 04-18-11) I will be taking the same route as Kris. No incandescent if I can help it. I can do a little less than 4 times the LEDs for the same current flow as the incandescent. Remember, the resistor is a non-point for temperature problems. Current limiting can be done via PWM (or other current limiting) which significantly reduces nasty inefficient heat creation. At around 1/4 the current flow you would think that you would have 1/4 the heat output but this is not the case. LEDs are quite a bit more efficient at generating photons than heating a wire glowing molten hot. The actual loss as heat vs light is quite a bit lower. Something else to keep in mind, LEDs are virtually immune to vibration. For those who have a sub-woofer for hearing that nice low engine/runway rumble, you may want to prepare for failures. I have two 60watt incandescent over my basement bar (so I can dim them) and have changed them over a dozen times in the last year. My two 6ft tall Nuance tower speakers give me that nice low bass channel during TV and movies and consequently eat incandescent. Not saying this will happen, but maybe prepare as the little guys are more prone to failure than 60W versions in my experience. This is one of the many reasons you see LEDs being used for illumination in moving equipment (aircraft, automotive etc). Not to mention the efficiency as well. Not trying to shoot down the idea at all, just contribute. Keep up the great strides toward perfection. (Posted by Vince C. on 04-20-11) In reference to the back lighting, thousand of aircraft use incandescent light bulbs but most of the newest aircraft only use LEDs. Why? Simply because they drain less current and last 10 times longer meaning less maintenance, less power drain and more efficiency. FDS did a choice for their panels and I do respect them, but they are not a rule and I have to say that I've seen some hundred thousand dollars simulators for training at LIRF airport (Rome International) both A330 and 737/767 and they are all LED driven, plus the panels were not all of the same back lighting tone. This thread is just for discussing the pros and cons of each solution. With that said, it would be nice to find a way uniform what we are producing. There's no problem for my panels if you want to replace the LEDs with incandescent bulbs since I have thousands of 3mm, 3V bulbs to replace the 3V LEDs on my RMUs/DUs if people want and there's no need to change anything else. You only have to use a bigger power supply, but I would stay with the LED solution for so many reasons. (Posted by Ron Rollo on 04-20-11) Thanks Vince, there are certainly Pros and Cons to each method. I do think that the future trend will be to go with LEDs in new aircraft because of the reasons you pointed out. If I decide to go with LEDs, in my mind I am going to call it an upgrade or retrofit to newer technology. At the same time knowing and acknowledging that the color will not be the same as what the incandescent bulbs put out. I don't think they would try to match up the two perfectly even if it was possible. (Posted by Eric Tomlin on 04-20-11) Oh, I did want to point one thing out, which was addressed quite a few times above. While I personally have a very strong desire to try to make things in the sim as real as the aircraft as possible, I'm not above adopting new type tech into the aircraft. In this case, the use of LEDs for backlighting panels. The issues that I have with LEDs is this: The color. Yes, the color will never match the "real" incandescent color unless you make it pretty much the same way BUT you can get close. My deal with color is that I prefer a color that is easy on the eyes, period. I'm at a point to where I don't necessarily care what that color is, as long as it's dim and easy on the eyes because face it, all simulators are relatively dim/dark by default even when simulating daytime in the sim. I'm having a hard time finding an SMD LED that meets the specs, with those specs being: Near 1206 size Wide Viewing Angle (more than 120 degrees) Warm white color Full specs disclosed by the manufacturer and quality assured by the vendor It's very hard to find an LED that meets these specs so sometimes it's just better to go with a known product that has been available for decades and has served well. That's my point. However, at the end of the day, don't we all just want a nice looking readable backlit panel? (Posted by Vince C. on 04-20-11) I think most has been said. Let's face the possibility that some of our cockpits might have different tonalities in backlit panels since they will be coming from different producers, just like some panels might not match with the paint, that's all. What we want is nothing but "nice looking and readable". No one will care later about the exact color. (Original thread started on 03-19-10 by Shane Barnes) Here are some observations I have made about the light plates (front plates) for the Lear. The following photos were taken from a real environmental plate removed from a 2005 Lear45: The "clad board" is .035 inch thick: The photo below is a closeup of the openings for one of the square switches and an opening for a toggle: Note that the top of the square opening is painted white, the other three sides of the opening are grey, also the round opening for a toggle is painted white all the way around the opening. I have noticed this is the same on all of the real panels that I have. The photo below is a closeup of the temperature control's It appears that the panel is a clear material similar to Plexi: It appears that the panel is painted a silver reflective color near the areas where the lights are embedded, then a white coating is applied, followed by the final grey coating. The letters are engraved in the grey coating exposing the white coating. The area beneath the trans illuminated knobs are milled down until the clear Plexi is showing. This photo below is of one of the smaller holes for one of the lights, these are the holes that have the silver paint showing: The sides of the hole have a blue tint to them. I don't know how that color is applied. I can't tell but it may be an insert that is placed in the hole. Maybe this has something to do with the color of the lighting. The panel is .245 to .250 inch thick. At first I thought the lights lined up with the text but the holes for the lights on the back of the panel do not line up with the text. I think that the light is transmitted thru the clear material, and I think the silver coating in the area of the hole for the light is to reflect the light back into the clear material. I really like how the design illuminates the trans illuminated knobs by simply milling off the grey and white paint on the panel allowing the light to emit underneath the knobs thus providing the illumination up thru the knob. I hope this information will help when members start to make the front panels. (Posted by Vince C. on 03-20-10) The "caps" present in the plate are blueish transparent caps with a silver top. Those are both hot spots savers by blocking the light from going directly to the panel and have brighter parts of the text than others. There are also light diffusers/color tuners by making the bulbs light color a bit less yellowish and more red side of the spectrum. I had this research on my own TQ plate back in the past. You won't be able anyway to replicate such a complex panel in any way because of the paint types and the laser methods used to engrave the text. The light diffusion method for the transflective knobs instead is something that I'm already using for the electrical panel and I will as well for the others that will need. This is something applied to all the panels and not only the TQ plate. You can see that also in the lower MIP Panels one side (the top one) of the PB holes are white. This helps flowing of a small part of light toward the button to make easier to find and press them while in the dark. Many vendors have laser engravers but none of them makes Learjet panels, so the advertising in this case is almost useless. Also none of the vendors sell panels made exactly like real ones. Even with laser engravers the technique to remove just microns of paint isn't available in the cheap (sub 30K $) laser machines and for simplification purposes all of them use LEDs instead of wheat of grain bulbs, so they have a quite different way to backlight then the one we are discussing here. I hope you'll understand. (Posted by Vince C. on 03-19-11) My opinions about back lighting methods and final quality results are: 1. The real way: Full transparent acrylic panels, over paint in white and then in final color. Engraving achieved with a YAG Professional laser (a common laser can't help give good results). A very small inlay in the back of the panel to allow a clad board to be placed in the back. Incandescent grain of Wheat bulbs used to for full diffused lighting. Final Quality: PROs: EXCELLENT. Best diffusion, more like real light color. CONS: High power drain and more difficult panel dimming solutions. 2. A Hybrid solution: White acrylic panels, over paint in color. Engraving achieved with a common laser engraver or CNC bit. A full inlay in the back of the panel (all the portion that has engravings on top). Backlighting with LEDs or Grain of wheat bulbs placed directly on the back of the panel or over a clad board. Final Quality: PROS: VERY GOOD. CONS: Light can be not be as much diffused as the first solution. Needs more CNC work to inlay the back. Color of the light often depends on acrylic white type and shade. 3. A Custom solution: White acrylic panels, over paint in color. Engraving achieved with a common laser engraver or CNC bit. A full inlay in the back of the panel (all the portion that has engravings on top). An extra backer 8 to 10mm thick fully inlayed to create a light chamber with the front panel. Parts are then joined together like a sandwich. Backlighting with LEDs placed on a light strip on a side of the internal part of the backer. Final Quality: PROS: VERY GOOD TO EXCELLENT. Light diffusion is excellent since the light is diffused not perpendicular but parallel to the front of the panel. It doesn't need any particular attention in placing led. Really few LEDs are needed (4 to 6 for a common DIN size panel). CONS: Needs quite more work to be done to fully inlay the front and make the needed backer. Light color depends on acrylic type and shade. After having tried all the possible solutions but the real way (I did also try different methods that weren't good at all so I discarded in this list) I chose to go with the last solution for many of my panels. But any of those will give good results and a nice effect. (Posted by Mark L. on 03-19-11) Vince posted, before I finished typing this, but as you have read with more detail of his process. I did as well for my EFIS and FGC (not finished) and was thinking of doing the same for the lower panels. Using heavier single side copper clad, the switches would mount on those and the panel would be milled where the copper clad would sit flush on the back end of the panel. The appropriate areas would be milled to simulate a backer exists and as Kris stated, using like 3/8" plastic, you could mill to a full .25" thick panel or a little thicker if desired, either way, giving additional room for everything and no alignment issues of the backer and main panel. Kris, as long as you don't reset your 'Home' position when milling, tool changes are nothing. For a particular part if I have 3 tool changes, say .25", .0787 and .0394 bits, I will have 3 separate G-code files, 1 for each bit. When the first job is done, change the tool, load the appropriate G-code file for that part and process and continue on. IMPORTANT! If your bits don't have the plastic ring gauge like Precise bits do, you have to re-zero your bit to the material!! (only the "Z" axis) Where it gets tricky is if you have to flip the part over and mill where it has to line up with the previous side! That's where I figure out where I can place registration holes outside of the part preferably, but sometimes within the part using a area that can and will be milled out larger than the registration hole. These holes are drilled thru the material into the sacrificial board using the CNC during the initial cutting on the first side. Sometimes because of depth, I may use my regular cordless drill to finish the hole into the CNC bed. I then use some steel .125 pins (careful not to accidentally leave in the material after flipping and clamping where your router/bit will hit it!) to allow me to flip the material over and using the registration pins, I'm usually within a few thousandths of exactly where I need to be to mill the back side. Just note, the these holes need to be planned so that when you flip, the alignment will happen. Another trick without pins, is to create registration holes in the material anywhere that is allowable, then flipping your work and then with the inverse G-code file of those registration holes loaded, positioning your bit to those locations manually or maybe a combination of moving the material and the x,y of the router to align with the holes. Then when satisfied, and the bit sitting at one of the holes in the material for this G-code, enter the x, y position noted in you cam file in Mach3 hitting enter after entering each. You should now be able to click home and go to 0,0. Retest by running your registration code to see if it moves to each registration hole exactly. If not realign and repeat the process, also it's advisable to 1, have a separate G-code file for this alignment process for this part. 2, Set your z axis zero position high enough where it won't actually go into the material. Bad things can happen if your alignment is off. This gives you the opportunity to manually stop the job in Mach3 and manually jog to the hole to check alignment. This process is way more involved than I like, so I use my pinning method, quick and easy. You just have create the opposite side file (or at least I do) by copying the first mill side file (cad/cam) to a new file and flipping the contents horizontally or vertically, your call, depends on your preference or the job itself. This gives me a reference via layers that I can hide to use while using CAD and CAM on the backside of the part. The other way is to simply make sure that in the flip side file that you reference that 0,0 home position correctly. Because you are not resetting the home position on the CNC, you are simply flipping the material over, so when you load the G-code to start cutting the flip side, 0,0 of the part better be the same location of where your CNC is sitting at it's 'Home' position, otherwise, you will have a part ready for the trash when it's done. (Posted by Eric Tomlin on 04-13-11) Ron and I have been working to determine the best all-around panel lighting method for COLOR. Personally, I love the real internal lighting color. Not only do I like it because it's prototypical, but because it's pleasing to the eye. It's been a challenge but has been made much easier due to having access to the real panels over the past few weeks. However, there's an understanding that most here have never and will never set foot on board a real LJ45 and you may not care what the color of the internal panel lighting is. I can tell you that the internal lighting of the panels is nothing like what most have seen in aircraft. It's very hard to describe but I can tell you that it's no where near as "orange" as a Boeing panel, but it's not cool white either- at least not an LED style cool white, which is what I will from here on out refer to as "Cold White". Again though, compared to Boeing incandescent, it's definitely "cool" in nature. It's somewhere in between, and if you can imagine, a cream color with a tad of coral pink and dirty blue-gray, then you may imagine it half-way close. But, trust me, it's a beautiful color of lighting. Several folks here are on the waiting list for some of my products. It's my goal to provide the best made part at the most realistic appearance but that design goal can sometimes be problematic when working to prevent a clash with another source, in this case- Ron's products. As we work through our own design goals and share info to try to minimize the difference between the two, I can safely say that we both appreciate folks understanding that we both want to bring the best product regardless of the outcome of where we land in the color spectrum for internal lighting. (Posted by Will Sasse on 04-13-11) As an active real pilot doing shifts at night, spending many hours staring at instruments panels lit in various ways (including LCD panels), what I feel is more important is that the whiter the light, the more tiresome it gets, the harder on the eyes it feels. I find I have to reduce the brightness of screens to at least 30% to make it comfortable at night - but then I like a darker cockpit so I can see more outside. Also, there is a big difference in the external light from the night sky, compared to our projectors / LCD panels. This too affects the perceived 'color' and brightness of the panel lighting. As this is a sim, not something I plan on eight hour legs in, perhaps this is less important. It does need to be something easy on the eyes. The idea of "a cream color with a tad of coral pink and dirty blue-gray" sounds lovely, but I wouldn't bust a gut trying to find it. (Posted by Mark L. on 04-13-11) I've been using the LED's first introduced to me by Vince which are basically a warm white and used in his RMU's. It's easier on the eyes for me compared to cool or cold white in my comparisons. The downside, is I haven't located a source in the USA for what I get from Vince as we don't know who makes them. The last few I've ordered and tried are way towards the cold white. (Posted by Shane Barnes on 04-13-11) I can tell you that the real Lear45 panels are not that bright. In fact, with the lights on in the room, it is hard to tell if the panels are lit up at all. I would say Will has hit it right on the head with the comment about the whiter the light the more tiresome it is. Also makes sense that the brighter the light the more it would affect your night vision. Thanks for that input from a real world observation Will. (Posted by Ron Rollo on 04-13-11) As I have always said, "Nothing is easy with this project!" Grab a couple LEDs and a power pack and light them up! NOT..... I agree and understand everyone's points posted so far but here is the thing that I worry about. I don't want to see several different panel makers with an equal amount of different lighting colors and qualities. I think if there was an easy solution to perfect lighting, we would all want to have it in our sims and we would be implementing it by now! The reality is more than likely each of us will have a few panels from three or even more panel makers. I'm afraid that if Eric comes out with the perfect lighting match, it will be a great achievement, however, we would end up with mismatched lighting with the other panels. My personal goal would be to keep the lighting issue as simple and uniform as possible. I would suggest that we agree on either the warm lighting that we all have available to us. The other alternative would be up to Eric but it would involve passing on the techniques as to how he arrived at the perfect lighting color once he achieves it. I for one am ready to settle on a solution and move forward! (Posted by Will Sasse on 04-14-11) Re-read my post, noticed I forgot to say how I voted and why.... Go with 'Warm White' for the following reasons: - Easy to source, ie: easy to replace by users when needed - After 5 minutes flying, you wont realize they're not quite kosher - They do the same job just as well. Ron and Eric, those of you making these extremely tempting panels, the ease of maintenance by your purchasers should be a consideration... ergo: warm white! For what its worth, that's the nuts & bolts of my choice, and will be the way I go. (Posted by Shane Barnes on 04-14-11) Will has a very good point, ease of maintenance and also to consider sourcing these parts to service the panels at a later date. You know at some point whatever lighting choice is decided on we will have parts to fail so it would be nice to have a part that we can count on being available in the future. (Posted by Alaxus on 04-15-11) I have been spending a bit of time in the Avionics shop at work and what I have noticed is that each component manufacturer uses a different method to light up there panels. I have even noticed that some panels have changed over from incandescent to LED due to a mod. So there are differing colors between the panels. I have been told that there is 3 different light settings in the 737 and when on that lowest, you would only just see the light on the darkest of nights. In any case, red is the best for night vision and blue to white is the worst. I have talked to people with blue lights in their dashes of their cars, they say there eyes get sore real quick. (Posted by Ron Rollo on 04-15-11) I agree Jeff, I can say for sure we want to stay away from blue white. Red for that matter too unless we were building a custom sim NOT prototypical to the Lear45. ATM, it is a matter of finding an LED source that delivers on what they advertise. We have tested what is called a warm white light, but it has a touch of green in it. The funny thing is like what Will said, after a few minutes, you don't even notice it any longer. And that's true! After it is lit up and in my face for a few minutes, I find myself looking at it and asking, "What's wrong with this color?" I have to do a few more mods to the way the lighting all fits into the panel, but later today, I will try to share some photos with you guys so that you can see what I am talking about. Although we can not always judge LED light colors from photos, it is an attempt. WANTED! Looking for a 3 volt, 3mm bright (9,000 MCD or greater) warm white flat top LED with a viewing angle of at least 120 degrees. At a decent price. You would think that's not asking much. (Posted by Vince C. on 04-15-11) White light spectrum is really wide. What manufacturers define as "Warm White" is a wide range that goes from 2000K to 4500K. Lower range has deeper brown/yellow tint while upper range has more neutral/greenish tint. What we should look for to match the real panels? My answer is that anything from 3000 to 4500K is close enough to give a nice effect. What exactly match an incandescent light is 3200K. Please remember that due to the way Both Eric and Ron make their panels a colored transparent printed sheet can be used in sandwich to correct the tint and have it closer to the real one. Based on a few tests I did in the past a 25-30% brown light filter can give excellent white to slight red tint to the front panel. Try printing various tints in squares on a transparent sheet and overlap on top of a LED to find what you like best. An easy fix to mismatched backlit panels! About the LED types, obviously the choice mostly depends on the usage. I chose to only use SMD Led for my project, those can be both used on custom made light strips, a dedicated light copper clad (like a real panel) or soldered over the main components PCB (like my RMU have). The SMD LEDs I have are only 1400-1600 MCD but give really wide and uniform light and a quite neutral tint. Unfortunately I don't have a manufacturer/PN from them since I'm buying those parts from a local store. What I paid is 25c of Euro each. Ron, Mark and Eric have had them in their hands to test. (Posted by Mark L. on 04-17-11) Really here nor there, but for me I prefer the non heat generating LED's over bulbs that will burn out. For me, I'll sacrifice a little realism here and I'm quite content of the look I get on my TQ with the LED's I got from Vince. Just my 2cents worth. (Posted by Ron Rollo on 04-17-11) Mark, a part of me is with you. I have produced 6 sets of 12 volt lighting, and then completed 10 sets of the 5 volt warm lighting only to find that the color was off. I want this to be resolved 6 weeks ago but I am personally still not happy. But getting close! For the record, I too like the LEDs, that has been my plan for years! Maybe we would all be using the SMDs that Vince is using if we had a supply available to us. In fact, I wish that was the case because we all would have followed that lead and this would all be a none issue at this point. But from what I have heard from Eric, there is no SMD that gives off a warm light available to us here in the U.S. And after what I have just been through with the so called Warm light 3mm LED, I am at that point that I will try anything as long as the color is at least in the same family. As for the heat and life concerns: I just ran an experiment for the past eight hours running the incandescent prototype REV panel at full power (5 volts) to see if there would be any obvious failures. Everything passed! The paint and plastic did not melt. As a matter of fact, they got warm, almost hot but not hot enough that I could not touch them. With that said, only time will tell if the plastic will turn brittle and or turn yellow. As for the life of the bulbs, until Eric and I can agree on the perfect bulb, the life of the bulb is up in the air. From the research I have done, I have found that the life range of the various bulbs is from 30 hours up to 50,000. The average is between 15,000 and 25,000 hours. If we can find one in this range, we should be more than fine. (Posted by Vince C. on 04-17-11) What I don't like about the incandescent bulbs is that they produce heat, can burn out easily and need a lot of power. Using them for just a small panel like the REV isn't a problem (PWM dimming it too), but imagine what would happen when you need to source and control at least 2K of them. With a 60mA typical for a 5V bulb this means 120A of current. Let's remember this is a simulator and not a real airplane. If you want a simple comparison let's consider my own RMUs/DUs set. They drain in total less then 500mA at full power with 12V. A 2A 10 Euros 12V power supply (like the one you might use to power your internet router) can then source not only all of them but also the whole glareshield at once. Doing the same with bulbs means you'll have to put them in parallel and only the RMUs/DUs will drain about 4A at 5V, together with the whole glareshield about 10A. Then a dedicated switching power supply will be needed just for them and this wouldn't be a problem but then finding a PWM dimmer for 10A wouldn't be as much easy and cheap. (Posted by Ron Rollo on 04-18-11) I think it is important to try to keep this lighting issue as simple as possible but at the same time strive to achieve a higher lever of realism. At this point, I am not looking for perfection, just something that looks close. (Posted by Eric Tomlin on 04-18-11) Good info there Vince. One thing I really want to point out to those hesitant about incandescent- If these things were so bad, they would never have made it into the panels of 1000's of real aircraft, using the same current, etc. FDS wouldn't sell their panels with the same exact specs and the panels that I have on-hand would be ruined by heat. None of this danger of heat and current is an issue [b]*when the proper specs*[/b] are followed. The real bulbs in the real LJ45 panels are 5v .06 amp @ .15 MSCP. The panel gets warm, sure, but no paint is melted and neither is there any damage on the inside. It's been examined up and down for three weeks now, there's no issue at all with this. The LEDs being ran are 5v LEDs. They are using the same voltage as the traditional bulbs, but put out less heat yes, but the resistors are usually pretty hot. So is the bottom of the LEDs too, so while they put out less heat on top, there's still heat somewhere because as you know, it has to go somewhere. Now, if you use an incandescent bulb that draws much more current and a decent light output, then you would have some thermal issues. However, that's why you choose a component that meets the known performance of other products satisfactorily. At this point, I think it's safe to say that for me, the best over-all solution is an incandescent bulb. It's warm in color, simpler for the customer to replace, simpler to build, and that means that subsequent products down the road can keep decent pricing since the labor is effectively cut down by at least 1/3 due to the simpler installation of bulbs vs. LEDs w/resistor. I've put months into the LED method, and I have several clads that are ready to go with that method but the cold white color has always thrown me off and unlike incandescent, if you simply dim the LEDs the panel isn't quite as evenly illuminated as with dimmed bulbs. This is just what Ive learned through my personal observation and experience and consider the fact that Ive invested $200+ on LEDs and Clad alone just to find that best balance between a good, easy-on-the-eyes color and a cost-effective component. One more thing, I'm finding that if you want LEDs that have the viewing angle, then you don't have the right color. If you find the right color, the viewing angle is bad. If you find both, then the supply is either low and has a long lead time OR you find a great source at a terrific price, but then the quality is suspect, as in the batch Ron just received. Supposedly Kris received the SAME product from the SAME vendor, but it was a DIFFERENT product. How in the heck can we use that as a reliable vendor for panel components? (Posted by Kris Stow on 04-18-11) I'm sticking with the Warm LED method. I received a shipment from you know where, (China). I put them next to the LEDs Ron sent and to my surprise they were a warm white and not white with a hint of green as Ron's light up. Now here lies the problem I'm finding. "its which batch you get". I did however notice one difference, Ron's LED's have a small yellow tip and the ones I got do not. So I'm thinking this is whats causing the green tint. I'm still against the bulb idea for the simple fact is there more expensive, run hotter and just all around more difficult I feel. Now this is only my opinion. I want as close to the real thing as possible but I don't want to go overboard. (Posted by Eric Williams on 04-18-11) I will be taking the same route as Kris. No incandescent if I can help it. I can do a little less than 4 times the LEDs for the same current flow as the incandescent. Remember, the resistor is a non-point for temperature problems. Current limiting can be done via PWM (or other current limiting) which significantly reduces nasty inefficient heat creation. At around 1/4 the current flow you would think that you would have 1/4 the heat output but this is not the case. LEDs are quite a bit more efficient at generating photons than heating a wire glowing molten hot. The actual loss as heat vs light is quite a bit lower. Something else to keep in mind, LEDs are virtually immune to vibration. For those who have a sub-woofer for hearing that nice low engine/runway rumble, you may want to prepare for failures. I have two 60watt incandescent over my basement bar (so I can dim them) and have changed them over a dozen times in the last year. My two 6ft tall Nuance tower speakers give me that nice low bass channel during TV and movies and consequently eat incandescent. Not saying this will happen, but maybe prepare as the little guys are more prone to failure than 60W versions in my experience. This is one of the many reasons you see LEDs being used for illumination in moving equipment (aircraft, automotive etc). Not to mention the efficiency as well. Not trying to shoot down the idea at all, just contribute. Keep up the great strides toward perfection. (Posted by Vince C. on 04-20-11) In reference to the back lighting, thousand of aircraft use incandescent light bulbs but most of the newest aircraft only use LEDs. Why? Simply because they drain less current and last 10 times longer meaning less maintenance, less power drain and more efficiency. FDS did a choice for their panels and I do respect them, but they are not a rule and I have to say that I've seen some hundred thousand dollars simulators for training at LIRF airport (Rome International) both A330 and 737/767 and they are all LED driven, plus the panels were not all of the same back lighting tone. This thread is just for discussing the pros and cons of each solution. With that said, it would be nice to find a way uniform what we are producing. There's no problem for my panels if you want to replace the LEDs with incandescent bulbs since I have thousands of 3mm, 3V bulbs to replace the 3V LEDs on my RMUs/DUs if people want and there's no need to change anything else. You only have to use a bigger power supply, but I would stay with the LED solution for so many reasons. (Posted by Ron Rollo on 04-20-11) Thanks Vince, there are certainly Pros and Cons to each method. I do think that the future trend will be to go with LEDs in new aircraft because of the reasons you pointed out. If I decide to go with LEDs, in my mind I am going to call it an upgrade or retrofit to newer technology. At the same time knowing and acknowledging that the color will not be the same as what the incandescent bulbs put out. I don't think they would try to match up the two perfectly even if it was possible. (Posted by Eric Tomlin on 04-20-11) Oh, I did want to point one thing out, which was addressed quite a few times above. While I personally have a very strong desire to try to make things in the sim as real as the aircraft as possible, I'm not above adopting new type tech into the aircraft. In this case, the use of LEDs for backlighting panels. The issues that I have with LEDs is this: The color. Yes, the color will never match the "real" incandescent color unless you make it pretty much the same way BUT you can get close. My deal with color is that I prefer a color that is easy on the eyes, period. I'm at a point to where I don't necessarily care what that color is, as long as it's dim and easy on the eyes because face it, all simulators are relatively dim/dark by default even when simulating daytime in the sim. I'm having a hard time finding an SMD LED that meets the specs, with those specs being: Near 1206 size Wide Viewing Angle (more than 120 degrees) Warm white color Full specs disclosed by the manufacturer and quality assured by the vendor It's very hard to find an LED that meets these specs so sometimes it's just better to go with a known product that has been available for decades and has served well. That's my point. However, at the end of the day, don't we all just want a nice looking readable backlit panel? (Posted by Vince C. on 04-20-11) I think most has been said. Let's face the possibility that some of our cockpits might have different tonalities in backlit panels since they will be coming from different producers, just like some panels might not match with the paint, that's all. What we want is nothing but "nice looking and readable". No one will care later about the exact color.Real Backlit Panel Design and Discussion
![]()
2017-10-10