


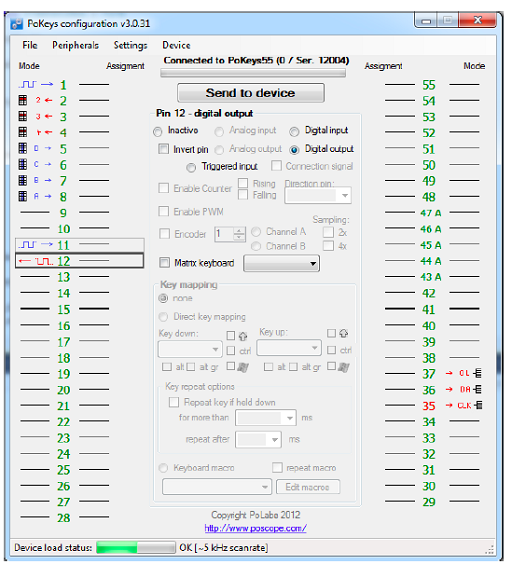
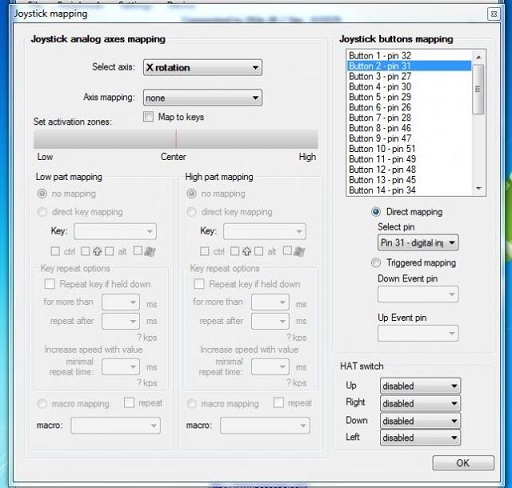
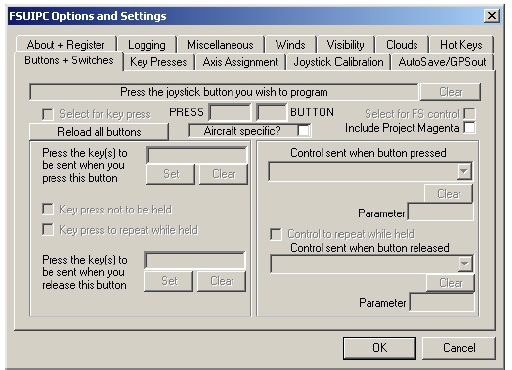
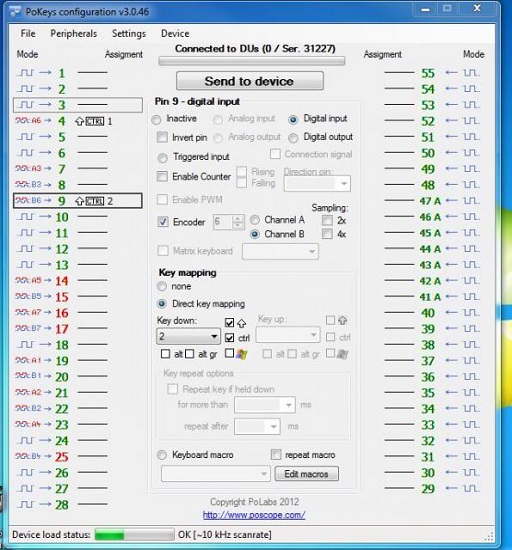
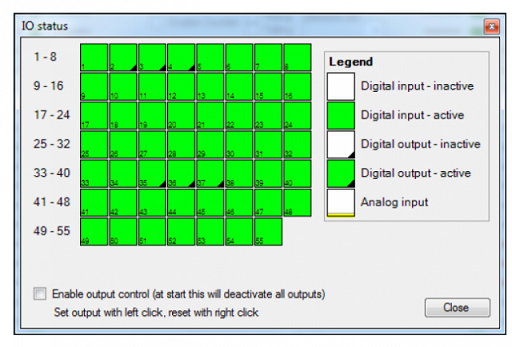
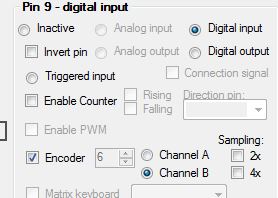
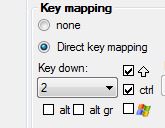
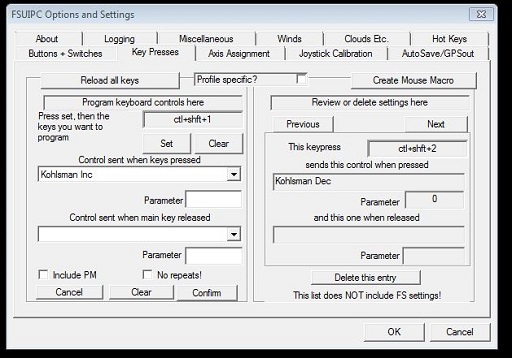
(Original thread started on 03-21-13 by Alan Norris) I have spent the last several days trying to get my pilot MFD buttons programmed and have succeeded so I decided to write a tutorial. TUTORIAL FOR PROGRAMMING BUTTONS These are the steps you need to take: After you have successfully wired the buttons to your Pokeys card open the Pokeys console and click on connect to the card (I named mine DUs as my other card is named RMUs). It will open this window: Make sure that you have the inputs as "Digital Inputs" (ignore the Digital Output radio button on this screen shot as that pin is not being used). Click on Peripherals and select "Digital Inputs". This will bring up this window: Push the buttons on the MFD in turn and note which pins they are wired to (the green boxes will turn white as you do so). When you have all the pin numbers close the window and click on Peripherals then Joystick Mapping. It will open the window on the right: Next in the box at the top right of the window you will see a list of joystick button mappings. Click on the first button to highlight it then check the radio button next to Direct Mapping and select the pin number from its drop down list for the first button on the MFD -- SUMRY. Do this for the rest of the buttons then close the window and click on Send to Device. All your buttons are now programmed for use. Open up FSX and then open FSUIPC. In the FSUIPC window click on Buttons+Switches tab which will bring up this window: Then click the first button on the MFD, the joystick window should display a number and the button window should display 0 (your mileage may vary). You may want to read up on Joystick numbering in the manual. The default is okay but if you happen to plug the USB cable into a different port then Windows assigns a new number which may screw up your settings. Also check the Aircraft Specific Box and select Lear45 that you no doubt have in the list. To the right hand side check the Select for FS Control box. In the box that says Control sent when button pressed from its drop down list select Offset Setbit. In the Offset box type in x73F8 (which is the offset that JET45 uses for the MFD). In the Parameters box you need to add this for button #1 x01. For the Action when button is released -- select the Offset Clrbit and enter x73F8 and x01. Click okay. You have now programed the SUMRY button. Do the same for the other buttons and use the same offset and these Parameters (I couldn't seem to get the offsets from the JET45 manual to work but by trial and error these seem to work). SUMRY x01 ELEC x02 HYD x04 ECS x08 FLT x10 FUEL x20 All mine work okay. I tried to do the same for the FO MFD but the offset for this 73F9 puts the same button IDs (SUMRY, ELEC etc) in the DU screen. I though that it would program the DU3 (TCAS etc) but apparently we don't have the offset for that yet. Maybe Eric or Jason could comment. Hope this works okay for you. If you try it and it works (or doesn't) please post here. I will be working on the encoders next. EDIT: I found out what the bit syntax is from the FSUIPC forum: Hex -> Decimal -> Binary Button 1 x01 -> 1 -> 00000001 Button 3 x02 -> 2 -> 00000010 Button 2 x03 -> 6 -> 00000100 Button 4 x08 -> 8 -> 00001000 Button 5 x10 -> 16 -> 00010000 Button 6 x20 -> 32 -> 00100000 So Mark was right -- think Binary. These make more sense but still do not gel with the the bits shown in the JET45 offset list. They show: Button 1: 0 Button 2: 1 Button 3: 2 Button 4: 3 Button 5: 4 Button 6: 5 REVISIONS: Changed the Offset Togglebit to Offset Setbit and Clrbit Changed the Parameter for button #2 from x06 to x02 (with x06 pressing button 2 (ELEC) momentarily activated HYD before settling on ELEC. TUTORIAL FOR PROGRAMMING ENCODERS. Open up the Pokeys console and make sure you have all your encoders properly identified. On this screen you will see that my encoders are identified as EncoderA1 and Encoder B1, Encoder A2 and Encoder B2 etc: You must first find out which pins your encoders are wired to. Go to the IO Status screen as you did for the button programming here: If you turn your encoder in each direction the appropriate boxes will turn from green to white. Write down the two pin numbers for each encoder. For the purpose of this tutorial assume that your encoder is #6 and that it is connected to pins 4 & 9. Next go back to the main screen and highlight encoder pin #4 in the list and then check the Digital Input box, check the Encoder box and select 6 from the list with up and down arrows, then check the "A" box. Do the same again for encoder pin #9 and this time set as encoder "6B". See this screenshot and you will see that I have done that for my Encoder #6 which is the BARO encoder on my PFD. BTW check the 4X sampling box for all your encoders, you will see that I haven't done that yet: Back on the main screen highlight encoder 6A and in the Key Mapping area you need to assign a key to that encoder pin. I chose to use CTRL/SHIFT/2 for 6B (6A was CTRL/SHIFT/1). To do that check the CTRL box as well as the SHIFT (up arrow) box and select a number from the drop down list. See this screenshot: Click on Send to Device, your encoder # 6 is now programmed as keys CTRL/SHIFT/1 and CTRL/SHIFT/2. Your screen should look something like this -- note the Up arrow, the CTRL and numbers next to the encoder pins showing that they are assigned: Next open up FSX and FSUIPC and click on Key Presses: Check the box Profile Specific if you are doing this with all of your controls. In the left hand pane where it says Program keyboards controls here, check the SET box and on your keyboard press CTRL then SHIFT then the number 1. In the box Control sent when key pressed select the appropriate action from the drop down list, in this case as it's the BARO encoder we're programming, select Kohlsman Inc (for increase). Click on the Confirm button and that action will be added to the list in the right hand pane. Do the same for CTRL SHIFT 2 and select Kohlsman Dec (for decrease). Click Confirm. Your BARO encoder is now programmed. Click OK to exit FSUIPC and test the encoder. If it happens to operate in reverse just reverse the Kohlsman Inc and Kohlsman Dec for numbers 1 and 2. You can program all your encoders this way. I couldn't find a MINIMUMS in the FSUIPC drop down list and on the MFD I'm ignorant as to what CAS stands for so cannot program that -- yet. Let me know if you have any issues or need any further explanation. Programing the STD Buttons Here's an update on how to the program the STD button on both PFD. Set up your button as you did in the Tutorial for Programing Buttons. Open up FSX and FSUIPC select the Buttons tab and check the Aircraft Specific box and then Lear45. Push the STD button on the PFD and FSUIPC should now identify the button. In the Control sent when button pressed drop down box, select Offset Setbit and type x0330 in the Offset box and x16211 in the Parameter box. Select Offset Clrbit from the drop down box for Control sent when button released and put in the same values. Pressing the STD button will now change the BARO setting to 29.92" kPa. In order to make updating the procedures more easy for me, I've created a PDF programming guide that Eric posted in the Resources section of Hangar45. You can download and print it which will make programming easier for you. As I come across any issues (or ones that you let me know of) I will revise the document. UPDATE: Program DUs via PoKeys .pdf Revision 01 available HERE Please use the PDF guide instead of what is listed in this thread as I have update the procedures. You can find the updated PDF at the bottom of this post. (Posted by Ron Rollo on 03-24-15) Hey Alan, while attempting to program the STD Buttons following your tutorial, when I hit the STD button on the PFD, it sets the BARO to 27.99 which is the low end of the spectrum. What it should do is set the BARO to 29.92. What I found is that within FSUIPC under Buttons and Switches, "Control sent when button pressed", I found "Barometric STD Pressure". Using this method works as it should. I am not sure why the Jet45 offset is not working for me. (Posted by Shane Barnes on 03-25-15) Still no luck getting the RA/BARO button working. I was finally able to get the RA to show up and set the minimums but could not toggle back out. Has anyone updated to the latest release of JET45? Not sure if a fix might have been included. I did some more testing and here is what I have found. I used the XFR button on the FGC to test the RA/BARO function thru InterfaceIT. If I program the RA/BARO thru InterfaceIT I have some functionality . . I can toggle thru the different settings of RA or BARO. It still takes 2 to 3 sometimes more button presses to toggle thru the settings. I cannot get the RA/BARO button programmed thru FSUIPC at all. It will not toggle thru but it will cause "MAN" to be displayed on the N1 gauge on DU2. I just don't think this particular button is going to play well with FSUIPC for whatever reason. (Posted by Eric Tomlin on 03-26-15) It's been recommended to try to use the offsets directly like in a program such as InterfaceIT, SIOC, etc. vs. FSUIPC. One thing for certain is that there are particular offsets that for whatever reason, do not always behave well when used in a hardware environment. They become "sticky" and those are the ones that often require multiple key strokes for whatever reason. I had that issue with the Master Caution Reset for a while until we changed the offset assigned to it (this was years ago now). I will report this thread to Jason for his review. (Posted by Shane Barnes on 03-29-15) NOTE: YOU HAVE TO BE RUNNING AT LEAST Jet45 V 1.0.0.5 FOR THIS TO WORK. Okay guys, I have found the correct parameter for the RA/BARO function. You can program the RA/BARO button thru the PoKeys card and FSUIPC. We were trying to use the wrong parameter. Bit 7 is 128 and when converted to hexadecimal = 0x80 Here is how you need to program it. Pilot side: OFFSET BYTE SET OFFSET = 73D5 PARAMETER= x80 OFFSET BYTE CLRBIT OFFSET = 73D5 PARAMETER = x80 First Officer side: OFFSET BYTE SET OFFSET= 73D6 PARAMETER= x80 OFFSET BYTE CLRBIT OFFSET=73D6 PARAMETER= x80 For future reference here is a chart breaking down the bit /hexadecimal/parameter BIT HEXADECIMAL/PARAMETER 0= 1 = x01 1= 2 = x02 2= 4 = x04 3= 8 = x08 4= 16 = x10 5= 32 = x20 6= 64 = x40 7= 128 = x80 (Original thread started on 03-21-13 by Alan Norris) I have spent the last several days trying to get my pilot MFD buttons programmed and have succeeded so I decided to write a tutorial. TUTORIAL FOR PROGRAMMING BUTTONS These are the steps you need to take: After you have successfully wired the buttons to your Pokeys card open the Pokeys console and click on connect to the card (I named mine DUs as my other card is named RMUs). It will open this window: Make sure that you have the inputs as "Digital Inputs" (ignore the Digital Output radio button on this screen shot as that pin is not being used). Click on Peripherals and select "Digital Inputs". This will bring up this window: Push the buttons on the MFD in turn and note which pins they are wired to (the green boxes will turn white as you do so). When you have all the pin numbers close the window and click on Peripherals then Joystick Mapping. It will open the window on the right: Next in the box at the top right of the window you will see a list of joystick button mappings. Click on the first button to highlight it then check the radio button next to Direct Mapping and select the pin number from its drop down list for the first button on the MFD -- SUMRY. Do this for the rest of the buttons then close the window and click on Send to Device. All your buttons are now programmed for use. Open up FSX and then open FSUIPC. In the FSUIPC window click on Buttons+Switches tab which will bring up this window: Then click the first button on the MFD, the joystick window should display a number and the button window should display 0 (your mileage may vary). You may want to read up on Joystick numbering in the manual. The default is okay but if you happen to plug the USB cable into a different port then Windows assigns a new number which may screw up your settings. Also check the Aircraft Specific Box and select Lear45 that you no doubt have in the list. To the right hand side check the Select for FS Control box. In the box that says Control sent when button pressed from its drop down list select Offset Setbit. In the Offset box type in x73F8 (which is the offset that JET45 uses for the MFD). In the Parameters box you need to add this for button #1 x01. For the Action when button is released -- select the Offset Clrbit and enter x73F8 and x01. Click okay. You have now programed the SUMRY button. Do the same for the other buttons and use the same offset and these Parameters (I couldn't seem to get the offsets from the JET45 manual to work but by trial and error these seem to work). SUMRY x01 ELEC x02 HYD x04 ECS x08 FLT x10 FUEL x20 All mine work okay. I tried to do the same for the FO MFD but the offset for this 73F9 puts the same button IDs (SUMRY, ELEC etc) in the DU screen. I though that it would program the DU3 (TCAS etc) but apparently we don't have the offset for that yet. Maybe Eric or Jason could comment. Hope this works okay for you. If you try it and it works (or doesn't) please post here. I will be working on the encoders next. EDIT: I found out what the bit syntax is from the FSUIPC forum: Hex -> Decimal -> Binary Button 1 x01 -> 1 -> 00000001 Button 3 x02 -> 2 -> 00000010 Button 2 x03 -> 6 -> 00000100 Button 4 x08 -> 8 -> 00001000 Button 5 x10 -> 16 -> 00010000 Button 6 x20 -> 32 -> 00100000 So Mark was right -- think Binary. These make more sense but still do not gel with the the bits shown in the JET45 offset list. They show: Button 1: 0 Button 2: 1 Button 3: 2 Button 4: 3 Button 5: 4 Button 6: 5 REVISIONS: Changed the Offset Togglebit to Offset Setbit and Clrbit Changed the Parameter for button #2 from x06 to x02 (with x06 pressing button 2 (ELEC) momentarily activated HYD before settling on ELEC. TUTORIAL FOR PROGRAMMING ENCODERS. Open up the Pokeys console and make sure you have all your encoders properly identified. On this screen you will see that my encoders are identified as EncoderA1 and Encoder B1, Encoder A2 and Encoder B2 etc: You must first find out which pins your encoders are wired to. Go to the IO Status screen as you did for the button programming here: If you turn your encoder in each direction the appropriate boxes will turn from green to white. Write down the two pin numbers for each encoder. For the purpose of this tutorial assume that your encoder is #6 and that it is connected to pins 4 & 9. Next go back to the main screen and highlight encoder pin #4 in the list and then check the Digital Input box, check the Encoder box and select 6 from the list with up and down arrows, then check the "A" box. Do the same again for encoder pin #9 and this time set as encoder "6B". See this screenshot and you will see that I have done that for my Encoder #6 which is the BARO encoder on my PFD. BTW check the 4X sampling box for all your encoders, you will see that I haven't done that yet: Back on the main screen highlight encoder 6A and in the Key Mapping area you need to assign a key to that encoder pin. I chose to use CTRL/SHIFT/2 for 6B (6A was CTRL/SHIFT/1). To do that check the CTRL box as well as the SHIFT (up arrow) box and select a number from the drop down list. See this screenshot: Click on Send to Device, your encoder # 6 is now programmed as keys CTRL/SHIFT/1 and CTRL/SHIFT/2. Your screen should look something like this -- note the Up arrow, the CTRL and numbers next to the encoder pins showing that they are assigned: Next open up FSX and FSUIPC and click on Key Presses: Check the box Profile Specific if you are doing this with all of your controls. In the left hand pane where it says Program keyboards controls here, check the SET box and on your keyboard press CTRL then SHIFT then the number 1. In the box Control sent when key pressed select the appropriate action from the drop down list, in this case as it's the BARO encoder we're programming, select Kohlsman Inc (for increase). Click on the Confirm button and that action will be added to the list in the right hand pane. Do the same for CTRL SHIFT 2 and select Kohlsman Dec (for decrease). Click Confirm. Your BARO encoder is now programmed. Click OK to exit FSUIPC and test the encoder. If it happens to operate in reverse just reverse the Kohlsman Inc and Kohlsman Dec for numbers 1 and 2. You can program all your encoders this way. I couldn't find a MINIMUMS in the FSUIPC drop down list and on the MFD I'm ignorant as to what CAS stands for so cannot program that -- yet. Let me know if you have any issues or need any further explanation. Programing the STD Buttons Here's an update on how to the program the STD button on both PFD. Set up your button as you did in the Tutorial for Programing Buttons. Open up FSX and FSUIPC select the Buttons tab and check the Aircraft Specific box and then Lear45. Push the STD button on the PFD and FSUIPC should now identify the button. In the Control sent when button pressed drop down box, select Offset Setbit and type x0330 in the Offset box and x16211 in the Parameter box. Select Offset Clrbit from the drop down box for Control sent when button released and put in the same values. Pressing the STD button will now change the BARO setting to 29.92" kPa. In order to make updating the procedures more easy for me, I've created a PDF programming guide that Eric posted in the Resources section of Hangar45. You can download and print it which will make programming easier for you. As I come across any issues (or ones that you let me know of) I will revise the document. UPDATE: Program DUs via PoKeys .pdf Revision 01 available HERE Please use the PDF guide instead of what is listed in this thread as I have update the procedures. You can find the updated PDF at the bottom of this post. (Posted by Ron Rollo on 03-24-15) Hey Alan, while attempting to program the STD Buttons following your tutorial, when I hit the STD button on the PFD, it sets the BARO to 27.99 which is the low end of the spectrum. What it should do is set the BARO to 29.92. What I found is that within FSUIPC under Buttons and Switches, "Control sent when button pressed", I found "Barometric STD Pressure". Using this method works as it should. I am not sure why the Jet45 offset is not working for me. (Posted by Shane Barnes on 03-25-15) Still no luck getting the RA/BARO button working. I was finally able to get the RA to show up and set the minimums but could not toggle back out. Has anyone updated to the latest release of JET45? Not sure if a fix might have been included. I did some more testing and here is what I have found. I used the XFR button on the FGC to test the RA/BARO function thru InterfaceIT. If I program the RA/BARO thru InterfaceIT I have some functionality . . I can toggle thru the different settings of RA or BARO. It still takes 2 to 3 sometimes more button presses to toggle thru the settings. I cannot get the RA/BARO button programmed thru FSUIPC at all. It will not toggle thru but it will cause "MAN" to be displayed on the N1 gauge on DU2. I just don't think this particular button is going to play well with FSUIPC for whatever reason. (Posted by Eric Tomlin on 03-26-15) It's been recommended to try to use the offsets directly like in a program such as InterfaceIT, SIOC, etc. vs. FSUIPC. One thing for certain is that there are particular offsets that for whatever reason, do not always behave well when used in a hardware environment. They become "sticky" and those are the ones that often require multiple key strokes for whatever reason. I had that issue with the Master Caution Reset for a while until we changed the offset assigned to it (this was years ago now). I will report this thread to Jason for his review. (Posted by Shane Barnes on 03-29-15) NOTE: YOU HAVE TO BE RUNNING AT LEAST Jet45 V 1.0.0.5 FOR THIS TO WORK. Okay guys, I have found the correct parameter for the RA/BARO function. You can program the RA/BARO button thru the PoKeys card and FSUIPC. We were trying to use the wrong parameter. Bit 7 is 128 and when converted to hexadecimal = 0x80 Here is how you need to program it. Pilot side: OFFSET BYTE SET OFFSET = 73D5 PARAMETER= x80 OFFSET BYTE CLRBIT OFFSET = 73D5 PARAMETER = x80 First Officer side: OFFSET BYTE SET OFFSET= 73D6 PARAMETER= x80 OFFSET BYTE CLRBIT OFFSET=73D6 PARAMETER= x80 For future reference here is a chart breaking down the bit /hexadecimal/parameter BIT HEXADECIMAL/PARAMETER 0= 1 = x01 1= 2 = x02 2= 4 = x04 3= 8 = x08 4= 16 = x10 5= 32 = x20 6= 64 = x40 7= 128 = x80Programming Pokeys by Alan Norris
![]()


2017-10-10