


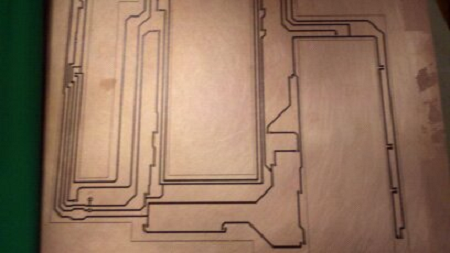
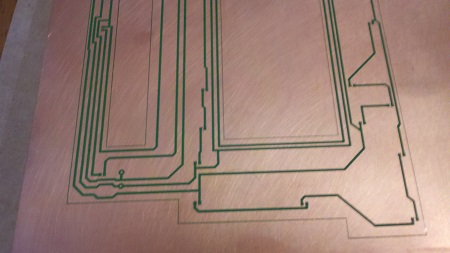
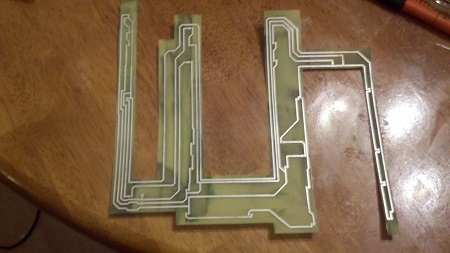
(Original thread started on 04-17-11 by Mark L.) I needed to create a flexible circuit board for the TQ cover to provide back lighting. This has caused considerable problems/hurtles. First to locate copper clad material thin enough to accommodate the 3" radius bend of the cover. There is a material called Pyralux/Mylar that would work well for this, but I was unable to locate any that would work for my project and budget. So I ended up with some scissors cut copper clad that is .01" thick with 1oz copper on both sides. Again, preferred single sided as that is all that is required, but unable to locate. Being extremely budget minded, my only choice to create this PCB was thru chemical etching as the material is just to thin for my CNC to mill this out. I tried a couple of times and failed which gets costly. So, after researching how to do this, I ended up buying some inkjet photo paper, printed the image in reverse using a HP5SI Laserjet printer at work and attempted to transfer the image to the copper. I then stole the wife's iron to heat up and transfer the toner image to the copper. Out of 5 attempts, I only ended up with 1 usable transfer. Even then I had to grab the black permanent marker and clean up a few areas. I went to Radio Shack and picked up a bottle of Ferric Chloride solution and did the etching. While it turned out okay, the trace edges and the trace itself ended up with some pitting as the etch solution was able to penetrate into and under the toner. So while it worked I wasn't satisfied with the results. I decided to try PCB Fab-In-a-Box, the toner transfer paper is on the pricey side, but I was spending more on my current process. I decided to buy the laminator they recommend instead=d of using the wife's iron as it's all about lbs per sq inch pressure and heat to have a successful transfer. The first attempt didn't go well and after talking with Frank at PulsarProFX (PCB Fab-In-a-Box), he felt it was the printer/toner was not up to par. Knowing the printer at work as seen better days, I opted to purchase a used HP 2300 Laserjet on eBay for $60 plus another $91 for a authentic HP toner cart I found on Amazon. Another key item to this process is that the toner must or really should be HP not a comparable refill and the toner density set to max (5). This weekend I received the printer and printed up another sheet, ran the transfer/copper clad thru the laminator twice and ended up with a perfect image transfer. Immediately after it came out of the laminator I placed it into a pan of cool water where after 1 minute the paper easily released without any intervention on my part. Not to mention I didn't have to scrub any photo paper residue off the board. This was clean and easy! I then used the PCB Foil that is laminated over the transferred trace on the copper. This helps seal the toner and prevent the acid solution from seeping thru the toner and attacking the copper where your trace would be: Finally, after cutting the PCB from the copper clad stock, I placed it in the etching solution followed by a bath in Liquid Tin and ended up with what I consider a perfect flexible board for my TQ cover: I found this product to be all that it claims and painless to create a PCB in the 8 minutes they state on their website. I won't go back to the photo paper or magazine paper methods. It's just not worth my time and money. While I did have to spend the extra cash for the laminator and printer, they are both items I can use for other than this process (tired of buying high price inkjet carts). If you find that you need to make your own circuit board and not looking to invest in the PhotoSensitive method, this is the way to go in my book. (Original thread started on 04-17-11 by Mark L.) I needed to create a flexible circuit board for the TQ cover to provide back lighting. This has caused considerable problems/hurtles. First to locate copper clad material thin enough to accommodate the 3" radius bend of the cover. There is a material called Pyralux/Mylar that would work well for this, but I was unable to locate any that would work for my project and budget. So I ended up with some scissors cut copper clad that is .01" thick with 1oz copper on both sides. Again, preferred single sided as that is all that is required, but unable to locate. Being extremely budget minded, my only choice to create this PCB was thru chemical etching as the material is just to thin for my CNC to mill this out. I tried a couple of times and failed which gets costly. So, after researching how to do this, I ended up buying some inkjet photo paper, printed the image in reverse using a HP5SI Laserjet printer at work and attempted to transfer the image to the copper. I then stole the wife's iron to heat up and transfer the toner image to the copper. Out of 5 attempts, I only ended up with 1 usable transfer. Even then I had to grab the black permanent marker and clean up a few areas. I went to Radio Shack and picked up a bottle of Ferric Chloride solution and did the etching. While it turned out okay, the trace edges and the trace itself ended up with some pitting as the etch solution was able to penetrate into and under the toner. So while it worked I wasn't satisfied with the results. I decided to try PCB Fab-In-a-Box, the toner transfer paper is on the pricey side, but I was spending more on my current process. I decided to buy the laminator they recommend instead=d of using the wife's iron as it's all about lbs per sq inch pressure and heat to have a successful transfer. The first attempt didn't go well and after talking with Frank at PulsarProFX (PCB Fab-In-a-Box), he felt it was the printer/toner was not up to par. Knowing the printer at work as seen better days, I opted to purchase a used HP 2300 Laserjet on eBay for $60 plus another $91 for a authentic HP toner cart I found on Amazon. Another key item to this process is that the toner must or really should be HP not a comparable refill and the toner density set to max (5). This weekend I received the printer and printed up another sheet, ran the transfer/copper clad thru the laminator twice and ended up with a perfect image transfer. Immediately after it came out of the laminator I placed it into a pan of cool water where after 1 minute the paper easily released without any intervention on my part. Not to mention I didn't have to scrub any photo paper residue off the board. This was clean and easy! I then used the PCB Foil that is laminated over the transferred trace on the copper. This helps seal the toner and prevent the acid solution from seeping thru the toner and attacking the copper where your trace would be: Finally, after cutting the PCB from the copper clad stock, I placed it in the etching solution followed by a bath in Liquid Tin and ended up with what I consider a perfect flexible board for my TQ cover: I found this product to be all that it claims and painless to create a PCB in the 8 minutes they state on their website. I won't go back to the photo paper or magazine paper methods. It's just not worth my time and money. While I did have to spend the extra cash for the laminator and printer, they are both items I can use for other than this process (tired of buying high price inkjet carts). If you find that you need to make your own circuit board and not looking to invest in the PhotoSensitive method, this is the way to go in my book.PCB Fab In A Box Review by Mark L.
![]()
2017-10-10