


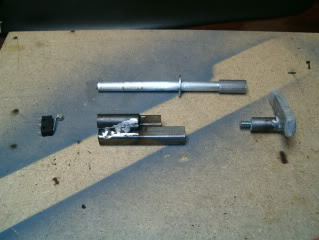
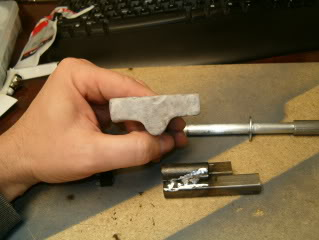
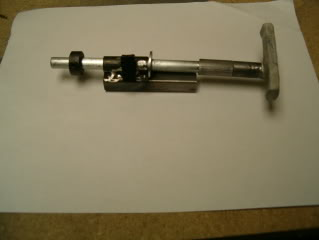
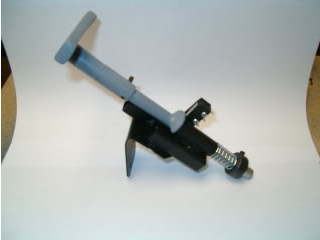
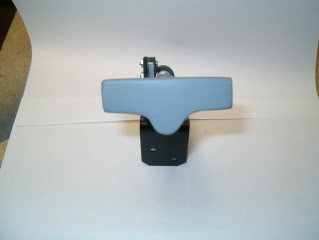
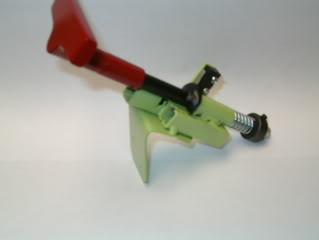
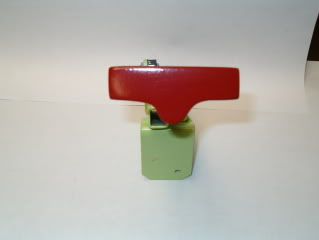
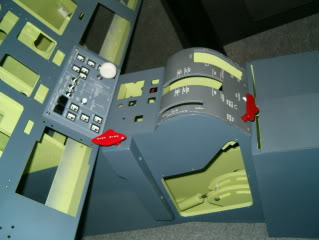
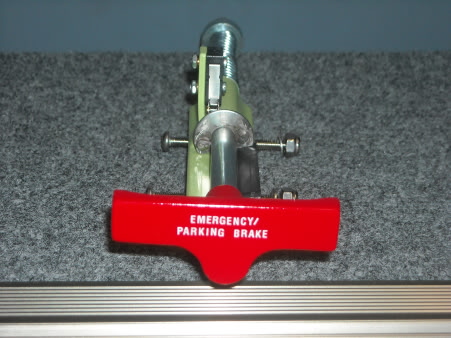
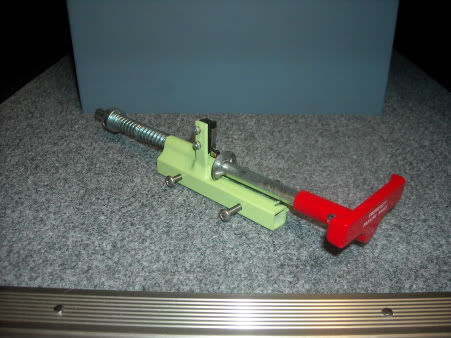
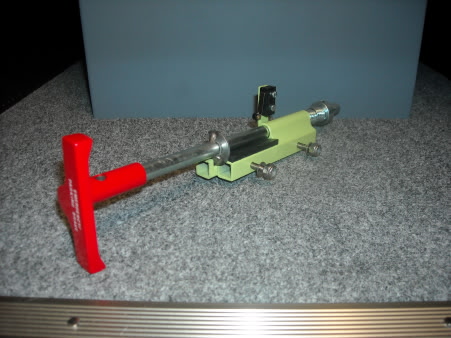
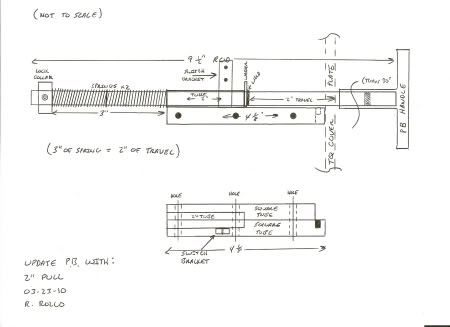
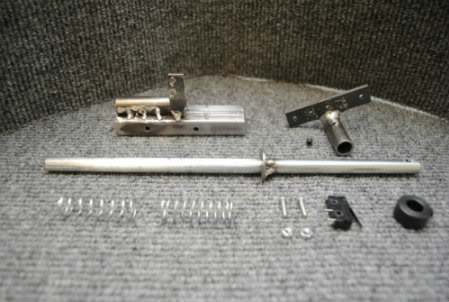
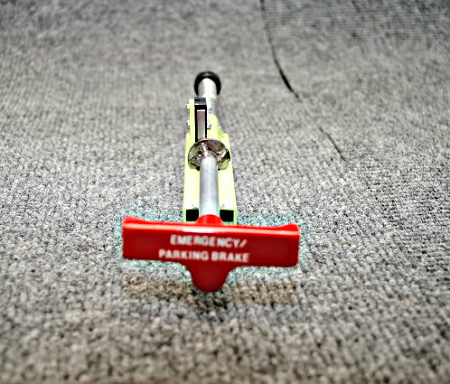
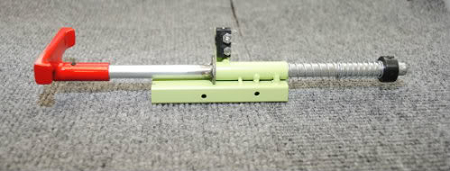
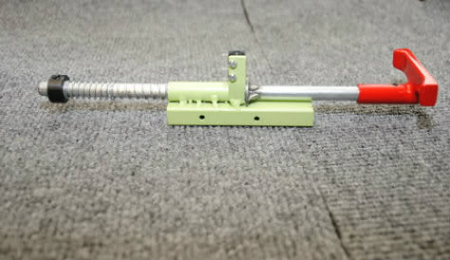
(Original thread started on 12-22-09 by Ron Rollo) Shane was asking about how I did my parking brake on my flight box a couple years back. Although it works fine in the flight box, we will be developing a new one for the full scale Lear45 using some of the same ideas. (Posted by Shane Barnes on 01-16-10) I am getting some ideas together to start working on the Emer/Park brake handle. In FSX I can only find an interface for parking brake . . nothing for emergency brake so I assume that FS only modeled the parking brake function as I would think the emergency brake would operate the same. I am thinking of only adding one switch to the handle assembly as I really do not see a reason to add a second switch. My early plans here are to model a handle that will trip the switch if the handle is pulled straight out or if it is turned and pulled out. Anyone see any problems with this? Anything I am missing here? Do I need the second switch to disengage/turn off the parking brake? (Posted by Ron Rollo on 01-17-10) In the real airplane, just by pulling the brake handle applies braking to the wheels (emergency if your trying to stop and your primary brakes have failed). When you turn it to the right after it has been pulled, it locks the brakes and the handle, acting like a parking brake. There is only one offset for this function in both FS9 and FSX. (Just for fun, try to land with the parking brake set and see what happens. I would like to know.) I used two switches in my flight box but they were attached to the same parking brake offset in FS9. At the time, it was the only way I could figure out how to get the brake to trigger for both functions, emergency and parking. In the new design, all you need to do is find a way to trigger the offset switch when the brake handle is pulled straight back. But when you turn the handle to the right to lock the parking brake, it has to remain pulled out and still triggering the offset switch. Because I was working with limited space, it was easier to just add the second switch to sense that the handle was turned 90 degrees. Long story short, the brake handle does work like one in a vehicle. If your primary brakes fails, you have an emergency brake to help slow or stop the aircraft. It is also used as a parking brake after your at the gate as an example. Sorry for the confusion in my first post. Looking forward to seeing your brake handle design! (Posted by Shane Barnes on 01-19-10) Hey guys, I have some photos of a parking brake assembly I have been working on. It is still in a very rough state as I am still working out a couple issues but overall I think this will work. The assembly still has more work to be completed but it will give you an idea on how it is made. This photo shows most of the parts. I had to make the handle portion in two pieces. The handle will screw off the rod so the TQ plate can be removed if needed without removing the whole park brake assembly: This photo shows the handle. I have applied the epoxy but have not sanded the handle to the final shape: This is the parking brake assembly. A drill stop is attached to the end of the rod to keep the rod from sliding all the way out: A washer is attached near the middle of the rod to act as a catch. You pull the handle out then turn to the right. The washer locks it in place. A SPDT roller lever switch will be attached behind the washer. The switch will contact the washer. When the washer is against the switch the brakes are in the off position. As soon as you move the handle forward, the washer disconnects from the switch and the brakes are applied. A spring will be attached between the drill stop and the tube that the rod slides in for tension. This photo shows the other side of the assembly including the cutout for the washer to rotate into. Ron I hope you don't have a patent on your park brake assembly design cause I stole ideas from it! The overall length that sticks back in the TQ pedestal is 4 inches and the height and width is 1 inch. The design could be changed a little to allow a smaller height or width depending on how you want to rotate the assembly for mounting in the TQ Ped. I will pin one end and put a set screw on the handle. This will make it easier to take the handle off if need be. I also added a #15 compression spring to the assembly. I had to cut the spring down to about 3/4 inch long. The part # from FASTENAL for this spring is 110166687. This added some pressure to the assembly when you pull the handle out . . giving you some feedback, and if you let the handle go it will return to an off position by itself unless you turn it to the right and lock it in place to apply parking brake. UPDATE: I have the emergency/parking brake assembly almost completed. I still need to cut off the roll pin that Scott suggested be installed and final paint. The handle of course will be red and still debating on whether to paint the assembly body black or the same green we used on the shell: Handle rotated and locked in the parking brake position: Front shot of handle: The assembly part is not that difficult to make, it is the handle that is time consuming. I cut the basic shape of the handle out, weld the piece of 1 inch tubing to it then apply 5 minute epoxy putty to mold the shape. The shaping is all done by hand and then sanding to final shape, priming, applying putty to fill in small voids, then priming several more times for final paint. Okay guys, I have painted the parking brake assembly in final colors. All that is left is to letter the handle with dry transfer lettering which I discovered this evening I do not have enough letters so that will have to wait till later this week. Assembly in the off position: Assembly in the on position: Front view no lettering yet: And the assembly bolted into the TQ pedestal. If you look at the top right of the access door you can see the assembly: (Posted by Ron Rollo on 05-17-10) Thanks to Shane for his hand in this part of the project, I have finalized my EMERGENCY/ PARKING BRAKE assembly. It has a two inch pull and locks to the right when it is in parking brake mode. I used dry transfers for the lettering and then a clear coat to protect them: Here is a quick drawing of the latest version of our Parking Brake assembly: Feel free to make your own assembly based off of this drawing, or if you are interested in having one made, please contact Shane Barnes. Thanks Shane! (Posted by Shane Barnes on 05-17-10) Hey Ron, that lettering looks great, I've yet to complete my own, of course you understand how that is! As Ron stated anyone that wants to build one of these feel free to copy the design or if anyone wants to take the project on to make these for other members that is okay with me. The design that Ron and I came up with is for the benefit of all members. (Posted by Ron Rollo on 01-22-11) UPDATE: Speaking of Parking Brake drawings, I recently updated the drawing for a few guys not to long ago. Here is my latest drawing: Your right, I cut off the catch on the end to get it to turn either direction. You can see the difference between the two drawings posted above in this tread. Here is a photo of the finished Parking/Emergency Brake installed in the Project45 TQ Module: (Posted by Shane Barnes on 04-23-12) I have completed a parking brake module for Randy to go along with the real TQ parts and TQ module that Ron designed/built. This module will only work with the real parts and Ron's TQ module design. Mark has a similar product that is designed to work with his TQ module as it needed to be designed a little different to fit the space requirements. So if you have or plan on purchasing Mark's TQ module he has a parking brake kit designed specifically for his kit so no one is left out. Either direction you go you are able to find a parking brake handle for your build. Here are a few photos of the Parking Brake module. This is what you start out with, some of the parts have already been welded together: Assembled and ready for the handle to be molded and painted and the body to be painted: After molding and painting: The parking brake handle will rotate 90 degrees in either direction once pulled out to its extended position. The handle will also lock in place for use as a parking brake. Once released the spring action will return the handle to its off position. (Posted by DonnyRay Jones on 08-04-15) Those are VERY nice looking brake handles. I need one! I've just been working on the TQ pedestal this weekend and thus have been reading through this topic. The "one switch or two" discussion is interesting. Unlike an automobile, the "Emergency" brake on the Lear 45 is NOT a backup or separate set of brakes. Only one set of "brakes" exist, and they are hydraulically actuated. The normal system is a "brake-by-wire system that electronically controls the hydraulic brake pressure that is applied to the brakes". (Quotes here from the Lear factory maintenance manual.) "Should the main hydraulic system fail, the auxiliary hydraulic system provides pressure for normal braking. In the event of multiple failures (total hydraulic and /or electrical) emergency braking pressure is available from the brake accumulator via the hand operated emergency/parking brake system. The brake accumulator also powers the parking brake and is set by locking the emergency/parking brake handle...to the applied position." The emergency/parking brake handle MECHANICALLY operates the emergency/parking brake VALVE which allows pressure from the brake accumulator to drive the hydraulically actuated brakes. The brake accumulator is pressurized to approximately 3000 psi and is sized to provide "at least 6 brake applications". The emergency brake system does not provide differential braking and there is no anti-skid protection. It's just you, that handle, and the binders, and once that accumulator bleeds down it's just you and the fence at the far end of the runway that's getting larger and larger in the windshield. Good luck! (Original thread started on 12-22-09 by Ron Rollo) Shane was asking about how I did my parking brake on my flight box a couple years back. Although it works fine in the flight box, we will be developing a new one for the full scale Lear45 using some of the same ideas. (Posted by Shane Barnes on 01-16-10) I am getting some ideas together to start working on the Emer/Park brake handle. In FSX I can only find an interface for parking brake . . nothing for emergency brake so I assume that FS only modeled the parking brake function as I would think the emergency brake would operate the same. I am thinking of only adding one switch to the handle assembly as I really do not see a reason to add a second switch. My early plans here are to model a handle that will trip the switch if the handle is pulled straight out or if it is turned and pulled out. Anyone see any problems with this? Anything I am missing here? Do I need the second switch to disengage/turn off the parking brake? (Posted by Ron Rollo on 01-17-10) In the real airplane, just by pulling the brake handle applies braking to the wheels (emergency if your trying to stop and your primary brakes have failed). When you turn it to the right after it has been pulled, it locks the brakes and the handle, acting like a parking brake. There is only one offset for this function in both FS9 and FSX. (Just for fun, try to land with the parking brake set and see what happens. I would like to know.) I used two switches in my flight box but they were attached to the same parking brake offset in FS9. At the time, it was the only way I could figure out how to get the brake to trigger for both functions, emergency and parking. In the new design, all you need to do is find a way to trigger the offset switch when the brake handle is pulled straight back. But when you turn the handle to the right to lock the parking brake, it has to remain pulled out and still triggering the offset switch. Because I was working with limited space, it was easier to just add the second switch to sense that the handle was turned 90 degrees. Long story short, the brake handle does work like one in a vehicle. If your primary brakes fails, you have an emergency brake to help slow or stop the aircraft. It is also used as a parking brake after your at the gate as an example. Sorry for the confusion in my first post. Looking forward to seeing your brake handle design! (Posted by Shane Barnes on 01-19-10) Hey guys, I have some photos of a parking brake assembly I have been working on. It is still in a very rough state as I am still working out a couple issues but overall I think this will work. The assembly still has more work to be completed but it will give you an idea on how it is made. This photo shows most of the parts. I had to make the handle portion in two pieces. The handle will screw off the rod so the TQ plate can be removed if needed without removing the whole park brake assembly: This photo shows the handle. I have applied the epoxy but have not sanded the handle to the final shape: This is the parking brake assembly. A drill stop is attached to the end of the rod to keep the rod from sliding all the way out: A washer is attached near the middle of the rod to act as a catch. You pull the handle out then turn to the right. The washer locks it in place. A SPDT roller lever switch will be attached behind the washer. The switch will contact the washer. When the washer is against the switch the brakes are in the off position. As soon as you move the handle forward, the washer disconnects from the switch and the brakes are applied. A spring will be attached between the drill stop and the tube that the rod slides in for tension. This photo shows the other side of the assembly including the cutout for the washer to rotate into. Ron I hope you don't have a patent on your park brake assembly design cause I stole ideas from it! The overall length that sticks back in the TQ pedestal is 4 inches and the height and width is 1 inch. The design could be changed a little to allow a smaller height or width depending on how you want to rotate the assembly for mounting in the TQ Ped. I will pin one end and put a set screw on the handle. This will make it easier to take the handle off if need be. I also added a #15 compression spring to the assembly. I had to cut the spring down to about 3/4 inch long. The part # from FASTENAL for this spring is 110166687. This added some pressure to the assembly when you pull the handle out . . giving you some feedback, and if you let the handle go it will return to an off position by itself unless you turn it to the right and lock it in place to apply parking brake. UPDATE: I have the emergency/parking brake assembly almost completed. I still need to cut off the roll pin that Scott suggested be installed and final paint. The handle of course will be red and still debating on whether to paint the assembly body black or the same green we used on the shell: Handle rotated and locked in the parking brake position: Front shot of handle: The assembly part is not that difficult to make, it is the handle that is time consuming. I cut the basic shape of the handle out, weld the piece of 1 inch tubing to it then apply 5 minute epoxy putty to mold the shape. The shaping is all done by hand and then sanding to final shape, priming, applying putty to fill in small voids, then priming several more times for final paint. Okay guys, I have painted the parking brake assembly in final colors. All that is left is to letter the handle with dry transfer lettering which I discovered this evening I do not have enough letters so that will have to wait till later this week. Assembly in the off position: Assembly in the on position: Front view no lettering yet: And the assembly bolted into the TQ pedestal. If you look at the top right of the access door you can see the assembly: (Posted by Ron Rollo on 05-17-10) Thanks to Shane for his hand in this part of the project, I have finalized my EMERGENCY/ PARKING BRAKE assembly. It has a two inch pull and locks to the right when it is in parking brake mode. I used dry transfers for the lettering and then a clear coat to protect them: Here is a quick drawing of the latest version of our Parking Brake assembly: Feel free to make your own assembly based off of this drawing, or if you are interested in having one made, please contact Shane Barnes. Thanks Shane! (Posted by Shane Barnes on 05-17-10) Hey Ron, that lettering looks great, I've yet to complete my own, of course you understand how that is! As Ron stated anyone that wants to build one of these feel free to copy the design or if anyone wants to take the project on to make these for other members that is okay with me. The design that Ron and I came up with is for the benefit of all members. (Posted by Ron Rollo on 01-22-11) UPDATE: Speaking of Parking Brake drawings, I recently updated the drawing for a few guys not to long ago. Here is my latest drawing: Your right, I cut off the catch on the end to get it to turn either direction. You can see the difference between the two drawings posted above in this tread. Here is a photo of the finished Parking/Emergency Brake installed in the Project45 TQ Module: (Posted by Shane Barnes on 04-23-12) I have completed a parking brake module for Randy to go along with the real TQ parts and TQ module that Ron designed/built. This module will only work with the real parts and Ron's TQ module design. Mark has a similar product that is designed to work with his TQ module as it needed to be designed a little different to fit the space requirements. So if you have or plan on purchasing Mark's TQ module he has a parking brake kit designed specifically for his kit so no one is left out. Either direction you go you are able to find a parking brake handle for your build. Here are a few photos of the Parking Brake module. This is what you start out with, some of the parts have already been welded together: Assembled and ready for the handle to be molded and painted and the body to be painted: After molding and painting: The parking brake handle will rotate 90 degrees in either direction once pulled out to its extended position. The handle will also lock in place for use as a parking brake. Once released the spring action will return the handle to its off position. (Posted by DonnyRay Jones on 08-04-15) Those are VERY nice looking brake handles. I need one! I've just been working on the TQ pedestal this weekend and thus have been reading through this topic. The "one switch or two" discussion is interesting. Unlike an automobile, the "Emergency" brake on the Lear 45 is NOT a backup or separate set of brakes. Only one set of "brakes" exist, and they are hydraulically actuated. The normal system is a "brake-by-wire system that electronically controls the hydraulic brake pressure that is applied to the brakes". (Quotes here from the Lear factory maintenance manual.) "Should the main hydraulic system fail, the auxiliary hydraulic system provides pressure for normal braking. In the event of multiple failures (total hydraulic and /or electrical) emergency braking pressure is available from the brake accumulator via the hand operated emergency/parking brake system. The brake accumulator also powers the parking brake and is set by locking the emergency/parking brake handle...to the applied position." The emergency/parking brake handle MECHANICALLY operates the emergency/parking brake VALVE which allows pressure from the brake accumulator to drive the hydraulically actuated brakes. The brake accumulator is pressurized to approximately 3000 psi and is sized to provide "at least 6 brake applications". The emergency brake system does not provide differential braking and there is no anti-skid protection. It's just you, that handle, and the binders, and once that accumulator bleeds down it's just you and the fence at the far end of the runway that's getting larger and larger in the windshield. Good luck!Parking / Emergency Brake Discussion
![]()


2017-10-10