


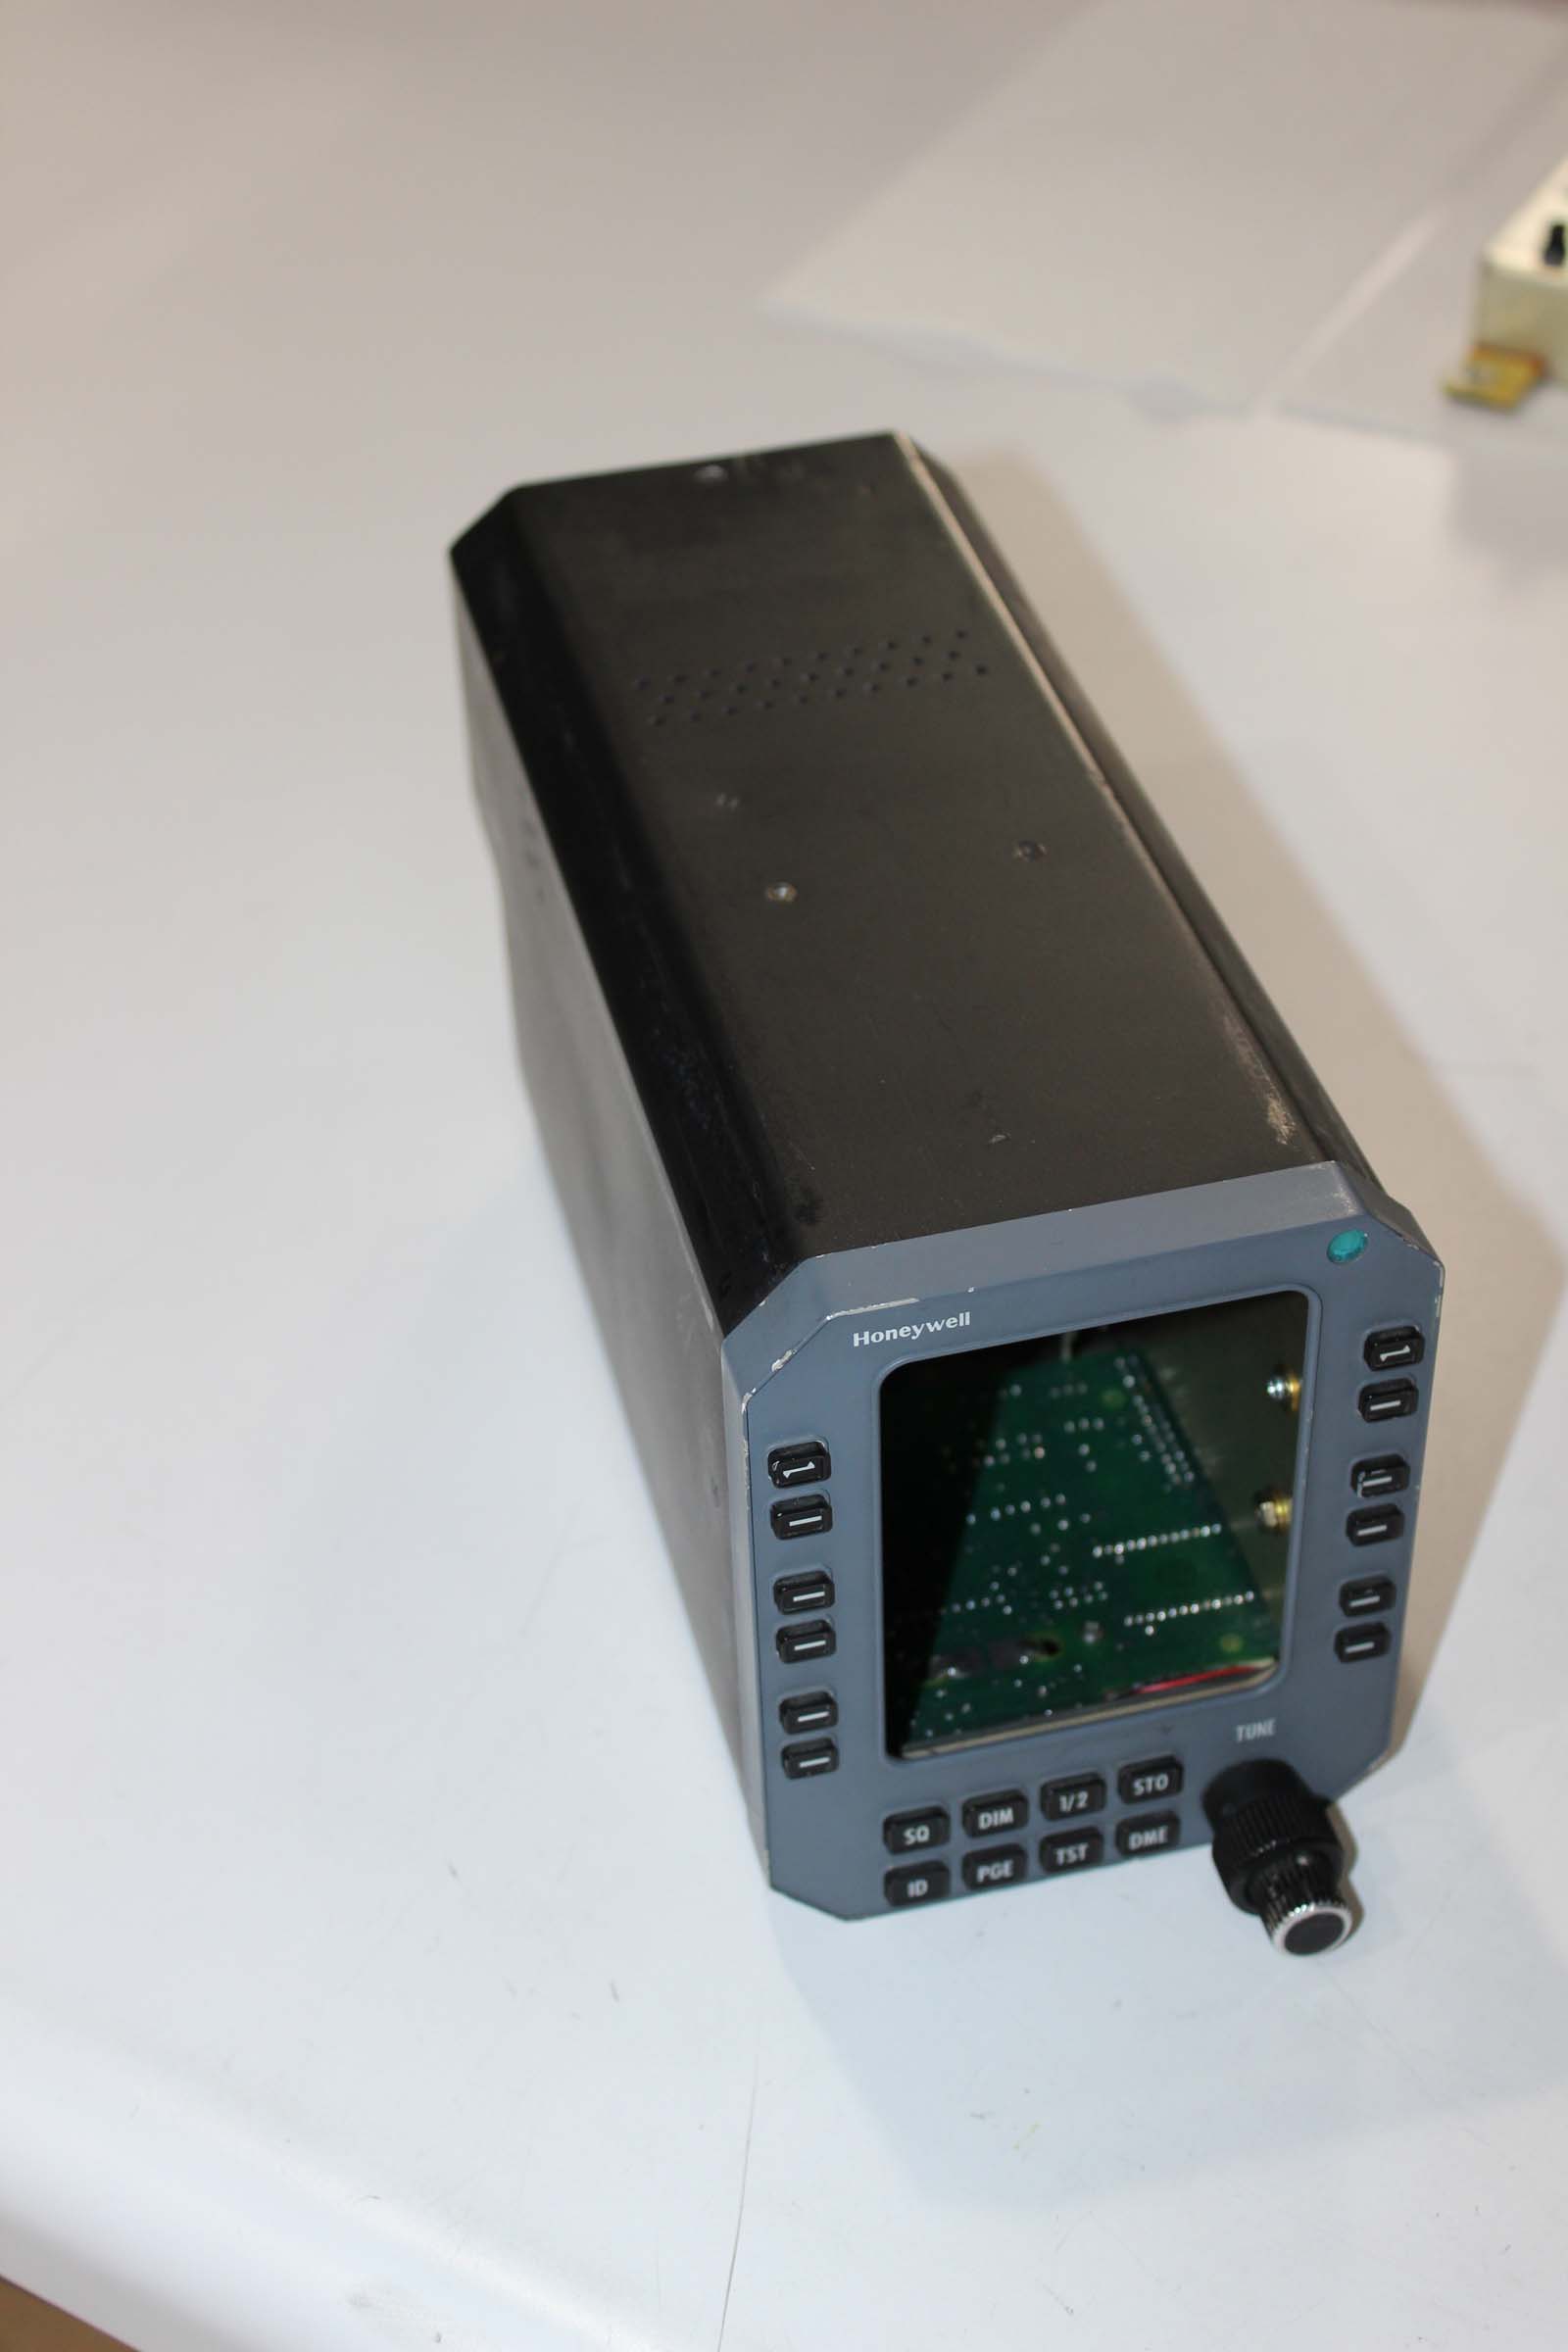
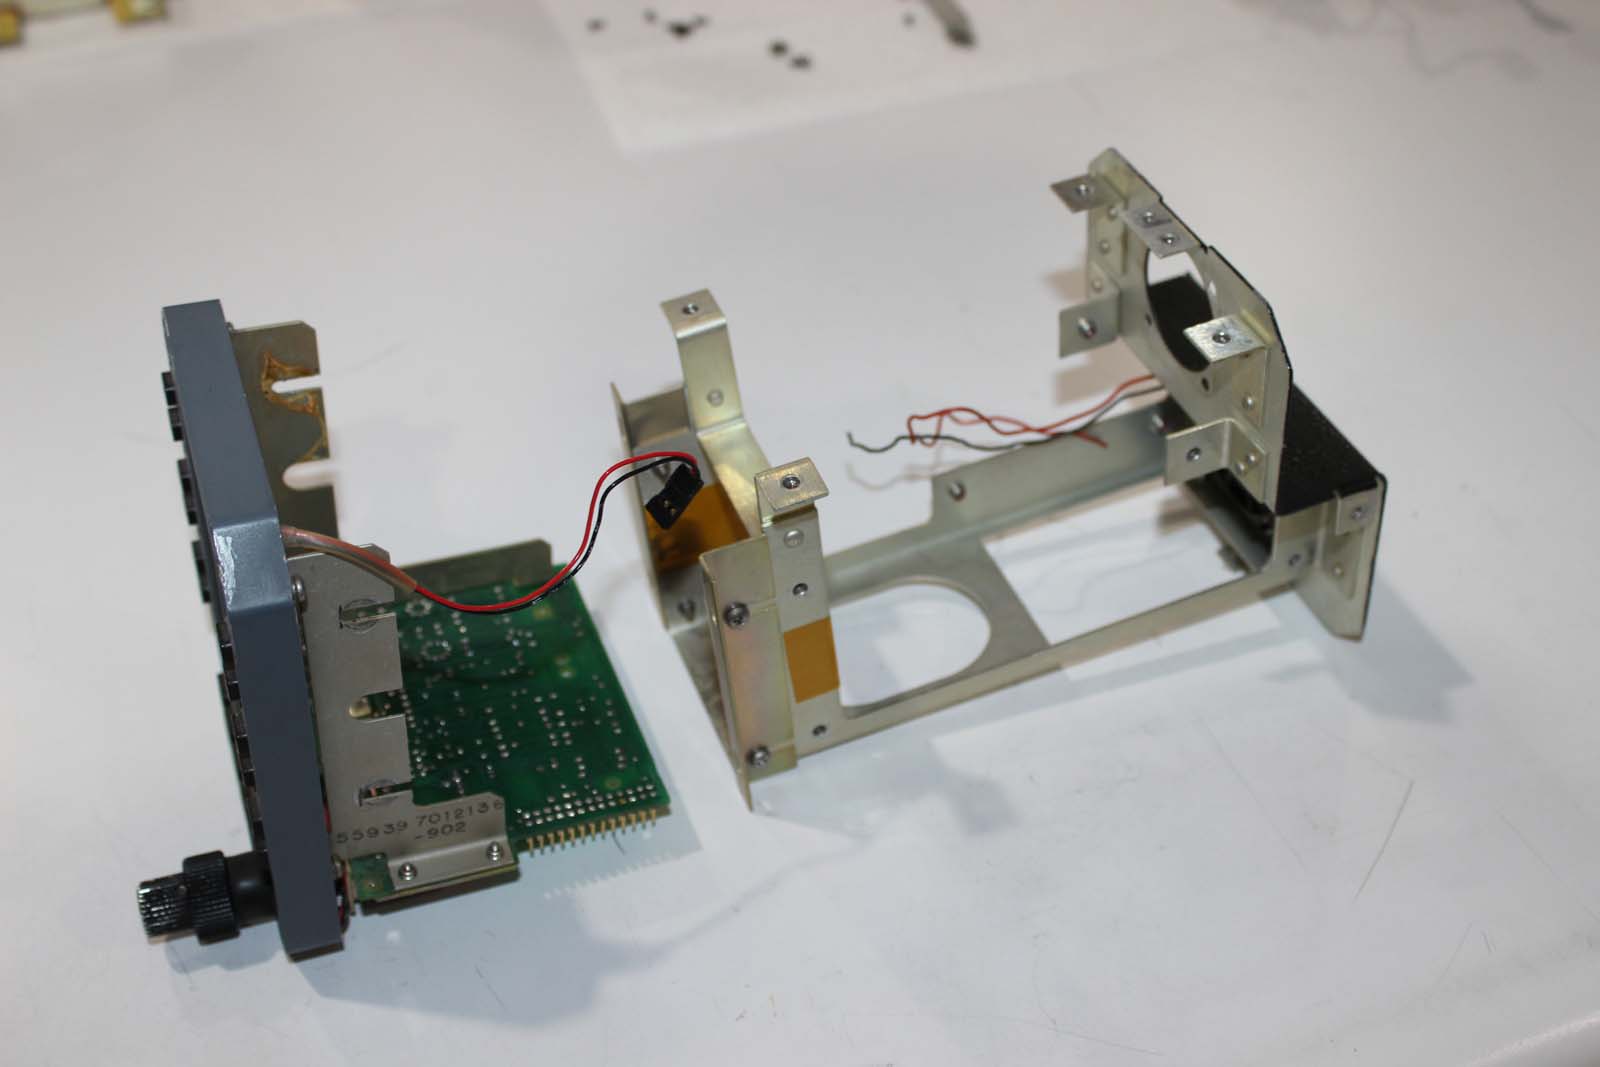
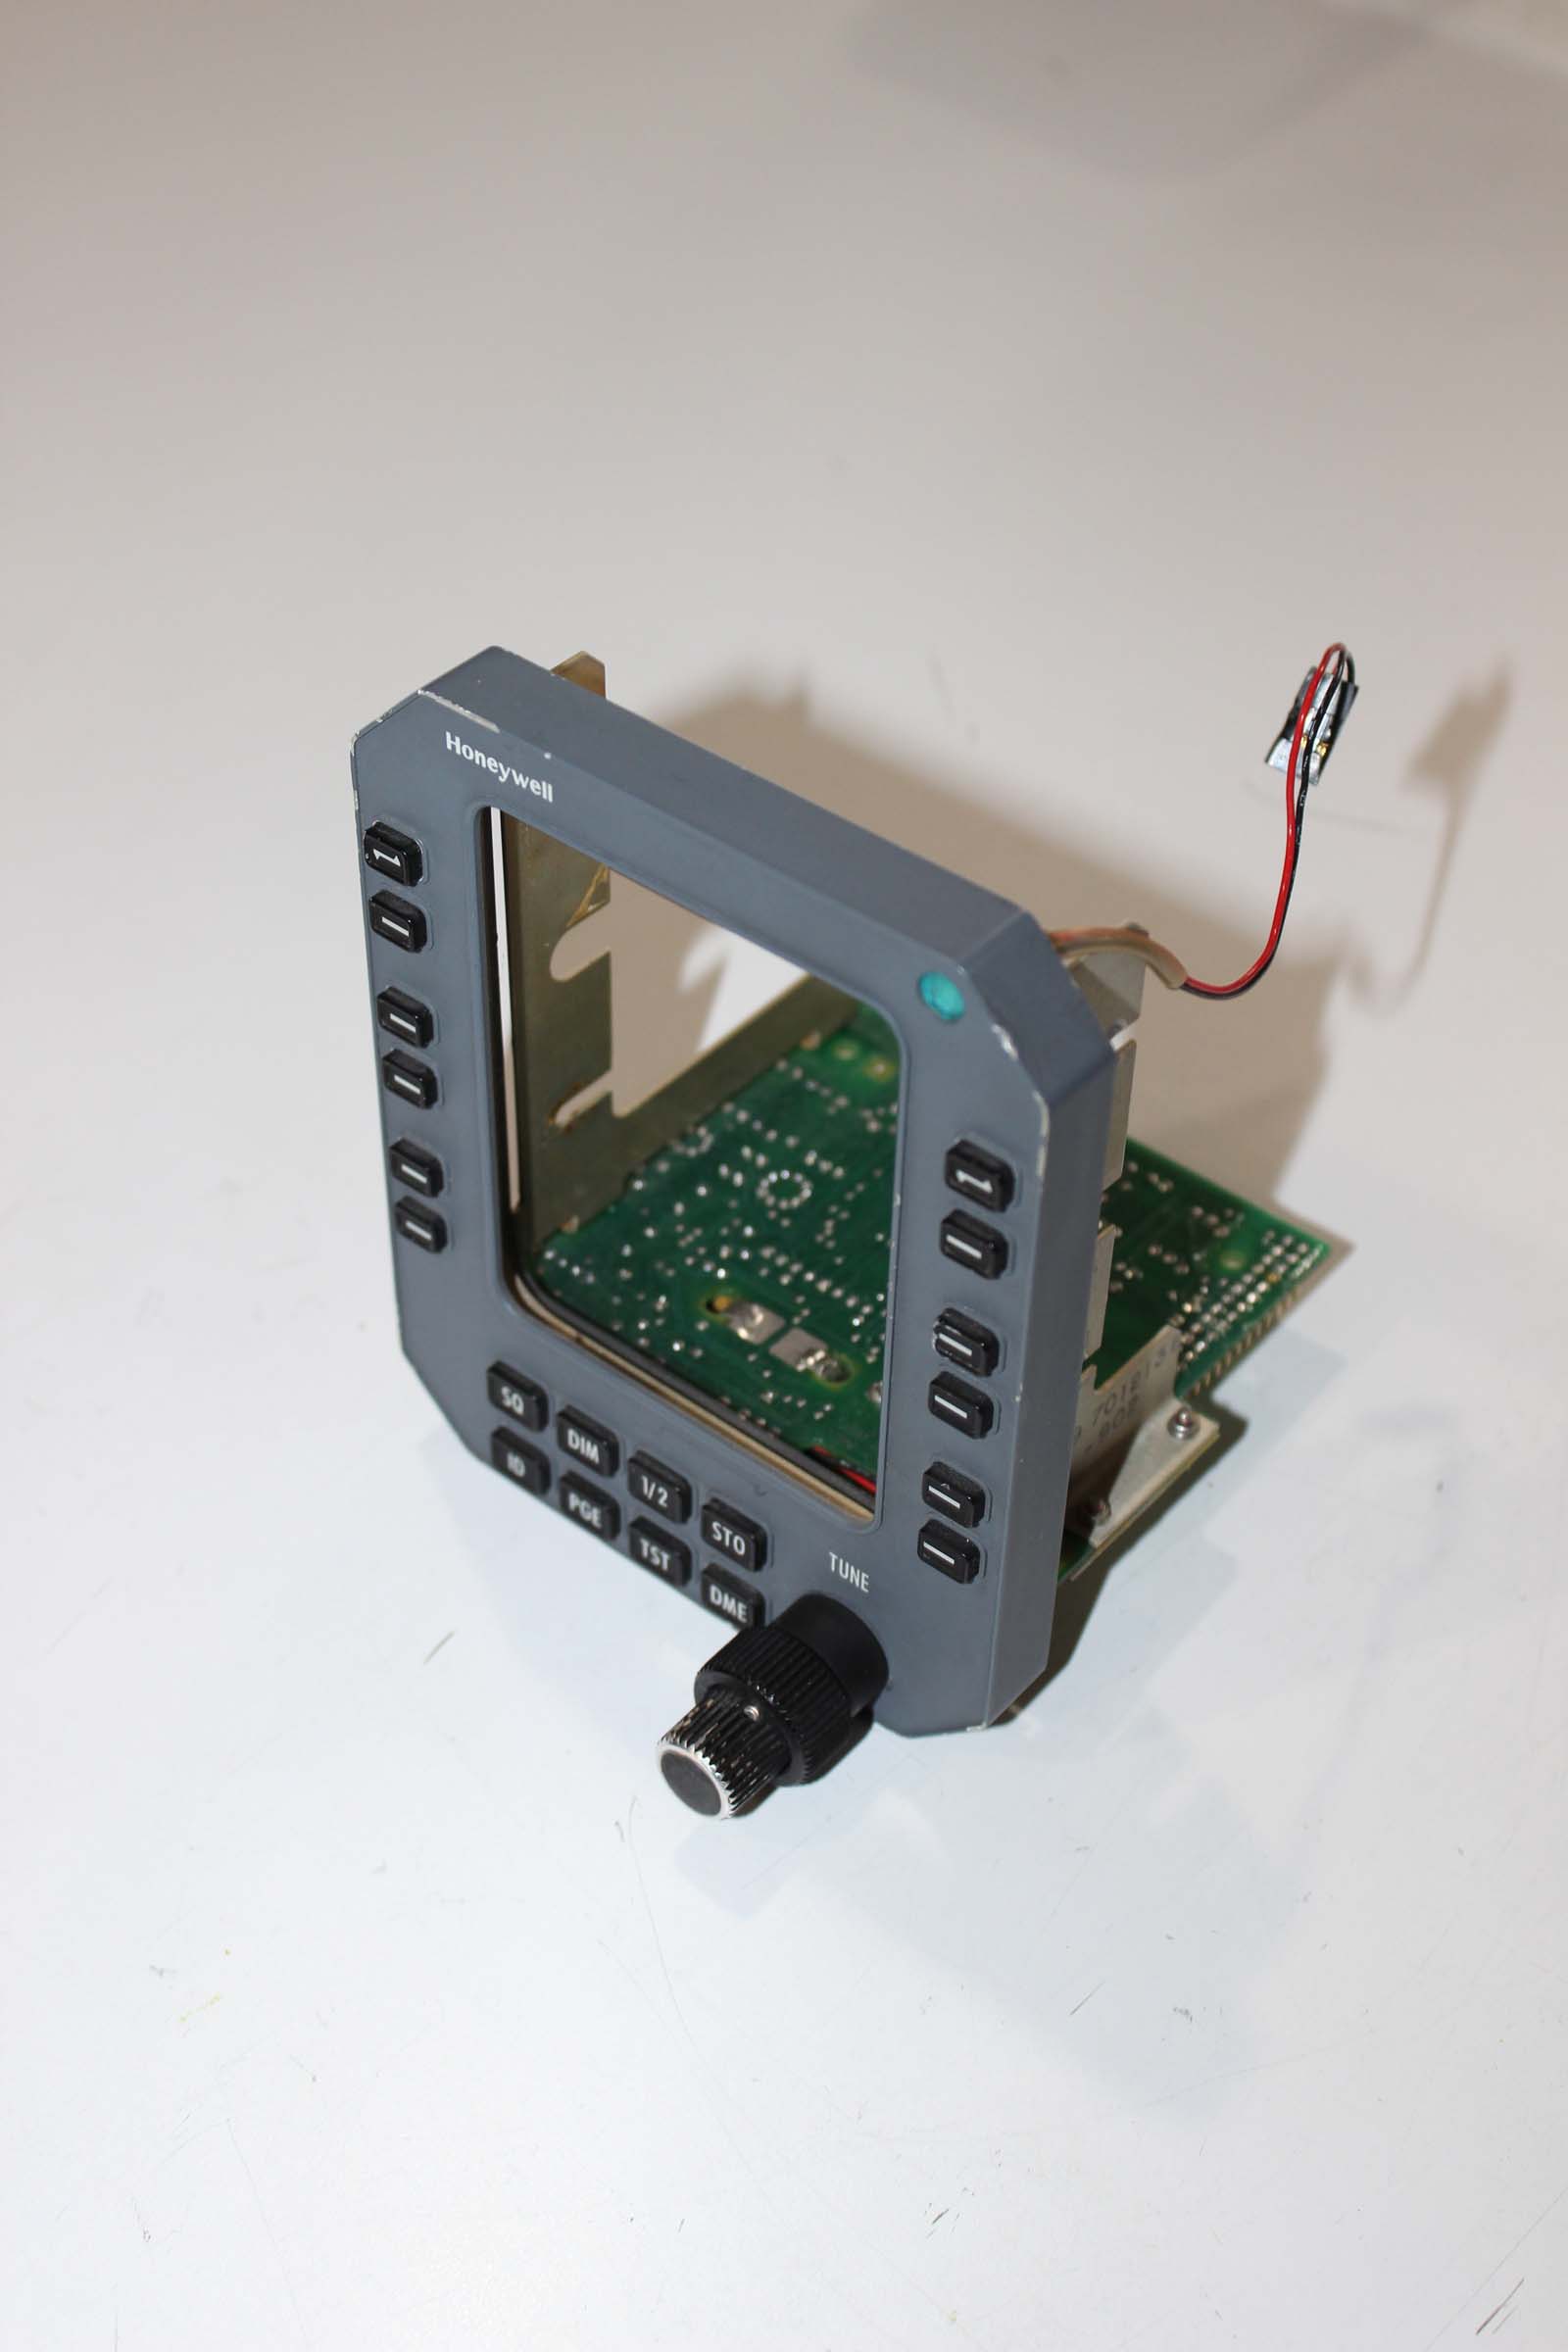
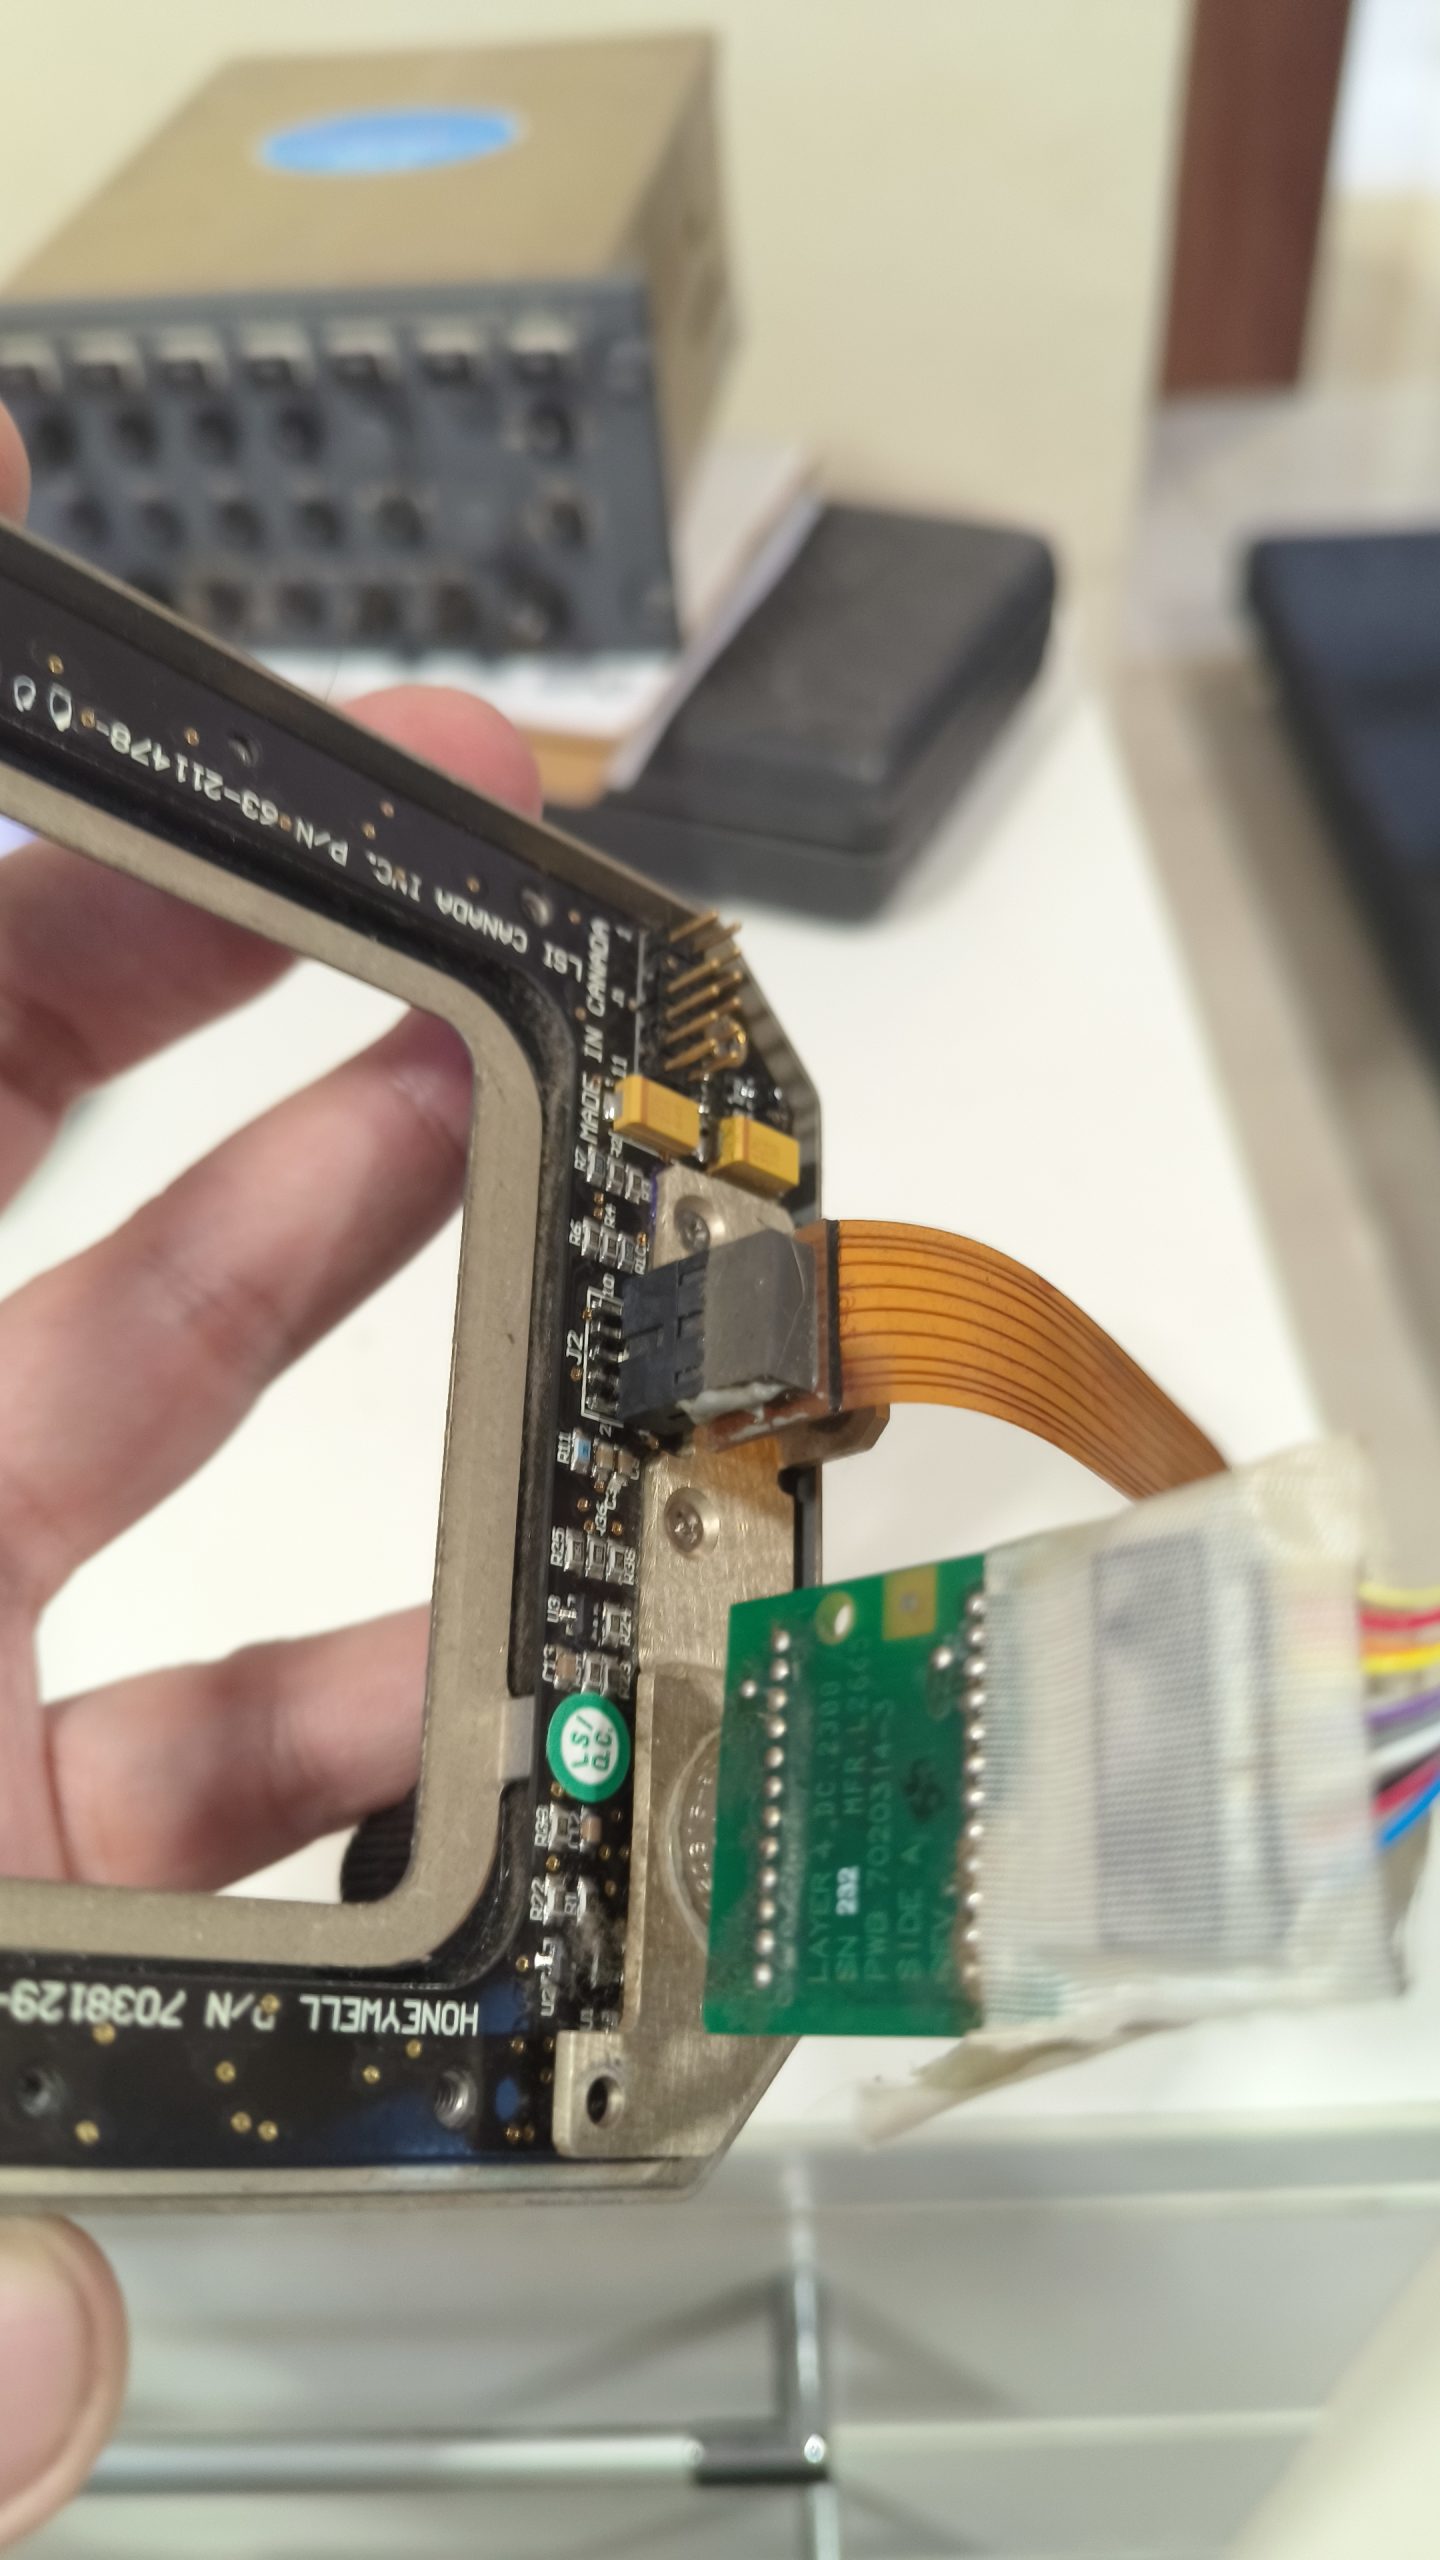
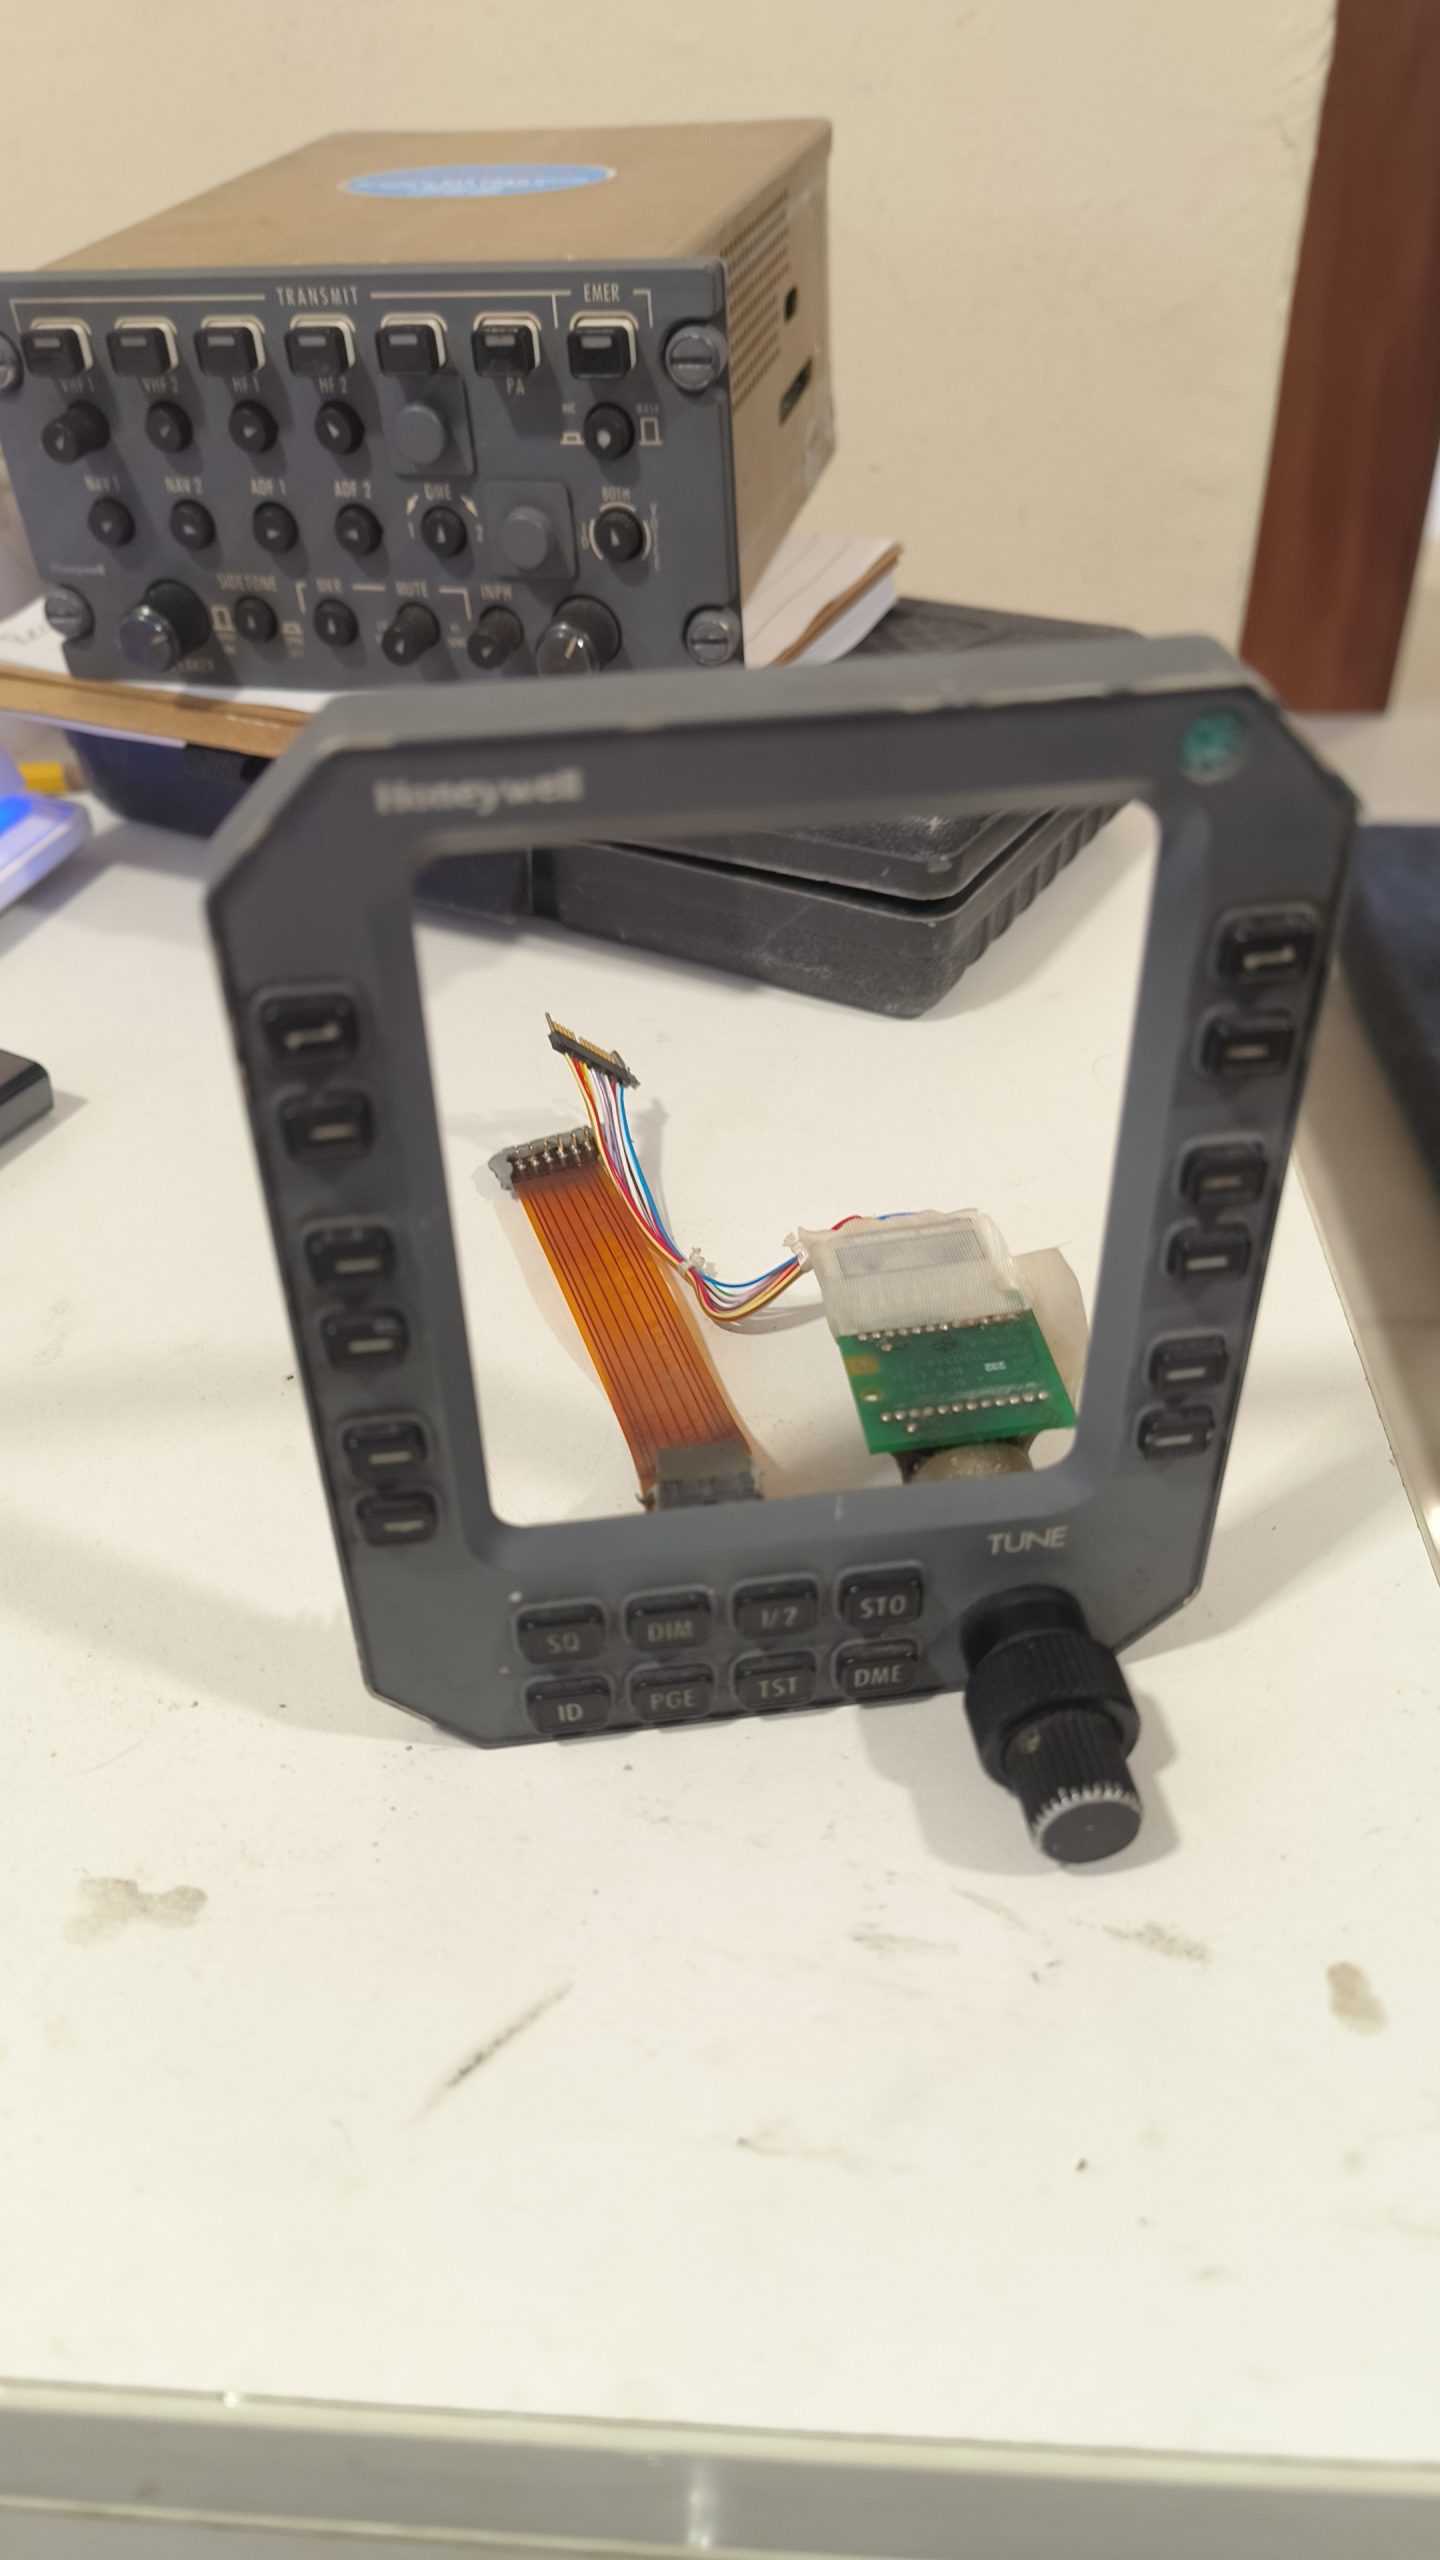
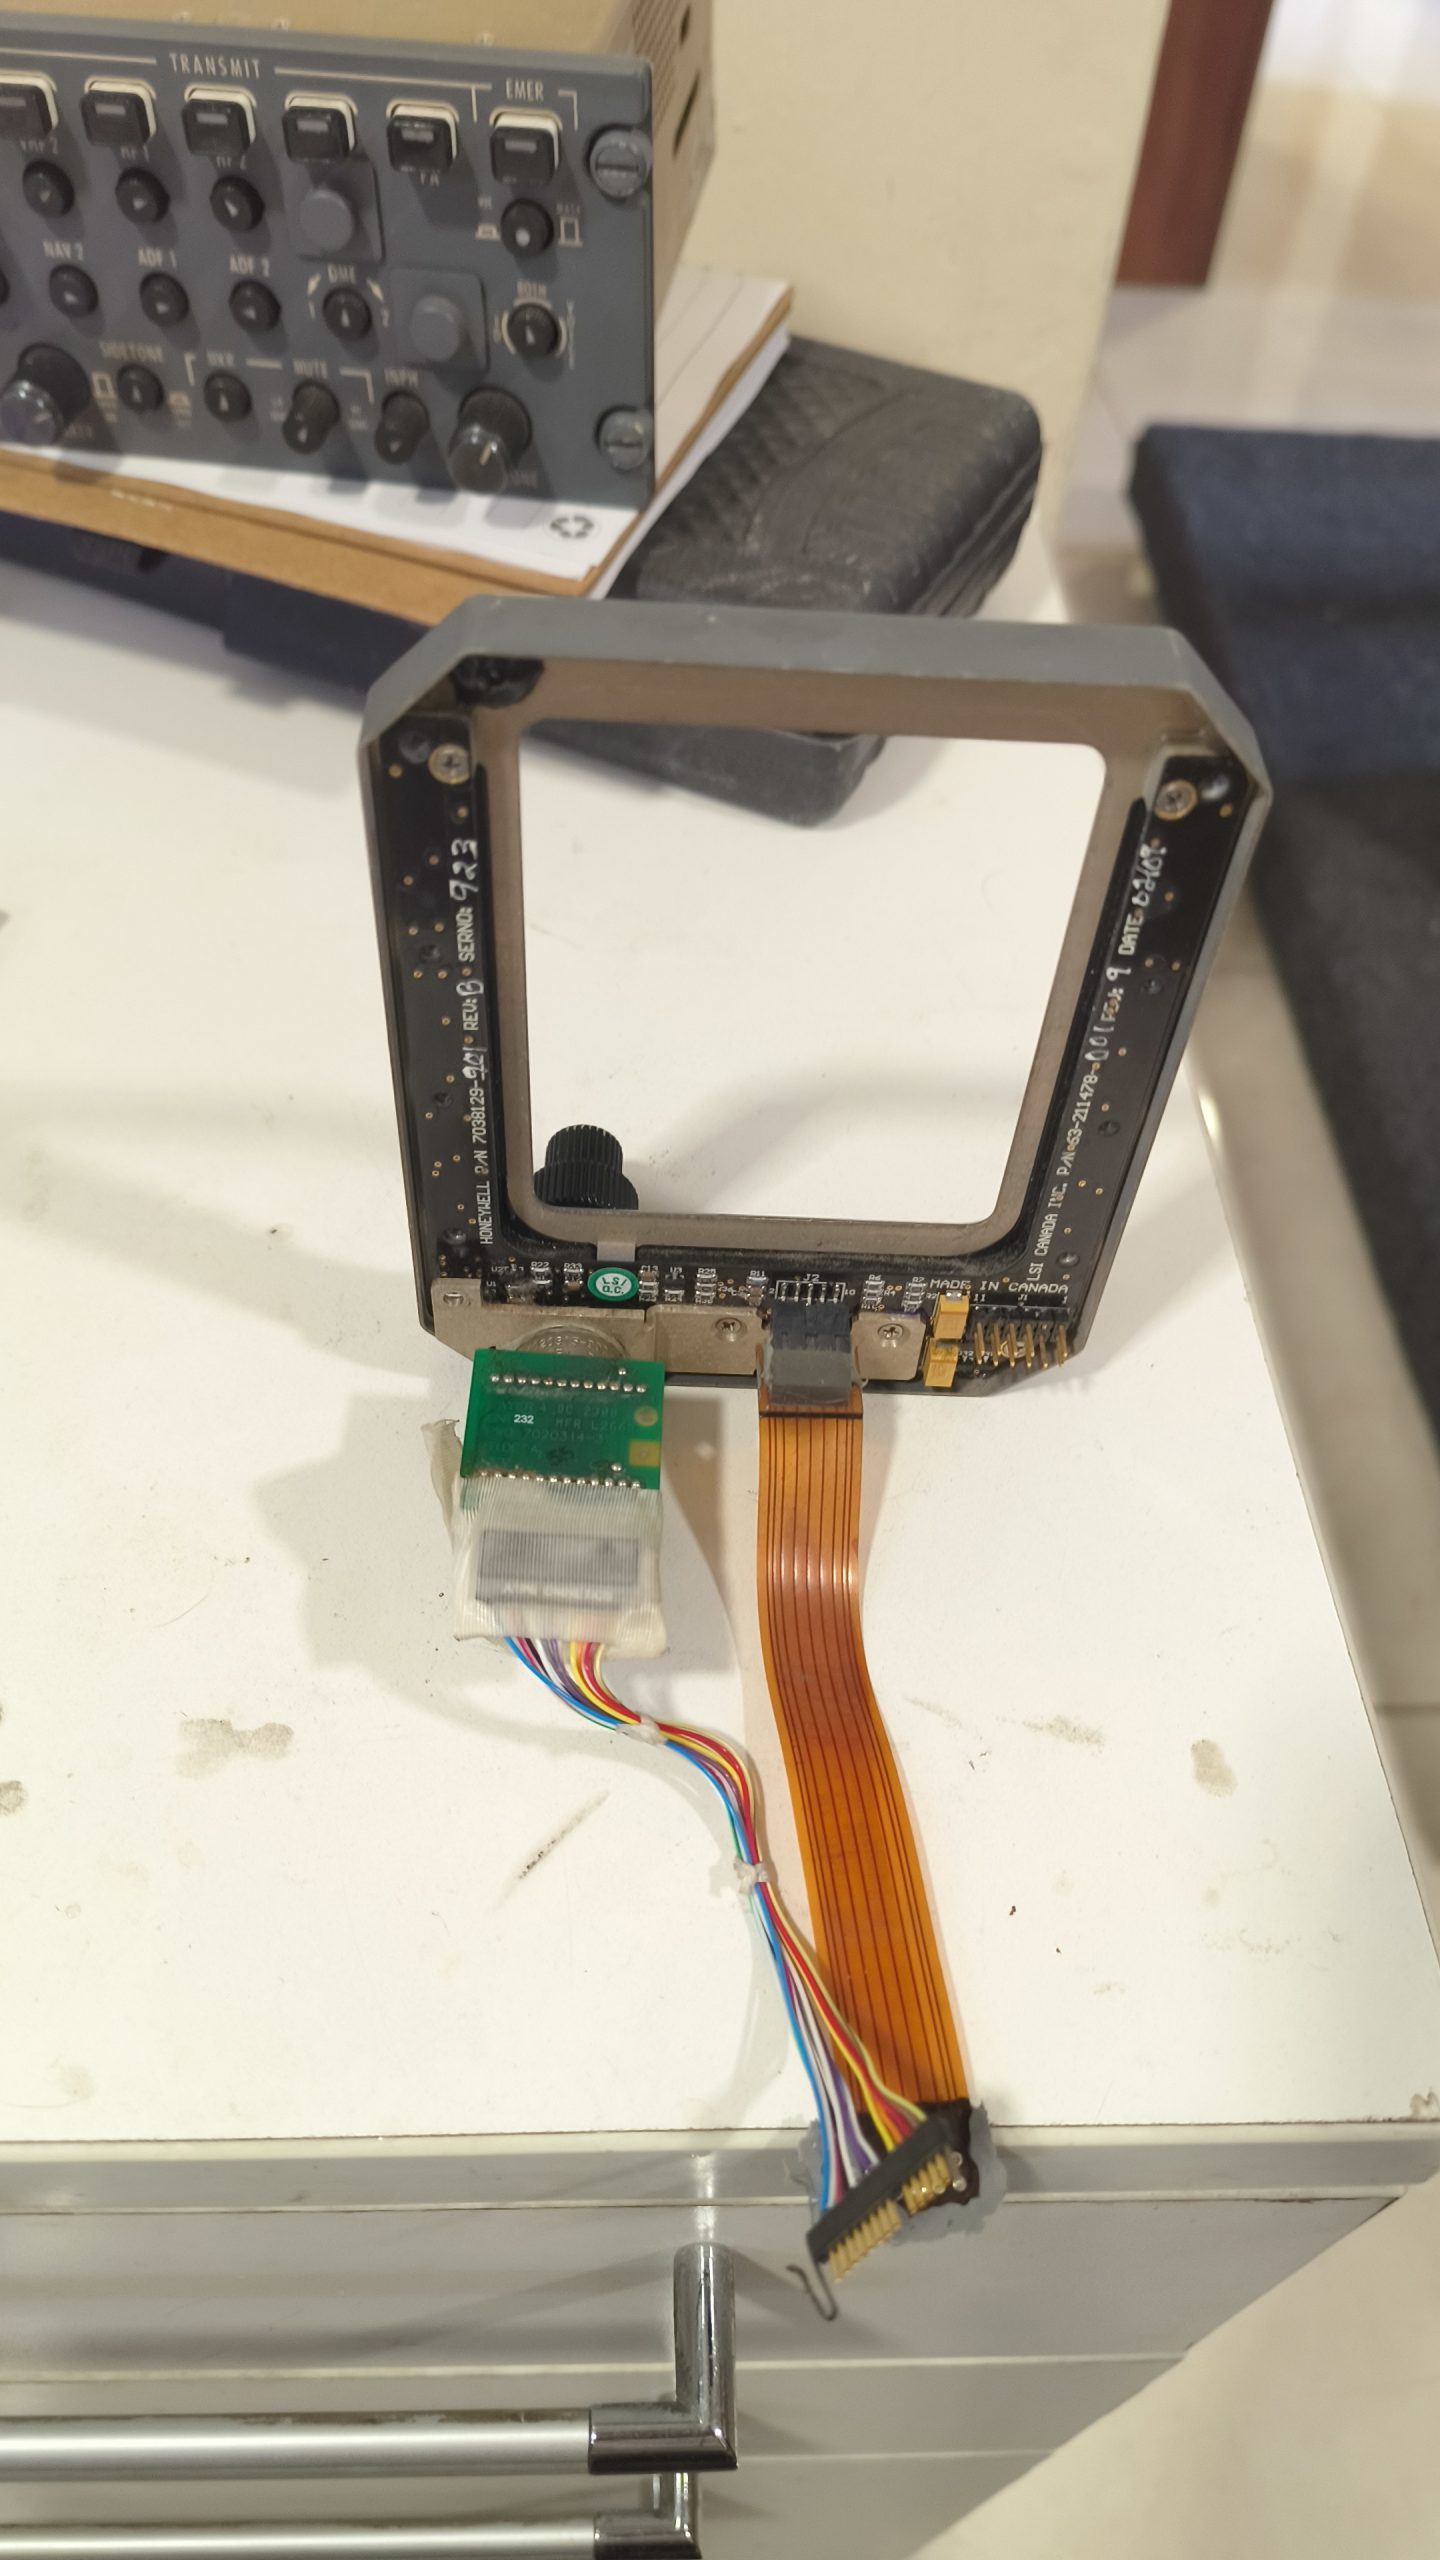
Hi everyone! My name is Cesar Bermudez, and I am thrilled to finally join this amazing community. After speaking with Ronjon and Jason, I’m excited to introduce myself and share my journey with you all. I have been building flight simulators since 2010 (with roots in simulation going back to 2007). Over the years, I’ve worked on several projects, including the B200, B737, and a Tucano T-27. My current focus is a Learjet 45 home cockpit project that I’m developing here in Venezuela. A bit about my background: Aviation & Network Experience: I am a C3 (Senior Controller) on VATSIM. I take procedures and realism very seriously, and I’ve spent years navigating the virtual skies and controlling traffic. Technical Setup: I’m currently working with X-Plane and FSX, while eagerly awaiting the JustFlight release for MSFS 2024. I use Arduinos and MobiFlight for hardware interfacing, as I enjoy the challenge of making physical controls respond accurately to the sim. Manufacturing: I also run a 3D printing business. This has been a game-changer for my cockpit, allowing me to manufacture custom bezels, knobs, and structural parts to achieve the look and feel I’m aiming for. I have deep respect for the years of knowledge gathered here at Hangar45. I’m looking forward to learning from your experiences and contributing my own expertise in hardware interfacing and 3D manufacturing to the group. I'll be sharing some photos of my progress soon. Thanks for having me! Best regards, Cesar Bermudez Hi everyone! My name is Cesar Bermudez, and I am thrilled to finally join this amazing community. After speaking with Ronjon and Jason, I’m excited to introduce myself and share my journey with you all. I have been building flight simulators since 2010 (with roots in simulation going back to 2007). Over the years, I’ve worked on several projects, including the B200, B737, and a Tucano T-27. My current focus is a Learjet 45 home cockpit project that I’m developing here in Venezuela. A bit about my background: Aviation & Network Experience: I am a C3 (Senior Controller) on VATSIM. I take procedures and realism very seriously, and I’ve spent years navigating the virtual skies and controlling traffic. Technical Setup: I’m currently working with X-Plane and FSX, while eagerly awaiting the JustFlight release for MSFS 2024. I use Arduinos and MobiFlight for hardware interfacing, as I enjoy the challenge of making physical controls respond accurately to the sim. Manufacturing: I also run a 3D printing business. This has been a game-changer for my cockpit, allowing me to manufacture custom bezels, knobs, and structural parts to achieve the look and feel I’m aiming for. I have deep respect for the years of knowledge gathered here at Hangar45. I’m looking forward to learning from your experiences and contributing my own expertise in hardware interfacing and 3D manufacturing to the group. I'll be sharing some photos of my progress soon. Thanks for having me! Best regards, Cesar Bermudez Hi Cesar, Let me be the first to formally welcome you to the Hangar! As we have always said, if your looking to build a Lear45 full scale cockpit, you have come to the right place. It sounds like you have a vast range of experience with flight simulation and you will fit right in here with us. Where else can you go if you want to focus 100% on one single airframe? We also support the Learjet40, but to this date, I don't know of anyone that is building one. If you are going to build a Learjet 40 series, you might as well build the Lear45 which includes a few extra features. In any case, we are really looking forward to seeing your project unfold. It's really exciting to see how other guys go about solving problems as we all strive for the same end goal. Speaking of watching your project unfold, I hope to see you start a build thread documenting your progress. It's a great way to measure your efforts and keep track of what you have done and how long things actually take to get things done. How time flies when you are having fun! Again, welcome to the hangar and please don't hesitate to ask questions. If you are not sure where to find something, just email me and I will point you to the right place. Hi Cesar, Let me be the first to formally welcome you to the Hangar! As we have always said, if your looking to build a Lear45 full scale cockpit, you have come to the right place. It sounds like you have a vast range of experience with flight simulation and you will fit right in here with us. Where else can you go if you want to focus 100% on one single airframe? We also support the Learjet40, but to this date, I don't know of anyone that is building one. If you are going to build a Learjet 40 series, you might as well build the Lear45 which includes a few extra features. In any case, we are really looking forward to seeing your project unfold. It's really exciting to see how other guys go about solving problems as we all strive for the same end goal. Speaking of watching your project unfold, I hope to see you start a build thread documenting your progress. It's a great way to measure your efforts and keep track of what you have done and how long things actually take to get things done. How time flies when you are having fun! Again, welcome to the hangar and please don't hesitate to ask questions. If you are not sure where to find something, just email me and I will point you to the right place. Hello Cesar and welcome to Hangar 45. Ron tells me that you have some real avionics parts you wish to use in your cockpit. I am using many real Learjet and Honeywell parts in my cockpit. Real parts add a degree of authenticity that is difficult to achieve with replica parts but they do require modification to use them in a simulator. It is usually easier to begin with a real part and modify it than to design and fabricate a replica part so I have used real parts where practical. Welcome aboard. Let us know what you need. Someone here on Hangar45 can usually provide help and assistance. DonnyRay Hello Cesar and welcome to Hangar 45. Ron tells me that you have some real avionics parts you wish to use in your cockpit. I am using many real Learjet and Honeywell parts in my cockpit. Real parts add a degree of authenticity that is difficult to achieve with replica parts but they do require modification to use them in a simulator. It is usually easier to begin with a real part and modify it than to design and fabricate a replica part so I have used real parts where practical. Welcome aboard. Let us know what you need. Someone here on Hangar45 can usually provide help and assistance. DonnyRay Hello DonnyRay! Thanks for the welcome. Yes, I currently have several real Learjet 45 instruments. Everything is coming along well, and I’ve already managed to get all the other buttons, lights, and standard encoders working with my Arduino. However, I’ve hit a wall with the RMU encoders. Since they are optical encoders, I haven't been able to get the Arduino to recognize them properly. Does anyone have insight into how these specific RMU encoders operate or how to interface them? Any help or ideas would be greatly appreciated! Hello DonnyRay! Thanks for the welcome. Yes, I currently have several real Learjet 45 instruments. Everything is coming along well, and I’ve already managed to get all the other buttons, lights, and standard encoders working with my Arduino. However, I’ve hit a wall with the RMU encoders. Since they are optical encoders, I haven't been able to get the Arduino to recognize them properly. Does anyone have insight into how these specific RMU encoders operate or how to interface them? Any help or ideas would be greatly appreciated! Hi Cesar, I can't answer this question for you but DonnyRay can. He is currently "out of pocket" but will be back soon to help answer this question for you. As I mentioned earlier, he is the only other guy that I know of in this group that is using and or trying to use as much real hardware as he can with his build including the real RMUs. So hopefully he will be able to shed some light on this subject for you shortly! Hi Cesar, I can't answer this question for you but DonnyRay can. He is currently "out of pocket" but will be back soon to help answer this question for you. As I mentioned earlier, he is the only other guy that I know of in this group that is using and or trying to use as much real hardware as he can with his build including the real RMUs. So hopefully he will be able to shed some light on this subject for you shortly! Hello Cesar, Why do commercial level-D flight simulators look and feel so much like the real airplane when you sit down in the cockpit? Because they use as many real airplane parts as practical and modify them for use in a simulator. It is always easier to modify a real part for sim use than it is to fabricate a replica part. The advantage of this method is that your sim will acquire some of the look and feel of the real airplane. Many of the Honeywell Primus 1000 avionics parts can be re-purposed and modified for a sim. Some modifications are easy, others can be complex. It depends on how you wish to utilize the real part. There are two basic approaches to using real parts: 1. Use the real part *as* the real part. This means you must obtain a working real part, gain an understanding of how the real part works, and discover items such as data bus message traffic, wiring diagrams and other technical details. You also need a means of interfacing the real part in a manner that replicates the real airplane. (The real part must believe it is connected to the real airplane.) If you use real parts as real parts you will become a “real avionics” customer with all the high maintenance and other costs associated with keeping the real part operable. Also note that many real parts will not fit in the Rollo shell cockpit because the shell does not conform to established aerospace mechanical / dimensional standards. 2. Modify the real part so that you can interface only the parts necessary for use in your sim. Generally this means stripping out the innards of the real part while keeping such things as the front panel switches, buttons, knobs, etc. These items can be re-wired to an Arduino or other interface card and will function in the same manner as a fabricated replica part. For many real parts this is a good option, but there are some parts for which fabricating a replica is the more practical choice. For an example take a look at these photos of the real RMU: The RM850 RMU uses a rotary SWITCH for radio tuning. It is not a quadrature encoder. It will not work with Jet45 because Jet45 only decodes quadrature encoders. But it can be interfaced to other interface cards. I do not know what the RM855 uses for this function. It doesn’t matter precisely what the OEM part may be (encoder or switch), it only matters that we can decode the output signals of the part and get them into the sim software in a manner that the software can understand. How do we do that? * Option 1: Find the OEM part number on the real part, get the spec sheet for it, and look at the pinouts. I have done that. The question here is “Can we use it as-is in a sim?”. For the RM850 RMU the short answer is no, not today anyway, because it is a type of switch/encoder not supported by Jet45. * Option 2: Replace the OEM part with a quadrature encoder. Two-section quadrature encoders with mechanical characteristics close to the OEM part are available but they are not identical mechanical replacements. Solving the quadrature decode issue by this method raises the issue of mechanical fit and function. In effect, trading one issue (decoding) for another issue (mechanical fit). Most low-end quadrature encoders do not have the “look and feel” of the real airplane part, so this option fails to capture that advantage of using a real part in your sim. * Option 3: Use the OEM switch and decode it with an alternative interface card and software. Suitable examples include Phidgets interface cards and SimConnect software. The specific design choices you select must function within the overall framework of your cockpit design. The OEM part for an RM850 is Grayhill p/n 71YY50502. This is a SWITCH, not an encoder. In the RM850 the switch outputs are read by a software routine in the RMU to determine the absolute switch position. RMU software translates the switch outputs to a specific frequency “number” (example, “121.50”) for use by the Primus radio system. It is a practical solution to replace the OEM part with a quadrature encoder. Several mechanical or optical quadrature encoders exist that solve the Jet45 issue, but none of them have the same “solid” mechanical feel of the real avionics part. This is a real consideration because one of the reasons for using real parts is to obtain that “real feel” in your simulator. L45-1001 is using real RM850s. I may find it necessary to use SimConnect or other software to interface these parts to P3D v6.x. What to do? A quicker solution is to replace the OEM part with a quadrature part, and accept the mechanical issues and poor feel as necessary until such time as Jet45 supports switch decoding for the OEM part. In my opinion the proper way to solve this is to add OEM switch decoding support to Jet45. The OEM switch outputs are right there on a set of ribbon cable headers! It’s a shame not to take advantage of this because it offers builders a chance to add real “look and feel” to the cockpit. Here are some photos of the OEM part that is used in the RM850 RMU: Technical information for this switch is found in the Grayhill series 71 catalog which is attached below in the "uploaded files". Similar parts are used in the real FMS/CDU, the weather radar control, SELCAL, EFIS controllers and HF radio control. The FGC is mostly an empty box that provides a physical location for the FGS switches. (The FGC switches connect to the EFIS controller on each side.) The AV850s, however, can be utilized as-is, in the manner of the real airplane, with some limitations. DonnyRay Hello Cesar, Why do commercial level-D flight simulators look and feel so much like the real airplane when you sit down in the cockpit? Because they use as many real airplane parts as practical and modify them for use in a simulator. It is always easier to modify a real part for sim use than it is to fabricate a replica part. The advantage of this method is that your sim will acquire some of the look and feel of the real airplane. Many of the Honeywell Primus 1000 avionics parts can be re-purposed and modified for a sim. Some modifications are easy, others can be complex. It depends on how you wish to utilize the real part. There are two basic approaches to using real parts: 1. Use the real part *as* the real part. This means you must obtain a working real part, gain an understanding of how the real part works, and discover items such as data bus message traffic, wiring diagrams and other technical details. You also need a means of interfacing the real part in a manner that replicates the real airplane. (The real part must believe it is connected to the real airplane.) If you use real parts as real parts you will become a “real avionics” customer with all the high maintenance and other costs associated with keeping the real part operable. Also note that many real parts will not fit in the Rollo shell cockpit because the shell does not conform to established aerospace mechanical / dimensional standards. 2. Modify the real part so that you can interface only the parts necessary for use in your sim. Generally this means stripping out the innards of the real part while keeping such things as the front panel switches, buttons, knobs, etc. These items can be re-wired to an Arduino or other interface card and will function in the same manner as a fabricated replica part. For many real parts this is a good option, but there are some parts for which fabricating a replica is the more practical choice. For an example take a look at these photos of the real RMU: The RM850 RMU uses a rotary SWITCH for radio tuning. It is not a quadrature encoder. It will not work with Jet45 because Jet45 only decodes quadrature encoders. But it can be interfaced to other interface cards. I do not know what the RM855 uses for this function. It doesn’t matter precisely what the OEM part may be (encoder or switch), it only matters that we can decode the output signals of the part and get them into the sim software in a manner that the software can understand. How do we do that? * Option 1: Find the OEM part number on the real part, get the spec sheet for it, and look at the pinouts. I have done that. The question here is “Can we use it as-is in a sim?”. For the RM850 RMU the short answer is no, not today anyway, because it is a type of switch/encoder not supported by Jet45. * Option 2: Replace the OEM part with a quadrature encoder. Two-section quadrature encoders with mechanical characteristics close to the OEM part are available but they are not identical mechanical replacements. Solving the quadrature decode issue by this method raises the issue of mechanical fit and function. In effect, trading one issue (decoding) for another issue (mechanical fit). Most low-end quadrature encoders do not have the “look and feel” of the real airplane part, so this option fails to capture that advantage of using a real part in your sim. * Option 3: Use the OEM switch and decode it with an alternative interface card and software. Suitable examples include Phidgets interface cards and SimConnect software. The specific design choices you select must function within the overall framework of your cockpit design. The OEM part for an RM850 is Grayhill p/n 71YY50502. This is a SWITCH, not an encoder. In the RM850 the switch outputs are read by a software routine in the RMU to determine the absolute switch position. RMU software translates the switch outputs to a specific frequency “number” (example, “121.50”) for use by the Primus radio system. It is a practical solution to replace the OEM part with a quadrature encoder. Several mechanical or optical quadrature encoders exist that solve the Jet45 issue, but none of them have the same “solid” mechanical feel of the real avionics part. This is a real consideration because one of the reasons for using real parts is to obtain that “real feel” in your simulator. L45-1001 is using real RM850s. I may find it necessary to use SimConnect or other software to interface these parts to P3D v6.x. What to do? A quicker solution is to replace the OEM part with a quadrature part, and accept the mechanical issues and poor feel as necessary until such time as Jet45 supports switch decoding for the OEM part. In my opinion the proper way to solve this is to add OEM switch decoding support to Jet45. The OEM switch outputs are right there on a set of ribbon cable headers! It’s a shame not to take advantage of this because it offers builders a chance to add real “look and feel” to the cockpit. Here are some photos of the OEM part that is used in the RM850 RMU: Technical information for this switch is found in the Grayhill series 71 catalog which is attached below in the "uploaded files". Similar parts are used in the real FMS/CDU, the weather radar control, SELCAL, EFIS controllers and HF radio control. The FGC is mostly an empty box that provides a physical location for the FGS switches. (The FGC switches connect to the EFIS controller on each side.) The AV850s, however, can be utilized as-is, in the manner of the real airplane, with some limitations. DonnyRay DonnyRay, Thank you both so much for taking the time to share this incredible breakdown! I truly appreciate the technical depth and the support you are giving to my project. I wanted to share that the RMUs I have in my workshop actually look a bit different from the ones in the photos you posted. I am attaching some pictures of my specific units here so you can take a look. That being said, I am going to thoroughly study the catalog and the technical information you sent over to see if I can find a way to interface them and make them work within my current framework. Thank you again for looking out for my build and for sharing your expertise with me. I'll keep you posted on what I find! Best regards, Cesar
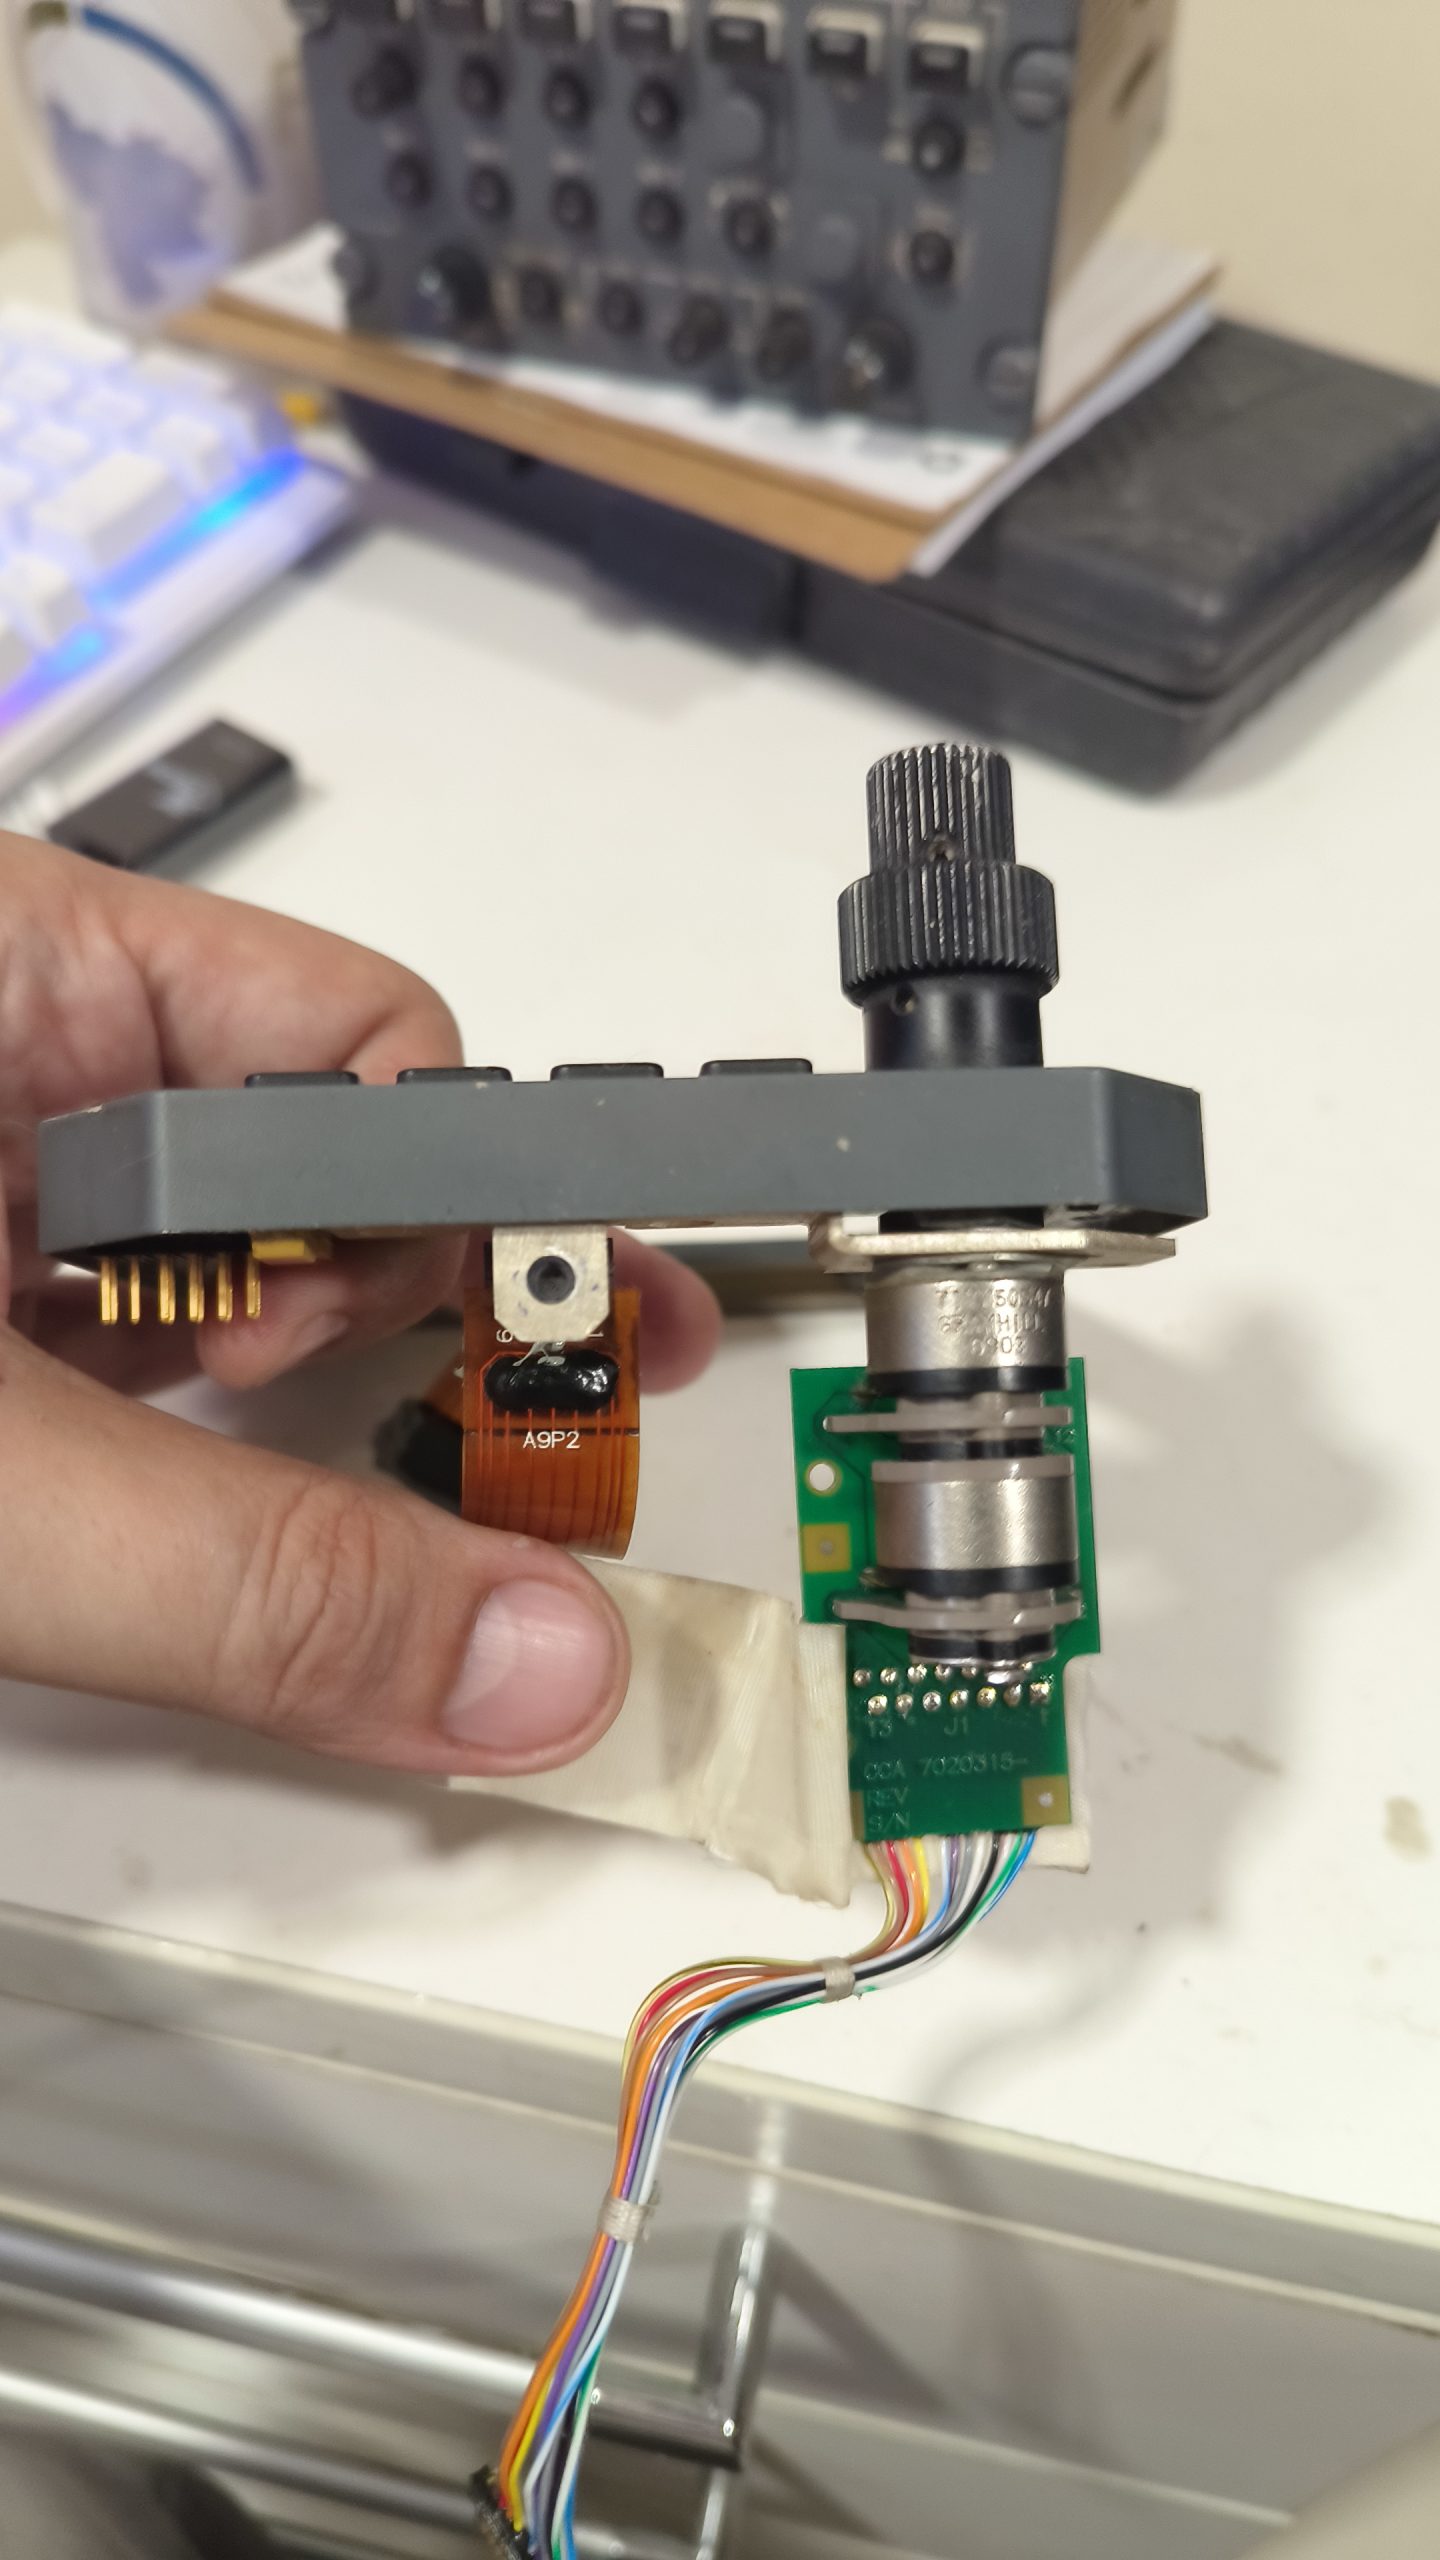
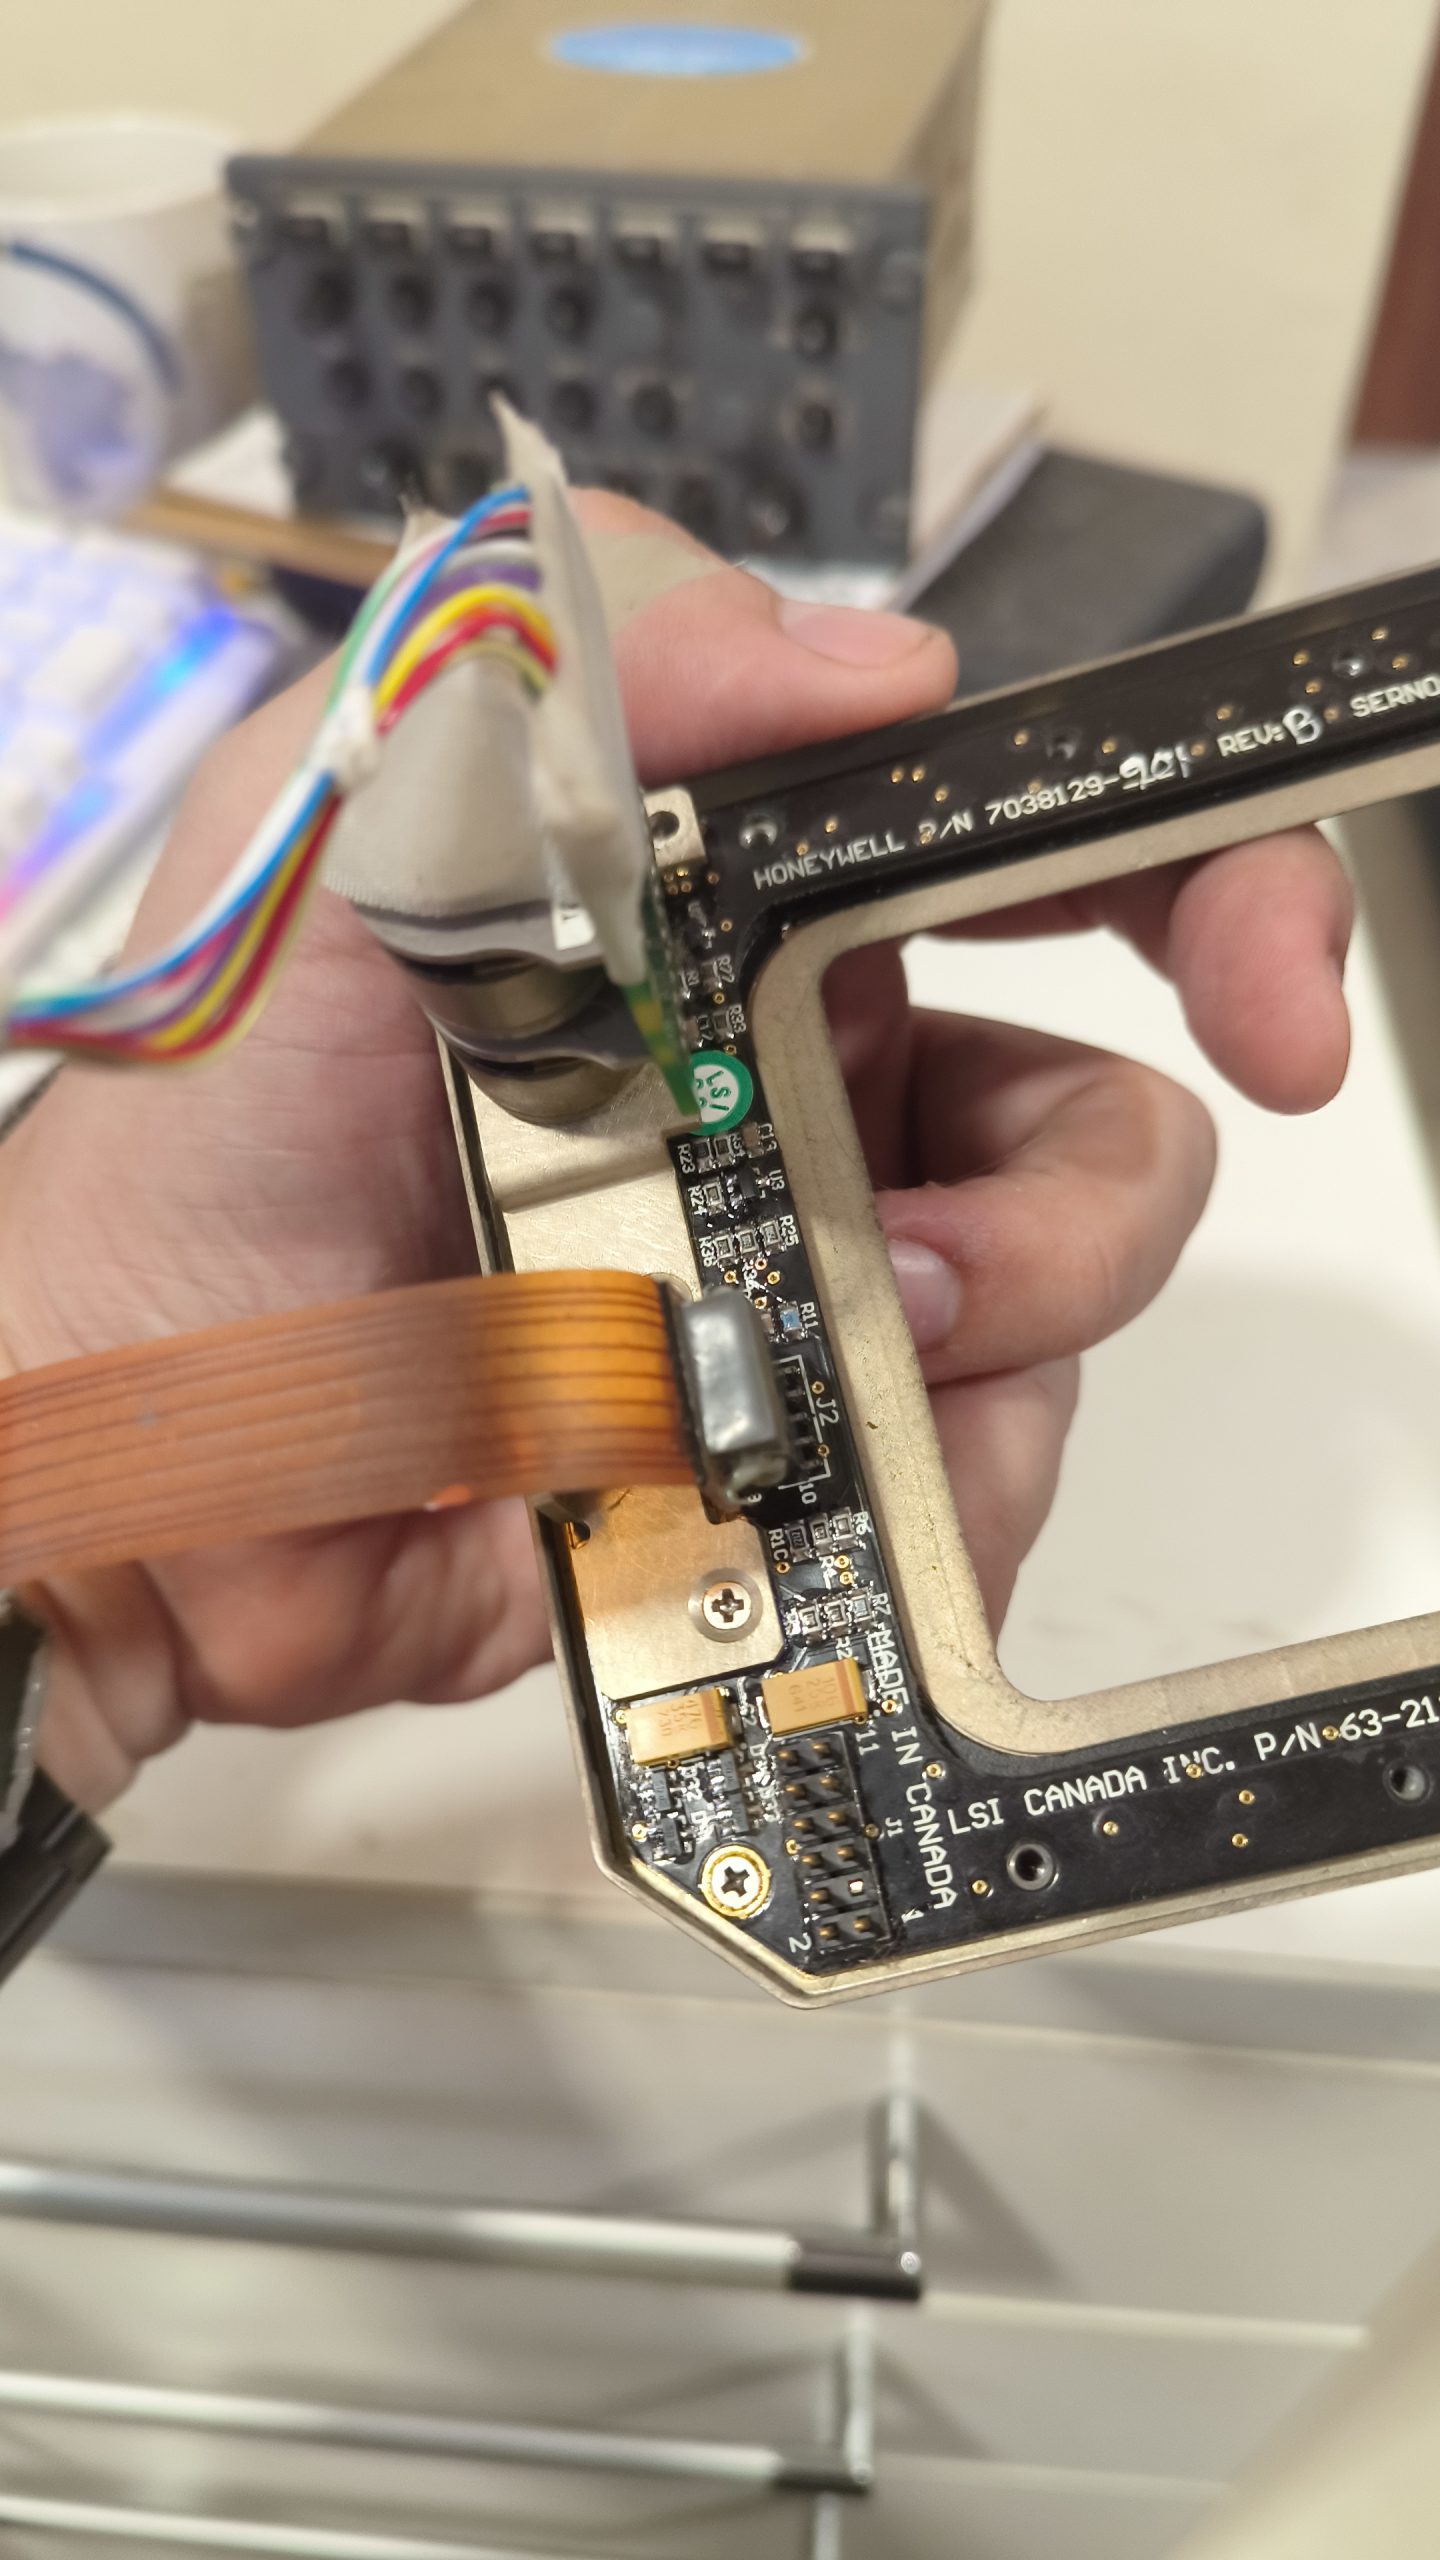
DonnyRay, Thank you both so much for taking the time to share this incredible breakdown! I truly appreciate the technical depth and the support you are giving to my project. I wanted to share that the RMUs I have in my workshop actually look a bit different from the ones in the photos you posted. I am attaching some pictures of my specific units here so you can take a look. That being said, I am going to thoroughly study the catalog and the technical information you sent over to see if I can find a way to interface them and make them work within my current framework. Thank you again for looking out for my build and for sharing your expertise with me. I'll keep you posted on what I find! Best regards, Cesar
Uploaded files: Hi Cesar! We are happy to help and looking forward to seeing if you are able to solve your RMU issue. Hopefully the information DonnyRay provided will help. Just to put some more ideas out there for you, HERE you will find my build thread of the replica RMUs. The nice thing about the replicas is they are designed so that everything is built within the front bezels so that there is plenty of room for a LED display behind the RMUs. You might get some ideas from this thread. (I moved your photos into the body of your post making it easier for guys to see them. We have instructions on how to post photos into a post HERE Last but not least, you should start a "Build thread" documenting your project and sub projects like the RMUs under this sub forum HERE This way you can showcase your project and we can all track your progress. Again, looking forward to seeing your project unfold! Hi Cesar! We are happy to help and looking forward to seeing if you are able to solve your RMU issue. Hopefully the information DonnyRay provided will help. Just to put some more ideas out there for you, HERE you will find my build thread of the replica RMUs. The nice thing about the replicas is they are designed so that everything is built within the front bezels so that there is plenty of room for a LED display behind the RMUs. You might get some ideas from this thread. (I moved your photos into the body of your post making it easier for guys to see them. We have instructions on how to post photos into a post HERE Last but not least, you should start a "Build thread" documenting your project and sub projects like the RMUs under this sub forum HERE This way you can showcase your project and we can all track your progress. Again, looking forward to seeing your project unfold! Hello from Venezuela!
![]()
![]()
![]()
![]()
![]()
![]()

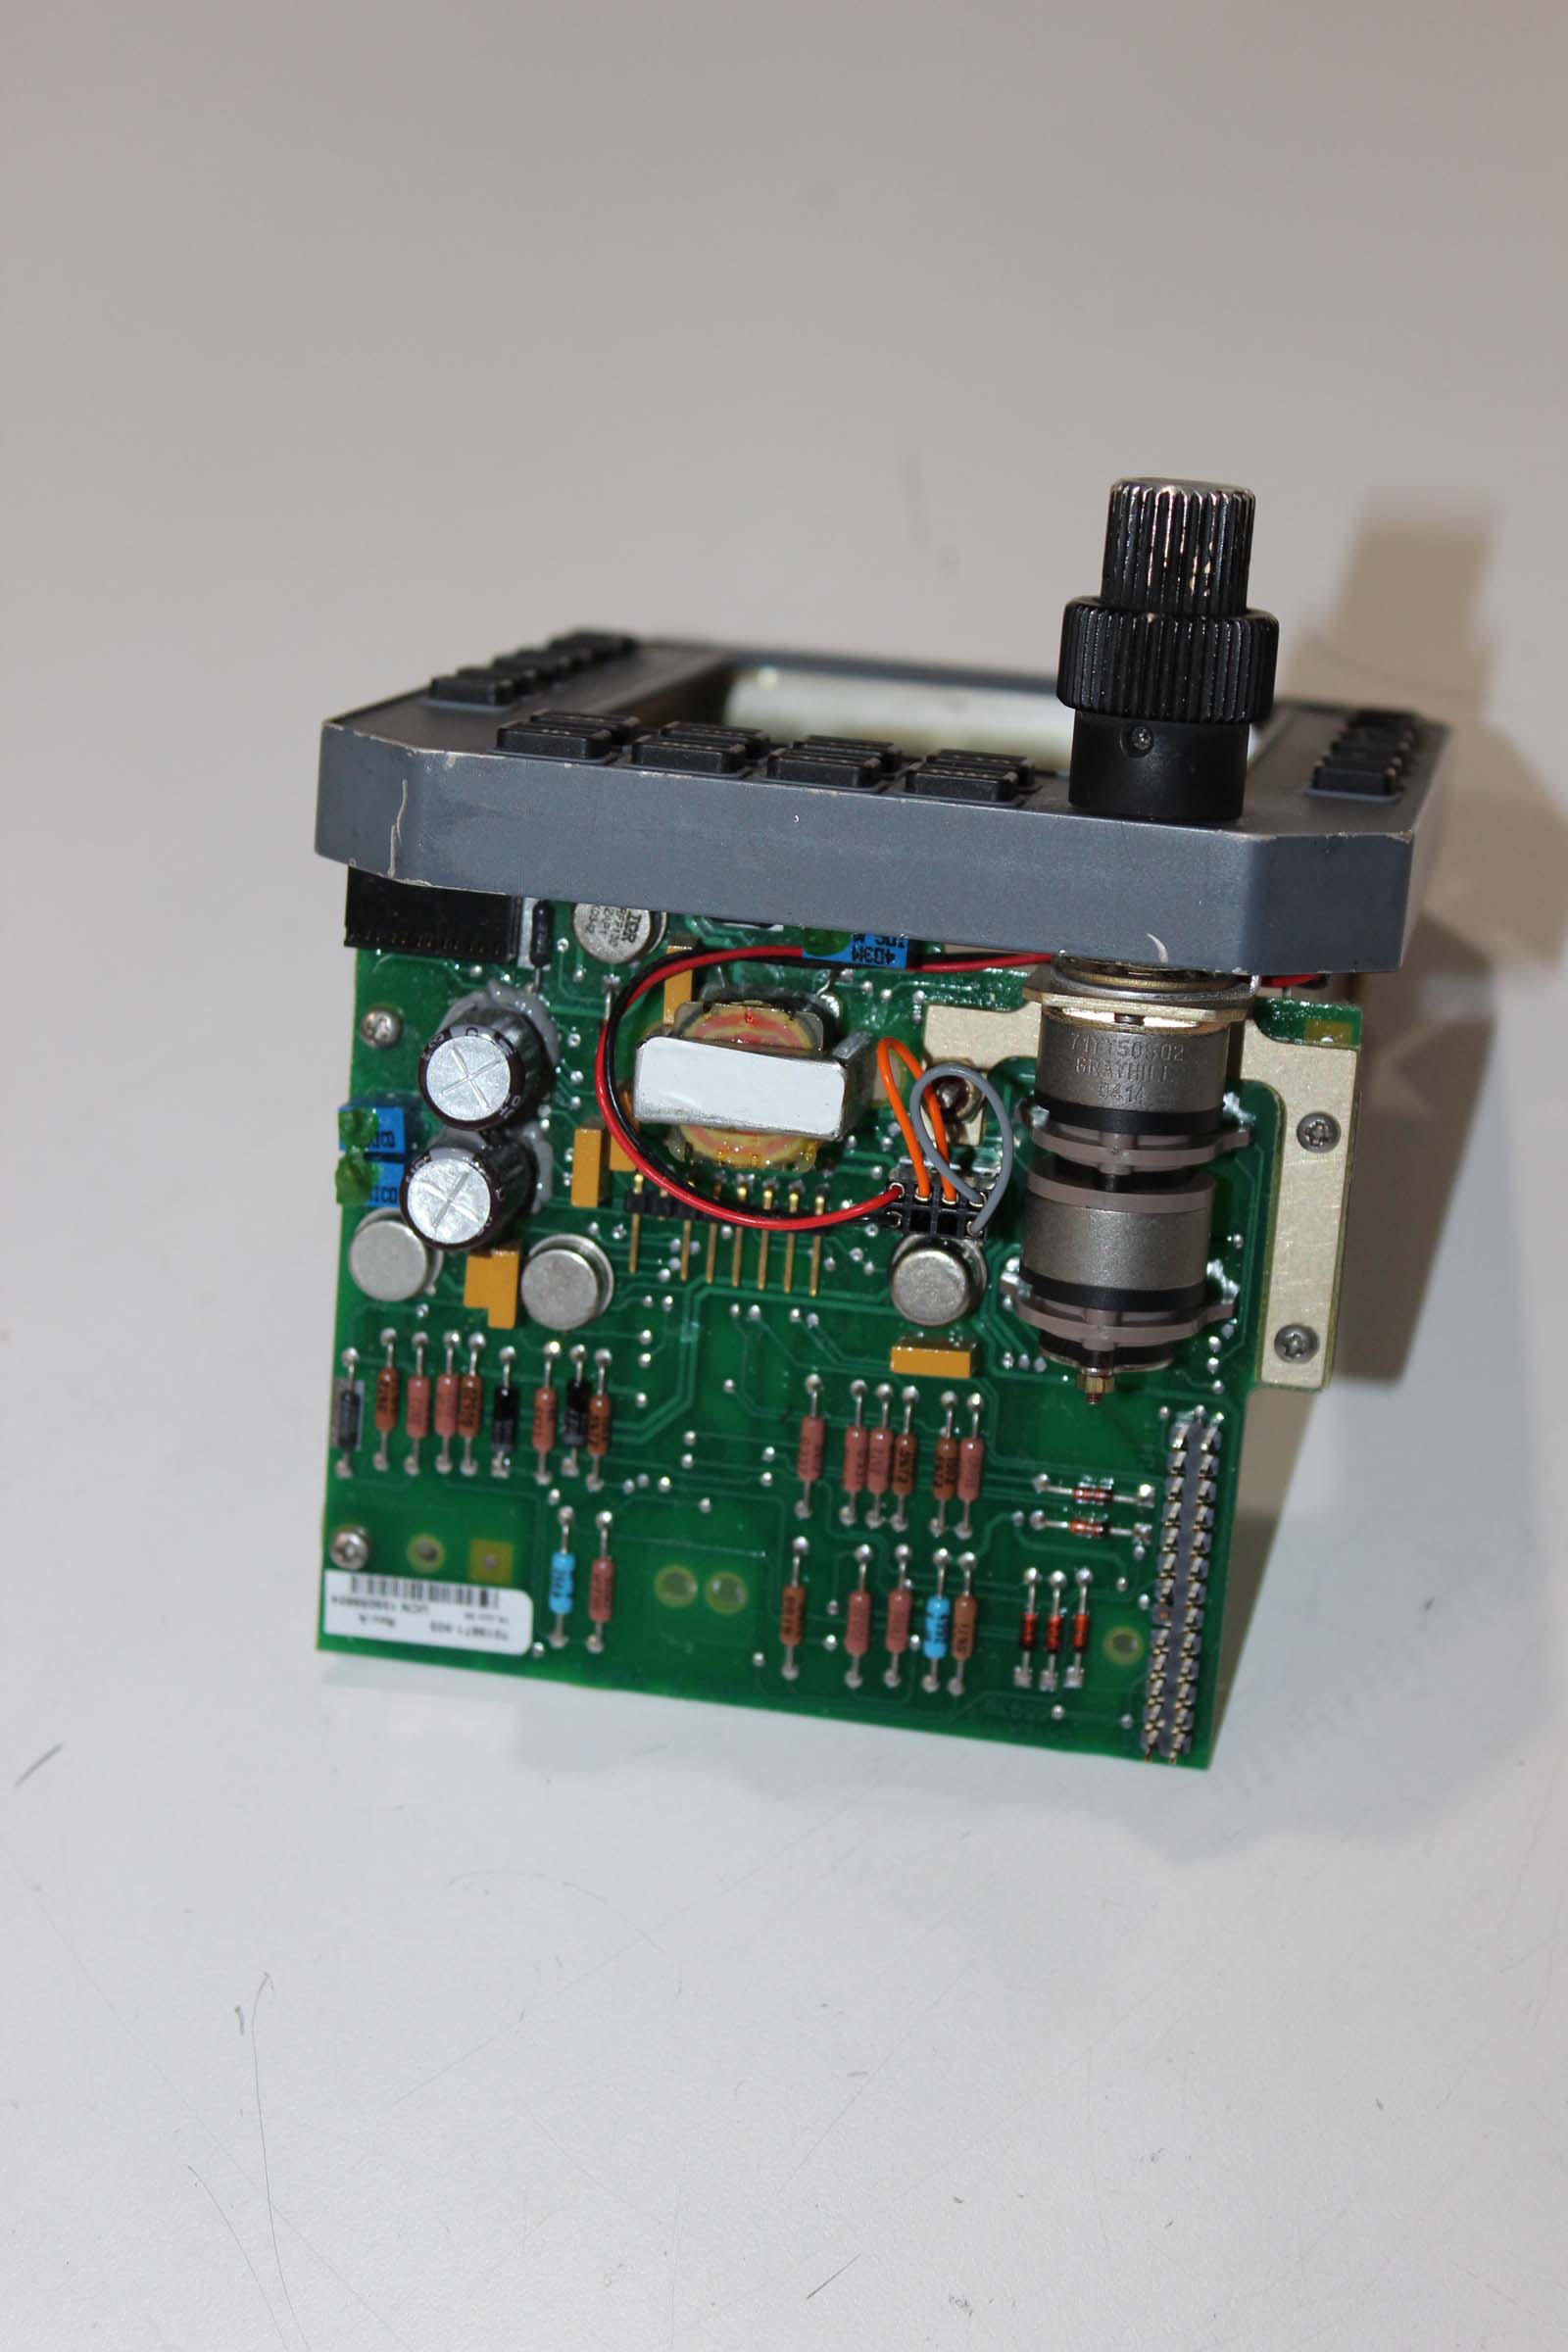
It is possible to build a hardware logic circuit that accepts the OEM switch inputs and outputs quadrature signals. The pinouts of the OEM part will be needed for this design. NOTE that the stampings on the rear plate of the OEM switch are NOT decimal positions (switch positions). They are the output terminal CODING assigned to each switch pin.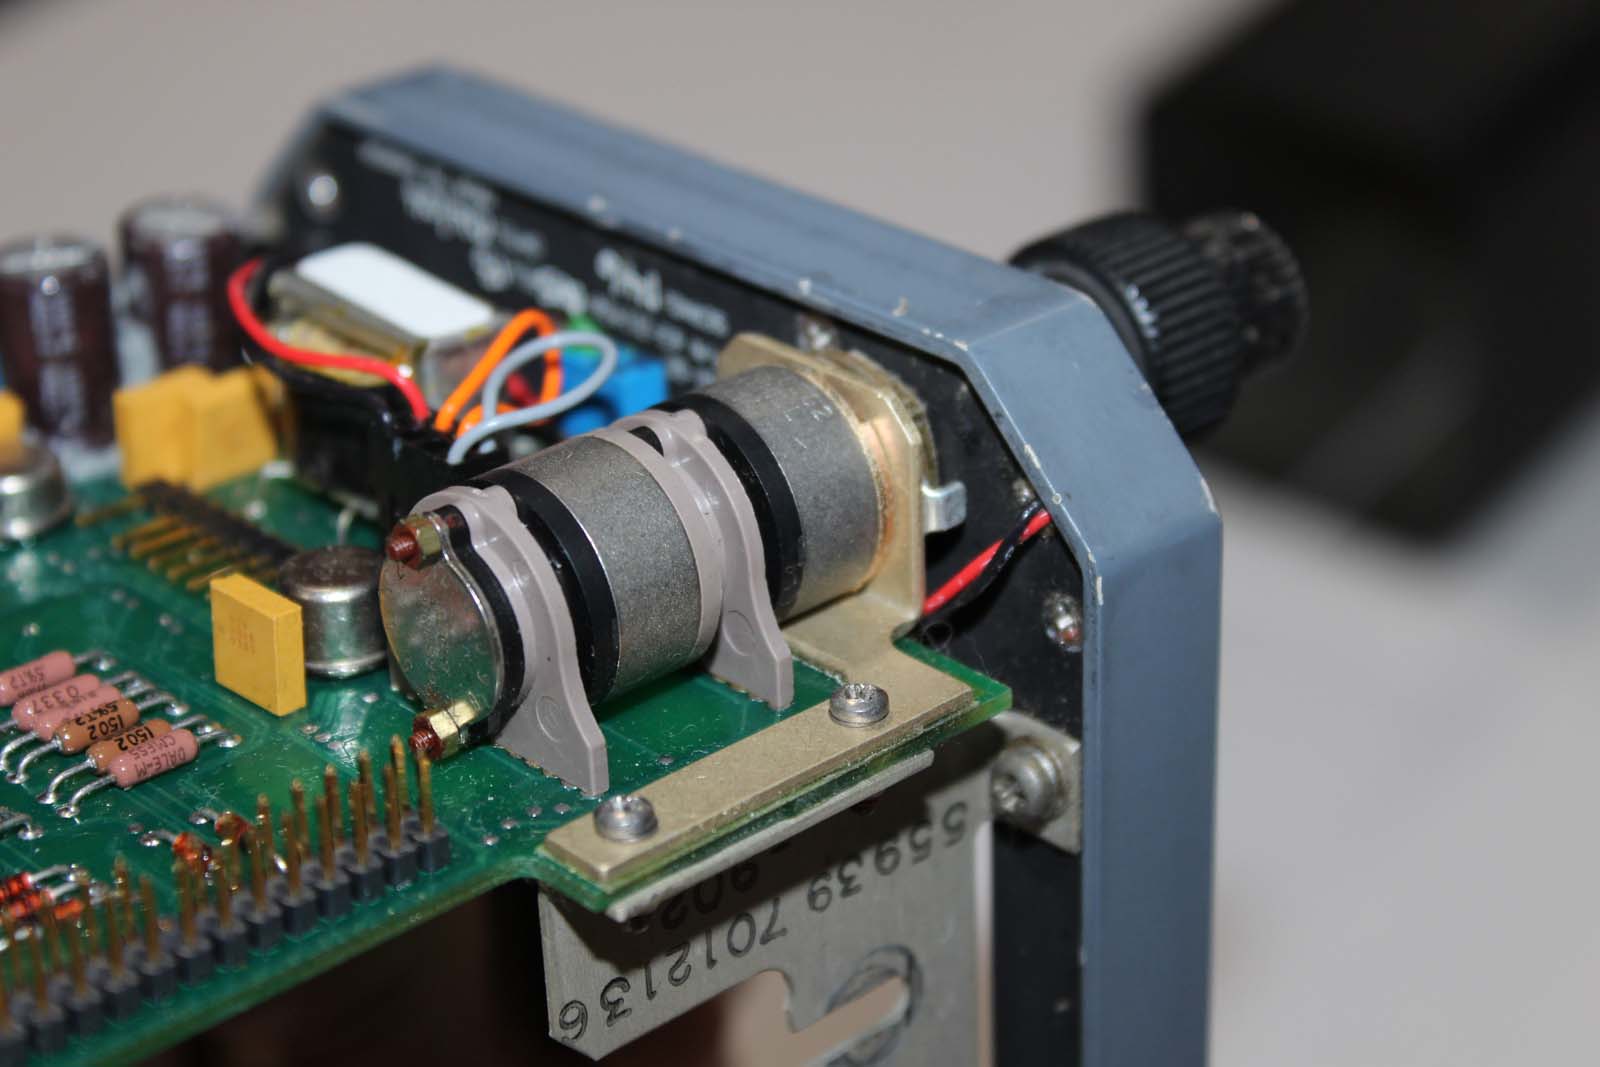
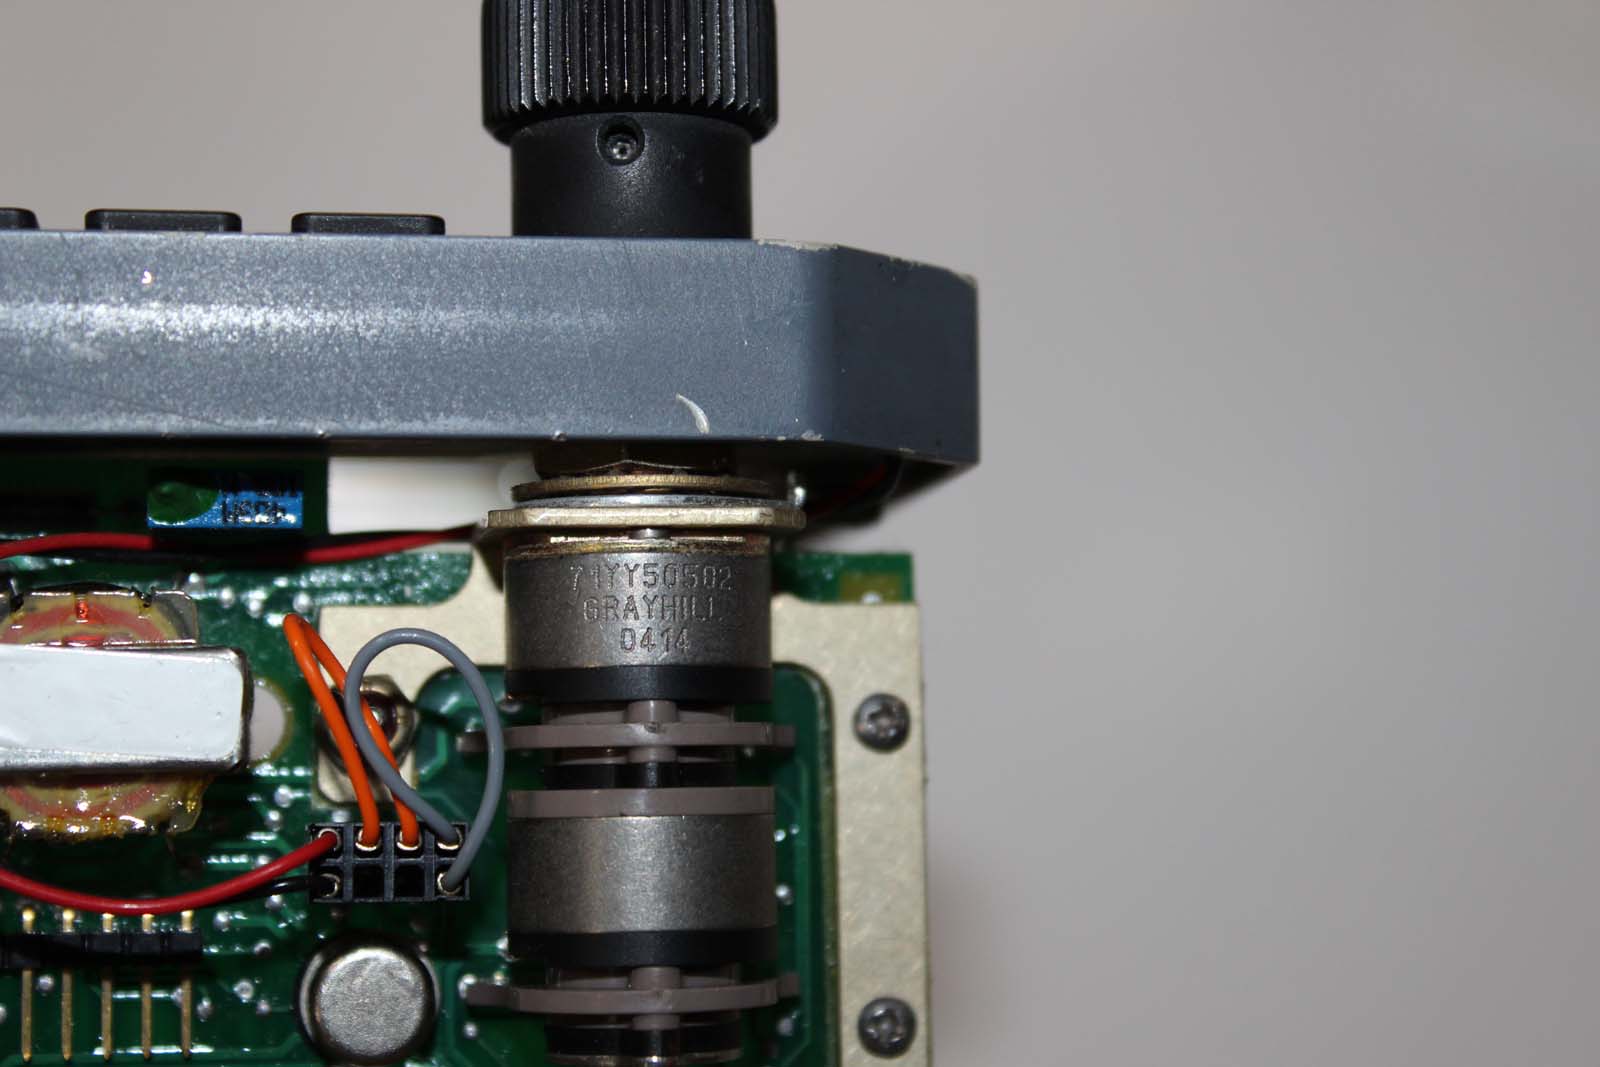
It is possible to build a hardware logic circuit that accepts the OEM switch inputs and outputs quadrature signals. The pinouts of the OEM part will be needed for this design. NOTE that the stampings on the rear plate of the OEM switch are NOT decimal positions (switch positions). They are the output terminal CODING assigned to each switch pin.![]()
![]()
Forum NavigationHello from Venezuela!
![]() #1 · March 17, 2026, 3:22 pmRon Rollo and Mark Speechley have reacted to this post.Ron RolloMark Speechley
#1 · March 17, 2026, 3:22 pmRon Rollo and Mark Speechley have reacted to this post.Ron RolloMark Speechley![]() #2 · March 17, 2026, 8:30 pmMark Speechley and zeckart have reacted to this post.Mark Speechleyzeckart
#2 · March 17, 2026, 8:30 pmMark Speechley and zeckart have reacted to this post.Mark Speechleyzeckart![]() #3 · March 24, 2026, 5:49 pmRon Rollo and Mark Speechley have reacted to this post.Ron RolloMark Speechley
#3 · March 24, 2026, 5:49 pmRon Rollo and Mark Speechley have reacted to this post.Ron RolloMark Speechley![]() #4 · April 22, 2026, 8:14 amRon Rollo has reacted to this post.Ron Rollo
#4 · April 22, 2026, 8:14 amRon Rollo has reacted to this post.Ron Rollo![]() #5 · April 27, 2026, 5:45 pm
#5 · April 27, 2026, 5:45 pm![]() #6 · May 13, 2026, 4:24 pmRon Rollo and zeckart have reacted to this post.Ron Rollozeckart
#6 · May 13, 2026, 4:24 pmRon Rollo and zeckart have reacted to this post.Ron Rollozeckart![]() #7 · June 3, 2026, 2:07 amRon Rollo has reacted to this post.Ron Rollo
#7 · June 3, 2026, 2:07 amRon Rollo has reacted to this post.Ron Rollo![]() #8 · June 3, 2026, 9:23 am
#8 · June 3, 2026, 9:23 am
2017-10-10