


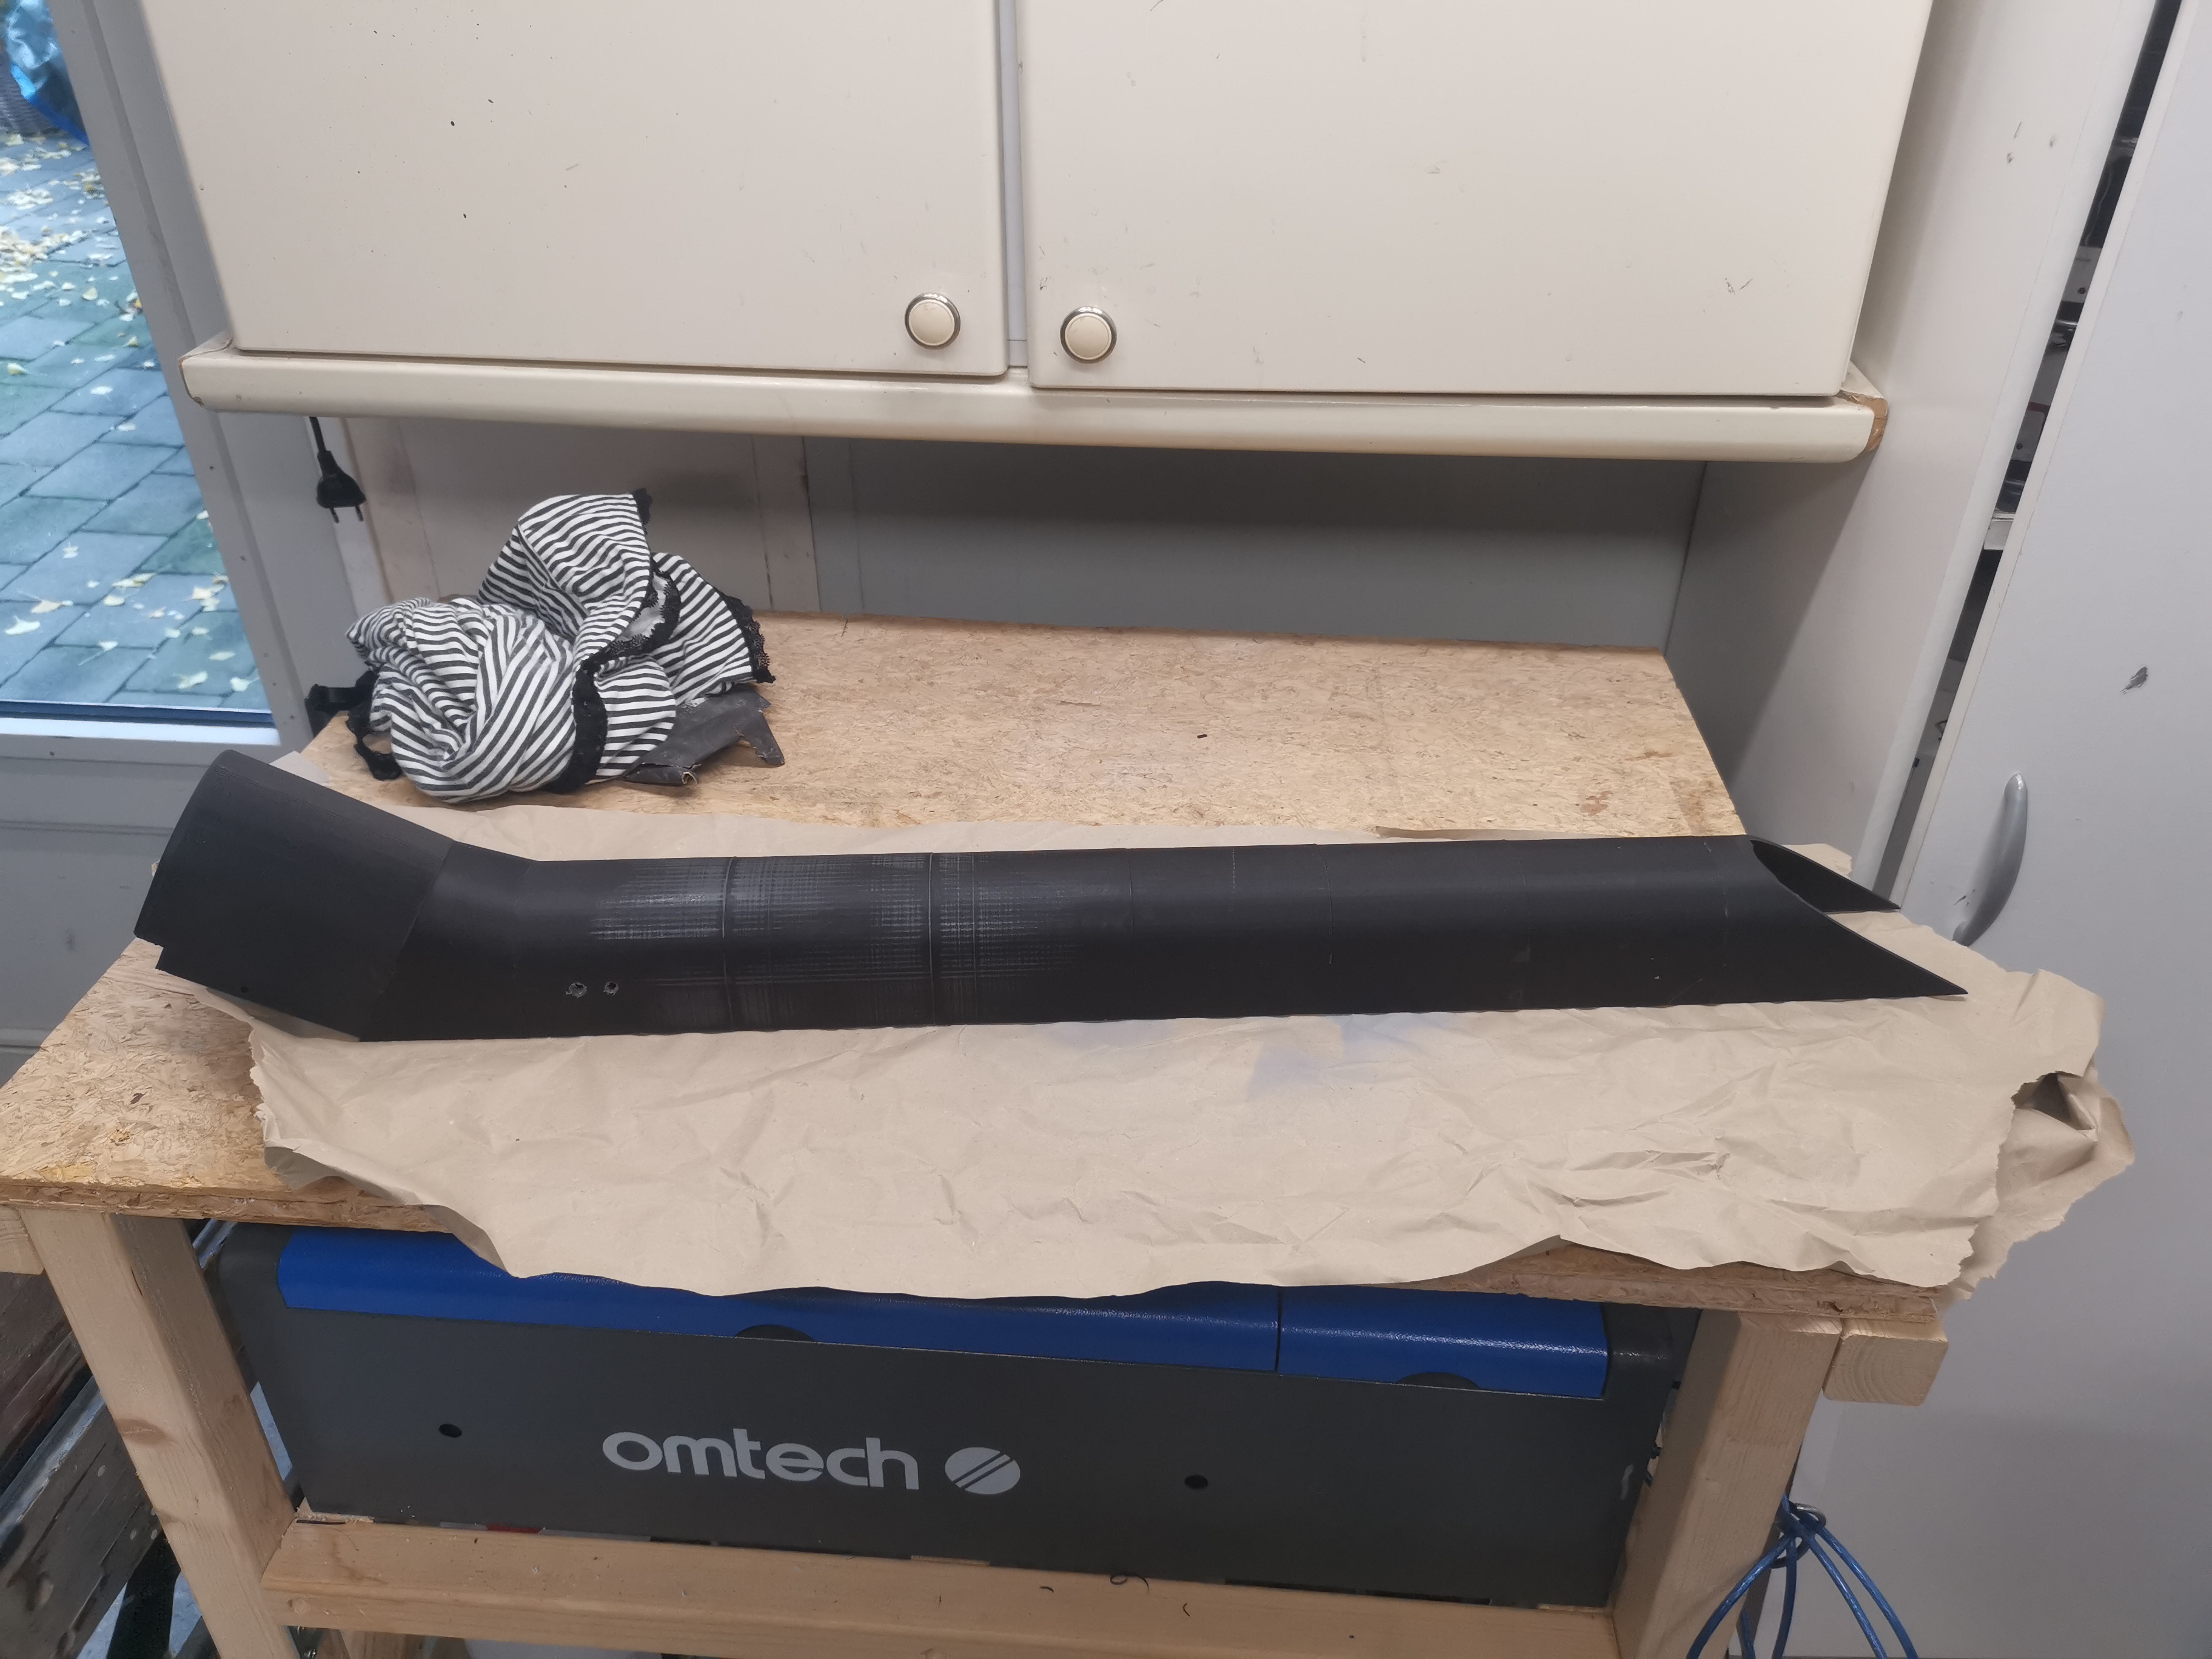
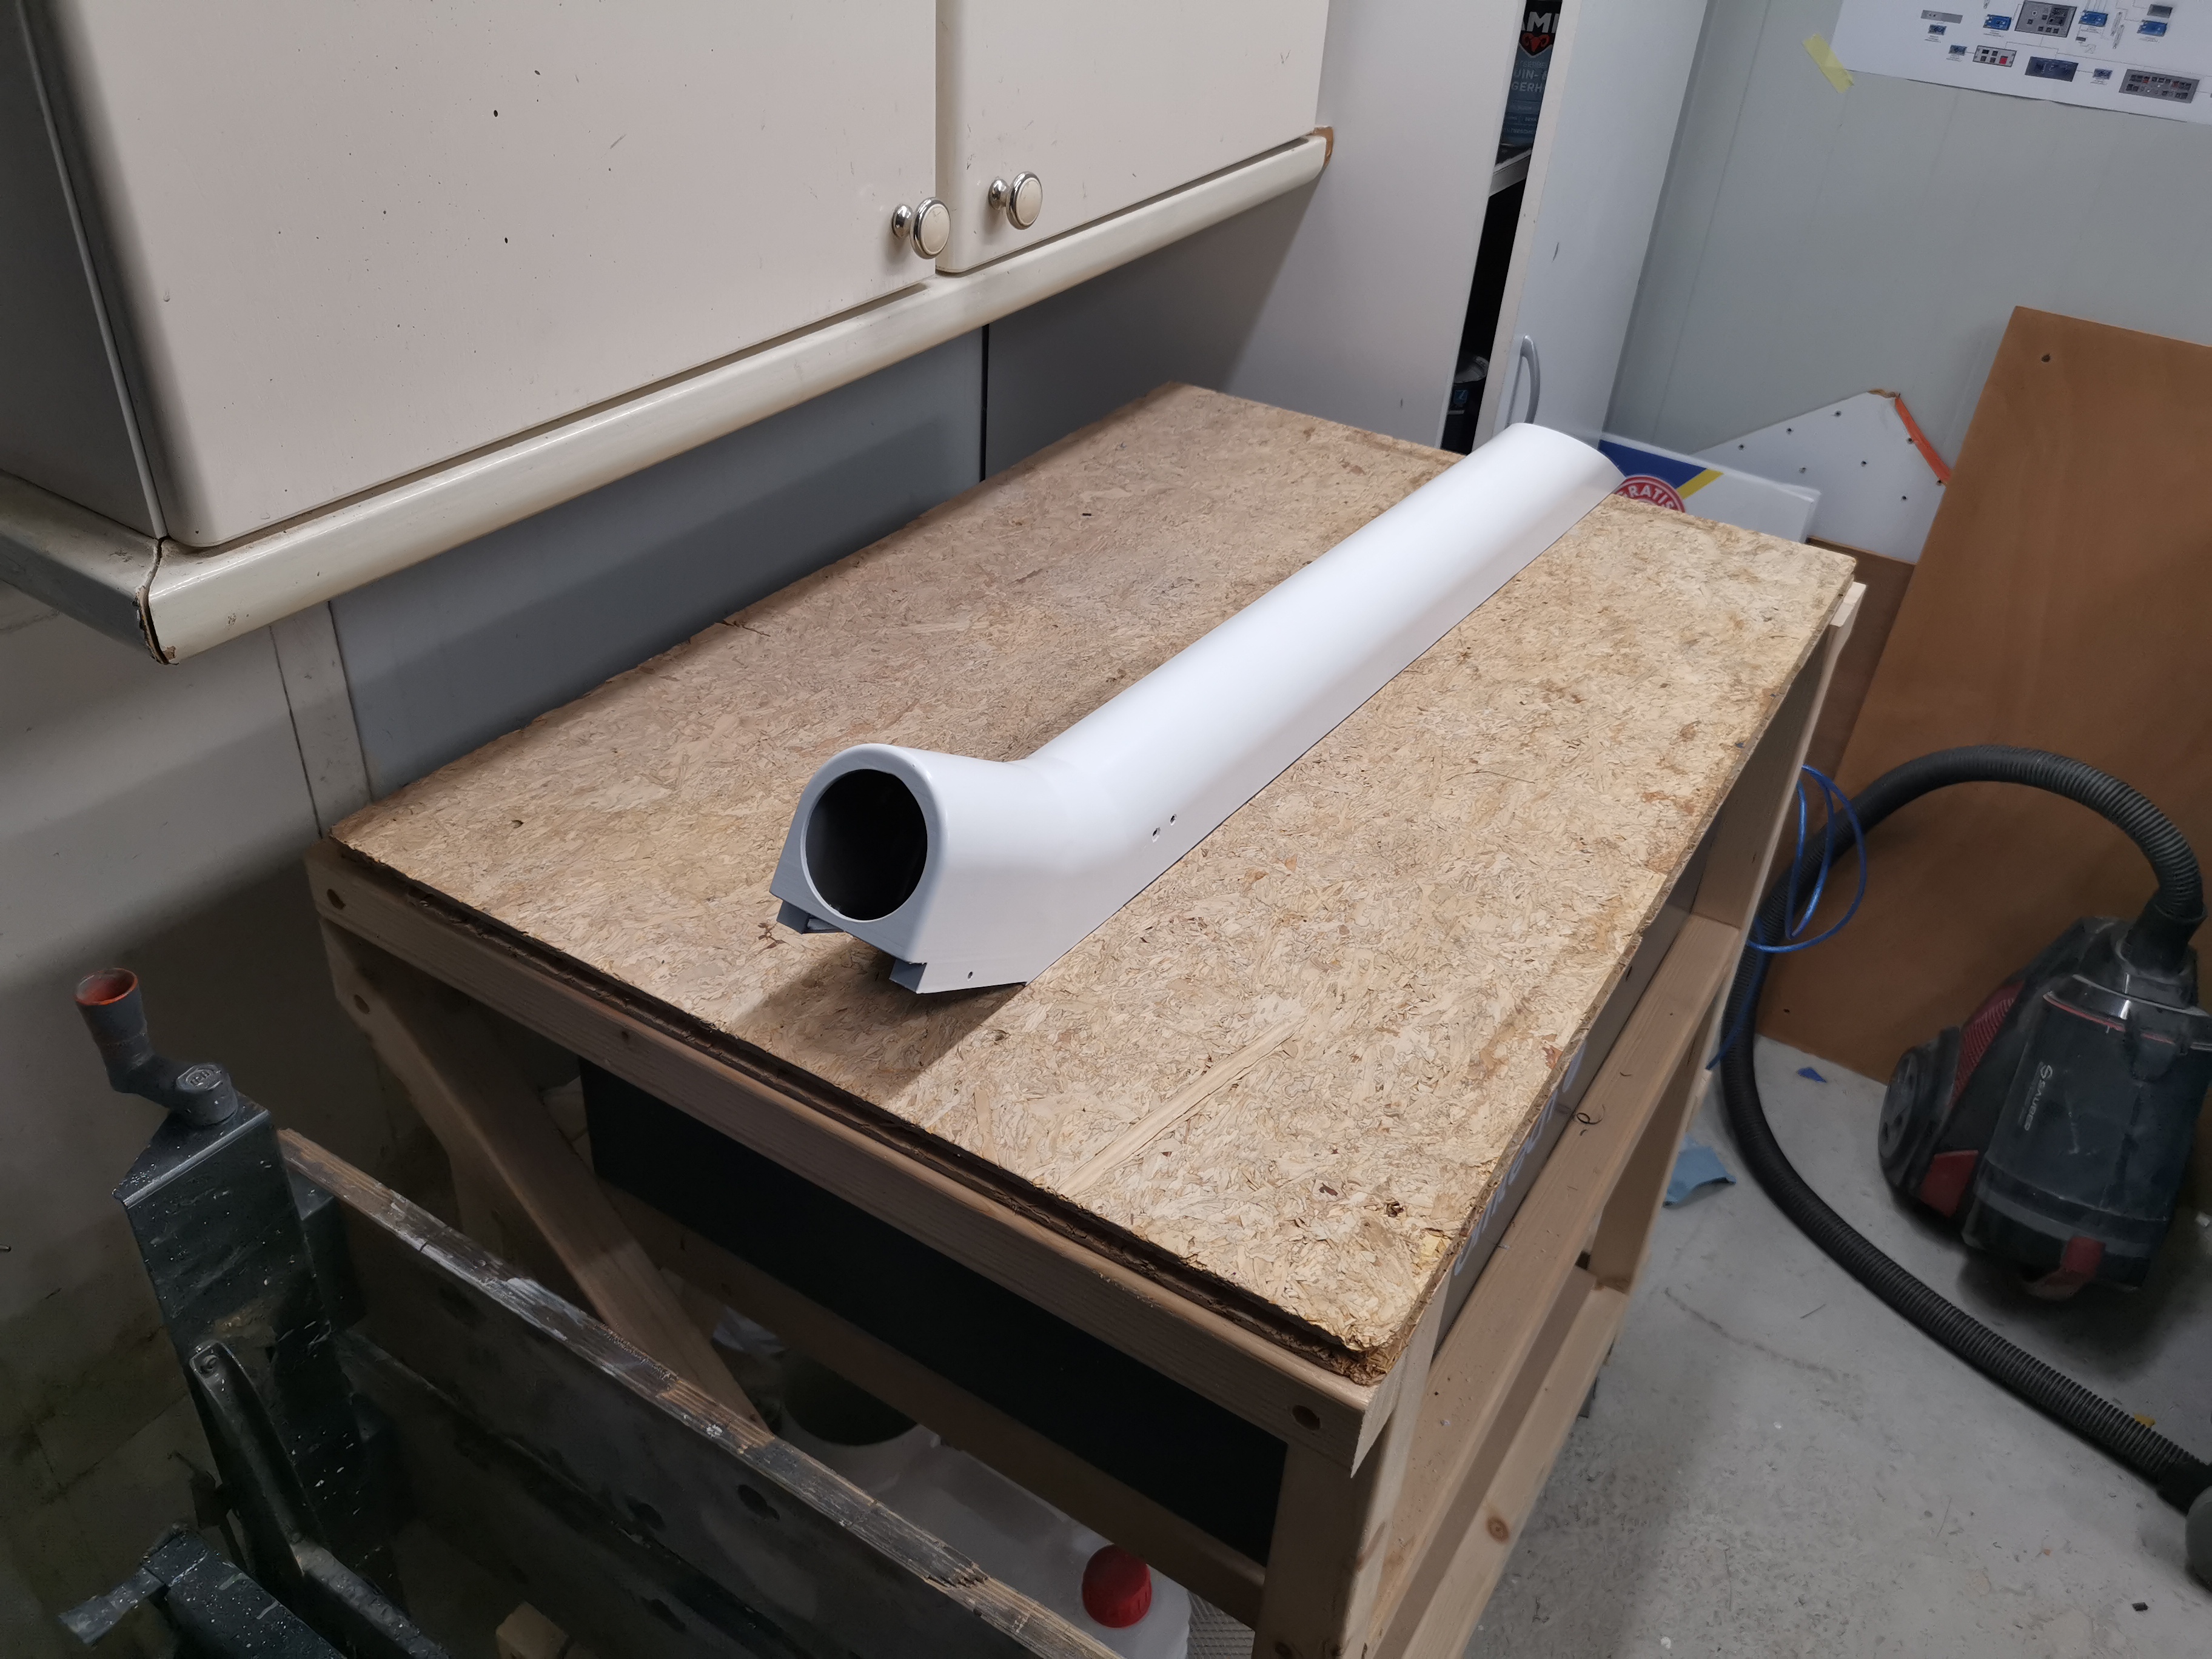
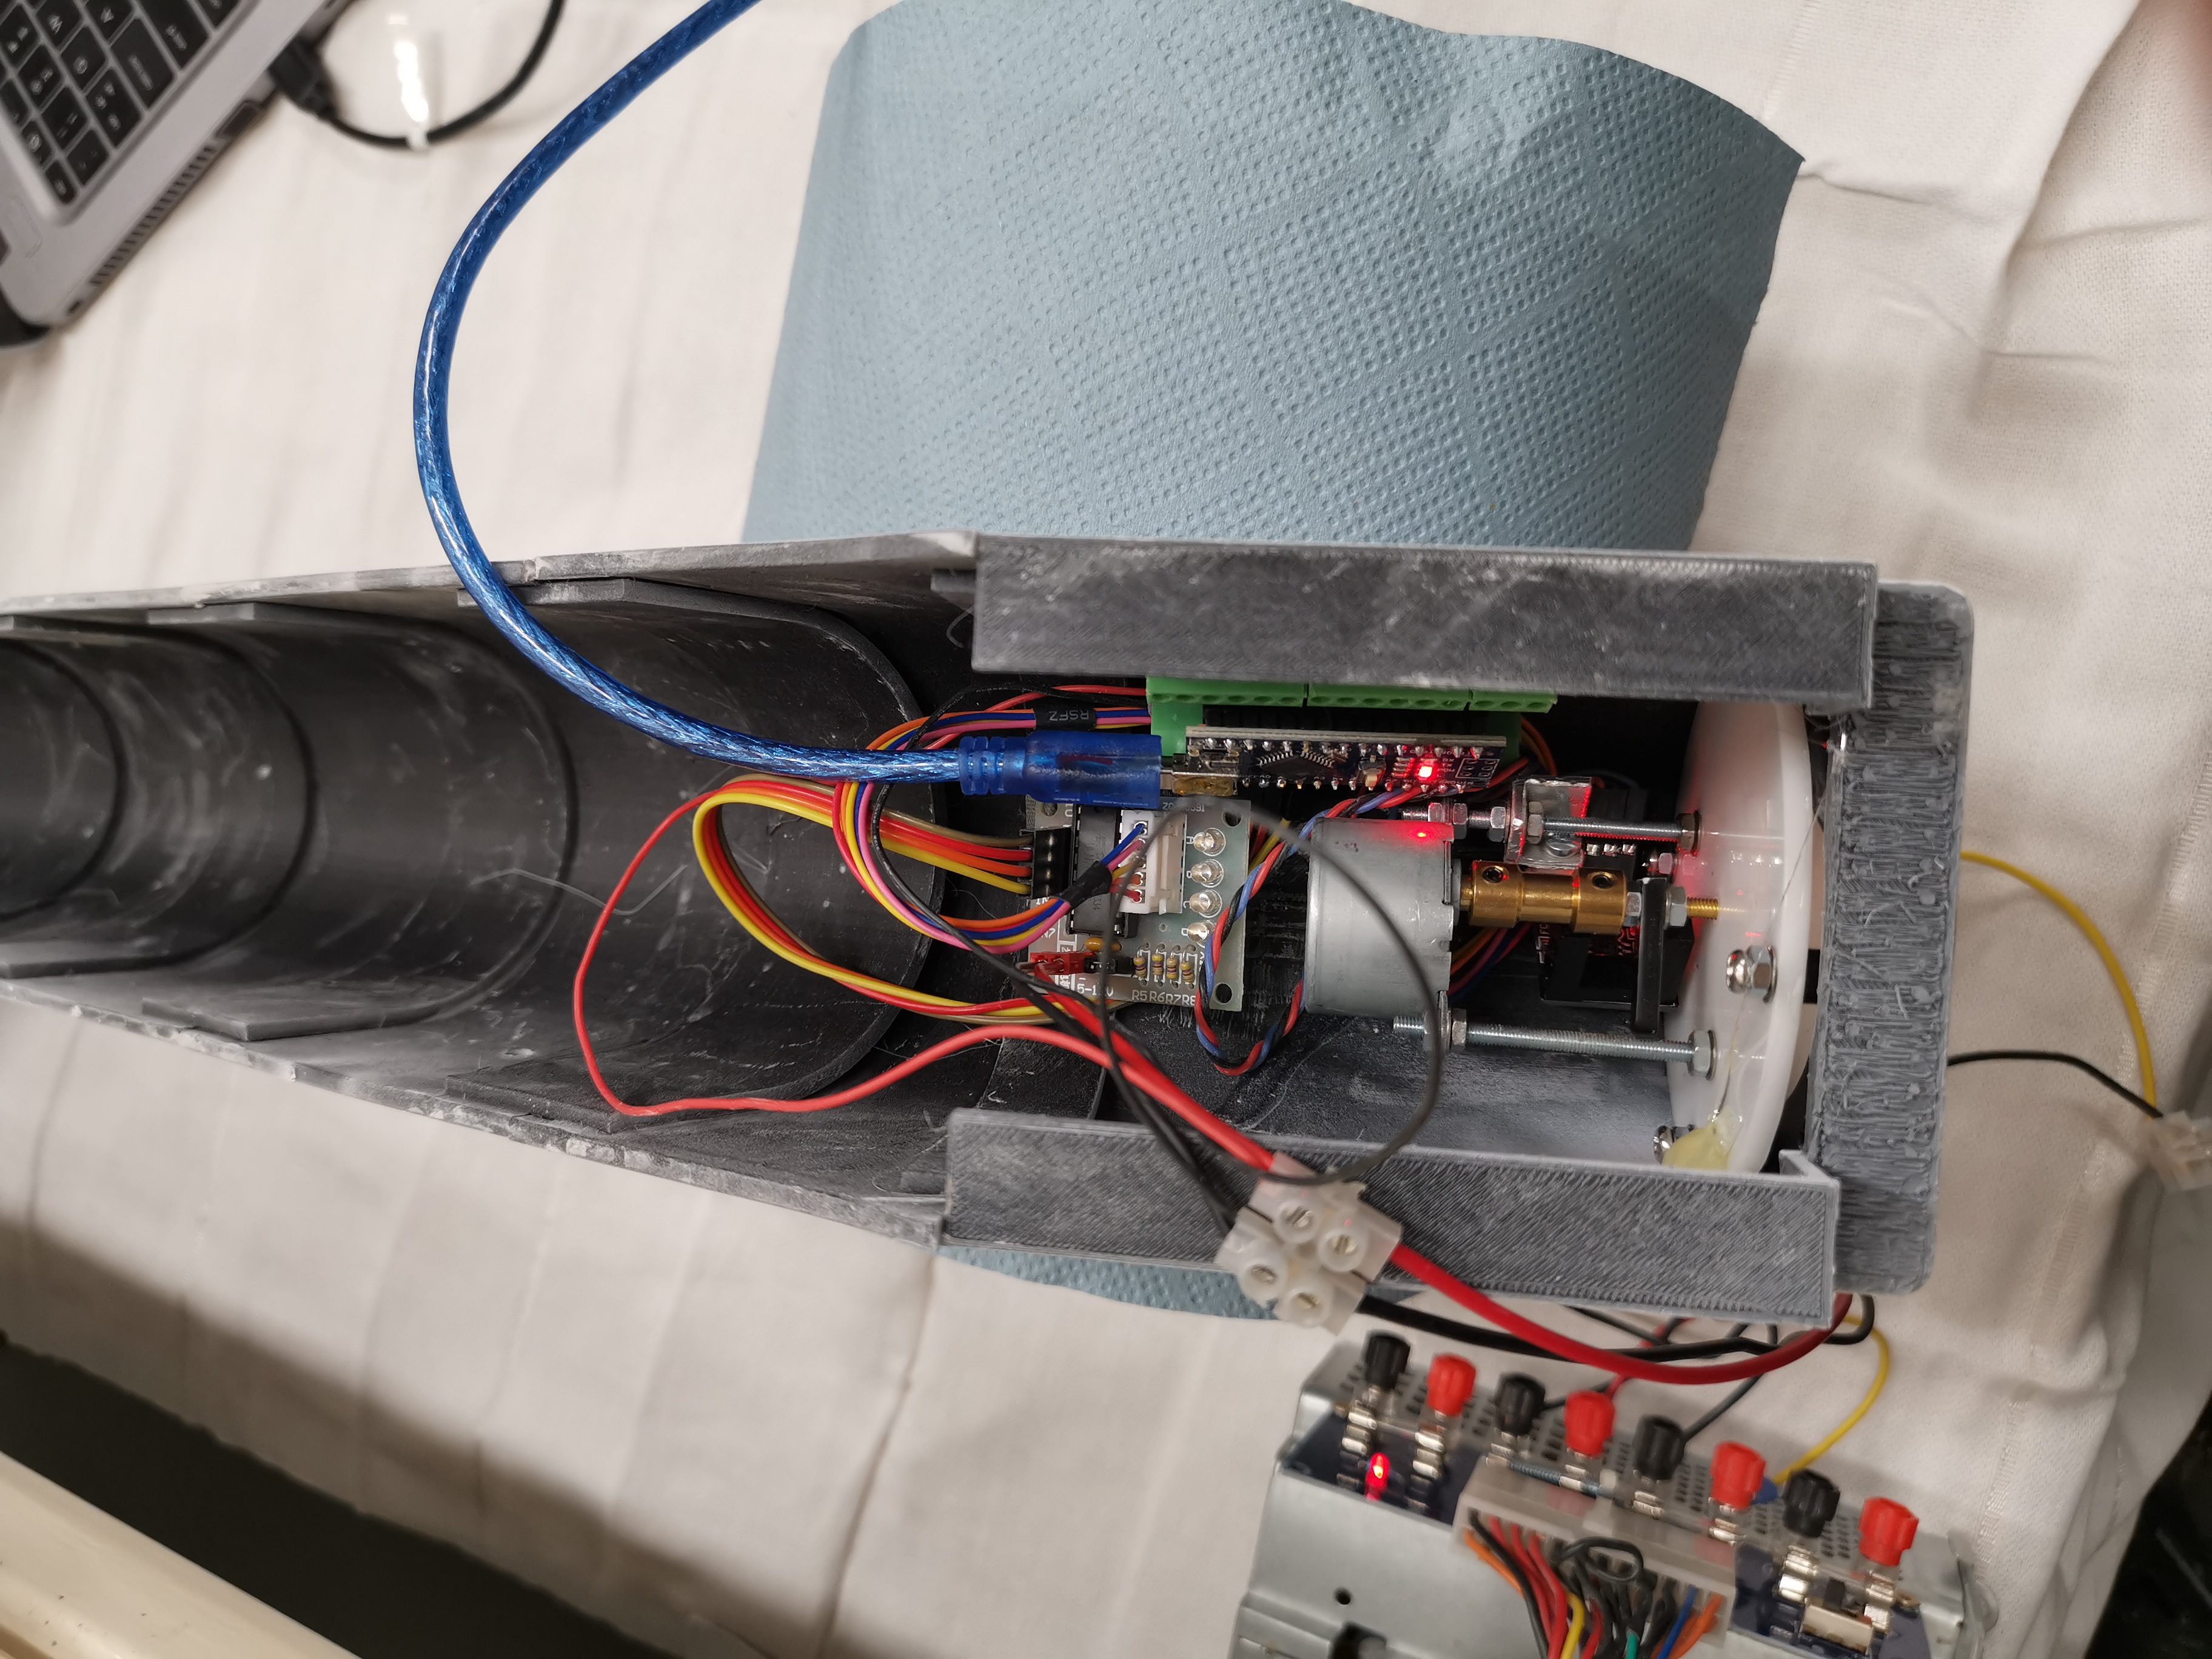
I have been busy with programming my FMS lately. - read the navigrapgh navdata Because i use the FMS now for all of this i also had to rewrite other avionics like FGC, PFD and MFD . Here are some videos about all this https://youtu.be/svViIYpHywQ https://youtu.be/2qjHHgtGQYI I have been busy with programming my FMS lately. - read the navigrapgh navdata Because i use the FMS now for all of this i also had to rewrite other avionics like FGC, PFD and MFD . Here are some videos about all this Hey Roel, Wow, you have been very busy! The work you have done on your FMS software is impressive. It is cool seeing your project come together like it has. What areas of your project are you still working? Hey Roel, Wow, you have been very busy! The work you have done on your FMS software is impressive. It is cool seeing your project come together like it has. What areas of your project are you still working? Thanks Ron Besides finishing my FMS software i am also working on the compass . Also i STILL have to create chairs . Also still little improvements like a moving map made from an old ipad on the cabin part, and such things. I am afraid the sim is never finished 😉 Thanks Ron Besides finishing my FMS software i am also working on the compass . Also i STILL have to create chairs . Also still little improvements like a moving map made from an old ipad on the cabin part, and such things. I am afraid the sim is never finished 😉 Very TRUE statement, "The sim is never finished." If you are like the rest of us, you will end up flying while at the same time still working on things to either add or improve on. But what may happen at some point is you will find yourself at a point where you can't progress any further without taking several steps backwards. If that happens to you, try to keep your sim operational as long as possible. I think if I had to do it all over again, I would have kept my best version of v1.0 up and flying while on the side, building my v2.0 and all the modules and panels that come with it. Back then none of us could foresee how far we would take this project. What I mean by that is when I first started peeling back the onion, I thought I would only be removing a couple layers. Two layers turned into three, then five and before I knew it, my whole sim was completely dismantled to make the necessary DEEP changes for all the updates. I really like your idea of adding the Airshow display on the forward cabin wall! I bet you will see some of us doing that at some point in the future. Looking good Roel! Very TRUE statement, "The sim is never finished." If you are like the rest of us, you will end up flying while at the same time still working on things to either add or improve on. But what may happen at some point is you will find yourself at a point where you can't progress any further without taking several steps backwards. If that happens to you, try to keep your sim operational as long as possible. I think if I had to do it all over again, I would have kept my best version of v1.0 up and flying while on the side, building my v2.0 and all the modules and panels that come with it. Back then none of us could foresee how far we would take this project. What I mean by that is when I first started peeling back the onion, I thought I would only be removing a couple layers. Two layers turned into three, then five and before I knew it, my whole sim was completely dismantled to make the necessary DEEP changes for all the updates. I really like your idea of adding the Airshow display on the forward cabin wall! I bet you will see some of us doing that at some point in the future. Looking good Roel! Roell, you are clearly a builder! Great job on the software. Now that you are tackling the FMS, you are taking on, what I believe, is the hardest component to model. One of the most challenging areas was how to get the FMS to 'fly' the airplane. Early on, I was able to use built-in autopilot states in P3D to do lateral navigation using heading hold mode. The FMS would calculate the track error from the course between the previous and next waypoint and then compute the heading required to maintain this track. This was based on a PI controller to make sure the aircraft minimizes any course error. This worked okay, but seeing the heading hold bug move around the HSI and masking the fact that GPS mode was not really enabled wasn't the right strategy. To solve this, I implemented a stand-alone autopilot in my FMS which does the same type of calculation above, but navigates the aircraft by commanding the control surfaces to bank the aircraft. This works better than using heading hold mode. If you look into the FSUIPC variables, you will see some variables for GPS waypoints. I thought that just writing the values to these waypoints and setting the FGC mode to LNAV and the NAV mode to GPS would force P3D to fly to these waypoints, but this didn't work because you had to have a flight plan loaded into P3D and you could not change the waypoints in the plan through FSUIPC, and therefore had to fly the flight plan originally loaded and could not change it on the fly through the FMS. Curious to know how you are doing this as you mentioned in the video you have the FMS 'flying' the airplane. Roell, you are clearly a builder! Great job on the software. Now that you are tackling the FMS, you are taking on, what I believe, is the hardest component to model. One of the most challenging areas was how to get the FMS to 'fly' the airplane. Early on, I was able to use built-in autopilot states in P3D to do lateral navigation using heading hold mode. The FMS would calculate the track error from the course between the previous and next waypoint and then compute the heading required to maintain this track. This was based on a PI controller to make sure the aircraft minimizes any course error. This worked okay, but seeing the heading hold bug move around the HSI and masking the fact that GPS mode was not really enabled wasn't the right strategy. To solve this, I implemented a stand-alone autopilot in my FMS which does the same type of calculation above, but navigates the aircraft by commanding the control surfaces to bank the aircraft. This works better than using heading hold mode. If you look into the FSUIPC variables, you will see some variables for GPS waypoints. I thought that just writing the values to these waypoints and setting the FGC mode to LNAV and the NAV mode to GPS would force P3D to fly to these waypoints, but this didn't work because you had to have a flight plan loaded into P3D and you could not change the waypoints in the plan through FSUIPC, and therefore had to fly the flight plan originally loaded and could not change it on the fly through the FMS. Curious to know how you are doing this as you mentioned in the video you have the FMS 'flying' the airplane. Hi Jason Since it seems it's not possible to alter the P3D entered flightplan inflight, i do more or less what you describe. I also steer the plane according to current lat,lon position to the next waypoint. When setting the airplane in nav mode , the hdg encoder is disabled , but indeed you do see the heading bug rotating to the waypoint. So far this does seem to be ok, i can change flightplans in mid flight. But i think i will run into issues not being able to replicate the FMS to what i read in documentation; turns for instance...and indeed the track error reading . I had to do some math to implement VNAV mode to calculate descent rates , but chatgpt comes in handy The FMS implementation is indeed complex to code. Hi Jason Since it seems it's not possible to alter the P3D entered flightplan inflight, i do more or less what you describe. I also steer the plane according to current lat,lon position to the next waypoint. When setting the airplane in nav mode , the hdg encoder is disabled , but indeed you do see the heading bug rotating to the waypoint. So far this does seem to be ok, i can change flightplans in mid flight. But i think i will run into issues not being able to replicate the FMS to what i read in documentation; turns for instance...and indeed the track error reading . I had to do some math to implement VNAV mode to calculate descent rates , but chatgpt comes in handy The FMS implementation is indeed complex to code. I finaly mounted the compass. So i decided to create one from scratch Another thing was the tube where the compass is mounted in. So i 3D printed this all!! The compass is a stepper motor controlled with a arduino nano mounted inside the compass housing. Some pics about this "project" Since i only can print parts 20cm big , the tube was printed in parts tube glued together after painting dial not mounted vertically here, and also the led is still visible 😉 inside the compass up and running. I finaly mounted the compass. So i decided to create one from scratch Another thing was the tube where the compass is mounted in. So i 3D printed this all!! The compass is a stepper motor controlled with a arduino nano mounted inside the compass housing. Some pics about this "project" Since i only can print parts 20cm big , the tube was printed in parts tube glued together after painting dial not mounted vertically here, and also the led is still visible 😉 inside the compass up and running. Hi Roel, Incredible work on the compass and compass housing! Good idea on using the 3D printer to make the pieces in sections. We have all seen how several guys are making large scale model aircraft with a 3D printer using this same principle. In case anyone has missed it, here is a good example: https://youtu.be/0YSXmKaWG-M Your project is looking fantastic Roel! Hi Roel, Incredible work on the compass and compass housing! Good idea on using the 3D printer to make the pieces in sections. We have all seen how several guys are making large scale model aircraft with a 3D printer using this same principle. In case anyone has missed it, here is a good example: Your project is looking fantastic Roel!Roel's Learjet 45 simulator
![]()
![]()
![]()
This sure is a hell of a job.
But it is starting to look like something now.
So far i have managed to :
- create flightplans with stars and sids
- make the sim fly accoring the flightplan , also VNAV
- show flightplan on NAV displays
- enter weight and balance
But all is ready to use now , and i am quite happy about the result
I used the colorscheme as presented in UNS documentation , with the browns for menu items.
This sure is a hell of a job.
But it is starting to look like something now.
So far i have managed to :
- create flightplans with stars and sids
- make the sim fly accoring the flightplan , also VNAV
- show flightplan on NAV displays
- enter weight and balance
But all is ready to use now , and i am quite happy about the result
I used the colorscheme as presented in UNS documentation , with the browns for menu items.![]()
![]()
Compass was allready finished , but i struggled with the center tunnel
I am 3D printing this now, and is allmost finished.
I am sitting on a litte wooden chair 🙂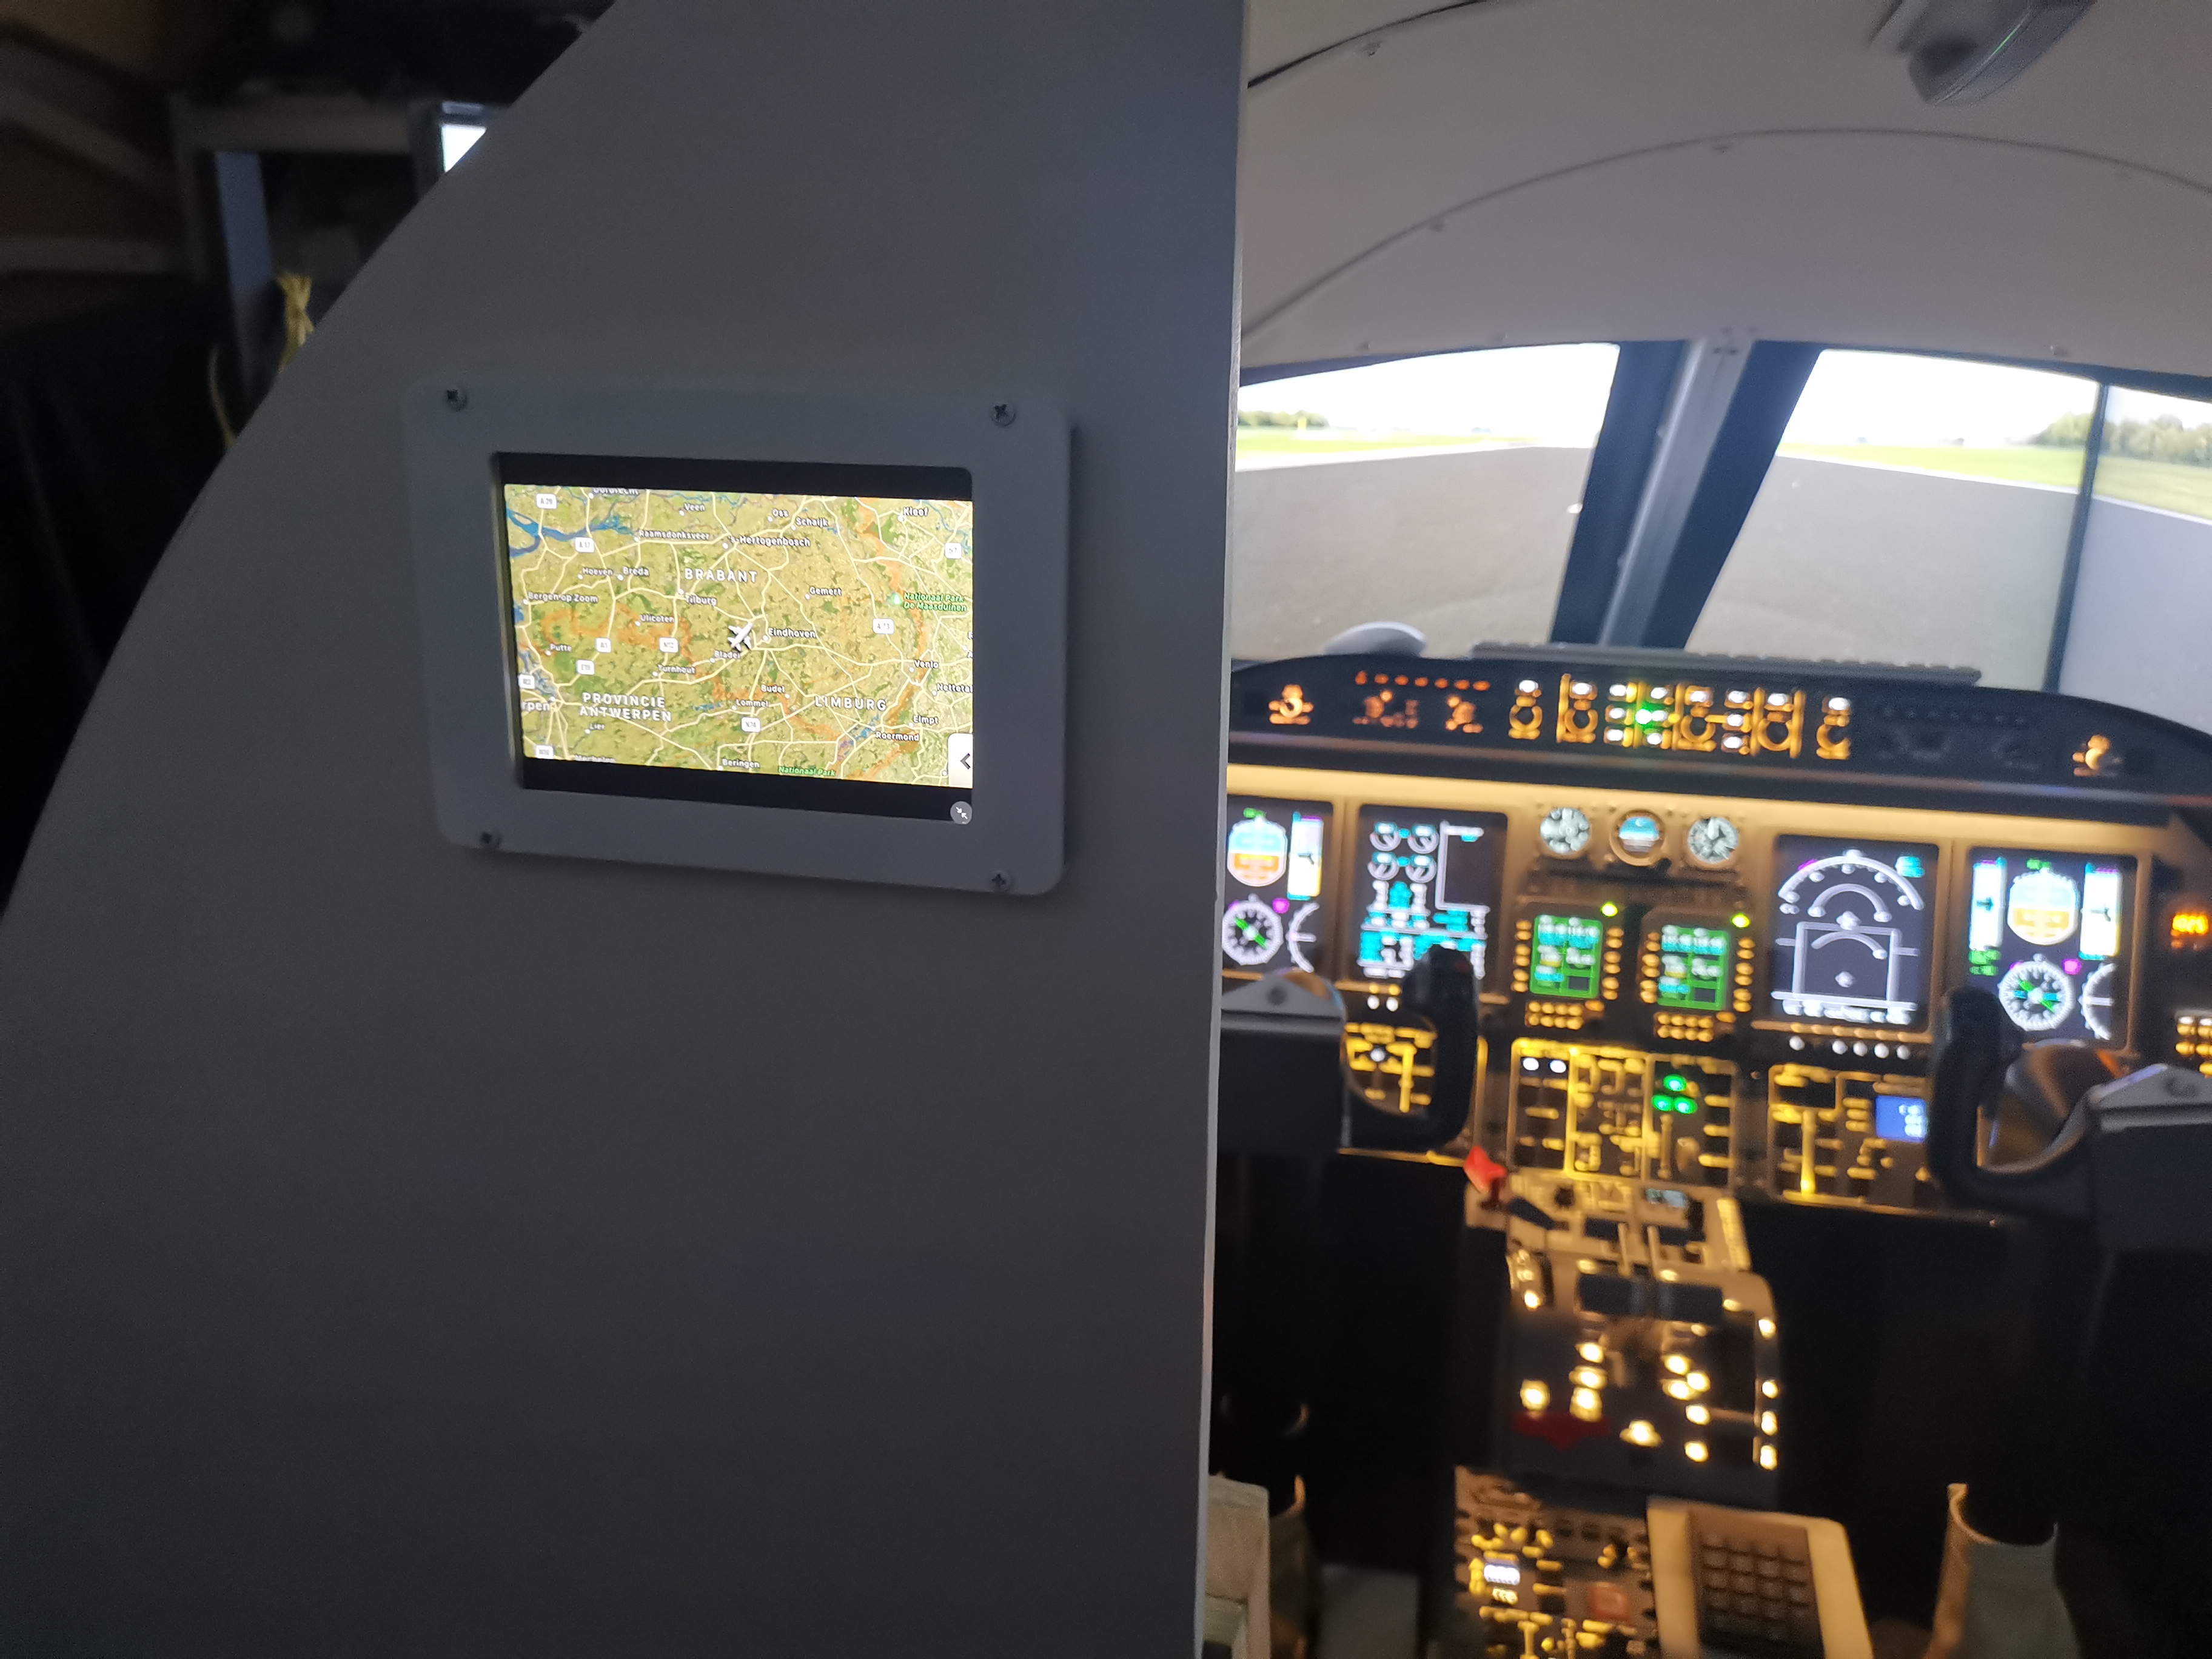
Compass was allready finished , but i struggled with the center tunnel
I am 3D printing this now, and is allmost finished.
I am sitting on a litte wooden chair 🙂![]()
![]()
![]()
Yes i know what you mean!
sometimes for that these days. 😉
But i do learn a lot about how airplanes actually fly.
So its fun
Yes i know what you mean!
sometimes for that these days. 😉
But i do learn a lot about how airplanes actually fly.
So its fun![]()
First attempt was with a OEM compass from a cessna. (as posted before)
But they are too big, this didn't look right.
Dialplate is a decal , so is the orange airplane on the glass.
Decals are cheap so i could experiment with the best way to get the best result mounting the decals.
First i tried the fiberglass way what i saw in this forum.
The tube was not that hard, but creating a housing for the compass was hard.
great succes.
It also took some trial and error filament, but this went well.
coding is pretty simple with the airmanager.


First attempt was with a OEM compass from a cessna. (as posted before)
But they are too big, this didn't look right.
Dialplate is a decal , so is the orange airplane on the glass.
Decals are cheap so i could experiment with the best way to get the best result mounting the decals.
First i tried the fiberglass way what i saw in this forum.
The tube was not that hard, but creating a housing for the compass was hard.
great succes.
It also took some trial and error filament, but this went well.
coding is pretty simple with the airmanager.![]()
Forum NavigationRoel's Learjet 45 simulator
![]() #161 · August 8, 2023, 10:22 am
#161 · August 8, 2023, 10:22 am![]() #162 · August 11, 2023, 9:57 am
#162 · August 11, 2023, 9:57 am![]() #163 · November 27, 2023, 9:59 am
#163 · November 27, 2023, 9:59 am![]() #164 · November 27, 2023, 10:57 pm
#164 · November 27, 2023, 10:57 pm![]() #165 · November 29, 2023, 2:10 am
#165 · November 29, 2023, 2:10 am![]() #166 · November 29, 2023, 5:53 pm
#166 · November 29, 2023, 5:53 pm![]() #167 · December 4, 2023, 4:19 pmJason Hite
FlightDeckSoft
#167 · December 4, 2023, 4:19 pmJason Hite
FlightDeckSoft![]() #168 · December 11, 2023, 8:27 am
#168 · December 11, 2023, 8:27 am![]() #169 · December 11, 2023, 8:41 am
#169 · December 11, 2023, 8:41 am![]() #170 · December 11, 2023, 11:16 am
#170 · December 11, 2023, 11:16 am
2017-10-10