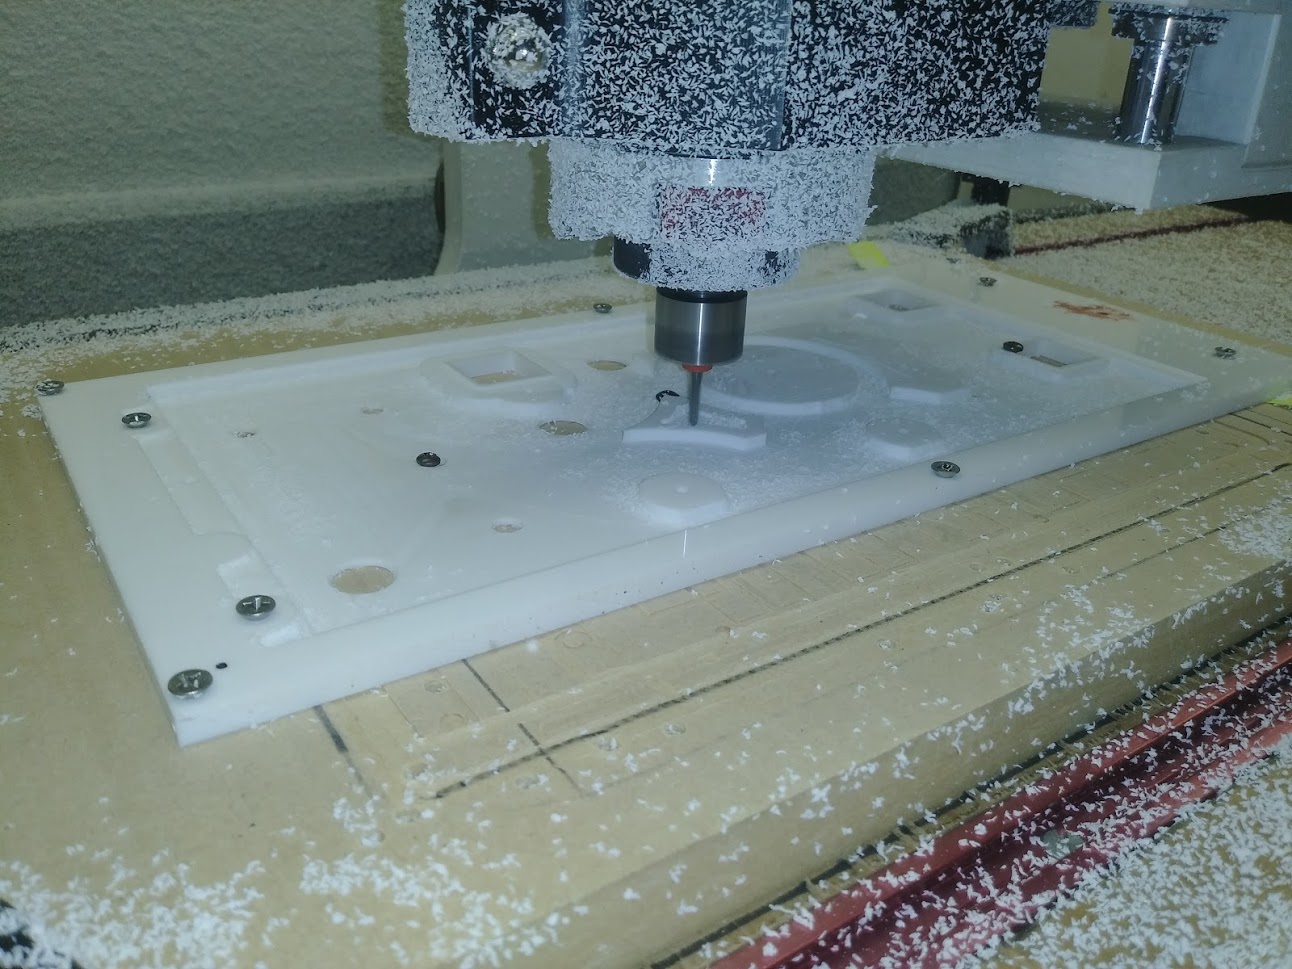
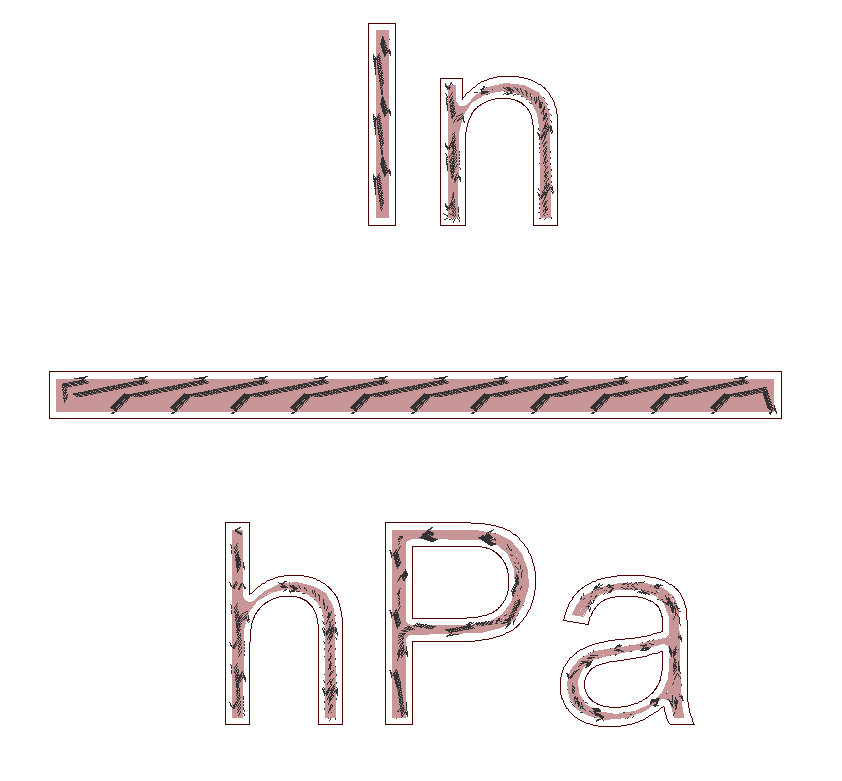
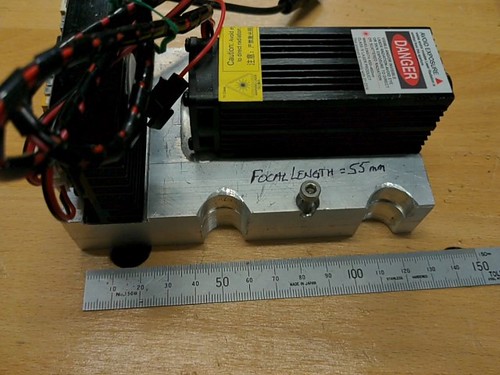
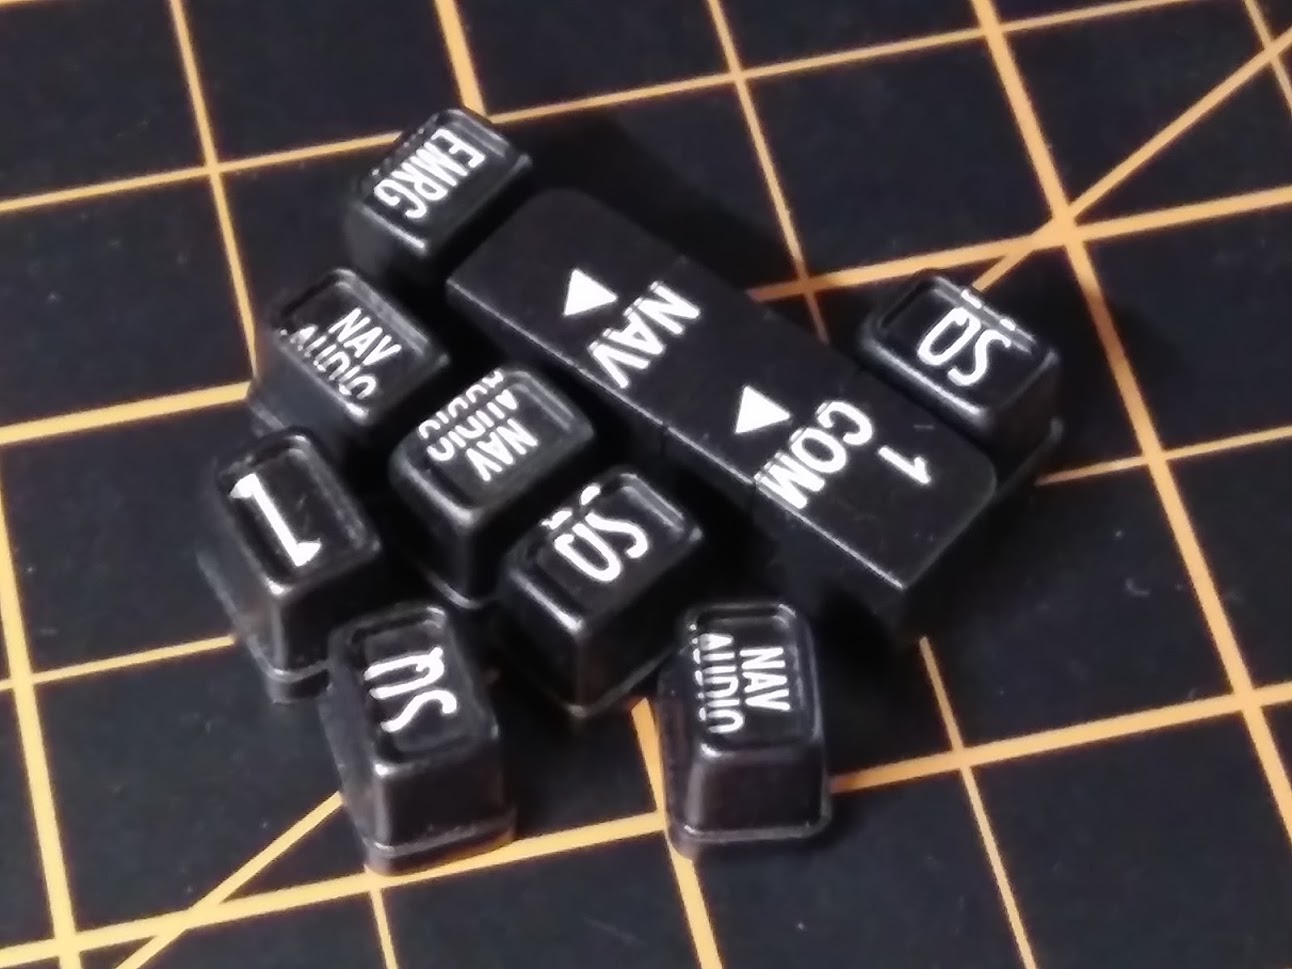
The laser engraving here is out of sight. Three bids on the MCP EFIS combo - $85, $125 and $95. Too much for my blood. Could buy a laser for myself. Try once more with CNC or Silk Screen. One more attempt with CNC. Then I guess no back light. Would need input on material hold down on spoiler board. Right now, screws seem to work best so far. Home Depot 2 sided tape too thick. Can cause flapping on thin pieces or use too much tape. Afraid of using carpet 2 sided tape. Maybe can't remove it from material or spoiler board. Has anyone tried masking to carpet to masking tapes? What is the best hold you all have used for the CNC? Thanks The laser engraving here is out of sight. Three bids on the MCP EFIS combo - $85, $125 and $95. Too much for my blood. Could buy a laser for myself. Try once more with CNC or Silk Screen. One more attempt with CNC. Then I guess no back light. Would need input on material hold down on spoiler board. Right now, screws seem to work best so far. Home Depot 2 sided tape too thick. Can cause flapping on thin pieces or use too much tape. Afraid of using carpet 2 sided tape. Maybe can't remove it from material or spoiler board. Has anyone tried masking to carpet to masking tapes? What is the best hold you all have used for the CNC? Thanks Hi Dave, I use this method: https://m.youtube.com/watch?v=gTUAAm0DFOQ For light work such as engraving I use quick-grip spray on glue, doesn’t need superglue. Works well. Hi Dave, I use this method: https://m.youtube.com/watch?v=gTUAAm0DFOQ For light work such as engraving I use quick-grip spray on glue, doesn’t need superglue. Works well. Wow Dave, those prices are insane. But for a 1 off job I’m not surprised. For all of my CNC work, I used double sided carpet tape. It holds the workpiece flat to the spoil board and I don’t have to worry about the CNC running into screw heads. You can end up with some adhesive residue on the spoil board and on the workpiece but it’s easily cleaned off with isopropyl alcohol. I don’t think you should give up on the backlighting, it takes a while (and lots of scrap) to learn to do it well, but it’s worth it. You will not be able to do it just by asking questions here, you have to take that info and continue trying and experimenting on your own since each machine is different. You haven’t shared anything about how you are doing the text in CAD then generating the tool paths for it. That’s a huge step in the outcome. Do you have details of that step? Wow Dave, those prices are insane. But for a 1 off job I’m not surprised. For all of my CNC work, I used double sided carpet tape. It holds the workpiece flat to the spoil board and I don’t have to worry about the CNC running into screw heads. You can end up with some adhesive residue on the spoil board and on the workpiece but it’s easily cleaned off with isopropyl alcohol. I don’t think you should give up on the backlighting, it takes a while (and lots of scrap) to learn to do it well, but it’s worth it. You will not be able to do it just by asking questions here, you have to take that info and continue trying and experimenting on your own since each machine is different. You haven’t shared anything about how you are doing the text in CAD then generating the tool paths for it. That’s a huge step in the outcome. Do you have details of that step? I agree with Jason, those prices are insane. Although I have found that most if not all laser shops don't want anything to do with engraving materials brought into the shop. Even the outfit that I work with is not particularly happy with engraving my panels. They know how much work it takes to get the panels ready for engraving and they worry about screwing something up. It takes several hours to make a single panel and only a single second to screw it up with a laser! In my case, I do everything in my power to insure high success on the laser shop's part and try to remove as much stress as possible. This includes making sure the panels are perfectly flat, the paint is not too thick and in some cases, including a couple extra panels or buttons so they can insure the alignment is perfect. This helps alleviate some of the stress they have to deal with. So as you can see, laser engraving is not worth their trouble and in most cases, they will try to price you up and right out of the store front door to avoid the hassle. Jason and I have both shopped around for our own lasers and I am ready to dive in IF my local laser shop ever tells me the gig is up. It would be like everything else in the hobby, a bit of a learning curve but at the same time, I think I would find it enjoyable! To throw my two cents in on the material hold down issue, for my larger pieces, I use screws. I look at it like a game or like flying a plane with a flight plan and a FGC. (My imagination at work which is not hard when you are watching a part like in the photo above that takes about an hour to mill out!) This is my preferred method for larger and thicker panels and parts. For thinner materials, like clad, I use blue painters tape. I have tried the double sided tape and found that it was way too sticky for a fast turn around but maybe I was using the wrong kind. As you can see, there are several different ways to hold down materials and it just comes down to what you are most comfortable with. Here you got three guys using three different methods, spray adhesive, double sided tape and screws. I agree with Jason, those prices are insane. Although I have found that most if not all laser shops don't want anything to do with engraving materials brought into the shop. Even the outfit that I work with is not particularly happy with engraving my panels. They know how much work it takes to get the panels ready for engraving and they worry about screwing something up. It takes several hours to make a single panel and only a single second to screw it up with a laser! In my case, I do everything in my power to insure high success on the laser shop's part and try to remove as much stress as possible. This includes making sure the panels are perfectly flat, the paint is not too thick and in some cases, including a couple extra panels or buttons so they can insure the alignment is perfect. This helps alleviate some of the stress they have to deal with. So as you can see, laser engraving is not worth their trouble and in most cases, they will try to price you up and right out of the store front door to avoid the hassle. Jason and I have both shopped around for our own lasers and I am ready to dive in IF my local laser shop ever tells me the gig is up. It would be like everything else in the hobby, a bit of a learning curve but at the same time, I think I would find it enjoyable! To throw my two cents in on the material hold down issue, for my larger pieces, I use screws. I look at it like a game or like flying a plane with a flight plan and a FGC. (My imagination at work which is not hard when you are watching a part like in the photo above that takes about an hour to mill out!) This is my preferred method for larger and thicker panels and parts. For thinner materials, like clad, I use blue painters tape. I have tried the double sided tape and found that it was way too sticky for a fast turn around but maybe I was using the wrong kind. As you can see, there are several different ways to hold down materials and it just comes down to what you are most comfortable with. Here you got three guys using three different methods, spray adhesive, double sided tape and screws. For those considering buying their own laser...a word of caution regarding plastics and chlorine gas: https://hackaday.com/tag/copper-wire-test/ I suggest you test your material before buying a laser to see if you are safe to laser it. I bought a cheap laser from china. Fitted it to the spindle mount on my CNC. Works well so far but have not used it much yet as a lot of the acrylic I have used making panels tested positive for chlorine, so I have not laser engraved any plastics yet. Although it works well on wood! For those considering buying their own laser...a word of caution regarding plastics and chlorine gas: https://hackaday.com/tag/copper-wire-test/ I suggest you test your material before buying a laser to see if you are safe to laser it. I bought a cheap laser from china. Fitted it to the spindle mount on my CNC. Works well so far but have not used it much yet as a lot of the acrylic I have used making panels tested positive for chlorine, so I have not laser engraved any plastics yet. Although it works well on wood! Hi Jason, I am using VCarve Pro to design and create toolpaths. The app is from Vectric in the UK and expensive. It came with my CNC (Rockler Shark). Very easy to use and creates engravable text and single line text. The problem I'm having is the text on panels is too small for engraving and can't use a bit small enough for single line text. Thanks Will for your input. Perhaps more information on your laser could be posted here. Details on the brand, model and cost as well as how you mounted the laser. Some input to start with on your setup. I understand about the Chlorine. It is PVC (polyvinyl chloride) that creates the gas. Recommended laser plastic is cast acrylic. Also recommended for CNC cutting. The PVC can also cause corrosion in metal parts even with ventilation. For all. I found that the best hold down for parts that can buckle in the middle (thin just cut a 3/32 piece) is painters tape to the material, 2 sided carpet tape on the painters tape (not on the plastic - messy) and then painters tape back side to carpet tape. Painters tape sticky side on the spoiler board. Acrylic 1/8" and thicker, screws are better. However, some 1/8" acrylics are not so good with screws. Depends on the size and number of screws. I've had flapping in the middle with 1/8" screwed down. Hi Jason, I am using VCarve Pro to design and create toolpaths. The app is from Vectric in the UK and expensive. It came with my CNC (Rockler Shark). Very easy to use and creates engravable text and single line text. The problem I'm having is the text on panels is too small for engraving and can't use a bit small enough for single line text. Thanks Will for your input. Perhaps more information on your laser could be posted here. Details on the brand, model and cost as well as how you mounted the laser. Some input to start with on your setup. I understand about the Chlorine. It is PVC (polyvinyl chloride) that creates the gas. Recommended laser plastic is cast acrylic. Also recommended for CNC cutting. The PVC can also cause corrosion in metal parts even with ventilation. For all. I found that the best hold down for parts that can buckle in the middle (thin just cut a 3/32 piece) is painters tape to the material, 2 sided carpet tape on the painters tape (not on the plastic - messy) and then painters tape back side to carpet tape. Painters tape sticky side on the spoiler board. Acrylic 1/8" and thicker, screws are better. However, some 1/8" acrylics are not so good with screws. Depends on the size and number of screws. I've had flapping in the middle with 1/8" screwed down. Dave, I also use Cut2D by Vectric (same company as VCarve), but I don't use the built in text features. I produce my text in my CAD program (Rhinoceros) as outline text in the DXF. I do this so I can use the correct fonts for the panels (futura). My CAD program allows me to create text as curves so they are closed polygons that Vcarve can do a pocketing operation on to remove the paint from within the borders of the text. Single line fonts will not work for what you are trying to do because they don't have thickness. It sounds like you essentially are trying to use the bit to determine the thickness of the characters. Here is a screenshot of what the toolpath should look like for a pocketing operation in outline text: Dave, I also use Cut2D by Vectric (same company as VCarve), but I don't use the built in text features. I produce my text in my CAD program (Rhinoceros) as outline text in the DXF. I do this so I can use the correct fonts for the panels (futura). My CAD program allows me to create text as curves so they are closed polygons that Vcarve can do a pocketing operation on to remove the paint from within the borders of the text. Single line fonts will not work for what you are trying to do because they don't have thickness. It sounds like you essentially are trying to use the bit to determine the thickness of the characters. Here is a screenshot of what the toolpath should look like for a pocketing operation in outline text: Thanks Jason It looks the same in VCarve Pro. I'm going to try one more time with your settings. The slowest speed is 16K on my Bosch Colt. Let you know. However, as I said, I have a New Wave Shark CNC. They had 2 refurbished laser attachments for their machines at $349 (Normally $499). I bought one. Let you know. Works with my controller. 30 day return with 2 day UPS delivery. Thanks Jason It looks the same in VCarve Pro. I'm going to try one more time with your settings. The slowest speed is 16K on my Bosch Colt. Let you know. However, as I said, I have a New Wave Shark CNC. They had 2 refurbished laser attachments for their machines at $349 (Normally $499). I bought one. Let you know. Works with my controller. 30 day return with 2 day UPS delivery. Dave, this is my setup. I bought a Laser Head Module kit similar to this: ebay-15W Laser Head Module Kit I machined an aluminum bracket from some stock I had: drilled and tapped the front of my spindle mount here: and mounted it like this: 3 bolts hold it on making it easy to put on and take off. I use g-codes M3 & M4 (motor switches) to turn it on and off. I would rather use M10 & M11 as they are specifically for laser switching, but my controller doesnt seem to like that! So far I have only done some setup and test burns, but so far so good. I have yet to work out how to use it to engrave our panels. I have done a test on a painted scrap piece which worked but at correct focal length it is a very fine cut. Dave, this is my setup. I bought a Laser Head Module kit similar to this: ebay-15W Laser Head Module Kit I machined an aluminum bracket from some stock I had: drilled and tapped the front of my spindle mount here: and mounted it like this: 3 bolts hold it on making it easy to put on and take off. I use g-codes M3 & M4 (motor switches) to turn it on and off. I would rather use M10 & M11 as they are specifically for laser switching, but my controller doesnt seem to like that! So far I have only done some setup and test burns, but so far so good. I have yet to work out how to use it to engrave our panels. I have done a test on a painted scrap piece which worked but at correct focal length it is a very fine cut. Hey Will, I was thinking of doing something very similar as to what you are doing but apparently got sidetracked. Looks very promising! Please post up some photos of your test work. When doing some research two years ago, I found several laser heads like the one you have above. As a bar to measure quality, the laser shop that I use here locally uses a dpi setting of 600 for my panels. Typically, they use 300 dpi on all their work unless a job requires a higher resolution or the customer request it. In their case, they can dial in any resolution from 75 to 1200 dpi because they have a couple high end lasers! Unless we are spending $5,000 or more, we will be lucky to find a laser head with a dpi of 300. The best I could find when searching last year was one that had a dpi of 250 and it was $300. The next best was 222 dpi for $229. The cheapest Chinese laser was $88 but it only had a dpi of 51. Just a couple examples of what I found and because I could not find anything at or above 300 dpi might be the reason why I suspended my efforts. The laser tech is always improving though! To better understand what to expect with different laser settings, I snipped this info off the net: 75 - 200 DPI: Use settings in this range for non-production purposes where you're experimenting with image location or are creating a rough draft of a particular project. 300 DPI:- This resolution is ideal for production work where image quality does not need to be extremely detailed. Simple shapes, objects with little shading differences and text (especially large, block text) engrave well at 300 DPI. 400 DPI - This resolution value is ideal for many applications. It combines very good image quality with fast engraving times. Many users like 400 DPI for all of their work. 600 DPI - When exceptionally fine detail or overall excellent results are required, most users choose 600 DPI. 1200 DPI - This resolution is used for projects that require the highest engraving quality possible, although it's rarely used because it takes twice as long to perform an engraving at this resolution (as opposed to 600 DPI, which is ideal for most projects.) The photo below is of some tiny CDR buttons cut at 600 dpi that were not lined up properly and will end up in the trash. Each one of the orange squares is .25" X .25" so as you can see, the engraving in these are tiny and tight! Looking forward to seeing some of your test pieces Will! Hey Will, I was thinking of doing something very similar as to what you are doing but apparently got sidetracked. Looks very promising! Please post up some photos of your test work. When doing some research two years ago, I found several laser heads like the one you have above. As a bar to measure quality, the laser shop that I use here locally uses a dpi setting of 600 for my panels. Typically, they use 300 dpi on all their work unless a job requires a higher resolution or the customer request it. In their case, they can dial in any resolution from 75 to 1200 dpi because they have a couple high end lasers! Unless we are spending $5,000 or more, we will be lucky to find a laser head with a dpi of 300. The best I could find when searching last year was one that had a dpi of 250 and it was $300. The next best was 222 dpi for $229. The cheapest Chinese laser was $88 but it only had a dpi of 51. Just a couple examples of what I found and because I could not find anything at or above 300 dpi might be the reason why I suspended my efforts. The laser tech is always improving though! To better understand what to expect with different laser settings, I snipped this info off the net: 75 - 200 DPI: Use settings in this range for non-production purposes where you're experimenting with image location or are creating a rough draft of a particular project. 300 DPI:- This resolution is ideal for production work where image quality does not need to be extremely detailed. Simple shapes, objects with little shading differences and text (especially large, block text) engrave well at 300 DPI. 400 DPI - This resolution value is ideal for many applications. It combines very good image quality with fast engraving times. Many users like 400 DPI for all of their work. 600 DPI - When exceptionally fine detail or overall excellent results are required, most users choose 600 DPI. 1200 DPI - This resolution is used for projects that require the highest engraving quality possible, although it's rarely used because it takes twice as long to perform an engraving at this resolution (as opposed to 600 DPI, which is ideal for most projects.) The photo below is of some tiny CDR buttons cut at 600 dpi that were not lined up properly and will end up in the trash. Each one of the orange squares is .25" X .25" so as you can see, the engraving in these are tiny and tight! Looking forward to seeing some of your test pieces Will! Engraving Text
![]()


Forum NavigationEngraving Text
#11 · May 12, 2021, 11:21 pm#12 · May 13, 2021, 9:05 am#13 · May 13, 2021, 10:43 amJason Hite
FlightDeckSoft#14 · May 13, 2021, 11:50 am#15 · May 13, 2021, 6:41 pm#16 · May 14, 2021, 3:23 pm#17 · May 14, 2021, 3:42 pmJason Hite
FlightDeckSoft#18 · May 15, 2021, 11:02 am#19 · May 18, 2021, 11:21 pm#20 · May 19, 2021, 6:18 am
2017-10-10


