


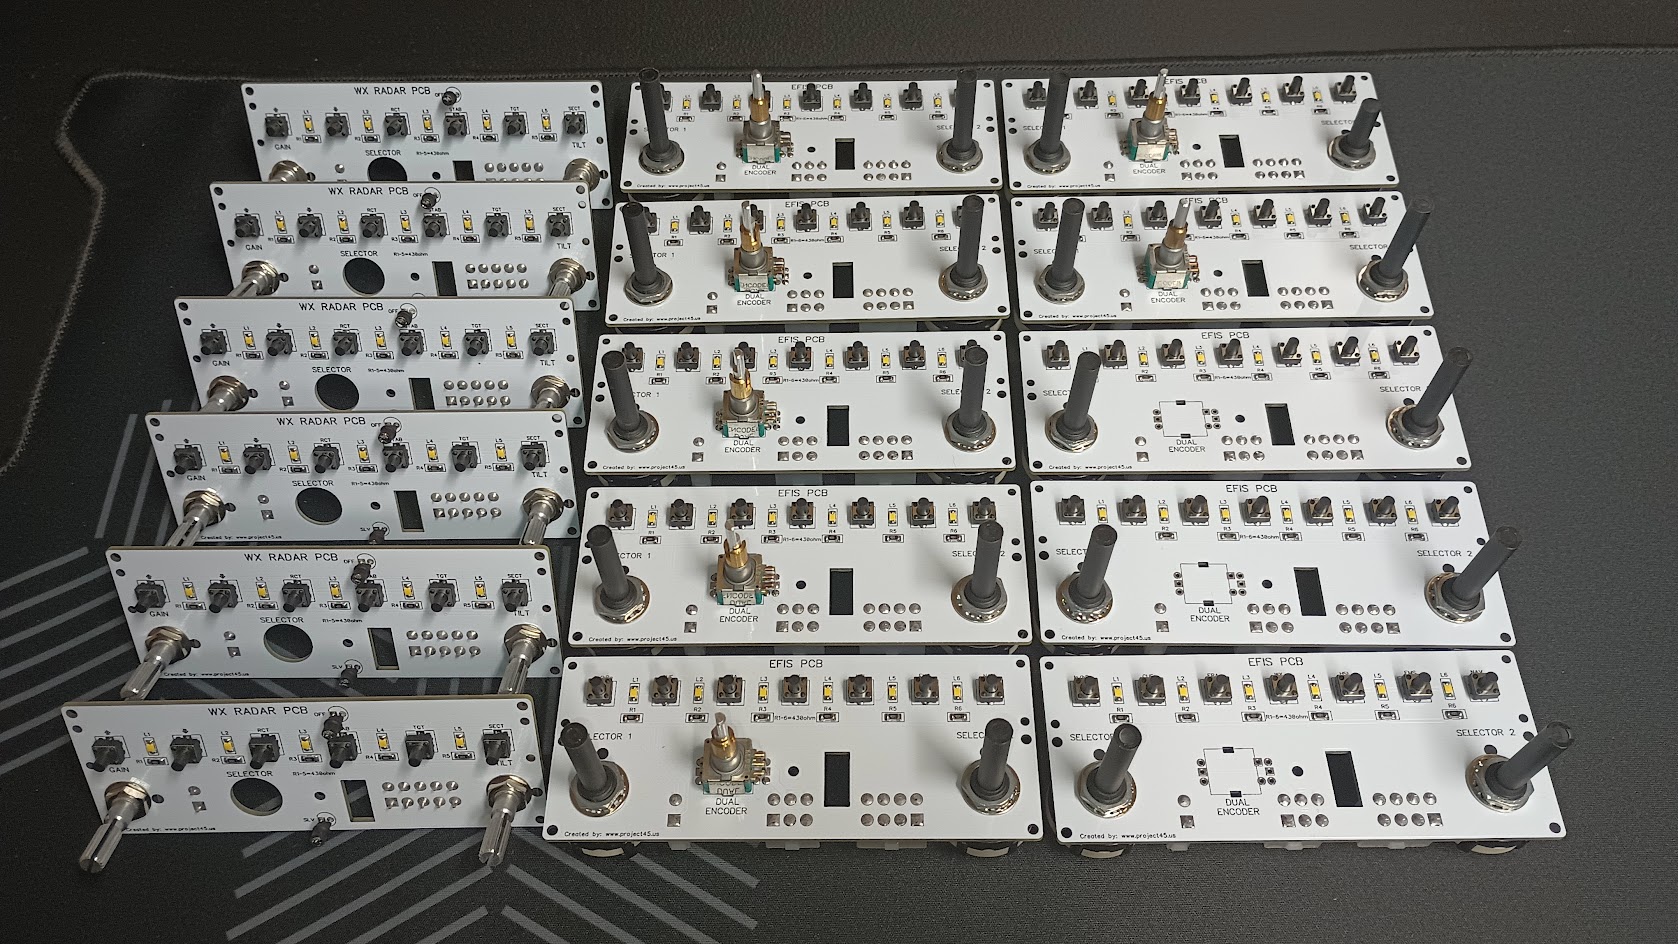
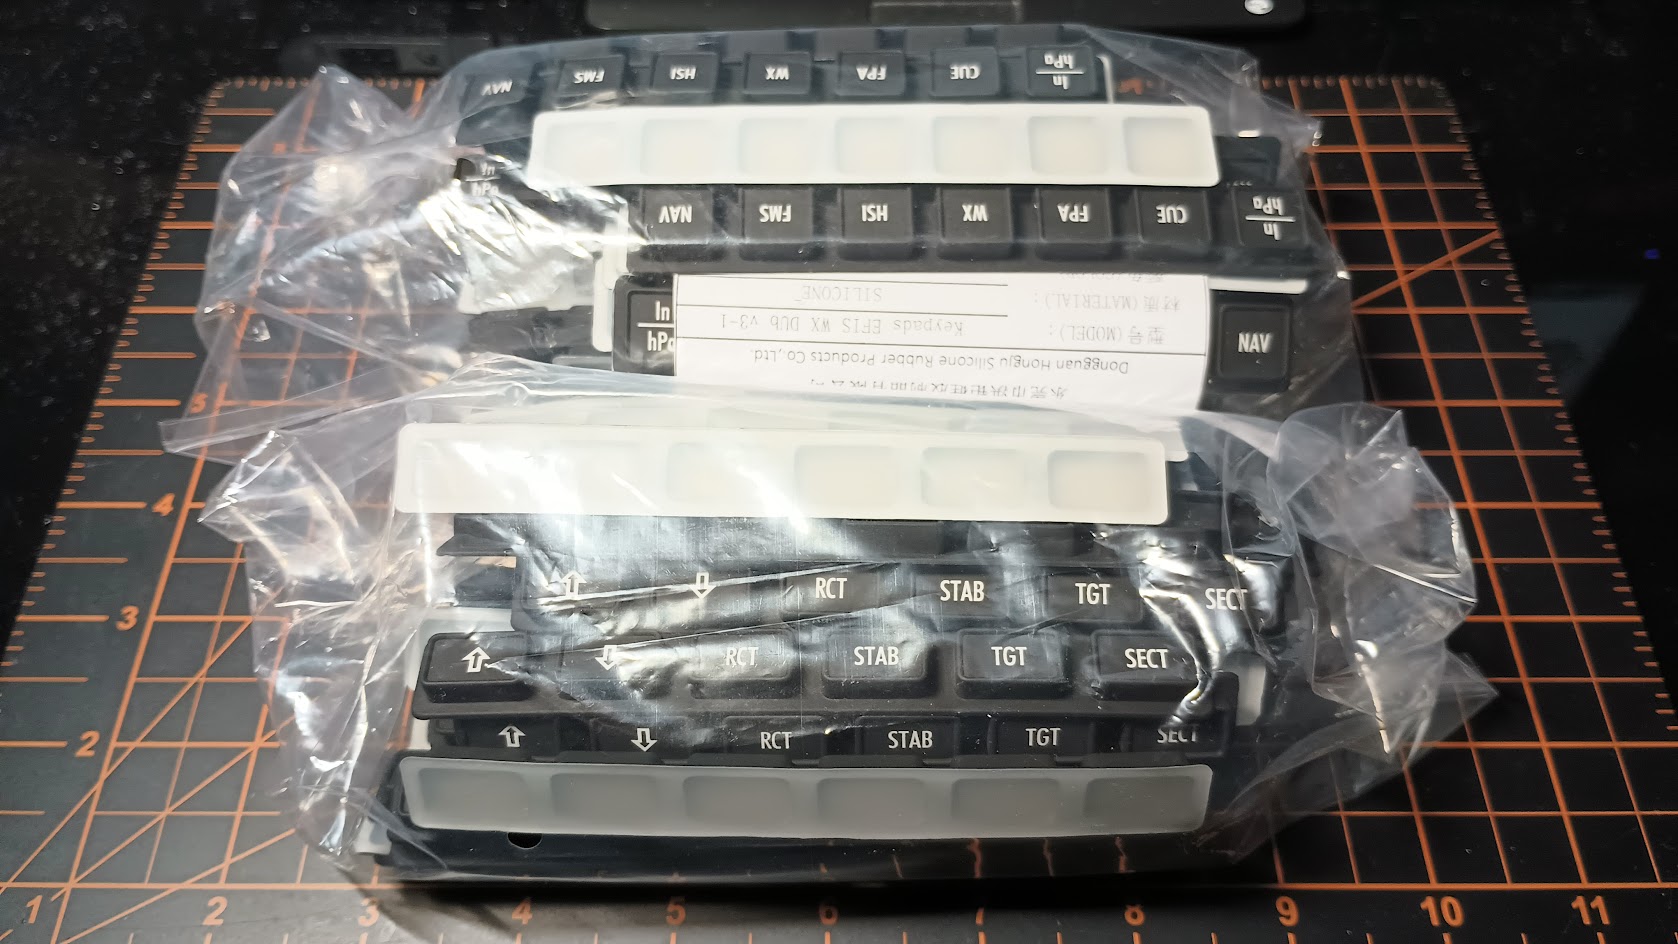
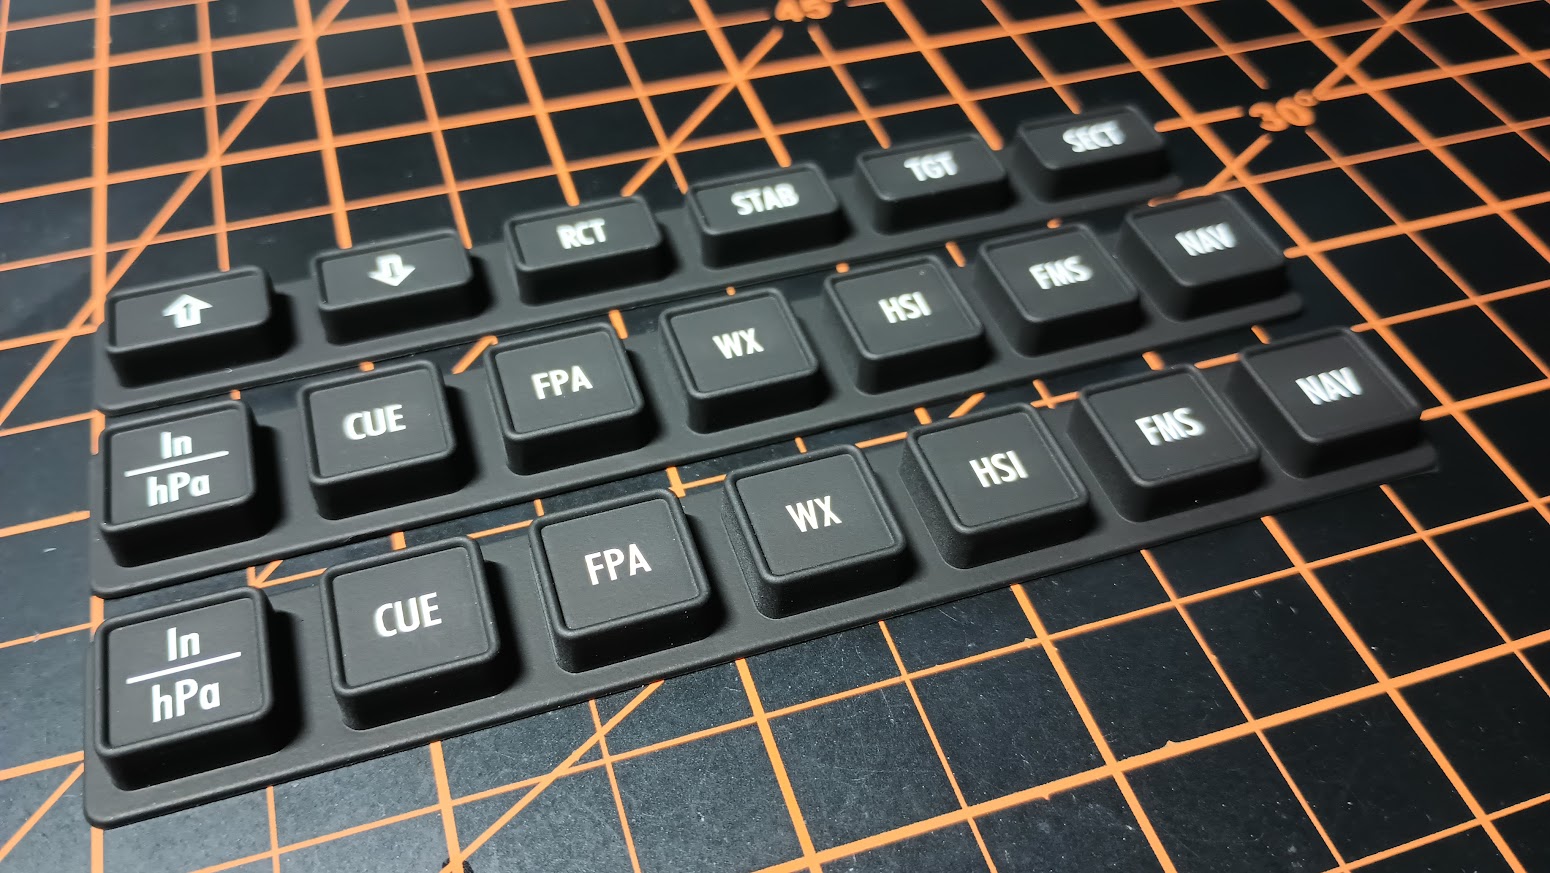
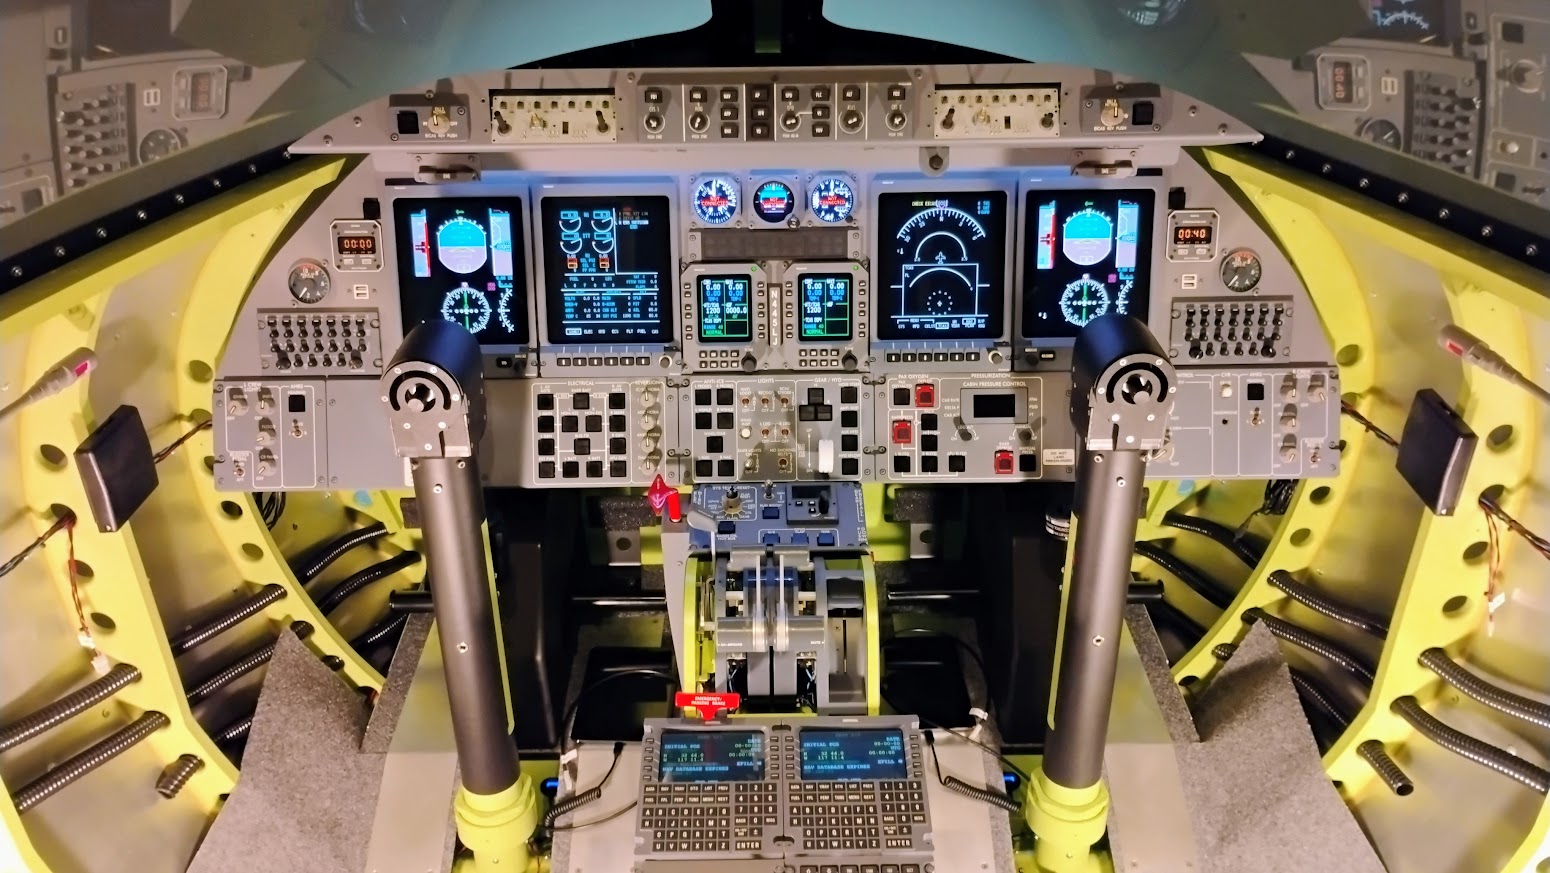
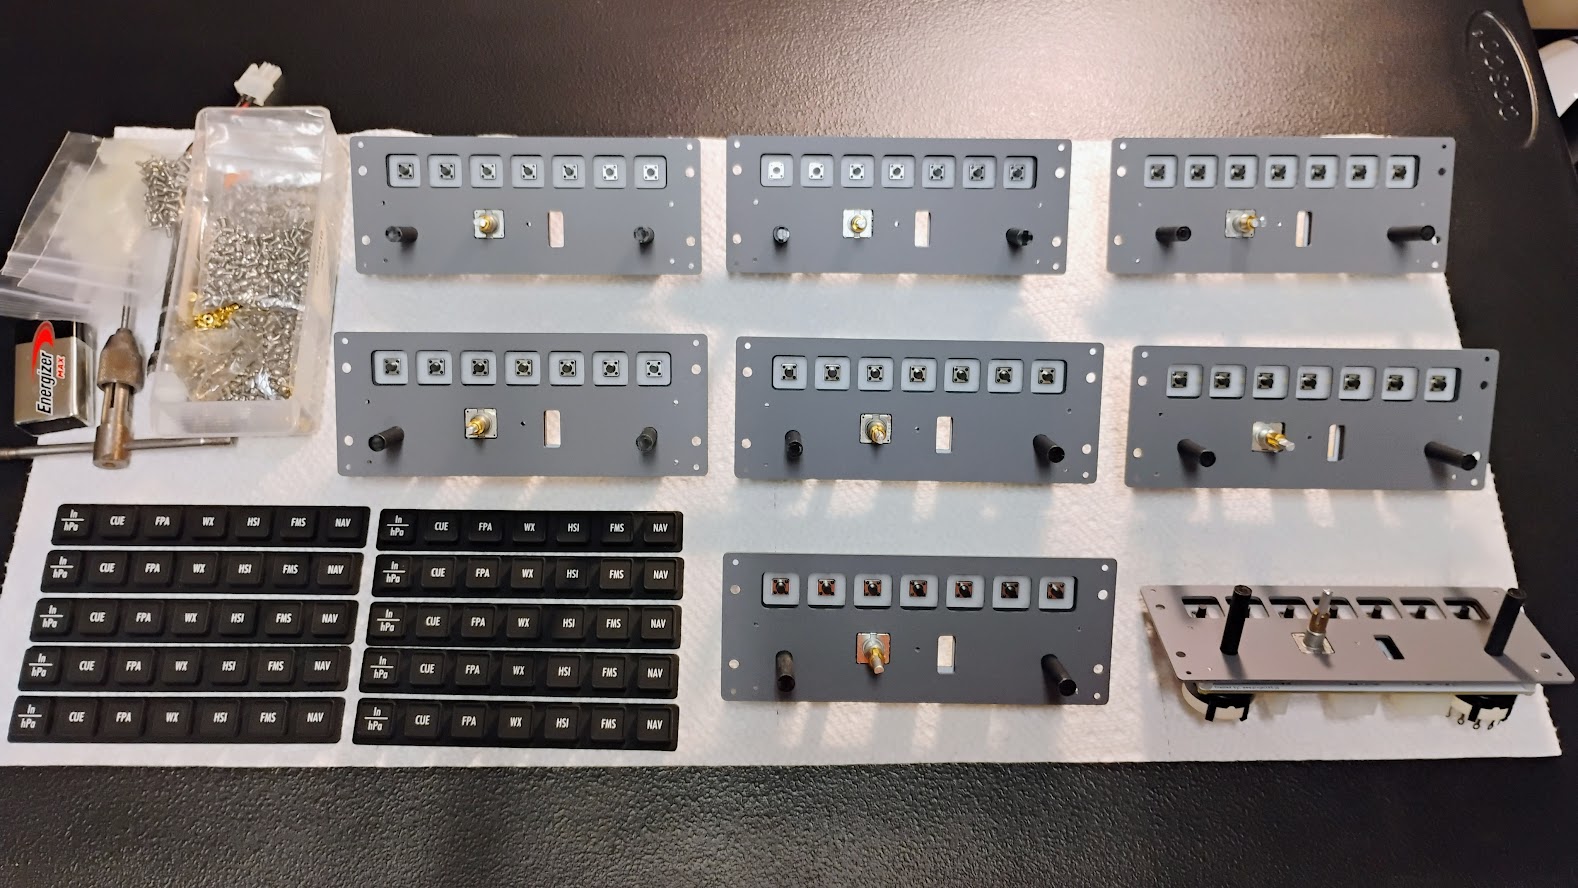
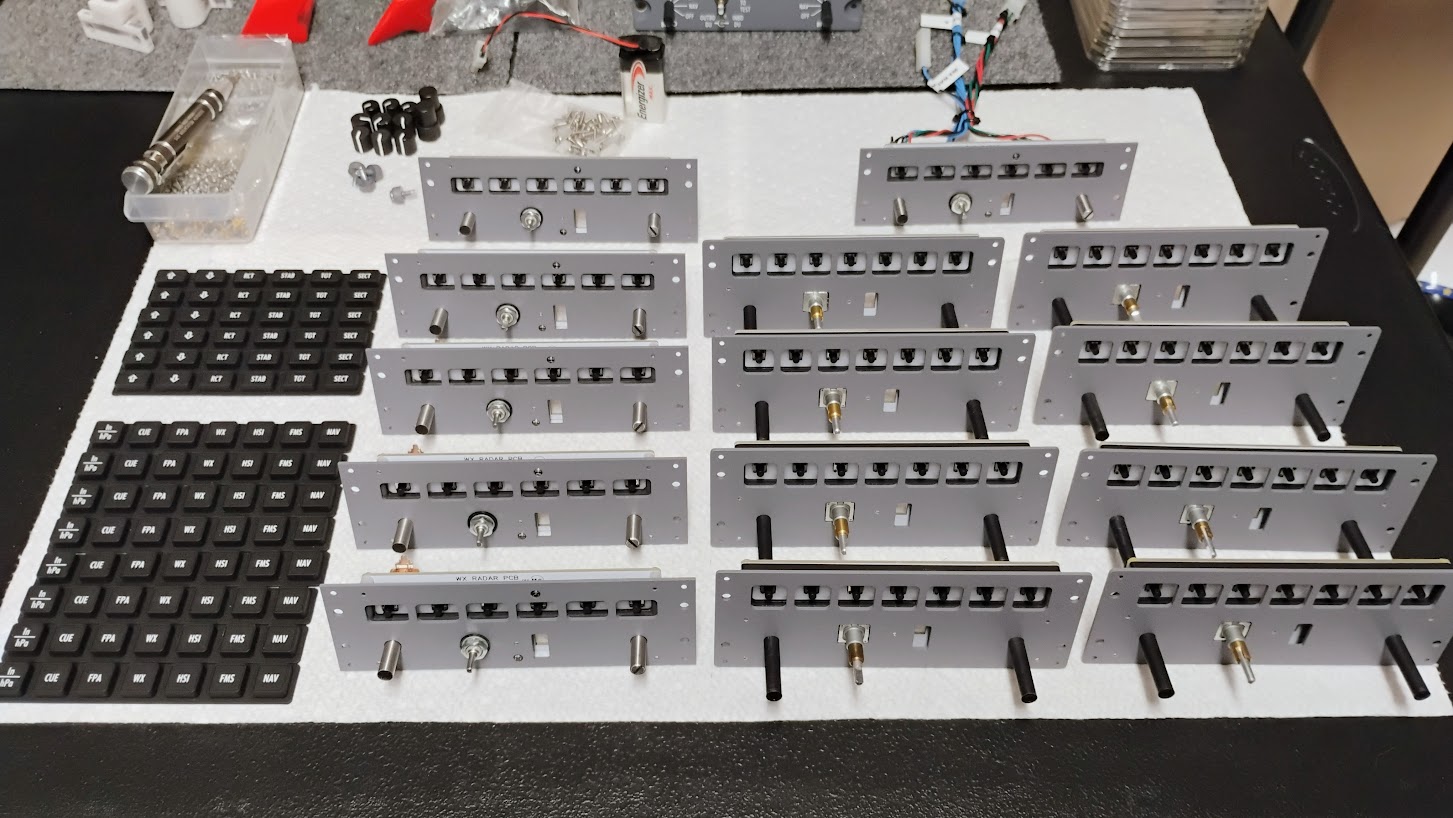
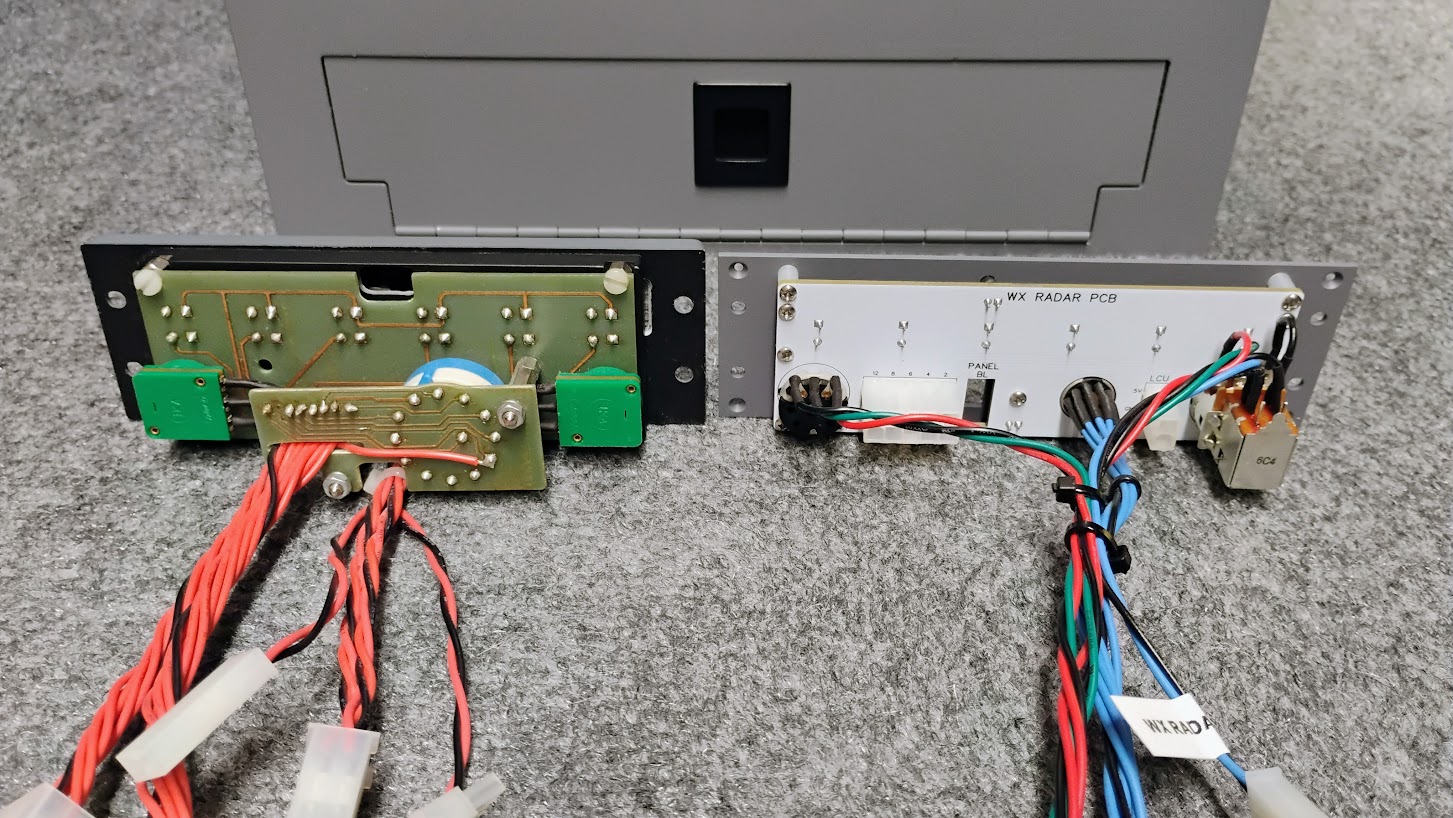
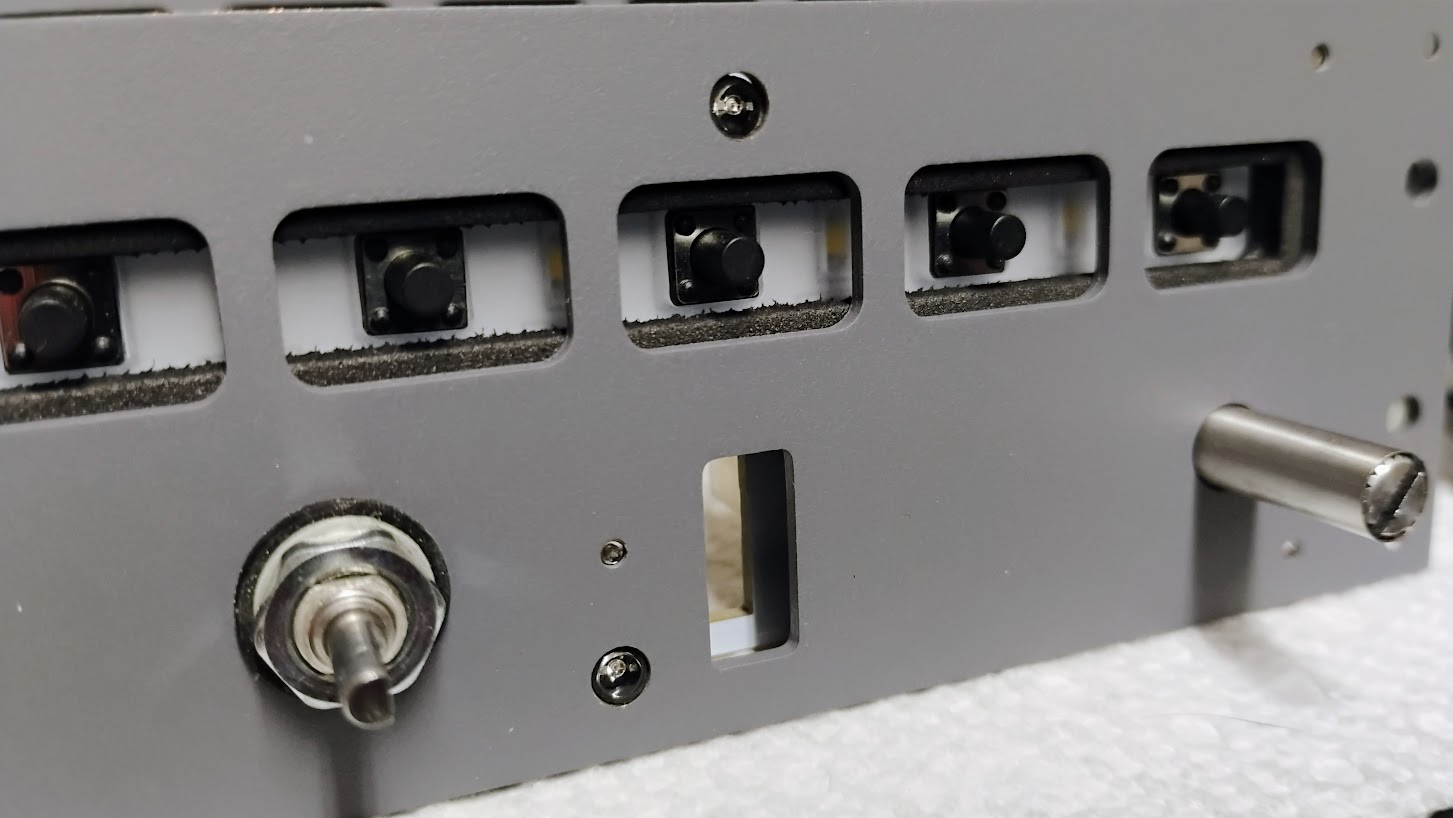
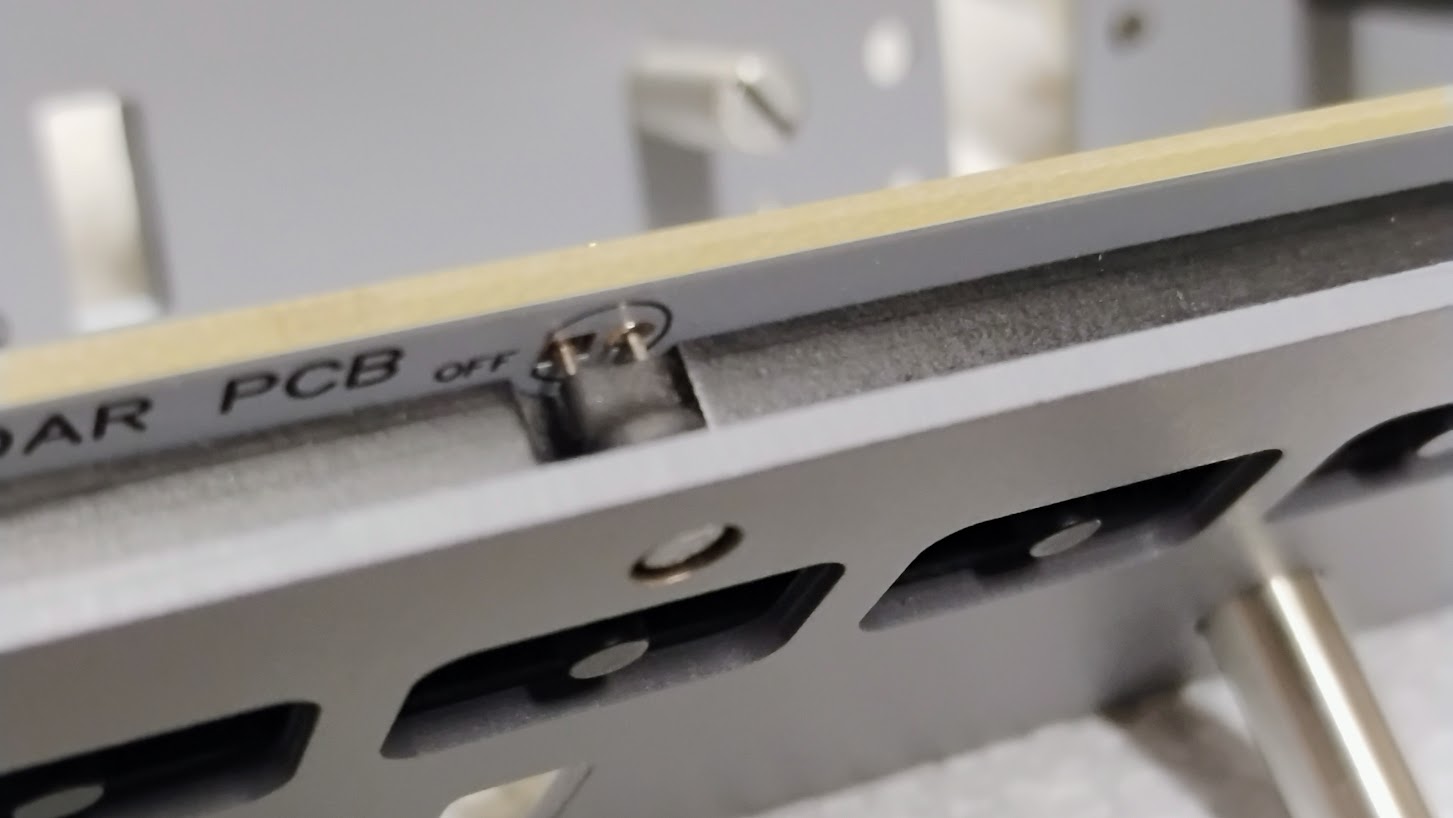
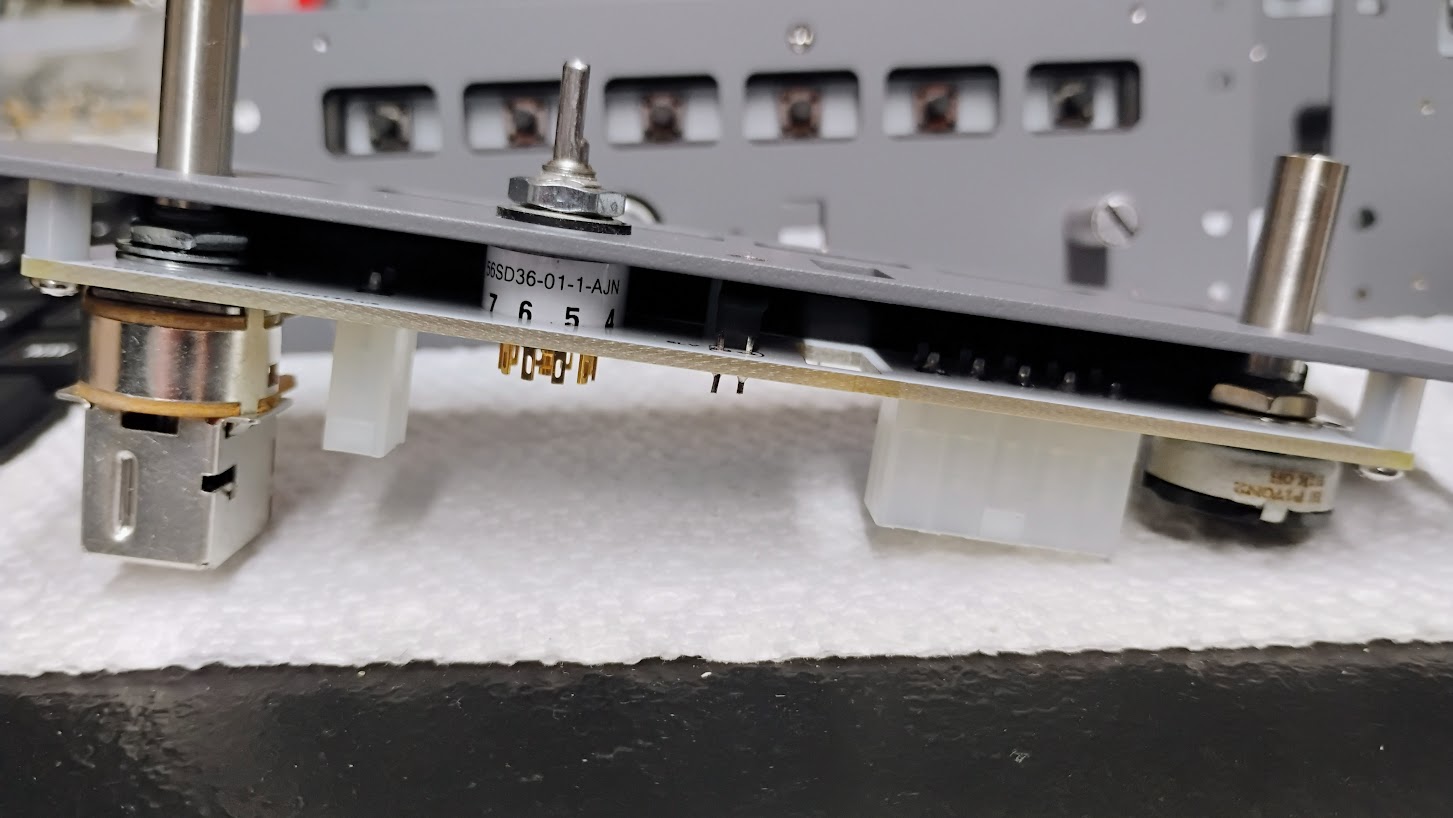
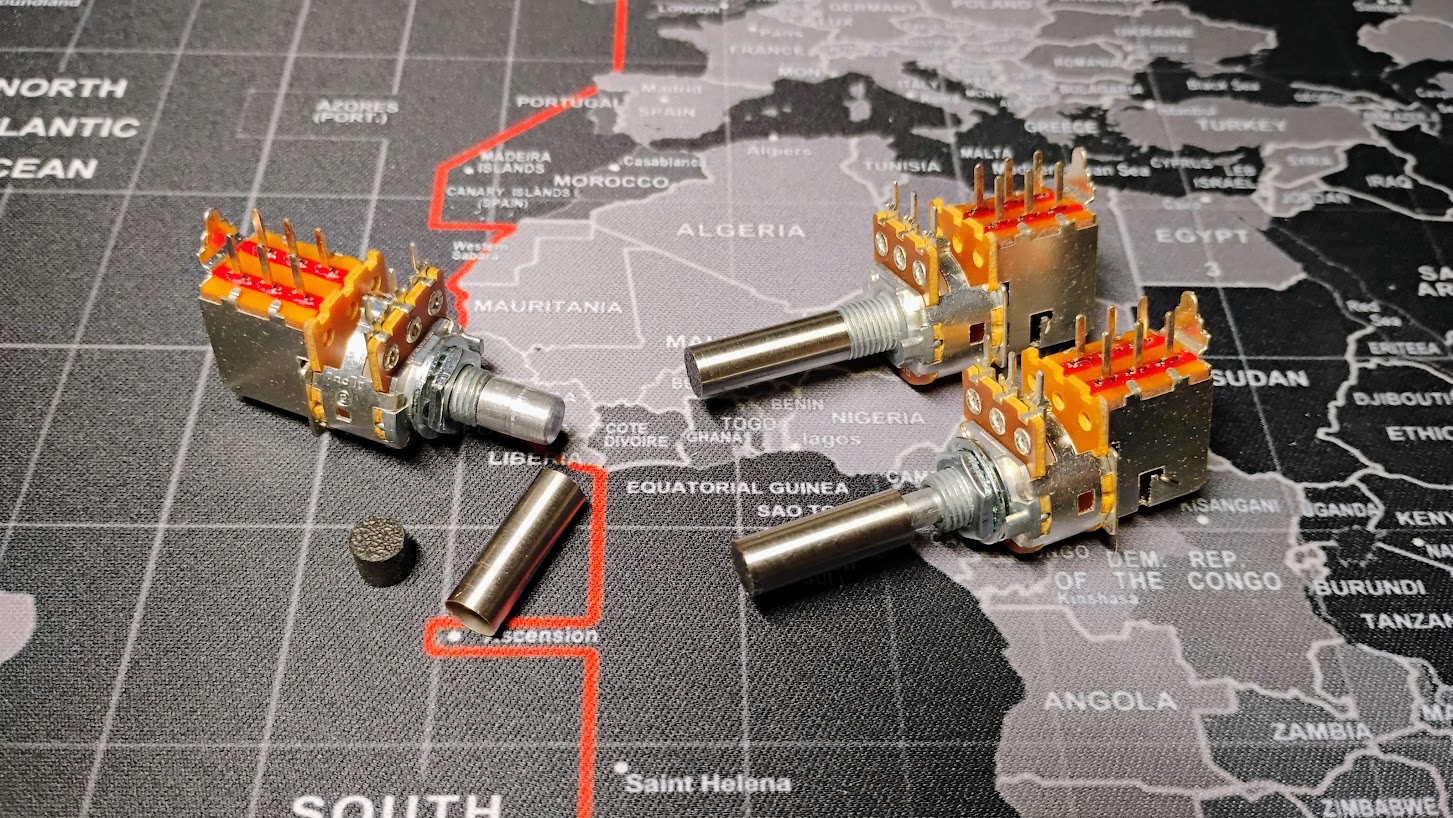
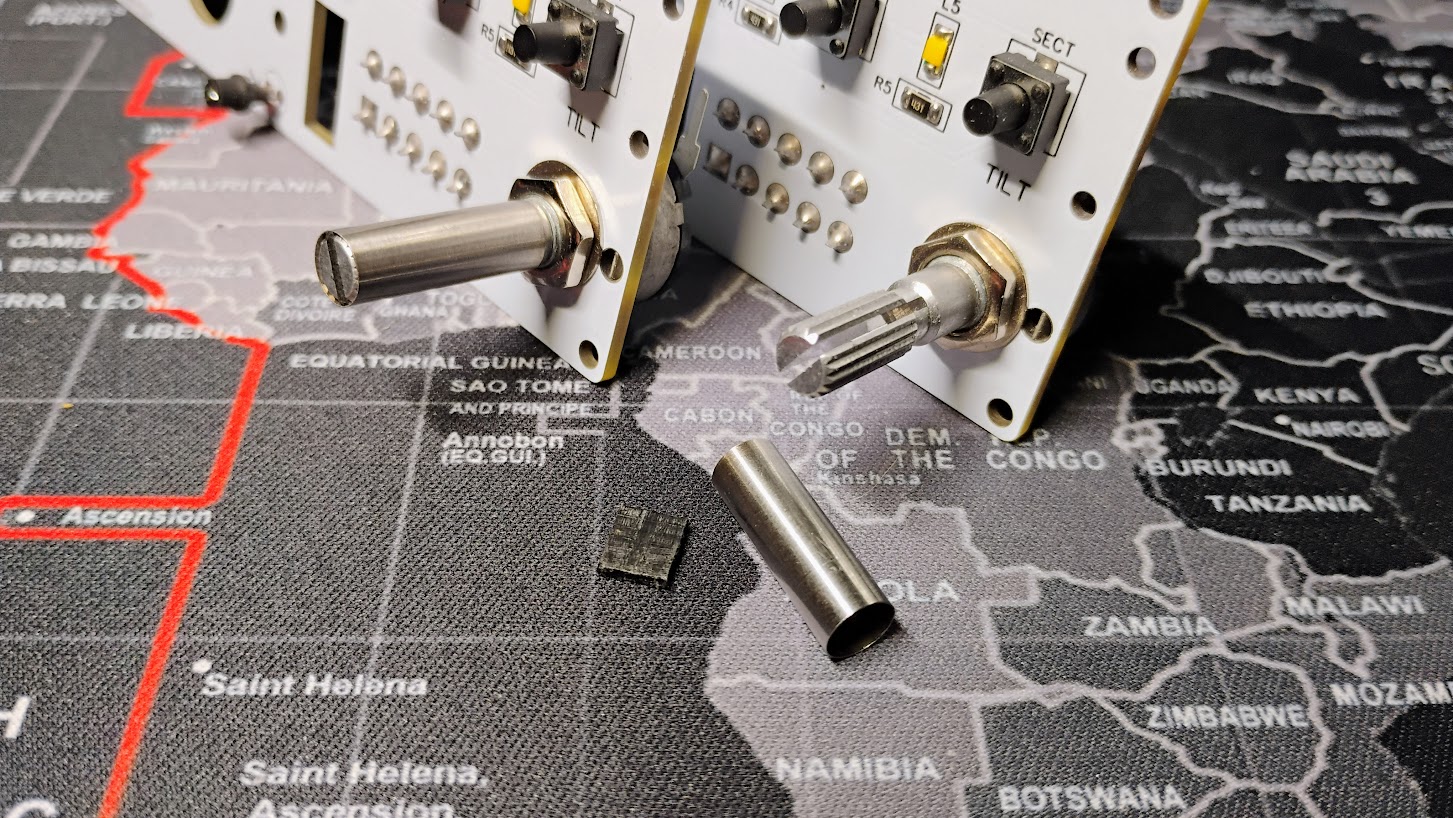
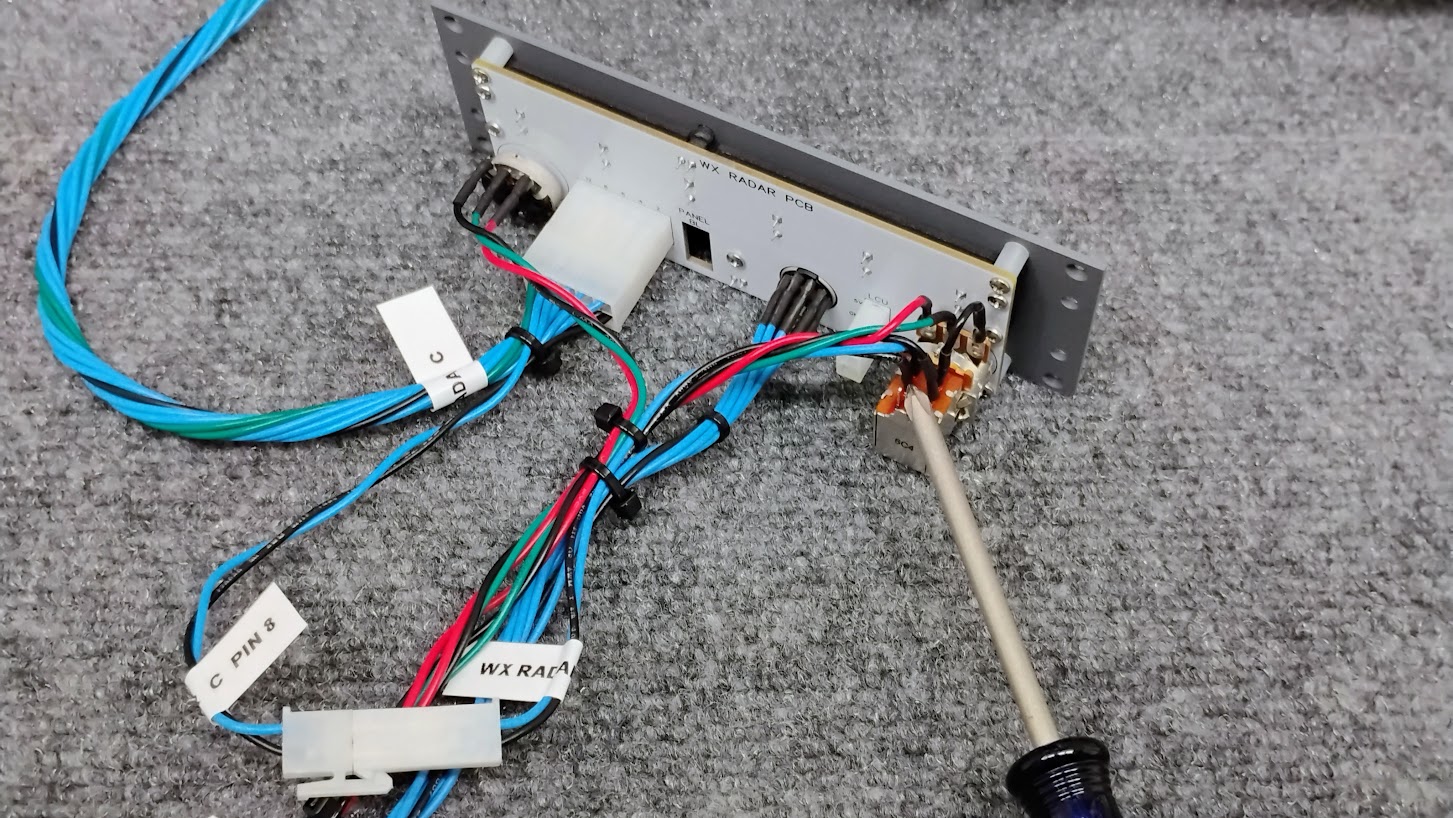
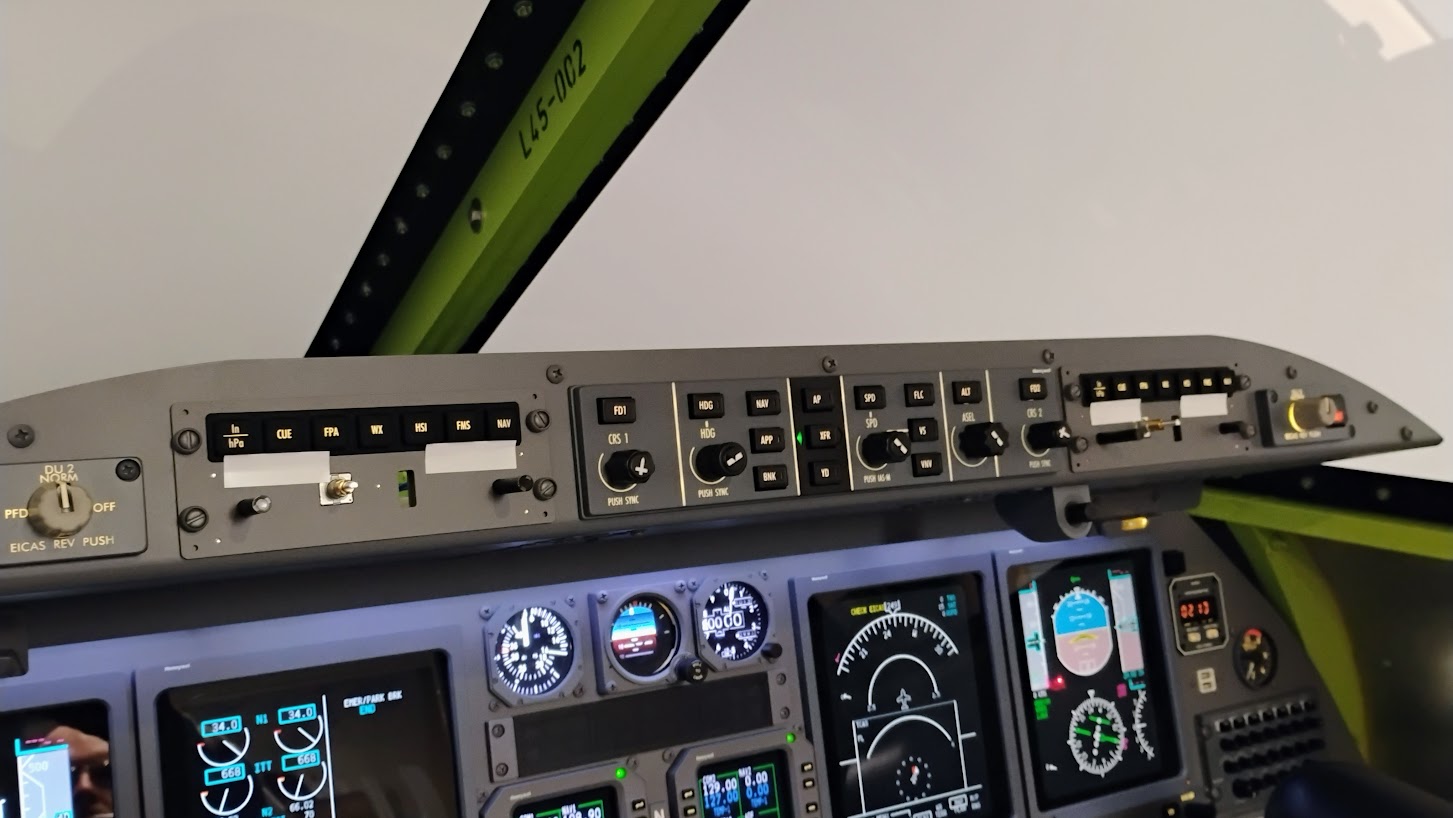
Hey Roel, Glad you were able to get the API for v6. I only have an older version of Active Sky and was hoping maybe Mark had the latest. Either way, you have it now! I am curious what is possible with their weather gauge. I am going to have to do some more reading on this topic. Let us know what you discover. Hey Roel, Glad you were able to get the API for v6. I only have an older version of Active Sky and was hoping maybe Mark had the latest. Either way, you have it now! I am curious what is possible with their weather gauge. I am going to have to do some more reading on this topic. Let us know what you discover. Yeah if anybody needs the documentation let me know, i can send it. Well..embedding weather information in the MFD is really something for developers like Jason. Yeah if anybody needs the documentation let me know, i can send it. Well..embedding weather information in the MFD is really something for developers like Jason. Hey guys, I have been working hard on the EFIS panels and WX Radar panels! To date, the drawings are now 100% complete, the PCBs have been received and they are all soldered up. I have also received the Silicone Keypads for the EFIS and WX Radar panels. The quality of these keypads are second to none and are going to be an incredible time saver while building these panels up. I always have to give thanks to Will Sasse for giving me a hand with converting my 2D drawings to 3D elements. Thanks Will! Now that I have in hand the PCB and keypads, the rest is all up to me and the CNC machine. Another update soon! Hey guys, I have been working hard on the EFIS panels and WX Radar panels! To date, the drawings are now 100% complete, the PCBs have been received and they are all soldered up. I have also received the Silicone Keypads for the EFIS and WX Radar panels. The quality of these keypads are second to none and are going to be an incredible time saver while building these panels up. I always have to give thanks to Will Sasse for giving me a hand with converting my 2D drawings to 3D elements. Thanks Will! Now that I have in hand the PCB and keypads, the rest is all up to me and the CNC machine. Another update soon! Hey guys, I know it's been a good while since I've updated this thread with any news due to being super busy with assembling and wiring my sim which took the better part of six months. I am sure you have seen some of my other threads including my Project Update thread HERE This is what my sim looks like today. Notice the EFIS panels are not yet complete? Last week I was able to get about half of the Jet45 AAS modules operational including the modules that control the EFIS panels. Needless to say, the EFIS panels have finally made it to the top of my immediate "To do List". At the very least, I needed to complete the backer panels to the EFIS panels to secure them properly to the Glareshield. I am working on a batch of ten units, (or five sets). Eight EFIS units pictured here: So far everything is coming together great! Recall that I had Silicone Keypads made for the EFIS panels and many other panels in the sim. Additionally, these EFIS panels are updated with professionally made PCB. Next week I will be working to progress the WX Radar backer panels so that I have both the EFIS and the WX Radar panels at about the same point in the production process. Once the WX Radar backers are complete, I will consider all these panels more than 50% complete. Another update shortly! Hey guys, I know it's been a good while since I've updated this thread with any news due to being super busy with assembling and wiring my sim which took the better part of six months. I am sure you have seen some of my other threads including my Project Update thread HERE This is what my sim looks like today. Notice the EFIS panels are not yet complete? Last week I was able to get about half of the Jet45 AAS modules operational including the modules that control the EFIS panels. Needless to say, the EFIS panels have finally made it to the top of my immediate "To do List". At the very least, I needed to complete the backer panels to the EFIS panels to secure them properly to the Glareshield. I am working on a batch of ten units, (or five sets). Eight EFIS units pictured here: So far everything is coming together great! Recall that I had Silicone Keypads made for the EFIS panels and many other panels in the sim. Additionally, these EFIS panels are updated with professionally made PCB. Next week I will be working to progress the WX Radar backer panels so that I have both the EFIS and the WX Radar panels at about the same point in the production process. Once the WX Radar backers are complete, I will consider all these panels more than 50% complete. Another update shortly! Happy New Year guys, I have just recently completed the backers for six WX Radar panels which include the PCB and the hardware. The photo below shows all the panels I am making for you guys, minus the ones for myself which are temporarily mounted in my sim. The EFIS panel does not include any new hardware features, however, the WX Radar panel does. Well, they are not "new" to the authentic Lear45, but are new to us and now the panel will be 100% modeled. To fully appreciate the new V2.0 WX Radar panels, we have to compare them side by side to the only other option we have had to date and that's the ones Vince made for us several years ago. Not to knock Vince's panels because they were great looking for the most part and all we had at the time. On top of that, we have a much deeper understanding of how these panels work and the technology available to us has also advanced! Here is a side by side of Vince's WX Radar along side my new V2.0 panel. I am only showing the back side at this pint because the front panels have not yet been made. Besides being a neater and cleaner design, the WX Radar panel will now include a couple hidden light indicators. The "SLV" indicator stands for "SLAVE" which is used in situations where two WX Radar controllers are used in larger aircraft and one unit is overriding the other. In our case, we only have one WX Radar controller and this indicator will only light up during a full lights test. The second indicator is "OFF" which is found above the "STAB" button which stands for stabilization of the radar in the nose cone. This indicator will have function once we are able to fully model the WX Radar which I think is possible. Here is a photo of the LEDs that are built into the backer and PCB. The hard part was figuring out a way to include these LED indicators and also keep the light sources separated from the back lighting in the panel. To do this, a "lamp shade" with a foam gasket is used to isolate the button back lighting. Additionally, the LED indicators are wrapped with shrink tube so that the light coming from them have only one direction to go.....up. The other hardware addition to bring the WX Radar panel up to 100% functionality is the "PULL VAR" potentiometer which includes a double pole switch behind it. The only problem with this pot is that the shaft was too short. I had to add a custom made shaft extender to this and the other pot on this panel. The photo below shows one of the pots pulled out, there is .165" worth positive pull with a click at the end. Perfect! See the attached LJ45 Primus 1000 WX Radar.pdf to see how this function works. The shaft extenders turned out perfect as well. I am using stainless .25" O.D. with .005" wall thickness. Next on the list of things to do is to build up the knobs for both the WX Radar and EFIS panels. One thing that is not so neat but really there was no other way to do it was add the pin that controls the PULL VAR switch to PLUG C. The reason being is that there is limited space on the WX Radar module. Thankfully we had a spare pin, pin 8 was available on PLUG C, the problem was getting the signal wire from the switch behind the pot to PLUG C. Here is a photo of my solution. If you blow this photo up you can see I am taking advantage of both poles on the switch. One pole is running back to pin 8 on PLUG C so Jason has access to it. The other pole on that switch is being used to connect the ground to the pot if pulled. In other words, the pot has no function until it is pulled like the attached pdf describes. The more I look at this solution, I am not sure what other option we have even if starting from scratch with the PCB design. The only other option would be to create a two pin plug on the PCB for this stray pin. Minor details! Here are a couple photos of how the new panels are looking in the sim so far. The EFIS panels are functional even though the front panels are not installed yet. (I have the Silicone keypads temporarily in place.) Back lighting is looking spot on as well. The WX Radar panel is not yet hooked up to the WX Radar module but at least I can confirm it fits on the Center Pedestal. Back lighting matches here also. Up next will be the knobs for the EFIS and WX Radar panels. I want to have everything completed before the front panels are made so that I can put them together and put a stamp on them all at the same time. Another update shortly! Happy New Year guys, I have just recently completed the backers for six WX Radar panels which include the PCB and the hardware. The photo below shows all the panels I am making for you guys, minus the ones for myself which are temporarily mounted in my sim. The EFIS panel does not include any new hardware features, however, the WX Radar panel does. Well, they are not "new" to the authentic Lear45, but are new to us and now the panel will be 100% modeled. To fully appreciate the new V2.0 WX Radar panels, we have to compare them side by side to the only other option we have had to date and that's the ones Vince made for us several years ago. Not to knock Vince's panels because they were great looking for the most part and all we had at the time. On top of that, we have a much deeper understanding of how these panels work and the technology available to us has also advanced! Here is a side by side of Vince's WX Radar along side my new V2.0 panel. I am only showing the back side at this pint because the front panels have not yet been made. Besides being a neater and cleaner design, the WX Radar panel will now include a couple hidden light indicators. The "SLV" indicator stands for "SLAVE" which is used in situations where two WX Radar controllers are used in larger aircraft and one unit is overriding the other. In our case, we only have one WX Radar controller and this indicator will only light up during a full lights test. The second indicator is "OFF" which is found above the "STAB" button which stands for stabilization of the radar in the nose cone. This indicator will have function once we are able to fully model the WX Radar which I think is possible. Here is a photo of the LEDs that are built into the backer and PCB. The hard part was figuring out a way to include these LED indicators and also keep the light sources separated from the back lighting in the panel. To do this, a "lamp shade" with a foam gasket is used to isolate the button back lighting. Additionally, the LED indicators are wrapped with shrink tube so that the light coming from them have only one direction to go.....up. The other hardware addition to bring the WX Radar panel up to 100% functionality is the "PULL VAR" potentiometer which includes a double pole switch behind it. The only problem with this pot is that the shaft was too short. I had to add a custom made shaft extender to this and the other pot on this panel. The photo below shows one of the pots pulled out, there is .165" worth positive pull with a click at the end. Perfect! See the attached LJ45 Primus 1000 WX Radar.pdf to see how this function works. The shaft extenders turned out perfect as well. I am using stainless .25" O.D. with .005" wall thickness. Next on the list of things to do is to build up the knobs for both the WX Radar and EFIS panels. One thing that is not so neat but really there was no other way to do it was add the pin that controls the PULL VAR switch to PLUG C. The reason being is that there is limited space on the WX Radar module. Thankfully we had a spare pin, pin 8 was available on PLUG C, the problem was getting the signal wire from the switch behind the pot to PLUG C. Here is a photo of my solution. If you blow this photo up you can see I am taking advantage of both poles on the switch. One pole is running back to pin 8 on PLUG C so Jason has access to it. The other pole on that switch is being used to connect the ground to the pot if pulled. In other words, the pot has no function until it is pulled like the attached pdf describes. The more I look at this solution, I am not sure what other option we have even if starting from scratch with the PCB design. The only other option would be to create a two pin plug on the PCB for this stray pin. Minor details! Here are a couple photos of how the new panels are looking in the sim so far. The EFIS panels are functional even though the front panels are not installed yet. (I have the Silicone keypads temporarily in place.) Back lighting is looking spot on as well. The WX Radar panel is not yet hooked up to the WX Radar module but at least I can confirm it fits on the Center Pedestal. Back lighting matches here also. Up next will be the knobs for the EFIS and WX Radar panels. I want to have everything completed before the front panels are made so that I can put them together and put a stamp on them all at the same time. Another update shortly!EFIS & WX Radar v2.0 Development
![]()
![]()
It is C++/C# coding.
I am not able , so far , with my Airmanager framework. 🙁
Well at least not for now, the streaming display option which is in the next version could be a solution.
Before when i used iFly737 for my Boeing sim ... like 10 years ago.. i also used Active Sky and iFly had an Active sky plugin.
So even then it was possible to display weather with AS.
It is C++/C# coding.
I am not able , so far , with my Airmanager framework. 🙁
Well at least not for now, the streaming display option which is in the next version could be a solution.
Before when i used iFly737 for my Boeing sim ... like 10 years ago.. i also used Active Sky and iFly had an Active sky plugin.
So even then it was possible to display weather with AS.![]()
![]()
![]()

2017-10-10