


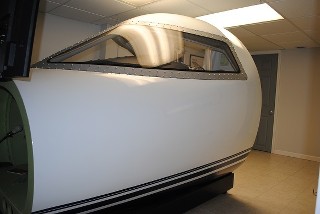
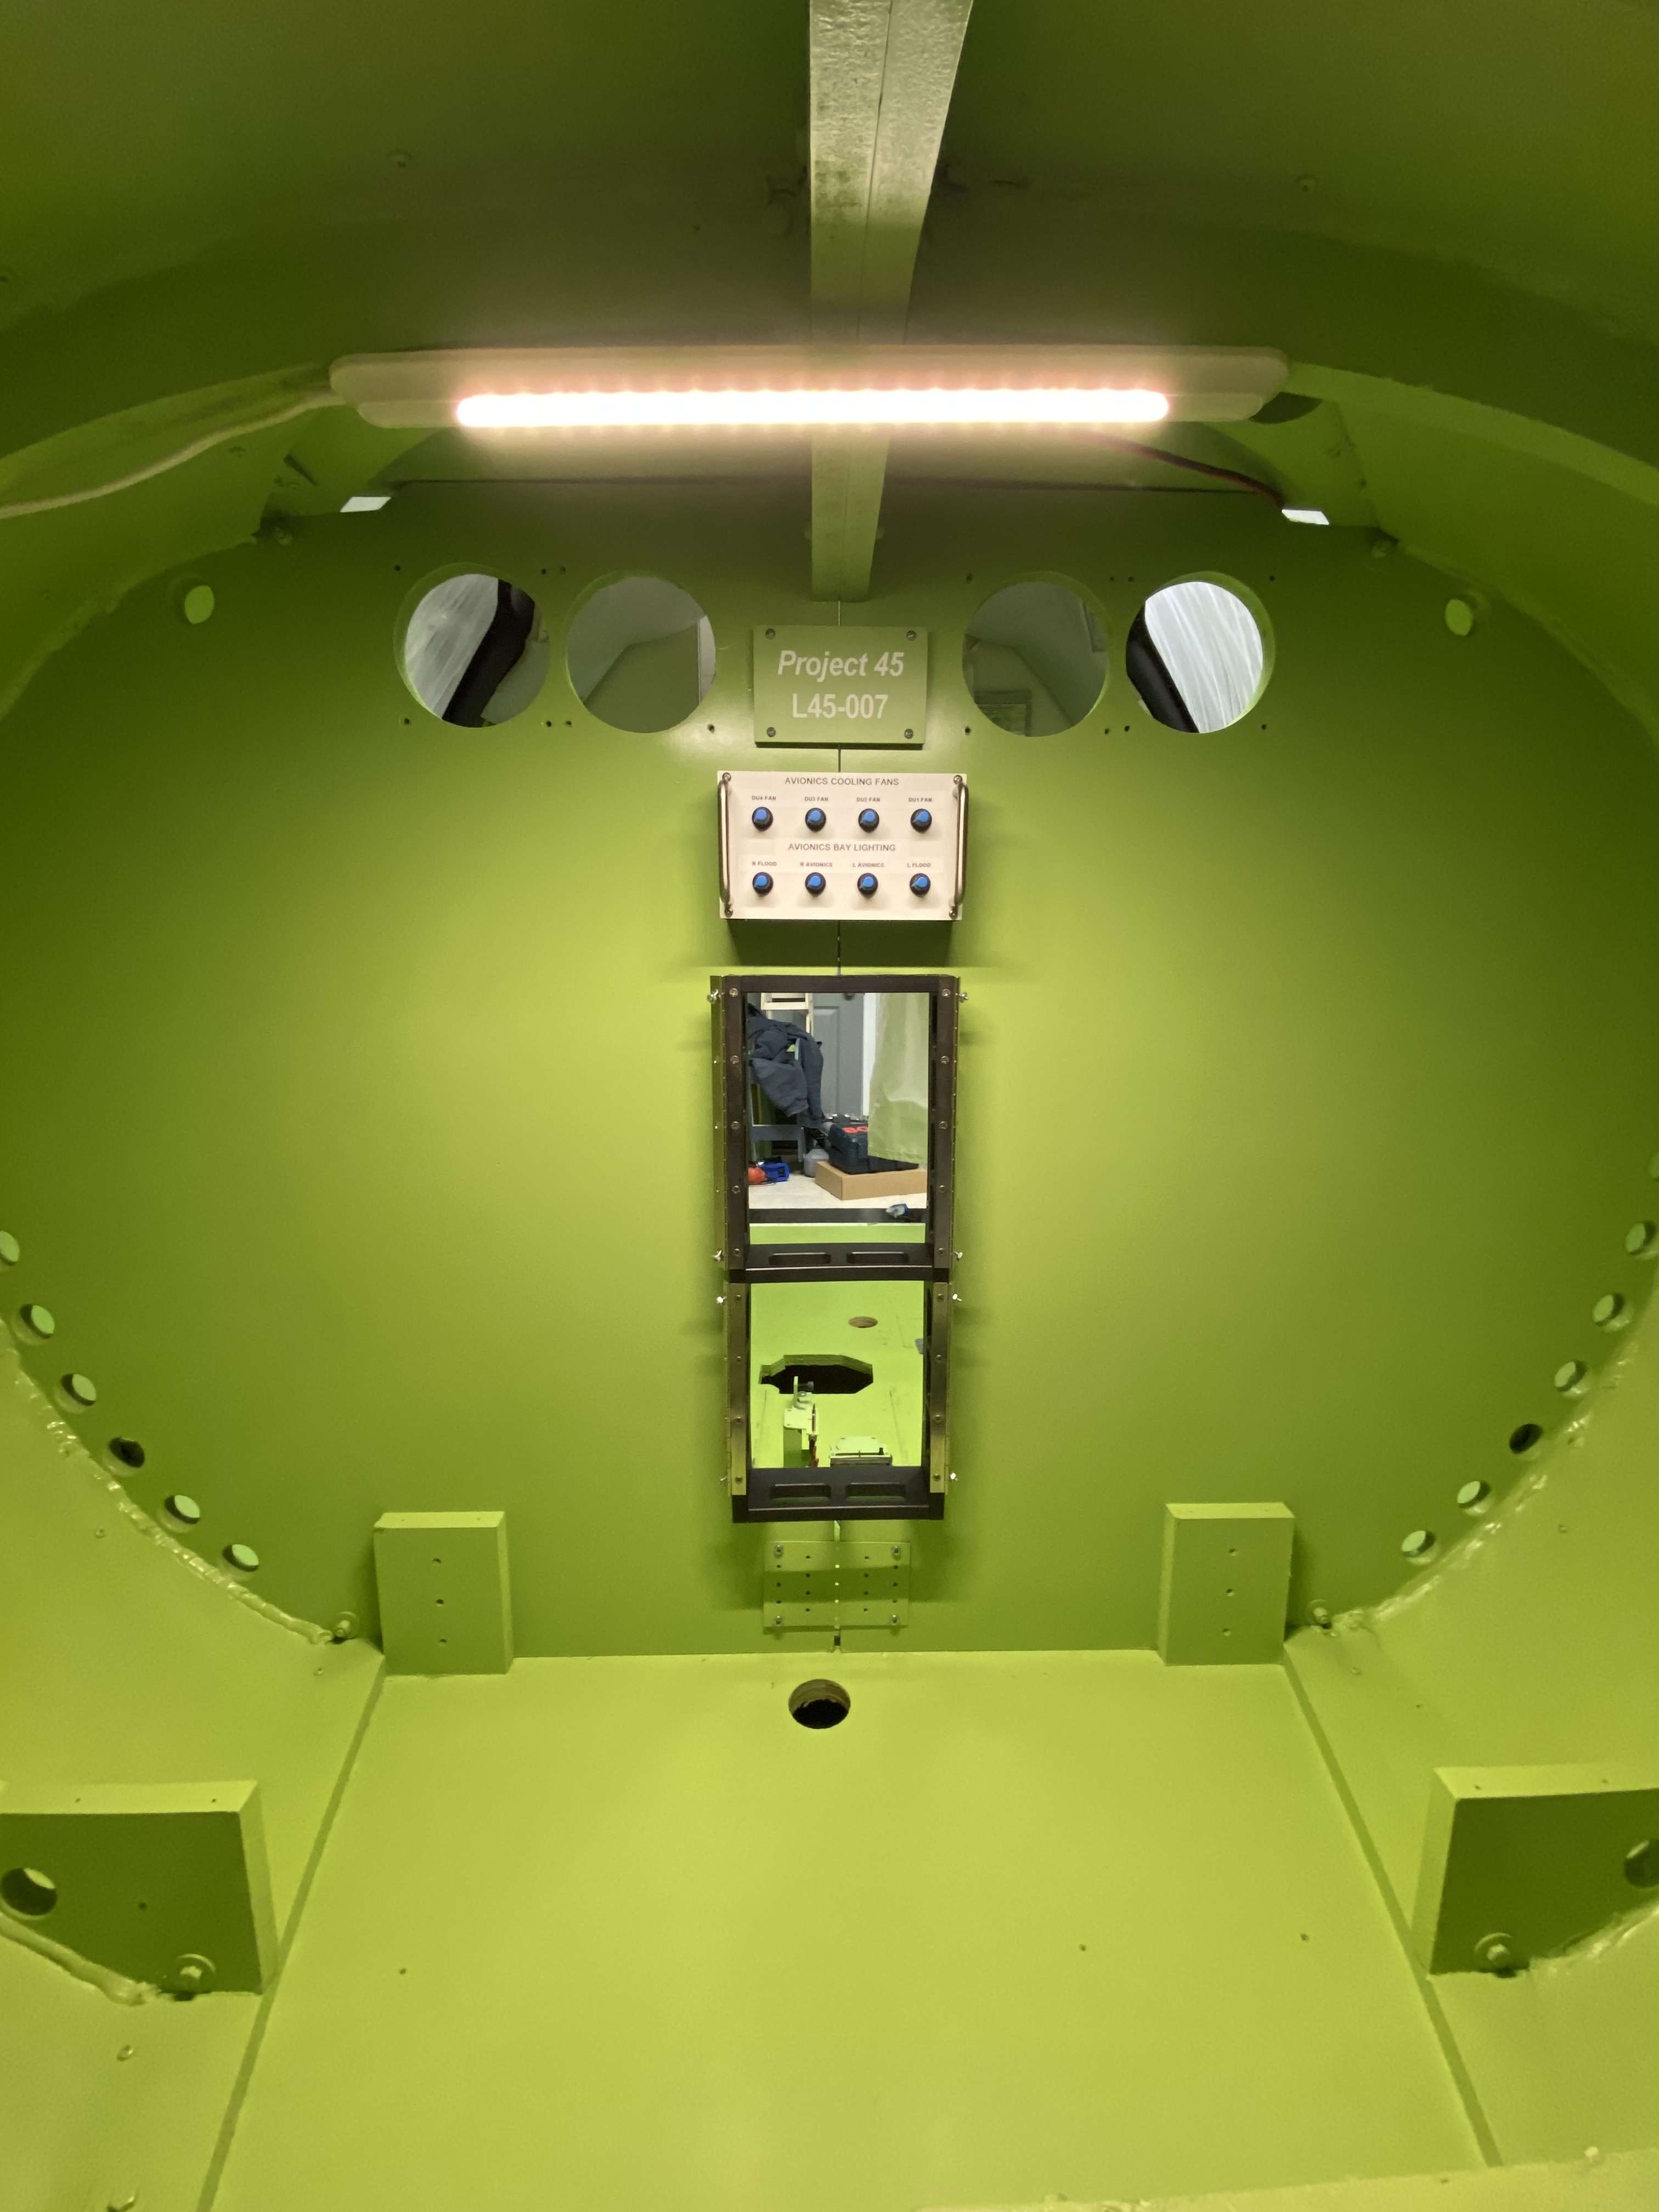
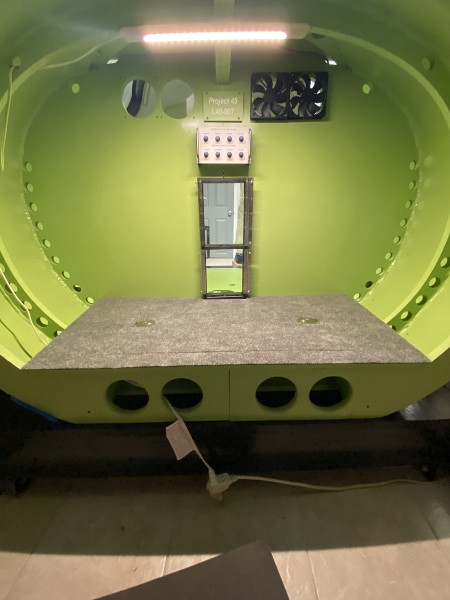
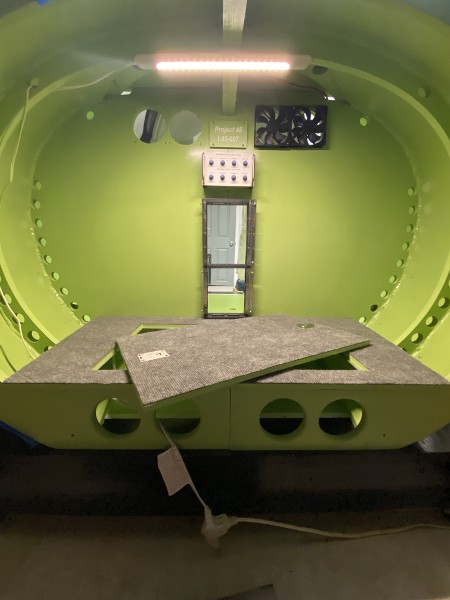
Welcome to my new build thread documenting the conversion of my build from V1.0 to V2.0. I started with this ... and now I am here . . . Refurbished Flight Deck side of the bulkhead (F3). I still have work to do to to the flight deck area to clean this area up and add some additional new details and ideas. I have completely refurbished the avionics bay bulkhead repairing several holes no longer needed, adding an additional hole for the avionics fans on both sides and filling many screw holes and re-painting the avionics bay with a fresh coat of paint. Additionally, I have added Ron's avionics cooling fan control module to the bulkhead and a placard Ron made denoting the Project 45 build number L45-007. I should have the avionics fans in later this week and installed soon. Welcome to my new build thread documenting the conversion of my build from V1.0 to V2.0. I started with this ... and now I am here . . . Refurbished Flight Deck side of the bulkhead (F3). I still have work to do to to the flight deck area to clean this area up and add some additional new details and ideas. I have completely refurbished the avionics bay bulkhead repairing several holes no longer needed, adding an additional hole for the avionics fans on both sides and filling many screw holes and re-painting the avionics bay with a fresh coat of paint. Additionally, I have added Ron's avionics cooling fan control module to the bulkhead and a placard Ron made denoting the Project 45 build number L45-007. I should have the avionics fans in later this week and installed soon. Looking good Shane. "Back to the future ! " Looking good Shane. "Back to the future ! " Thanks Mark! Excited that I'm finally making some progress! Thanks Mark! Excited that I'm finally making some progress! Very nice start Shane! To the casual observer, once it is put all back together, it might be said, "What did you do? It all looks the same to me." It's what's "under the hood" that will be the big difference. The software, interface modules, the way everything gets wired up are the biggest changes. These are things that the casual observer will not notice unless it is point them out to them. I will have to make an update to my build thread as well since we are running neck and neck with where we both are with our rebuilds. It will be hard for even the hardcore hangar guys to tell the two sims apart. The only give away will be the external pin striping on the shell. Very nice start Shane! To the casual observer, once it is put all back together, it might be said, "What did you do? It all looks the same to me." It's what's "under the hood" that will be the big difference. The software, interface modules, the way everything gets wired up are the biggest changes. These are things that the casual observer will not notice unless it is point them out to them. I will have to make an update to my build thread as well since we are running neck and neck with where we both are with our rebuilds. It will be hard for even the hardcore hangar guys to tell the two sims apart. The only give away will be the external pin striping on the shell. Here are a couple of photos of the finished avionics bay floor painted, with carpet installed and pull rings for the access hatch. .... And with access hatch open . . . Here are a couple of photos of the finished avionics bay floor painted, with carpet installed and pull rings for the access hatch. .... And with access hatch open . . . Good work Shane. I'm finishing off my panel wiring at present, and then I'll be back to shell assembly, so these are good photos to see, so thanks. Good work Shane. I'm finishing off my panel wiring at present, and then I'll be back to shell assembly, so these are good photos to see, so thanks. An update to my project. I assembled the new CDU's from Ron. These are now ready to install in my Version 2 build. Many years went into getting a professional level CDU for our projects and many thanks to Ron for taking this project on. Quite a few years ago this project started with several nights of me pulling my hair out trying to determine the pinout on a real UNS1 CDU. I did not have any documentation to work from but those few nights led us to having an option to use a real CDU and then later to Ron developing a replica CDU and Jason developing the software side. Great job by both of these guys! One might ask why develop a replica if you could use a real CDU? A real CDU at one point was somewhat hard to come by and expensive if you did and most of the units available were not correct for the Lear 45. They were close but several visual cues made it inaccurate for our builds. Additionally, the builder would need to take it apart, clean it, strip and paint it, hope that all keys worked and none of the incandescent bulbs were inoperable. Then a kit from Ron which would need to be ordered to be able to interface the CDU with JET45. Ron was already making 25 percent of the CDU so it only made sense to go ahead and create the PCB and front panel to accurately portray the correct CDU for our projects. Fast forward several years and we now have a replica CDU kit that can be purchased from Project45. Once again, nice job Ron and Jason! Parts ready for assembly . . . Backside after assembly . . . Two awesome CDU's ready for installation! An update to my project. I assembled the new CDU's from Ron. These are now ready to install in my Version 2 build. Many years went into getting a professional level CDU for our projects and many thanks to Ron for taking this project on. Quite a few years ago this project started with several nights of me pulling my hair out trying to determine the pinout on a real UNS1 CDU. I did not have any documentation to work from but those few nights led us to having an option to use a real CDU and then later to Ron developing a replica CDU and Jason developing the software side. Great job by both of these guys! One might ask why develop a replica if you could use a real CDU? A real CDU at one point was somewhat hard to come by and expensive if you did and most of the units available were not correct for the Lear 45. They were close but several visual cues made it inaccurate for our builds. Additionally, the builder would need to take it apart, clean it, strip and paint it, hope that all keys worked and none of the incandescent bulbs were inoperable. Then a kit from Ron which would need to be ordered to be able to interface the CDU with JET45. Ron was already making 25 percent of the CDU so it only made sense to go ahead and create the PCB and front panel to accurately portray the correct CDU for our projects. Fast forward several years and we now have a replica CDU kit that can be purchased from Project45. Once again, nice job Ron and Jason! Parts ready for assembly . . . Backside after assembly . . . Two awesome CDU's ready for installation! Looking good Shane! Mark the CDU update as COMPLETE! If anyone is wondering why we have included cooling fans, it's not so much to cool anything down, they were included to add to the avionics soundscape. Wikipedia snip: "A soundscape is a sound or combination of sounds that forms or arises from an immersive environment." The real CDUs include fans so why not include them here also? The db levels on these CDU fans are not very high and once everything else in the sim is up and running, they will blind in with everything else. However, you will be able to hear them during the start up sequence. What's next Shane! Looking good Shane! Mark the CDU update as COMPLETE! If anyone is wondering why we have included cooling fans, it's not so much to cool anything down, they were included to add to the avionics soundscape. Wikipedia snip: "A soundscape is a sound or combination of sounds that forms or arises from an immersive environment." The real CDUs include fans so why not include them here also? The db levels on these CDU fans are not very high and once everything else in the sim is up and running, they will blind in with everything else. However, you will be able to hear them during the start up sequence. What's next Shane! Shane's summary makes you realise all the work that has gone into developing the CDU for our Learjet 45 sim. Awesome work guys. Shane's summary makes you realise all the work that has gone into developing the CDU for our Learjet 45 sim. Awesome work guys. Having 2 real CDU’s to keep functioning and being reminded of their ages, I’d have to say these replicas are absolutely awesome. Kudos to Ron, Jason and Shane for giving builders this very important purchase for the Lear. Having 2 real CDU’s to keep functioning and being reminded of their ages, I’d have to say these replicas are absolutely awesome. Kudos to Ron, Jason and Shane for giving builders this very important purchase for the Lear.L45-007 V2.0 Project Updates!
![]()


![]()
![]()
![]()
![]()
![]()
![]()


![]()
![]()
![]()
We are so lucky and I appreciate the skills of our Hangar members for this wonderful hobby.
We are so lucky and I appreciate the skills of our Hangar members for this wonderful hobby.
L45-007 V2.0 Project Updates!
![]()
![]()
![]()
![]()
![]()
![]()
![]()
![]()
![]()
![]()