


(Original thread started on 03-13-13 by Alan Norris) I am having an issue with resizing the ADI with the "i" and "d" keys. Does anyone have any information on how to resize the standby gauges? (Posted by Dave Ault on 03-13-13) Alan, the .ini file that stores the gauge size and position is only written when you close the gauge down manually. As an example, if you resize or move the gauge and then reboot, it will NOT remember the position. Therefore, your gauge will not be where you think you saved it. (Posted by Alan Norris on 03-13-13) I will remember to close the gauges manually instead of letting Windows do it as part of it's shutdown procedure. However, I still have the problem whereby I cannot reduce the size of the gauges below the default -- not even by dragging the corner of the window. Can size up using alt+i but that's of no use. I've had this issue since Windows updated the driver without my knowledge (but I fixed that) and I have tried every legacy driver that Nvidia lists. (Posted by Dave Ault on 04-30-13) alt-i should increase the border size. What happens when you just press lower case i ? Once you have increased them with alt-i can you then reduce them again? Might be a daft question but has installing video drivers left your screen in a low resolution mode which makes the minimum size seem larger? (Posted by Alan Norris on 04-3-13) I can increase using alt+i above the default but alt+r only brings it back to default and no lower. The resolution of my three monitors is 1024x768 (default). I cannot even reduce the window by dragging the corners. Will try the "i" to see if that reduces the size. I can only change the size of the gauges by editing the .ini file. That's fine but still very strange that I cannot drag a corner of the window with my mouse or use the alt+ keys. Thanks (Posted by Dave Ault on 05-01-13) Here are the adjustment keys for latest versions: i ............ Increase Size r ............ Reduce Size b ............ bare mode ( no bezel or orange horizon marker ) s ............ Toggle Shadow On/Off a ............ Rotate Instrument ALT+f ........ Find Instrument ALT+i ........ Increase Border Size ALT+r ........ Reduce Border Size ALT+s ........ Toggle Smooth Graphics Here is a list of the .ini file variables for the latest versions of the gauges: ALT Horizontal screen position: pixels Vertical screen position: pixels Width of window: pixels Shadow enabled: 0 or 1 Instrument Angle: either 0, 64, 128 or 192 ( weird allegro angles, not degrees ) Extra border: pixels Gaussian Blur: 0 or 1 Pressure: hPa * 16 ASI Horizontal screen position: pixels Vertical screen position: pixels Width of window: pixels Shadow enabled: 0 or 1 Instrument Angle: either 0, 64, 128 or 192 ( weird allegro angles, not degrees ) Extra border: 0 or 1 Gaussian Blur enabled: 0 or 1 ADI Horizontal screen position: pixels Vertical screen position: pixels Width of window: pixels Shadow enabled: 0 or 1 Bare mode i.e bezel or no bezel: 0 or 1 Instrument Angle: either 0, 64, 128 or 192 ( weird allegro angles, not degrees ) Extra border: pixels Gaussian Blur: 0 or 1 There is no option to remove the windows border but you can increase the black border around each gauge instead. Also the Allegro graphics library that I have used when programming the gauges does not allow you change the window size by dragging the corner with the mouse, hence the keyboard controls. Looking at the code, I prevent the gauge from being reduced smaller that 120 pixels across. so if you measure your 1024x768 screen width then the smallest the gauge can be would be (Screen_width / 1024) * 120 .Is this the minimum you are getting?. You can get smaller gauges by either increasing the screen resolution or tweaking the .ini file. If this is an issue then I can lower this limit and recompile a new gauge for you. (Posted by Alan Norris on 05-01-13) I didn't know that you couldn't resize the window by dragging the corner. That's good to know. I found that changing the size in the .ini file to 200 (50% of default) they fit Ron's bezels perfectly. Thanks for all the help Dave! (Original thread started on 03-13-13 by Alan Norris) I am having an issue with resizing the ADI with the "i" and "d" keys. Does anyone have any information on how to resize the standby gauges? (Posted by Dave Ault on 03-13-13) Alan, the .ini file that stores the gauge size and position is only written when you close the gauge down manually. As an example, if you resize or move the gauge and then reboot, it will NOT remember the position. Therefore, your gauge will not be where you think you saved it. (Posted by Alan Norris on 03-13-13) I will remember to close the gauges manually instead of letting Windows do it as part of it's shutdown procedure. However, I still have the problem whereby I cannot reduce the size of the gauges below the default -- not even by dragging the corner of the window. Can size up using alt+i but that's of no use. I've had this issue since Windows updated the driver without my knowledge (but I fixed that) and I have tried every legacy driver that Nvidia lists. (Posted by Dave Ault on 04-30-13) alt-i should increase the border size. What happens when you just press lower case i ? Once you have increased them with alt-i can you then reduce them again? Might be a daft question but has installing video drivers left your screen in a low resolution mode which makes the minimum size seem larger? (Posted by Alan Norris on 04-3-13) I can increase using alt+i above the default but alt+r only brings it back to default and no lower. The resolution of my three monitors is 1024x768 (default). I cannot even reduce the window by dragging the corners. Will try the "i" to see if that reduces the size. I can only change the size of the gauges by editing the .ini file. That's fine but still very strange that I cannot drag a corner of the window with my mouse or use the alt+ keys. Thanks (Posted by Dave Ault on 05-01-13) Here are the adjustment keys for latest versions: i ............ Increase Size r ............ Reduce Size b ............ bare mode ( no bezel or orange horizon marker ) s ............ Toggle Shadow On/Off a ............ Rotate Instrument ALT+f ........ Find Instrument ALT+i ........ Increase Border Size ALT+r ........ Reduce Border Size ALT+s ........ Toggle Smooth Graphics Here is a list of the .ini file variables for the latest versions of the gauges: ALT Horizontal screen position: pixels Vertical screen position: pixels Width of window: pixels Shadow enabled: 0 or 1 Instrument Angle: either 0, 64, 128 or 192 ( weird allegro angles, not degrees ) Extra border: pixels Gaussian Blur: 0 or 1 Pressure: hPa * 16 ASI Horizontal screen position: pixels Vertical screen position: pixels Width of window: pixels Shadow enabled: 0 or 1 Instrument Angle: either 0, 64, 128 or 192 ( weird allegro angles, not degrees ) Extra border: 0 or 1 Gaussian Blur enabled: 0 or 1 ADI Horizontal screen position: pixels Vertical screen position: pixels Width of window: pixels Shadow enabled: 0 or 1 Bare mode i.e bezel or no bezel: 0 or 1 Instrument Angle: either 0, 64, 128 or 192 ( weird allegro angles, not degrees ) Extra border: pixels Gaussian Blur: 0 or 1 There is no option to remove the windows border but you can increase the black border around each gauge instead. Also the Allegro graphics library that I have used when programming the gauges does not allow you change the window size by dragging the corner with the mouse, hence the keyboard controls. Looking at the code, I prevent the gauge from being reduced smaller that 120 pixels across. so if you measure your 1024x768 screen width then the smallest the gauge can be would be (Screen_width / 1024) * 120 .Is this the minimum you are getting?. You can get smaller gauges by either increasing the screen resolution or tweaking the .ini file. If this is an issue then I can lower this limit and recompile a new gauge for you. (Posted by Alan Norris on 05-01-13) I didn't know that you couldn't resize the window by dragging the corner. That's good to know. I found that changing the size in the .ini file to 200 (50% of default) they fit Ron's bezels perfectly. Thanks for all the help Dave! Is this item still actual? How are things like posistion and size stored for the standby instuments? Is this item still actual? How are things like posistion and size stored for the standby instuments? Hey Roel, I am sure you have seen this thread HERE The .exe files for each of the three gauges are at the bottom of the first post. The .ini files are created and are saved within each of the gauge folders. You can drag the gauge around, manually size it or adjust the values in the .ini file. Let me know if this helps. Hey Roel, I am sure you have seen this thread HERE The .exe files for each of the three gauges are at the bottom of the first post. The .ini files are created and are saved within each of the gauge folders. You can drag the gauge around, manually size it or adjust the values in the .ini file. Let me know if this helps. I just installed and ran the gauges and it created the ini file in the same directory as the executable. NOTE that it created the file after I closed the program for the first time. See the post above for how to decode the list of items in the ini file. I just installed and ran the gauges and it created the ini file in the same directory as the executable. NOTE that it created the file after I closed the program for the first time. See the post above for how to decode the list of items in the ini file. Yes i know, i answered Ron by mail. when you place the standby gauges software in another folder f.i. C:\gauges the ini files are created. Yes i know, i answered Ron by mail. when you place the standby gauges software in another folder f.i. C:\gauges the ini files are created. That makes sense Roel. I always avoid installations into that directory for that reason, I installed on a separate drive from Windows. Wonder if running as administrator will help in that location? That makes sense Roel. I always avoid installations into that directory for that reason, I installed on a separate drive from Windows. Wonder if running as administrator will help in that location? Yes that also does the job, using runas administrator. i was a bit too quick with the next next finish buttons 😀 Yes that also does the job, using runas administrator. i was a bit too quick with the next next finish buttons 😀Adjusting Standby Gauge Size and Location
![]()
![]()
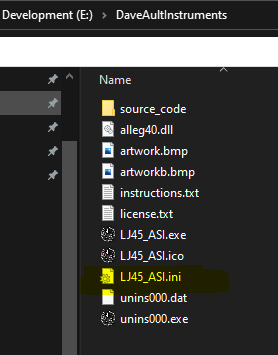
I don't see any INI file created?
I don't see any INI file created?![]()
![]()
![]()
i found the issue on win 10 is that folder protection and or uac is active.
This blocks creation of ini files in the %program(x86)% folders
i found the issue on win 10 is that folder protection and or uac is active.
This blocks creation of ini files in the %program(x86)% folders![]()
![]()
But i also never install fs software in the program files folders.
But i also never install fs software in the program files folders.
Forum NavigationAdjusting Standby Gauge Size and Location
![]() #1 · November 26, 2017, 7:10 pm
#1 · November 26, 2017, 7:10 pm![]() #2 · December 8, 2020, 7:15 am
#2 · December 8, 2020, 7:15 am![]() #3 · December 8, 2020, 8:46 pm
#3 · December 8, 2020, 8:46 pm![]() #4 · December 10, 2020, 10:22 amJason Hite
FlightDeckSoft
#4 · December 10, 2020, 10:22 amJason Hite
FlightDeckSoft![]() #5 · December 10, 2020, 12:15 pm
#5 · December 10, 2020, 12:15 pm![]() #6 · December 10, 2020, 12:20 pmJason Hite
FlightDeckSoft
#6 · December 10, 2020, 12:20 pmJason Hite
FlightDeckSoft![]() #7 · December 10, 2020, 1:38 pm
#7 · December 10, 2020, 1:38 pm
2017-10-10