


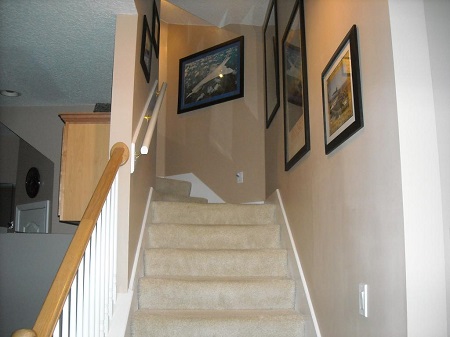
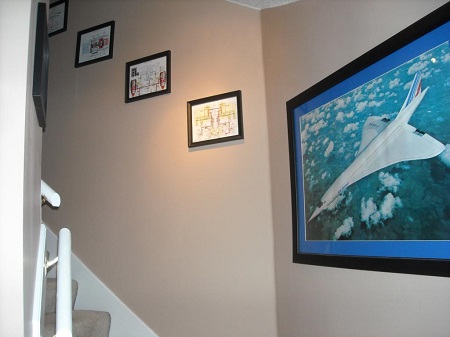
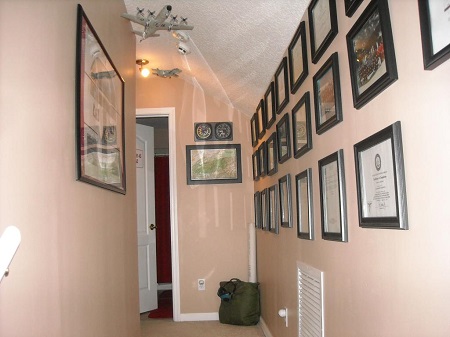
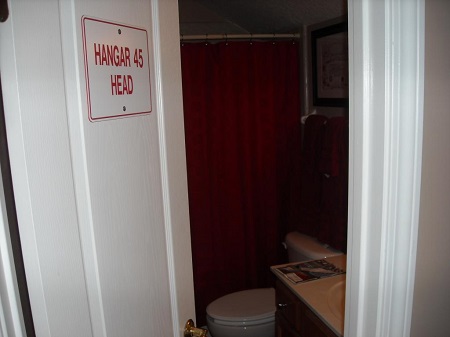
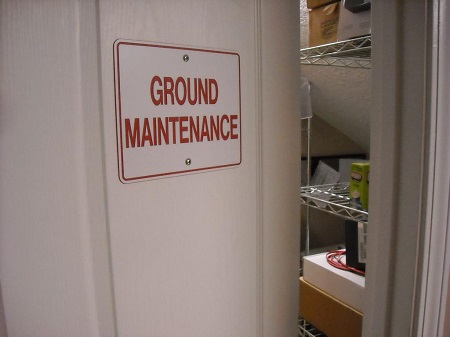
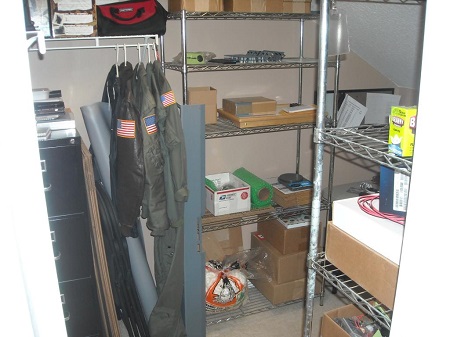
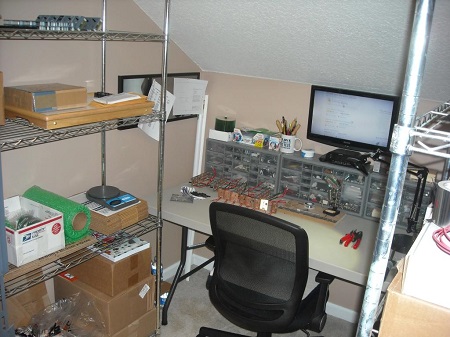
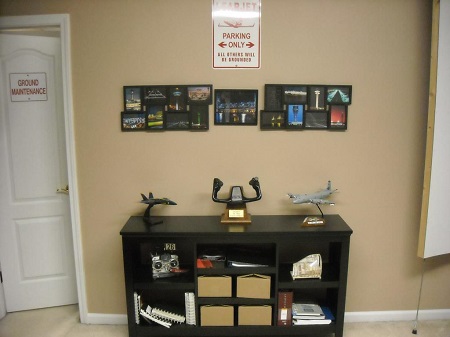
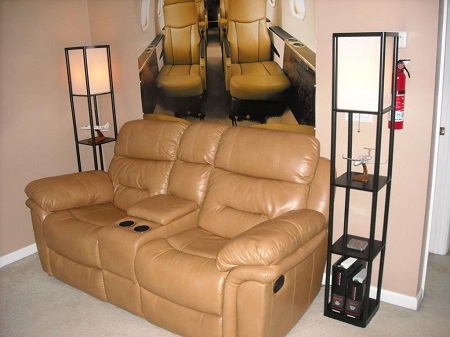
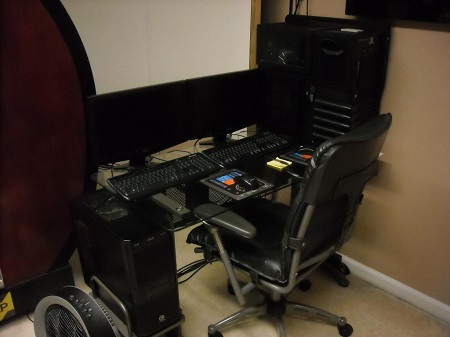
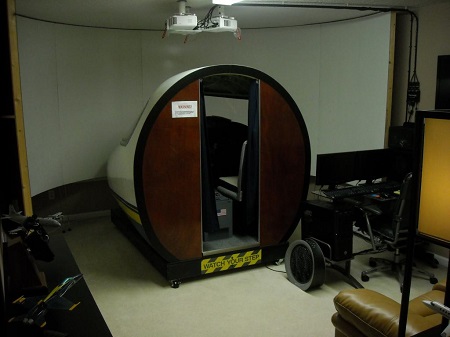
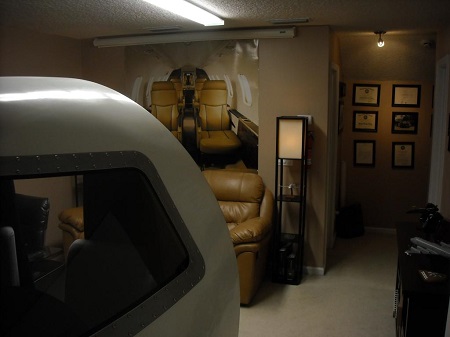
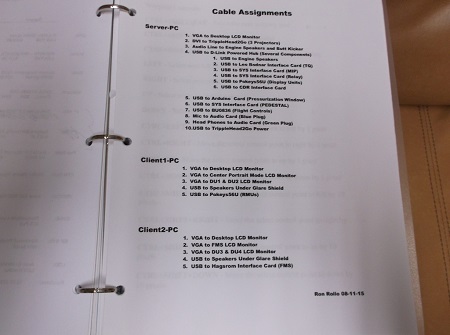
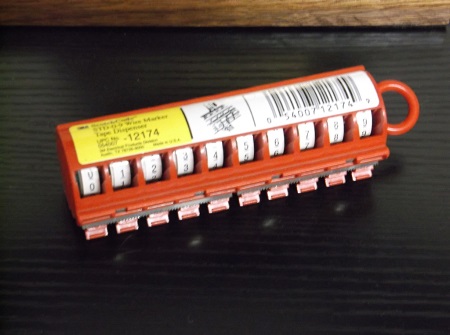
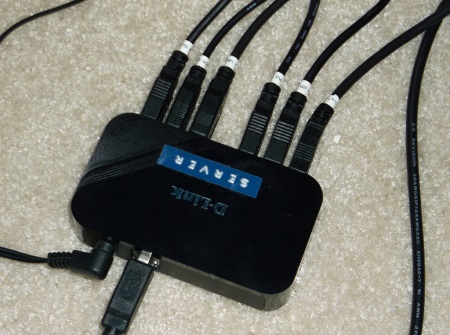
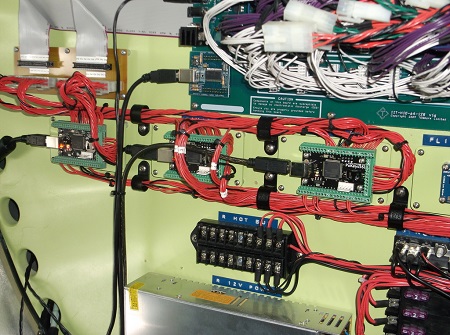
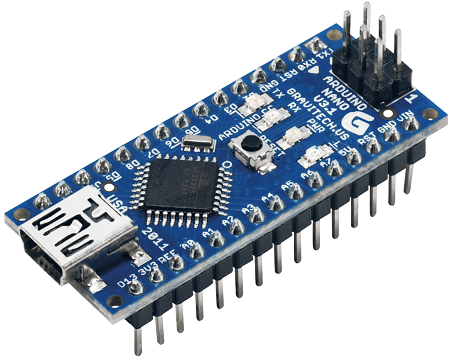
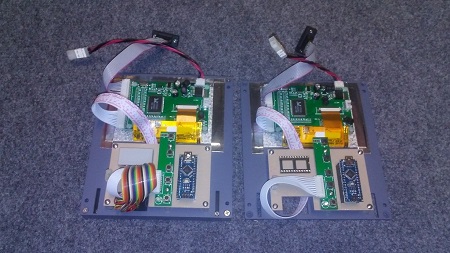
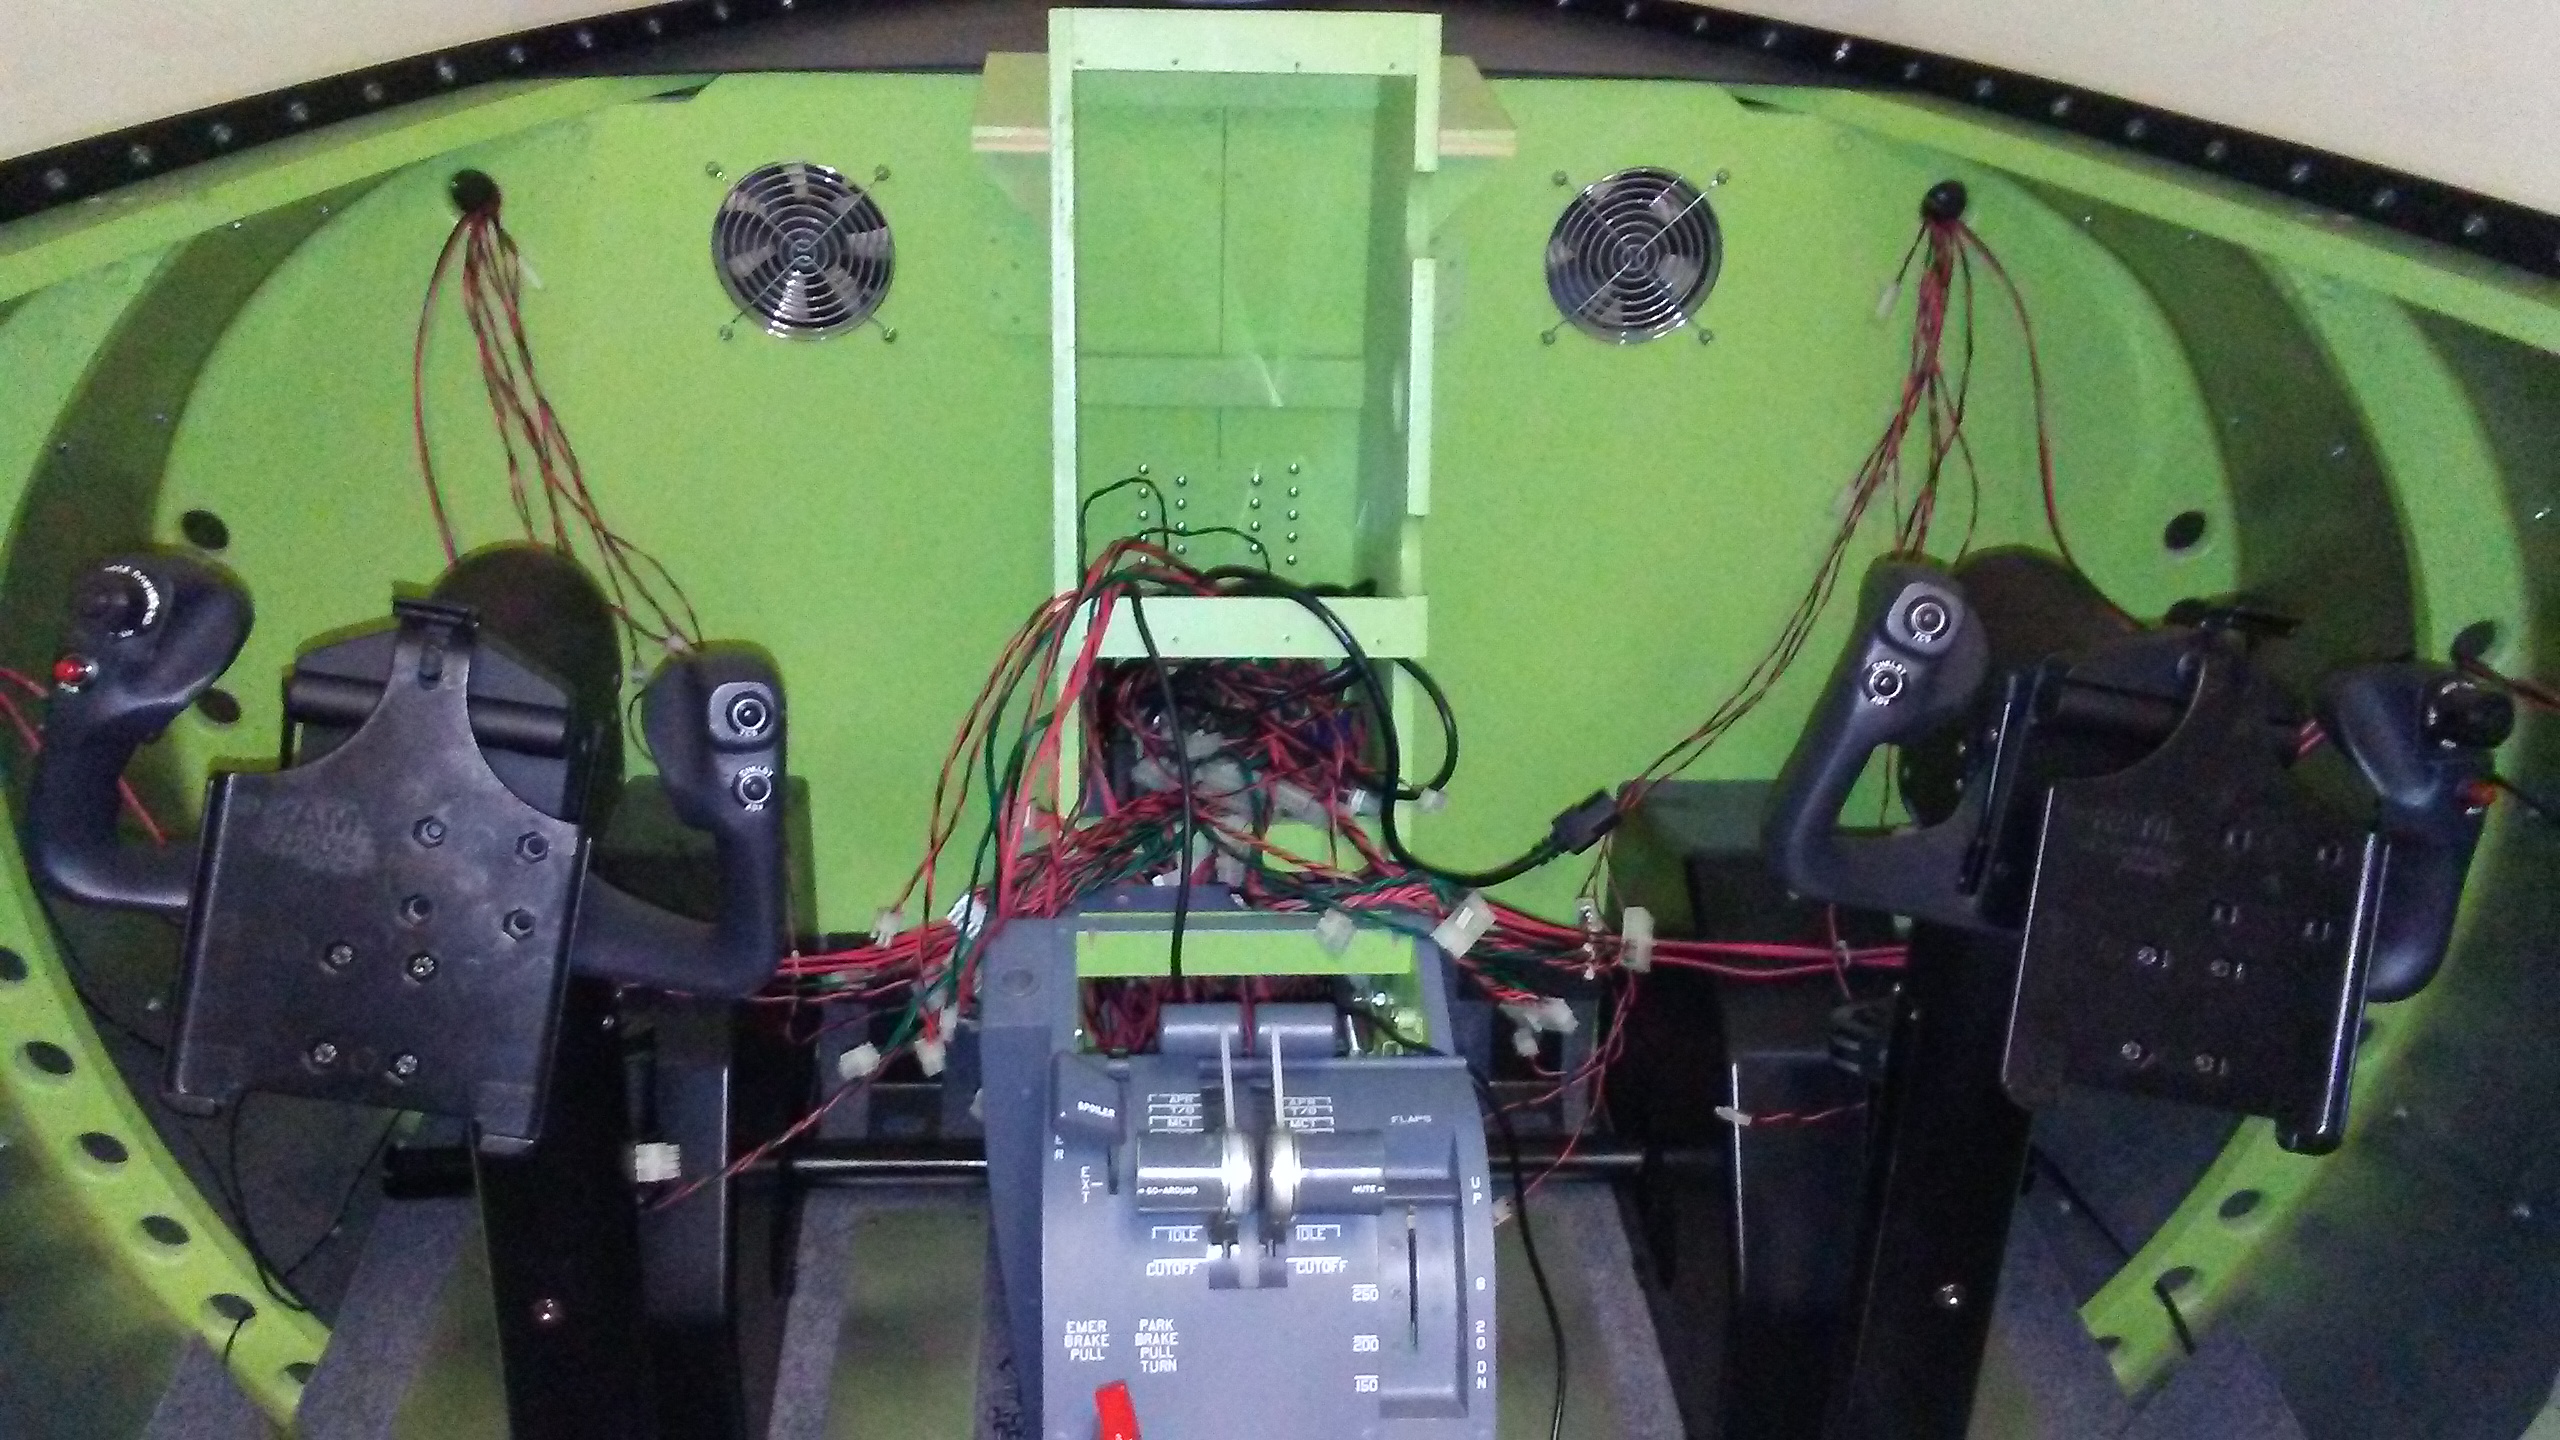
(Posted by Ron Rollo on 09-09-13) Thanks Greg for posting up the videos, helping to get the FGC up and running and tweaking the visual system. In both cases there is still room for tweaking but I would have to say that the things that we did were a 100% success, mostly due to the fact that we have pushed the envelope of possibilities even further! As an example, we have now been able to project 200 degrees of view onto the 220 degree screen. This gives us our full left at 90 degrees and full right at 90 degrees view. Prior to this I was flying with only 120 degrees of view stretched out over the 220 degrees of screen. This was good but when we would look full left or full right, we were not seeing what should have been there. The best example would be when we are taxing and stopping short of entering a runway at a 90 degree angle. You could not see if there was a plane coming in for landing or if the runway was clear. With the help of Greg (finer details), we will update the Project45 visual thread with our findings. As for the FGC, between this and the CDR, it has made my sim IFR ready! We did several ILS approaches and in some cases with only a half mile of visibility. This is another one of those mile stones I have been waiting for! Last but not least, you probably could not help but notice the iPad mini sitting on the glare shield. Greg down loaded a program called ForeFlight which gives real pilots real world up to date information and data including minute by minute weather. I knew this stuff was possible, some of you guys like Eric German have already done some neat stuff like this but seeing it in person literally blew me away! I understand that the iPod acts pretty much like a GPS but what I was most impressed with is the fact that you could sink it up with "another device", say a Lear45 home built flight simulator, (which I just happened to have) and the next thing you know is the iPad thinks it is in cyberspace with your sim! It's up there with magic if you ask me! "There's an app for that" so they say. My wife just got an iPad mini for her birthday a few months ago. This was our first Apple product ever if you can believe that. I have finally found a legit use for an Apple product that justifies the price. That's just me. If you saw the $11 cell phone that I use you would understand where I am coming from. UPDATE: I found a few minutes to update this thread with some overview photos. These photos that follow are more like a virtual tour of my "hangar space". Hope you enjoy! If you were to swing by and check out my sim, this is what you would see. This is a photo at the bottom of the steps looking up at the stairway that curves up and to the left. So like I was saying in the previous post, unless your invited up stairs, you would not have a clue what is up and around the corner: This is about the mid point in the stairway. I have a few Concorde photos because as you are probably aware my late Uncle Wayne was the First Officer on it when he flew for Braniff Airlines: This photo is at the top of the stairs and there is a hallway that leads back to the sim room, Hangar head and Ground Maintenance room: This is our official Hangar45 Head. (Restroom): Beyond this door is the Ground Maintenance room (walk in closet): This room is on the small side but just large enough to store all my spare parts and parts that I am working on for other members: It is also just big enough to do some of the more tedious jobs like soldering and assembling panels like the FGC or EFIS. If you look closely, there are four FGC Plug and Plays on the table to the left over 75% complete! Here is a photo of along the wall with a few models and photos of some interesting points of interest around the world that can be visited in our sims: This is a rendition of my cabin area of the Lear45. Thanks to you Randy for the cabin poster that you sent me a few years back. As you can see it went to great use! This is my instructor station or in other words my computer station. In the photo you will see two computers and two LCD monitors that run the sim: It is hard to squeeze everything into one photo but here is my best effort: I am taking the photo inside the screen area looking back into the rest of the sim room to help give you another perspective of the space that I have to work within: A quick photo of the avionics bay: Last but not least, what this project is all about, the Lear45 cockpit! It has been a lot of work and over 6 years of 100% dedication to the project only taking a few weeks off here and there to either go on vacations or do other projects around the house. Even then my mind is always thinking about the project and ways to make things happen or improve solutions. Also, I did a tutorial a few months ago that covers everything in the avionic bay in greater detail. You can see it by clicking HERE Hope you enjoyed! More photos to come as always. (Posted by Ron Rollo on 09-09-13) Thanks Greg for posting up the videos, helping to get the FGC up and running and tweaking the visual system. In both cases there is still room for tweaking but I would have to say that the things that we did were a 100% success, mostly due to the fact that we have pushed the envelope of possibilities even further! As an example, we have now been able to project 200 degrees of view onto the 220 degree screen. This gives us our full left at 90 degrees and full right at 90 degrees view. Prior to this I was flying with only 120 degrees of view stretched out over the 220 degrees of screen. This was good but when we would look full left or full right, we were not seeing what should have been there. The best example would be when we are taxing and stopping short of entering a runway at a 90 degree angle. You could not see if there was a plane coming in for landing or if the runway was clear. With the help of Greg (finer details), we will update the Project45 visual thread with our findings. As for the FGC, between this and the CDR, it has made my sim IFR ready! We did several ILS approaches and in some cases with only a half mile of visibility. This is another one of those mile stones I have been waiting for! Last but not least, you probably could not help but notice the iPad mini sitting on the glare shield. Greg down loaded a program called ForeFlight which gives real pilots real world up to date information and data including minute by minute weather. I knew this stuff was possible, some of you guys like Eric German have already done some neat stuff like this but seeing it in person literally blew me away! I understand that the iPod acts pretty much like a GPS but what I was most impressed with is the fact that you could sink it up with "another device", say a Lear45 home built flight simulator, (which I just happened to have) and the next thing you know is the iPad thinks it is in cyberspace with your sim! It's up there with magic if you ask me! "There's an app for that" so they say. My wife just got an iPad mini for her birthday a few months ago. This was our first Apple product ever if you can believe that. I have finally found a legit use for an Apple product that justifies the price. That's just me. If you saw the $11 cell phone that I use you would understand where I am coming from. UPDATE: I found a few minutes to update this thread with some overview photos. These photos that follow are more like a virtual tour of my "hangar space". Hope you enjoy! If you were to swing by and check out my sim, this is what you would see. This is a photo at the bottom of the steps looking up at the stairway that curves up and to the left. So like I was saying in the previous post, unless your invited up stairs, you would not have a clue what is up and around the corner: This is about the mid point in the stairway. I have a few Concorde photos because as you are probably aware my late Uncle Wayne was the First Officer on it when he flew for Braniff Airlines: This photo is at the top of the stairs and there is a hallway that leads back to the sim room, Hangar head and Ground Maintenance room: This is our official Hangar45 Head. (Restroom): Beyond this door is the Ground Maintenance room (walk in closet): This room is on the small side but just large enough to store all my spare parts and parts that I am working on for other members: It is also just big enough to do some of the more tedious jobs like soldering and assembling panels like the FGC or EFIS. If you look closely, there are four FGC Plug and Plays on the table to the left over 75% complete! Here is a photo of along the wall with a few models and photos of some interesting points of interest around the world that can be visited in our sims: This is a rendition of my cabin area of the Lear45. Thanks to you Randy for the cabin poster that you sent me a few years back. As you can see it went to great use! This is my instructor station or in other words my computer station. In the photo you will see two computers and two LCD monitors that run the sim: It is hard to squeeze everything into one photo but here is my best effort: I am taking the photo inside the screen area looking back into the rest of the sim room to help give you another perspective of the space that I have to work within: A quick photo of the avionics bay: Last but not least, what this project is all about, the Lear45 cockpit! It has been a lot of work and over 6 years of 100% dedication to the project only taking a few weeks off here and there to either go on vacations or do other projects around the house. Even then my mind is always thinking about the project and ways to make things happen or improve solutions. Also, I did a tutorial a few months ago that covers everything in the avionic bay in greater detail. You can see it by clicking HERE Hope you enjoyed! More photos to come as always. (Posted by Ron Rollo on 09-07-14) I have been busy working on my sim and lots of parts for all you guys. I will be updating this sim thread in greater detail in a couple of weeks but for now, I wanted to let everyone know that I have finally came to that point where it is time to move on to three computers! I have pushed it as far as I think I can go and now the two computer set up is starting to show signs of lagging with all the programs that they are trying to run between the two of them. My plans are to add a third computer and move the four display units and possibly the CDU and related software over to the new second client or third computer. This will free up the first client and enable me to move some of the minor programs from the server computer to the first client computer. I have already specked out the second client. It will be a a very strong i3 much like the first client. This should be more than enough to run the four display units. After all, the first client which is also an i3 is currently running the four display units, two RMUs, three standby gauges all on three monitors, four if you count the instructor station LCD. For the most part, the first client has done very well with this massive load. One of my issues with moving to a third computer is space for it and the monitor. I know there are programs that enable us to share a single monitor between two or more computers but I like the idea of having a dedicated monitor for each computer. It makes things easier and a little less complicated when working on the software portion of the sim. I could look for a larger desk for the three monitors but instead I opted to go with adding a third monitor to my current set up. Side by side by side was not an option unless I down graded to three 15 inch 12 year old used monitors. So this is what I came up with: My second client LCD is stacked on top between the first client and server LCDs. I carefully measured out and designed what I call the Acer Triple Stack Support Backer: It is made of half inch Polly material (plastic) but the catch is that it was too large to cut with the CNC. I had to cut it out with standard power tools and with the help of my father on the finishing work on the edges, it looks like it belongs. In the photo above, the right is the Server. The bottom left is Client1 and on top of that is the new Client2. So far I have got Windows7 Pro SP1 on it, linked to the internet and Disk Defrag loaded up. I still need to network the computer to the other two and download Wide Client on it before I can start moving some programs onto it to divide the work load. My plan is to divide the ten programs that are currently running on Client1 to five each. The simplest way to do this is to move Jet45 AAS DU1,2,3,4 and the CDU screen to Client2. This will leave the Jet45 AAS RMU1,2 and the three standby gauges on Client1. Client2 is very similar in strength to Client1. They are both using i3 Intel processors, 8gb of ram and 1gb video cards. The real power and performance is found in the server. Hopefully in the next week I will be able to report back to you that the addition of this third computer has solved all my minor issues and has boosted the sims performance to stunning! I have made some updates to Poject45.us especially on the Technical Information Page. If your curious about what I am running on all three computers, check it out: http://www.project45.us/technical-information/ (Posted by Ron Rollo on 01-16-15) L45-002 reaches 100 hours of flight time and test flights on 01-16-2015: UPDATE: I got some big bad news! Last night I broke my Project45 L45-002 FSX sim to the point it can not be fixed. This sucks especially sense it was working very well with three computers and nearly everything running in it including a pre beta CDU by Flightdecksoft. But with all that said, there was not much more performance left to squeeze out of the current sim, meaning FSX. Now for the good news! I have been waiting for over two years to break the FSX sim to the point that it would require a clean start. It was a good run and I have learned and shared lots of invaluable information over the past three years without needing to do a clean install. Now that this time has come I am moving forward with Prepare3D 2.0. This is going to be an exciting time for me and everyone out there who is following this build and has had the opportunity to fly the FSX sim in the past and compare that to the new P3D sim to come. Hopefully I will be able to get the new sim up and running within a few weeks, we will see. At least I have 99% of the required hardware in place! So keep an eye out for Project45 L45-002 P3D 2.0 sim in the near future! (Posted by Mark Speechley on 02-19-15) Ron, perfect timing. All of us Prepar3d die-hards have to uninstall P3D 2.x in order to install the new Ver 2.5. All you are doing is catching up with the rest of us in one shot going straight to v2.5 ! You will be very happy with the upgrade, but I can tell you it will take weeks before you have it rocking and rolling esp. with regards to the P3d.cfg file ( just as it was with the FSX.cfg file) and it's settings. Everyone's settings are different due to the hardware differences however you might just find that the default just might work right out of the box. You'll need to re-download all the ORBX installers for P3Dv2 (assuming you have any) as well as the compulsory FSUIPC, and port your planes from FSX over to P3D. I personally found that the Estonia FSX to P3D conversion tool was a boon. Hence the weeks I was talking about in getting all setup again. Get ready for Ron the software guru instead of the hardware guru for awhile. (Posted by Ron Rollo on 02-19-15) Hey Mark, I have a few advantages in that I have been backing up programs and files for weeks now in case of something like this and I do not have much add on scenery to deal with. BUT, there are nearly 20 flight sim related programs that have to be installed, and that does not include scenery programs. I also have Greg Branch coming down to help out. All in all, I suspect it will take 72 hours of work to get it back up and running like it was but only better. But 72 hours could mean a month! I will keep you all posted and document my noteworthy changes if applicable. UPDATE: Quick update on the 2.0 progress. I was successful in pulling all my files, programs and setting off of the hard drives. A few days ago I pulled the plug on FSX (reformatted) and began the process of starting from scratch. A few key changes that I made from sim 1.0 to 2.0: 1. I decided to go with a single 1TB hard drive instead of having a separate 64GB SSD to boot up windows7. The problem I ran into with this is that windows takes up 75% of that drive all by itself. And then windows7 ends up growing or you (or your friends) accidentally put programs on that 64GB drive and before you know it, your operating within 95% of max storage and you end up with a blue screen. I discovered this problem two years ago and managed to keep the 64GB drive under 95%, but still, if your going to go this route, get at least 128GB SSD and leave a sticky note on your monitor to remind yourself to double check which drive your programs are going to. I may add a second 1TB drive as a RAID drive, (back up drive) 2. Moving from FSX to Prepar3D 2.5. (I am looking forward to playing around with this program in the next two days.) Greg Branch gave me a hand on getting it up and running. 3. We installed P3D on the C drive outside of the programs file folder and the programs file 86x folder. This will come into play when I get back to working with Airport Design Editor. ADE does not like it when FSX or P3D is in the 86x folder for some reason. 4. I will be gaining about 12 inches of vertical view on the screen system down at the bottom of the screen. Greg reminded me that the alignment points can be dragged to anywhere in the room, including off the screen and to the carpet if need be. There will be a few blank spots in the visual at the bottom of the screen but they are in the pilot's blind spots anyway. So as of this moment, I would say I am at about 30% getting the sim back up to where it was and then some. More updates shortly. UPDATE: I have been plugging away at bringing the sim back up on line with P3D 2.5 and dealing with some hard to fix issues. At this point in time, I estimate I am 60% complete. This is the current list of things that has me stuck or at least taking too much time to resolve: 1. I need to fix the warp loader for Fly Elise visual system. It works sometimes. 2. I need to configure the three outside views. Still need to read some tutorials on that. 3. RMUs are dropping off even after the priority on Client1-PC is over ridden to HIGH. 4. I'm having a hard time installing A2A (Accu Feel) which is an addon to help the way the Lear45 sounds. Same thing with Audio Environment which gives the bumps, sound of wind and tire screeches when landing. These are two programs that were meant for FSX but can work with P3D if you use the migrator or tweak the ddl file. List of improvements and changes over Project45 sim 1.0: 1. Got rid of the smaller 64GB OP system drive that caused blue screen issues 2. Proper naming of the computers and setting up a home sharing group 3. Ethernet connection via switch to internet router rather than USB wifi 4. It seems that I can move all my USBs that were plugged into two powered USBs into one now. 5. Got rid of the Aero themes that was taking up some graphics computing on all three computers 6. 12 inches more of vertical view on the screen system making increased field of view 7. The PTT should be working now using the same method as I did with the trim switches 8. The sticking START issue is resolved when restarting engines 9. Flaps now show 0, 8, 20 and 40 degrees on the Jet45 MFD 10. I added the PoKeys cards and was able to name them, P56U RMUs and P56U DUs 11. Dimming for the display units are smoother As far as P3D 2.5 goes? I know it is a better simulator than FSX but so far, none of the improvements listed above are in any way related to P3D. If I wanted to, I could apply these changes to my FSX sim! As a matter of fact P3D is hindering my efforts to set up a few key programs, but that it just me not being able to get around the learning curve. I am very much looking forward to getting these issues ironed out and unleashing P3D to see what it can do first hand over FSX! So hopefully here in a couple more weeks the sim will be up to at least 95% of what it was before and then some. More updates soon. UPDATE: Over the past two weeks I have been finding a little time to work on the software to my sim. I have had some ups and downs and as of this moment it seems that I am learning to tame this wild beast. Thanks to Shane for helping me out over the phone with a few of my key issues. Sometimes a problem just needs a fresh look from a different point of view. As of now I still need to tweak the visual system add my scenery programs and tweak the sim for overall performance. One thing that I wanted to share with everyone is "Cable Assignments" and management. A desk sim is not that big of a deal but when you have a full size sim, no matter the airframe, your going to have VGA cables, USB cables, audio cables etc. running all over the place. And when you would like to try to find a cable to locate a particular component it is much easier if they are labeled and documented. Below are my "Cable Assignments. Cable Assignments: Server-PC 1. VGA to Desktop LCD Monitor 2. DVI to TrippleHead2Go (3 Projectors) 3. Audio Line to Engine Speakers and Butt Kicker 4. USB to D-Link Powered Hub (Several Components) 1. USB to Engine Speakers 2. USB to Leo Bodnar Interface Card (TQ) 3. USB to SYS Interface Card (MIP) 4. USB to SYS Interface Card (Relay) 5. USB to Pokeys56U (Display Units) 6. USB to CDR Interface Card 5. USB to Arduino Card (Pressurization Window) 6. USB to SYS Interface Card (PEDESTAL) 7. USB to BU0836 (Flight Controls) 8. Mic to Audio Card (Blue Plug) 9. Head Phones to Audio Card (Green Plug) 10.USB to TrippleHead2Go Power Client1-PC 1. VGA to Desktop LCD Monitor 2. VGA to Center Portrait Mode LCD Monitor 3. VGA to DU1 & DU2 LCD Monitor 4. USB to Speakers Under Glare Shield 5. USB to Pokeys56U (RMUs) Client2-PC 1. VGA to Desktop LCD Monitor 2. VGA to FMS LCD Monitor 3. VGA to DU3 & DU4 LCD Monitor 4. USB to Speakers Under Glare Shield 5. USB to Hagstrom Interface Card (FMS) It is also a great idea to print out your Cable Assignments for quick reference: By the way, what you see here above is subject to change, just like it did today! What Shane and I are discovering is that if you haphazardly place a program or connect a hardware component up to a computer you might get results that at first glance looks good and seems to work. But after some testing, you might discover that a program or a hardware component works better and even prefers to be in a particular place compared to where it was prior. This is a process that will drive you nuts but hopefully between several of us that have their sims up and running can help out the new guys coming online. We are still learning what works well and what works best. It is an art in progress! Anyway, back to cable management: You can find one of these number tape tools at most hardware or auto parts stores. It is great for marking wires and hoses: The change I made today was moving the Pokeys56U card that handles the RMUs from the Server-PC to Client1-PC which is why you see a missing plug in the powered USB D-Link. I hope this info helps you with your sim project! (Posted by Shane Barnes on 08-11-15) Yep, good advice! We have made a lot of progress on our sims the last few weeks. In fact, helping Ron sort out some of his issues helped me sort out some of mine. Glad we got some of that worked out! Seemed for awhile there we both were taking one step forward and about three backward! (Posted by Ron Rollo on 08-23-15) I do lots of test flying. If everything feels and looks good, I save it, but only after setting everything back to cold and dark and having the airplane in it's prime parking spot at that particular airport. When it comes to the perfect saved flight, the visuals are the thing to be looking at. If you get the visuals squared away, (for those of you using three screens & projectors, or three big LCD TVs) you will know what I am talking about. Once you get the visuals perfect, you will want to piggy back off of that saved flight to create other saved flights by selecting "Go To Airport" and over writing the other saved flights that you may have. This way your perfect visuals are saved at all your favorites or saved flights. (Posted by Mark Speechley on 08-23-15) And to add to Ron's advice. Cold and dark should do the trick however if you just save at engine idle make sure your 2D cockpit looks in order eg FGC button lights as well as make sure you have no mismatch between hardware LED's on and the 2D equivalent off. You should only have to do this occasionally and make sure it is saved as default. I was really raising this as a potential issue as the possible cause of the intermittent generator lights. I have loaded different saved flights and have had different instrument setups load up. If it is right for a few of us at least, we won't have to go searching for a hardware fix. (Posted by Ron Rollo on 12-03-15) Shane and I have been doing some talking back and forth in an effort to reduce bugs and glitches in the sim. One thing that we came up with is adding a third PoKeys56U card for the RMUs and DUs. So what I came up with is this: Server-PC PoKeys56U card handles all the buttons and encoders on the four Display Units. This is a total of six encoders. Client1-PC PoKeys56U card handles all the buttons and the two encoders on RMU1. In addition, this card handles three encoders from the FGC, CRS1, HDG and VS/SPD encoders. This is a total of five encoders. Client2-PC PoKeys57U card handles all the buttons and the two encoders on RMU2. In addition, this card handles two encoders from the FGC, ALT and CRS2. Last but not least, this card handles the encoder on the standby altimeter. This is a total of five encoders. What this does is divide up the work load of the encoders near perfectly and eliminates the need for Mark's RMU Utility. (Not that there was anything wrong with Mark's utility, but in order to insure that the testing that I am doing for Jason is as clean as possible, I had to put it aside.) I also took out the encoder debounce circuit that I made last year. All in an effort to clean up the signal flow. By the way, when I did the testing with and without the debounce circuit, I could not tell a noticeable deference one way or the other. You will also notice that I have two PoKeys56U cards and one PoKeys57U card. Recently, Polabs replaced the 56U with the 57U. They seem to work identical to each other. On a side note, I attempted to use a PoKeys55 card but it was not compatible with the new software updates. So the results are a lot of the nagging issues I had are now gone. I still need to do some more testing and digging to see if I can find something that is not working properly, but the initial results are outstanding! Here are a couple photos of the third Pokeys card added into the mix: Last thoughts, we have been at this for a while now and this seems to be the best solution to handle the multiple issues at hand. I wanted to get this posted up in my build thread to share with other builders in an effort to help reduce future headaches! (Posted by Ron Rollo on 03-31-17) Recently, Jason Hite has developed a solution that will enable us to have two CDUs in our sims for dual FMS capabilities. The key item in this solution is the Arduino Nano card which is an incredible interface card for the money. It actually out performs the Hagstrom card at just a fraction of the cost! This has us all gearing up for dual CDU flight decks! Recently I obtained my second CDU: So far I have all the wiring complete and have done a back light test which passed: Here is a photo of the new Arduino Nano installed on the CDU backers. A little neater than the old Hagstrom solution we had: For more information on the CDU/FMS check out this thread HERE
(Posted by Ron Rollo on 09-07-14) I have been busy working on my sim and lots of parts for all you guys. I will be updating this sim thread in greater detail in a couple of weeks but for now, I wanted to let everyone know that I have finally came to that point where it is time to move on to three computers! I have pushed it as far as I think I can go and now the two computer set up is starting to show signs of lagging with all the programs that they are trying to run between the two of them. My plans are to add a third computer and move the four display units and possibly the CDU and related software over to the new second client or third computer. This will free up the first client and enable me to move some of the minor programs from the server computer to the first client computer. I have already specked out the second client. It will be a a very strong i3 much like the first client. This should be more than enough to run the four display units. After all, the first client which is also an i3 is currently running the four display units, two RMUs, three standby gauges all on three monitors, four if you count the instructor station LCD. For the most part, the first client has done very well with this massive load. One of my issues with moving to a third computer is space for it and the monitor. I know there are programs that enable us to share a single monitor between two or more computers but I like the idea of having a dedicated monitor for each computer. It makes things easier and a little less complicated when working on the software portion of the sim. I could look for a larger desk for the three monitors but instead I opted to go with adding a third monitor to my current set up. Side by side by side was not an option unless I down graded to three 15 inch 12 year old used monitors. So this is what I came up with: My second client LCD is stacked on top between the first client and server LCDs. I carefully measured out and designed what I call the Acer Triple Stack Support Backer: It is made of half inch Polly material (plastic) but the catch is that it was too large to cut with the CNC. I had to cut it out with standard power tools and with the help of my father on the finishing work on the edges, it looks like it belongs. In the photo above, the right is the Server. The bottom left is Client1 and on top of that is the new Client2. So far I have got Windows7 Pro SP1 on it, linked to the internet and Disk Defrag loaded up. I still need to network the computer to the other two and download Wide Client on it before I can start moving some programs onto it to divide the work load. My plan is to divide the ten programs that are currently running on Client1 to five each. The simplest way to do this is to move Jet45 AAS DU1,2,3,4 and the CDU screen to Client2. This will leave the Jet45 AAS RMU1,2 and the three standby gauges on Client1. Client2 is very similar in strength to Client1. They are both using i3 Intel processors, 8gb of ram and 1gb video cards. The real power and performance is found in the server. Hopefully in the next week I will be able to report back to you that the addition of this third computer has solved all my minor issues and has boosted the sims performance to stunning! I have made some updates to Poject45.us especially on the Technical Information Page. If your curious about what I am running on all three computers, check it out: http://www.project45.us/technical-information/ (Posted by Ron Rollo on 01-16-15) L45-002 reaches 100 hours of flight time and test flights on 01-16-2015: UPDATE: I got some big bad news! Last night I broke my Project45 L45-002 FSX sim to the point it can not be fixed. This sucks especially sense it was working very well with three computers and nearly everything running in it including a pre beta CDU by Flightdecksoft. But with all that said, there was not much more performance left to squeeze out of the current sim, meaning FSX. Now for the good news! I have been waiting for over two years to break the FSX sim to the point that it would require a clean start. It was a good run and I have learned and shared lots of invaluable information over the past three years without needing to do a clean install. Now that this time has come I am moving forward with Prepare3D 2.0. This is going to be an exciting time for me and everyone out there who is following this build and has had the opportunity to fly the FSX sim in the past and compare that to the new P3D sim to come. Hopefully I will be able to get the new sim up and running within a few weeks, we will see. At least I have 99% of the required hardware in place! So keep an eye out for Project45 L45-002 P3D 2.0 sim in the near future! (Posted by Mark Speechley on 02-19-15) Ron, perfect timing. All of us Prepar3d die-hards have to uninstall P3D 2.x in order to install the new Ver 2.5. All you are doing is catching up with the rest of us in one shot going straight to v2.5 ! You will be very happy with the upgrade, but I can tell you it will take weeks before you have it rocking and rolling esp. with regards to the P3d.cfg file ( just as it was with the FSX.cfg file) and it's settings. Everyone's settings are different due to the hardware differences however you might just find that the default just might work right out of the box. You'll need to re-download all the ORBX installers for P3Dv2 (assuming you have any) as well as the compulsory FSUIPC, and port your planes from FSX over to P3D. I personally found that the Estonia FSX to P3D conversion tool was a boon. Hence the weeks I was talking about in getting all setup again. Get ready for Ron the software guru instead of the hardware guru for awhile. (Posted by Ron Rollo on 02-19-15) Hey Mark, I have a few advantages in that I have been backing up programs and files for weeks now in case of something like this and I do not have much add on scenery to deal with. BUT, there are nearly 20 flight sim related programs that have to be installed, and that does not include scenery programs. I also have Greg Branch coming down to help out. All in all, I suspect it will take 72 hours of work to get it back up and running like it was but only better. But 72 hours could mean a month! I will keep you all posted and document my noteworthy changes if applicable. UPDATE: Quick update on the 2.0 progress. I was successful in pulling all my files, programs and setting off of the hard drives. A few days ago I pulled the plug on FSX (reformatted) and began the process of starting from scratch. A few key changes that I made from sim 1.0 to 2.0: 1. I decided to go with a single 1TB hard drive instead of having a separate 64GB SSD to boot up windows7. The problem I ran into with this is that windows takes up 75% of that drive all by itself. And then windows7 ends up growing or you (or your friends) accidentally put programs on that 64GB drive and before you know it, your operating within 95% of max storage and you end up with a blue screen. I discovered this problem two years ago and managed to keep the 64GB drive under 95%, but still, if your going to go this route, get at least 128GB SSD and leave a sticky note on your monitor to remind yourself to double check which drive your programs are going to. I may add a second 1TB drive as a RAID drive, (back up drive) 2. Moving from FSX to Prepar3D 2.5. (I am looking forward to playing around with this program in the next two days.) Greg Branch gave me a hand on getting it up and running. 3. We installed P3D on the C drive outside of the programs file folder and the programs file 86x folder. This will come into play when I get back to working with Airport Design Editor. ADE does not like it when FSX or P3D is in the 86x folder for some reason. 4. I will be gaining about 12 inches of vertical view on the screen system down at the bottom of the screen. Greg reminded me that the alignment points can be dragged to anywhere in the room, including off the screen and to the carpet if need be. There will be a few blank spots in the visual at the bottom of the screen but they are in the pilot's blind spots anyway. So as of this moment, I would say I am at about 30% getting the sim back up to where it was and then some. More updates shortly. UPDATE: I have been plugging away at bringing the sim back up on line with P3D 2.5 and dealing with some hard to fix issues. At this point in time, I estimate I am 60% complete. This is the current list of things that has me stuck or at least taking too much time to resolve: 1. I need to fix the warp loader for Fly Elise visual system. It works sometimes. 2. I need to configure the three outside views. Still need to read some tutorials on that. 3. RMUs are dropping off even after the priority on Client1-PC is over ridden to HIGH. 4. I'm having a hard time installing A2A (Accu Feel) which is an addon to help the way the Lear45 sounds. Same thing with Audio Environment which gives the bumps, sound of wind and tire screeches when landing. These are two programs that were meant for FSX but can work with P3D if you use the migrator or tweak the ddl file. List of improvements and changes over Project45 sim 1.0: 1. Got rid of the smaller 64GB OP system drive that caused blue screen issues 2. Proper naming of the computers and setting up a home sharing group 3. Ethernet connection via switch to internet router rather than USB wifi 4. It seems that I can move all my USBs that were plugged into two powered USBs into one now. 5. Got rid of the Aero themes that was taking up some graphics computing on all three computers 6. 12 inches more of vertical view on the screen system making increased field of view 7. The PTT should be working now using the same method as I did with the trim switches 8. The sticking START issue is resolved when restarting engines 9. Flaps now show 0, 8, 20 and 40 degrees on the Jet45 MFD 10. I added the PoKeys cards and was able to name them, P56U RMUs and P56U DUs 11. Dimming for the display units are smoother As far as P3D 2.5 goes? I know it is a better simulator than FSX but so far, none of the improvements listed above are in any way related to P3D. If I wanted to, I could apply these changes to my FSX sim! As a matter of fact P3D is hindering my efforts to set up a few key programs, but that it just me not being able to get around the learning curve. I am very much looking forward to getting these issues ironed out and unleashing P3D to see what it can do first hand over FSX! So hopefully here in a couple more weeks the sim will be up to at least 95% of what it was before and then some. More updates soon. UPDATE: Over the past two weeks I have been finding a little time to work on the software to my sim. I have had some ups and downs and as of this moment it seems that I am learning to tame this wild beast. Thanks to Shane for helping me out over the phone with a few of my key issues. Sometimes a problem just needs a fresh look from a different point of view. As of now I still need to tweak the visual system add my scenery programs and tweak the sim for overall performance. One thing that I wanted to share with everyone is "Cable Assignments" and management. A desk sim is not that big of a deal but when you have a full size sim, no matter the airframe, your going to have VGA cables, USB cables, audio cables etc. running all over the place. And when you would like to try to find a cable to locate a particular component it is much easier if they are labeled and documented. Below are my "Cable Assignments. Cable Assignments: Server-PC 1. VGA to Desktop LCD Monitor 2. DVI to TrippleHead2Go (3 Projectors) 3. Audio Line to Engine Speakers and Butt Kicker 4. USB to D-Link Powered Hub (Several Components) 1. USB to Engine Speakers 2. USB to Leo Bodnar Interface Card (TQ) 3. USB to SYS Interface Card (MIP) 4. USB to SYS Interface Card (Relay) 5. USB to Pokeys56U (Display Units) 6. USB to CDR Interface Card 5. USB to Arduino Card (Pressurization Window) 6. USB to SYS Interface Card (PEDESTAL) 7. USB to BU0836 (Flight Controls) 8. Mic to Audio Card (Blue Plug) 9. Head Phones to Audio Card (Green Plug) 10.USB to TrippleHead2Go Power Client1-PC 1. VGA to Desktop LCD Monitor 2. VGA to Center Portrait Mode LCD Monitor 3. VGA to DU1 & DU2 LCD Monitor 4. USB to Speakers Under Glare Shield 5. USB to Pokeys56U (RMUs) Client2-PC 1. VGA to Desktop LCD Monitor 2. VGA to FMS LCD Monitor 3. VGA to DU3 & DU4 LCD Monitor 4. USB to Speakers Under Glare Shield 5. USB to Hagstrom Interface Card (FMS) It is also a great idea to print out your Cable Assignments for quick reference: By the way, what you see here above is subject to change, just like it did today! What Shane and I are discovering is that if you haphazardly place a program or connect a hardware component up to a computer you might get results that at first glance looks good and seems to work. But after some testing, you might discover that a program or a hardware component works better and even prefers to be in a particular place compared to where it was prior. This is a process that will drive you nuts but hopefully between several of us that have their sims up and running can help out the new guys coming online. We are still learning what works well and what works best. It is an art in progress! Anyway, back to cable management: You can find one of these number tape tools at most hardware or auto parts stores. It is great for marking wires and hoses: The change I made today was moving the Pokeys56U card that handles the RMUs from the Server-PC to Client1-PC which is why you see a missing plug in the powered USB D-Link. I hope this info helps you with your sim project! (Posted by Shane Barnes on 08-11-15) Yep, good advice! We have made a lot of progress on our sims the last few weeks. In fact, helping Ron sort out some of his issues helped me sort out some of mine. Glad we got some of that worked out! Seemed for awhile there we both were taking one step forward and about three backward! (Posted by Ron Rollo on 08-23-15) I do lots of test flying. If everything feels and looks good, I save it, but only after setting everything back to cold and dark and having the airplane in it's prime parking spot at that particular airport. When it comes to the perfect saved flight, the visuals are the thing to be looking at. If you get the visuals squared away, (for those of you using three screens & projectors, or three big LCD TVs) you will know what I am talking about. Once you get the visuals perfect, you will want to piggy back off of that saved flight to create other saved flights by selecting "Go To Airport" and over writing the other saved flights that you may have. This way your perfect visuals are saved at all your favorites or saved flights. (Posted by Mark Speechley on 08-23-15) And to add to Ron's advice. Cold and dark should do the trick however if you just save at engine idle make sure your 2D cockpit looks in order eg FGC button lights as well as make sure you have no mismatch between hardware LED's on and the 2D equivalent off. You should only have to do this occasionally and make sure it is saved as default. I was really raising this as a potential issue as the possible cause of the intermittent generator lights. I have loaded different saved flights and have had different instrument setups load up. If it is right for a few of us at least, we won't have to go searching for a hardware fix. (Posted by Ron Rollo on 12-03-15) Shane and I have been doing some talking back and forth in an effort to reduce bugs and glitches in the sim. One thing that we came up with is adding a third PoKeys56U card for the RMUs and DUs. So what I came up with is this: Server-PC PoKeys56U card handles all the buttons and encoders on the four Display Units. This is a total of six encoders. Client1-PC PoKeys56U card handles all the buttons and the two encoders on RMU1. In addition, this card handles three encoders from the FGC, CRS1, HDG and VS/SPD encoders. This is a total of five encoders. Client2-PC PoKeys57U card handles all the buttons and the two encoders on RMU2. In addition, this card handles two encoders from the FGC, ALT and CRS2. Last but not least, this card handles the encoder on the standby altimeter. This is a total of five encoders. What this does is divide up the work load of the encoders near perfectly and eliminates the need for Mark's RMU Utility. (Not that there was anything wrong with Mark's utility, but in order to insure that the testing that I am doing for Jason is as clean as possible, I had to put it aside.) I also took out the encoder debounce circuit that I made last year. All in an effort to clean up the signal flow. By the way, when I did the testing with and without the debounce circuit, I could not tell a noticeable deference one way or the other. You will also notice that I have two PoKeys56U cards and one PoKeys57U card. Recently, Polabs replaced the 56U with the 57U. They seem to work identical to each other. On a side note, I attempted to use a PoKeys55 card but it was not compatible with the new software updates. So the results are a lot of the nagging issues I had are now gone. I still need to do some more testing and digging to see if I can find something that is not working properly, but the initial results are outstanding! Here are a couple photos of the third Pokeys card added into the mix: Last thoughts, we have been at this for a while now and this seems to be the best solution to handle the multiple issues at hand. I wanted to get this posted up in my build thread to share with other builders in an effort to help reduce future headaches! (Posted by Ron Rollo on 03-31-17) Recently, Jason Hite has developed a solution that will enable us to have two CDUs in our sims for dual FMS capabilities. The key item in this solution is the Arduino Nano card which is an incredible interface card for the money. It actually out performs the Hagstrom card at just a fraction of the cost! This has us all gearing up for dual CDU flight decks! Recently I obtained my second CDU: So far I have all the wiring complete and have done a back light test which passed: Here is a photo of the new Arduino Nano installed on the CDU backers. A little neater than the old Hagstrom solution we had: For more information on the CDU/FMS check out this thread HERE
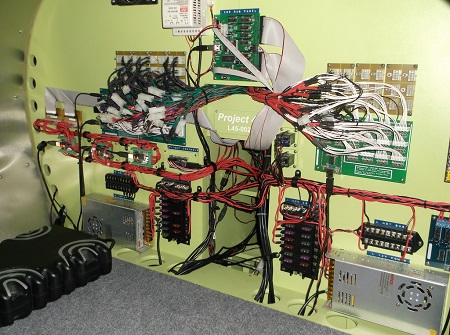
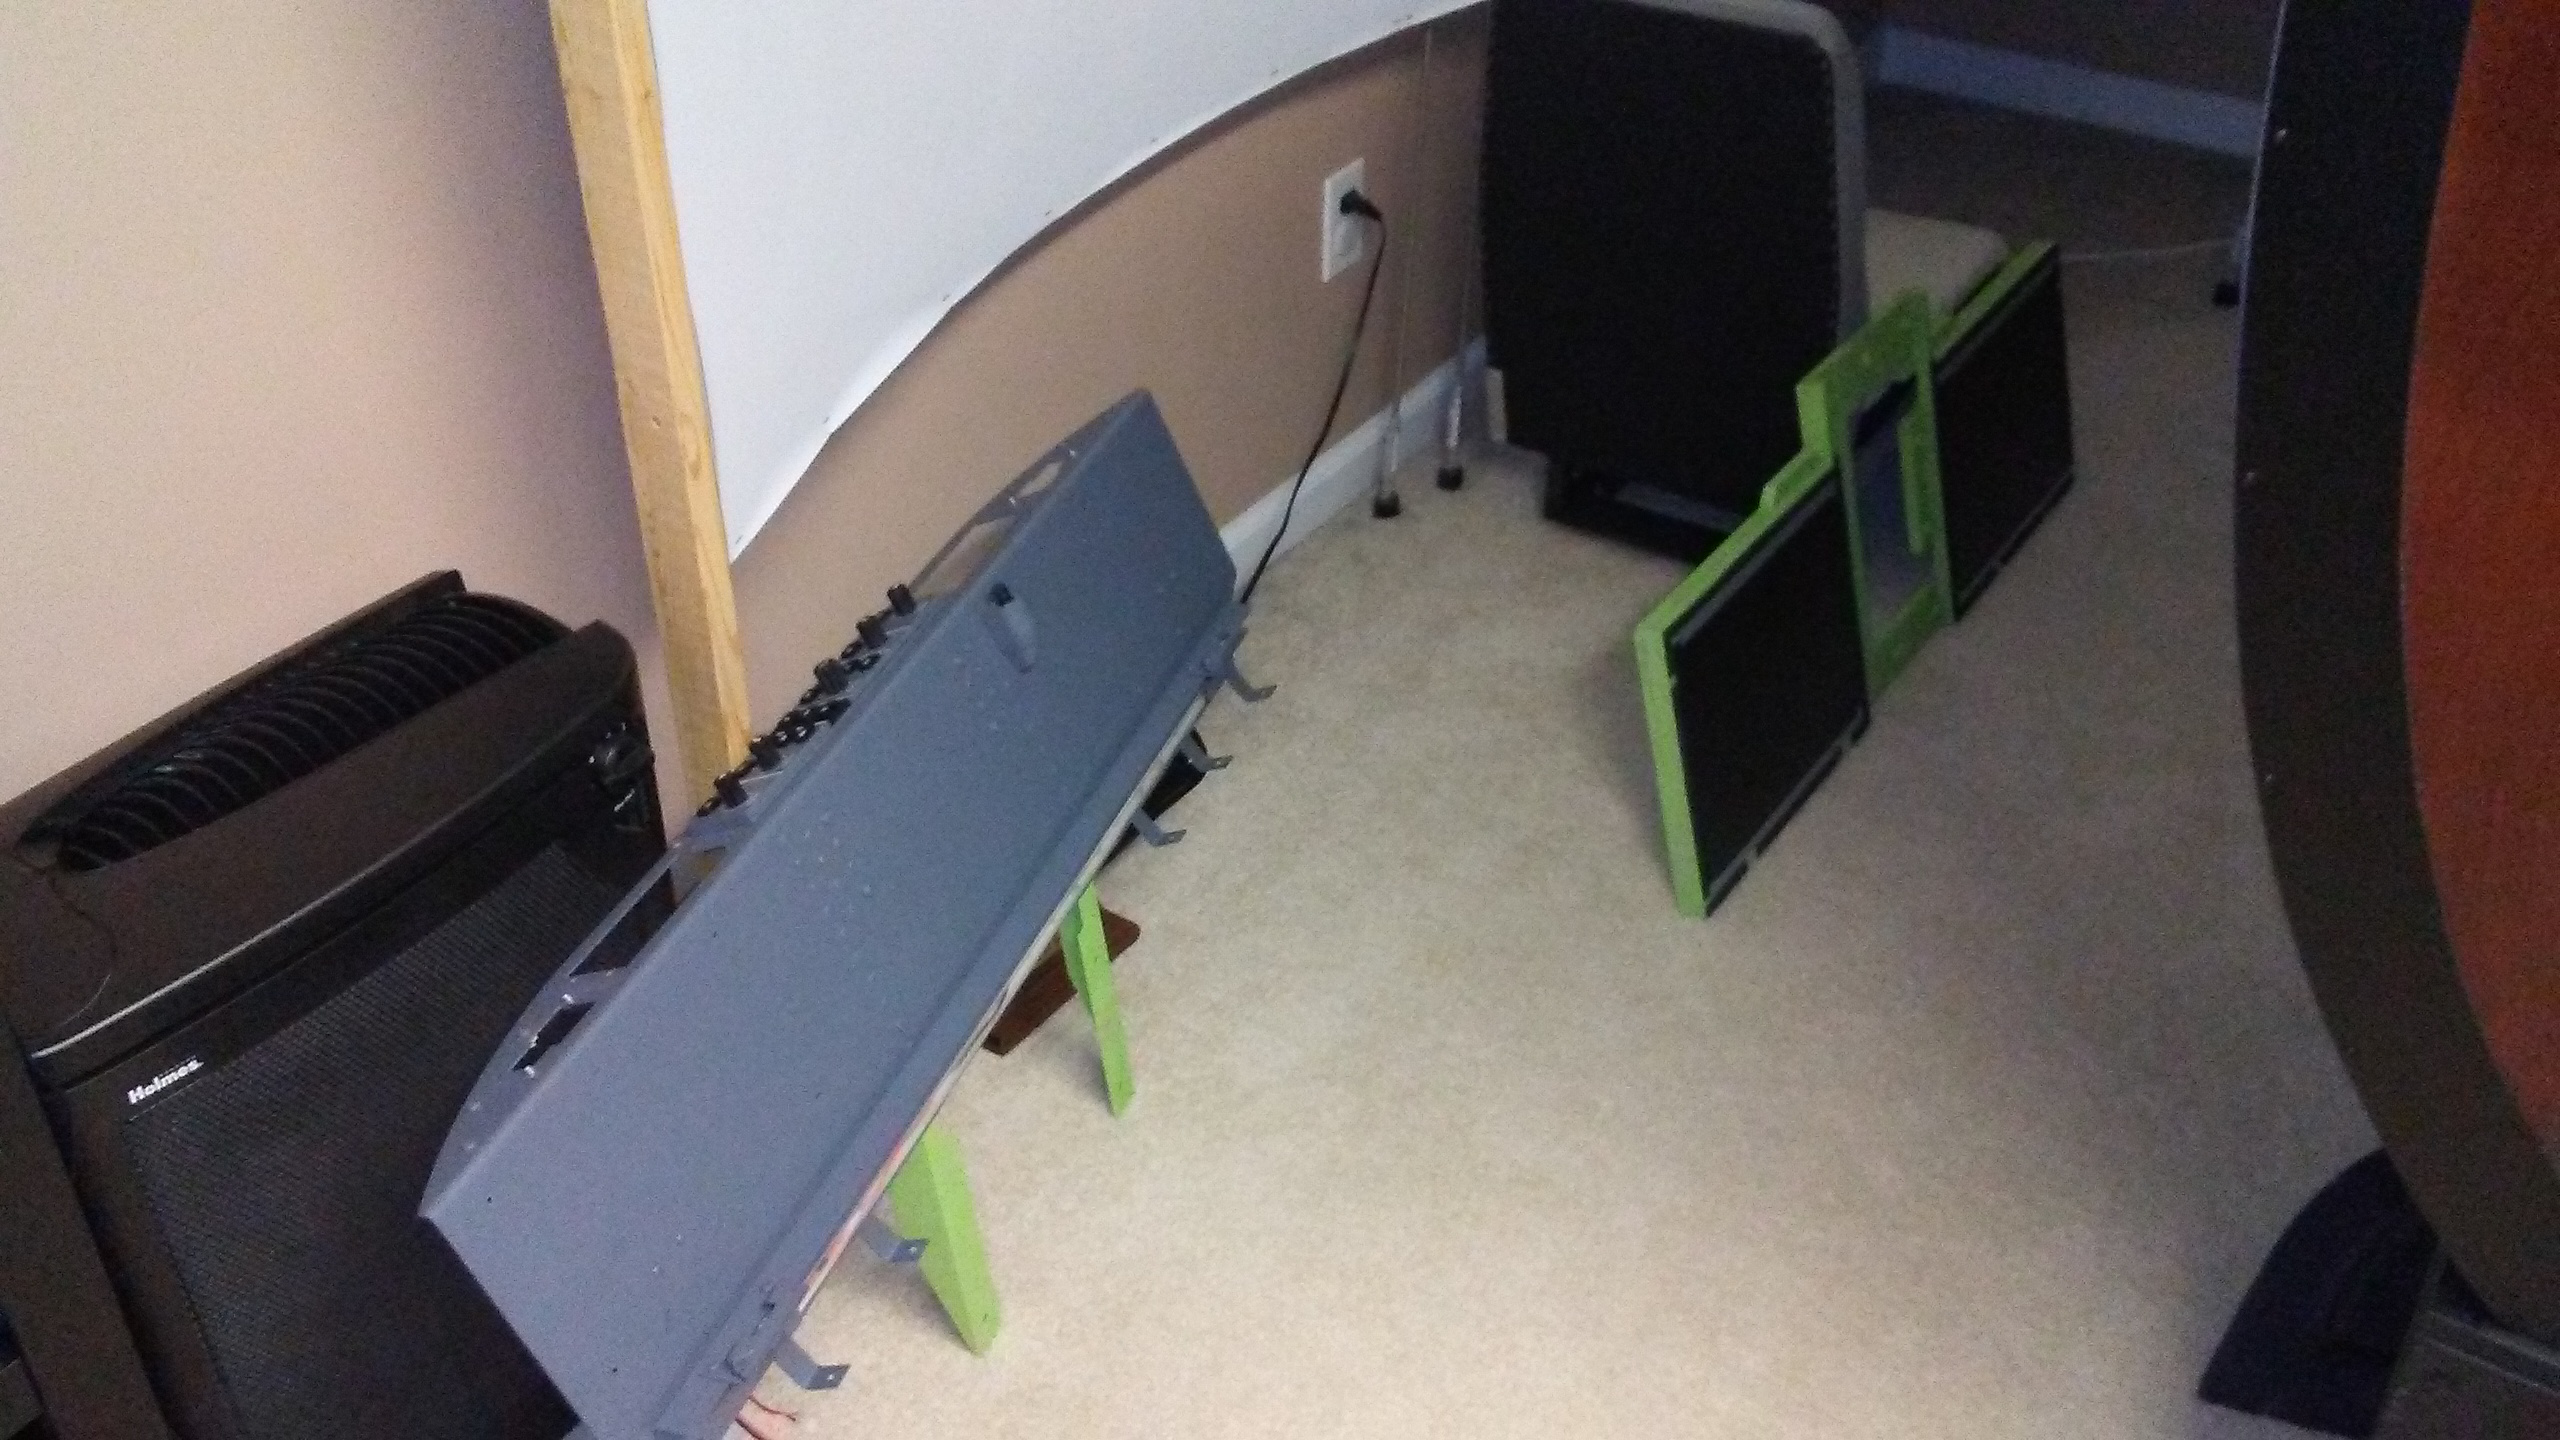
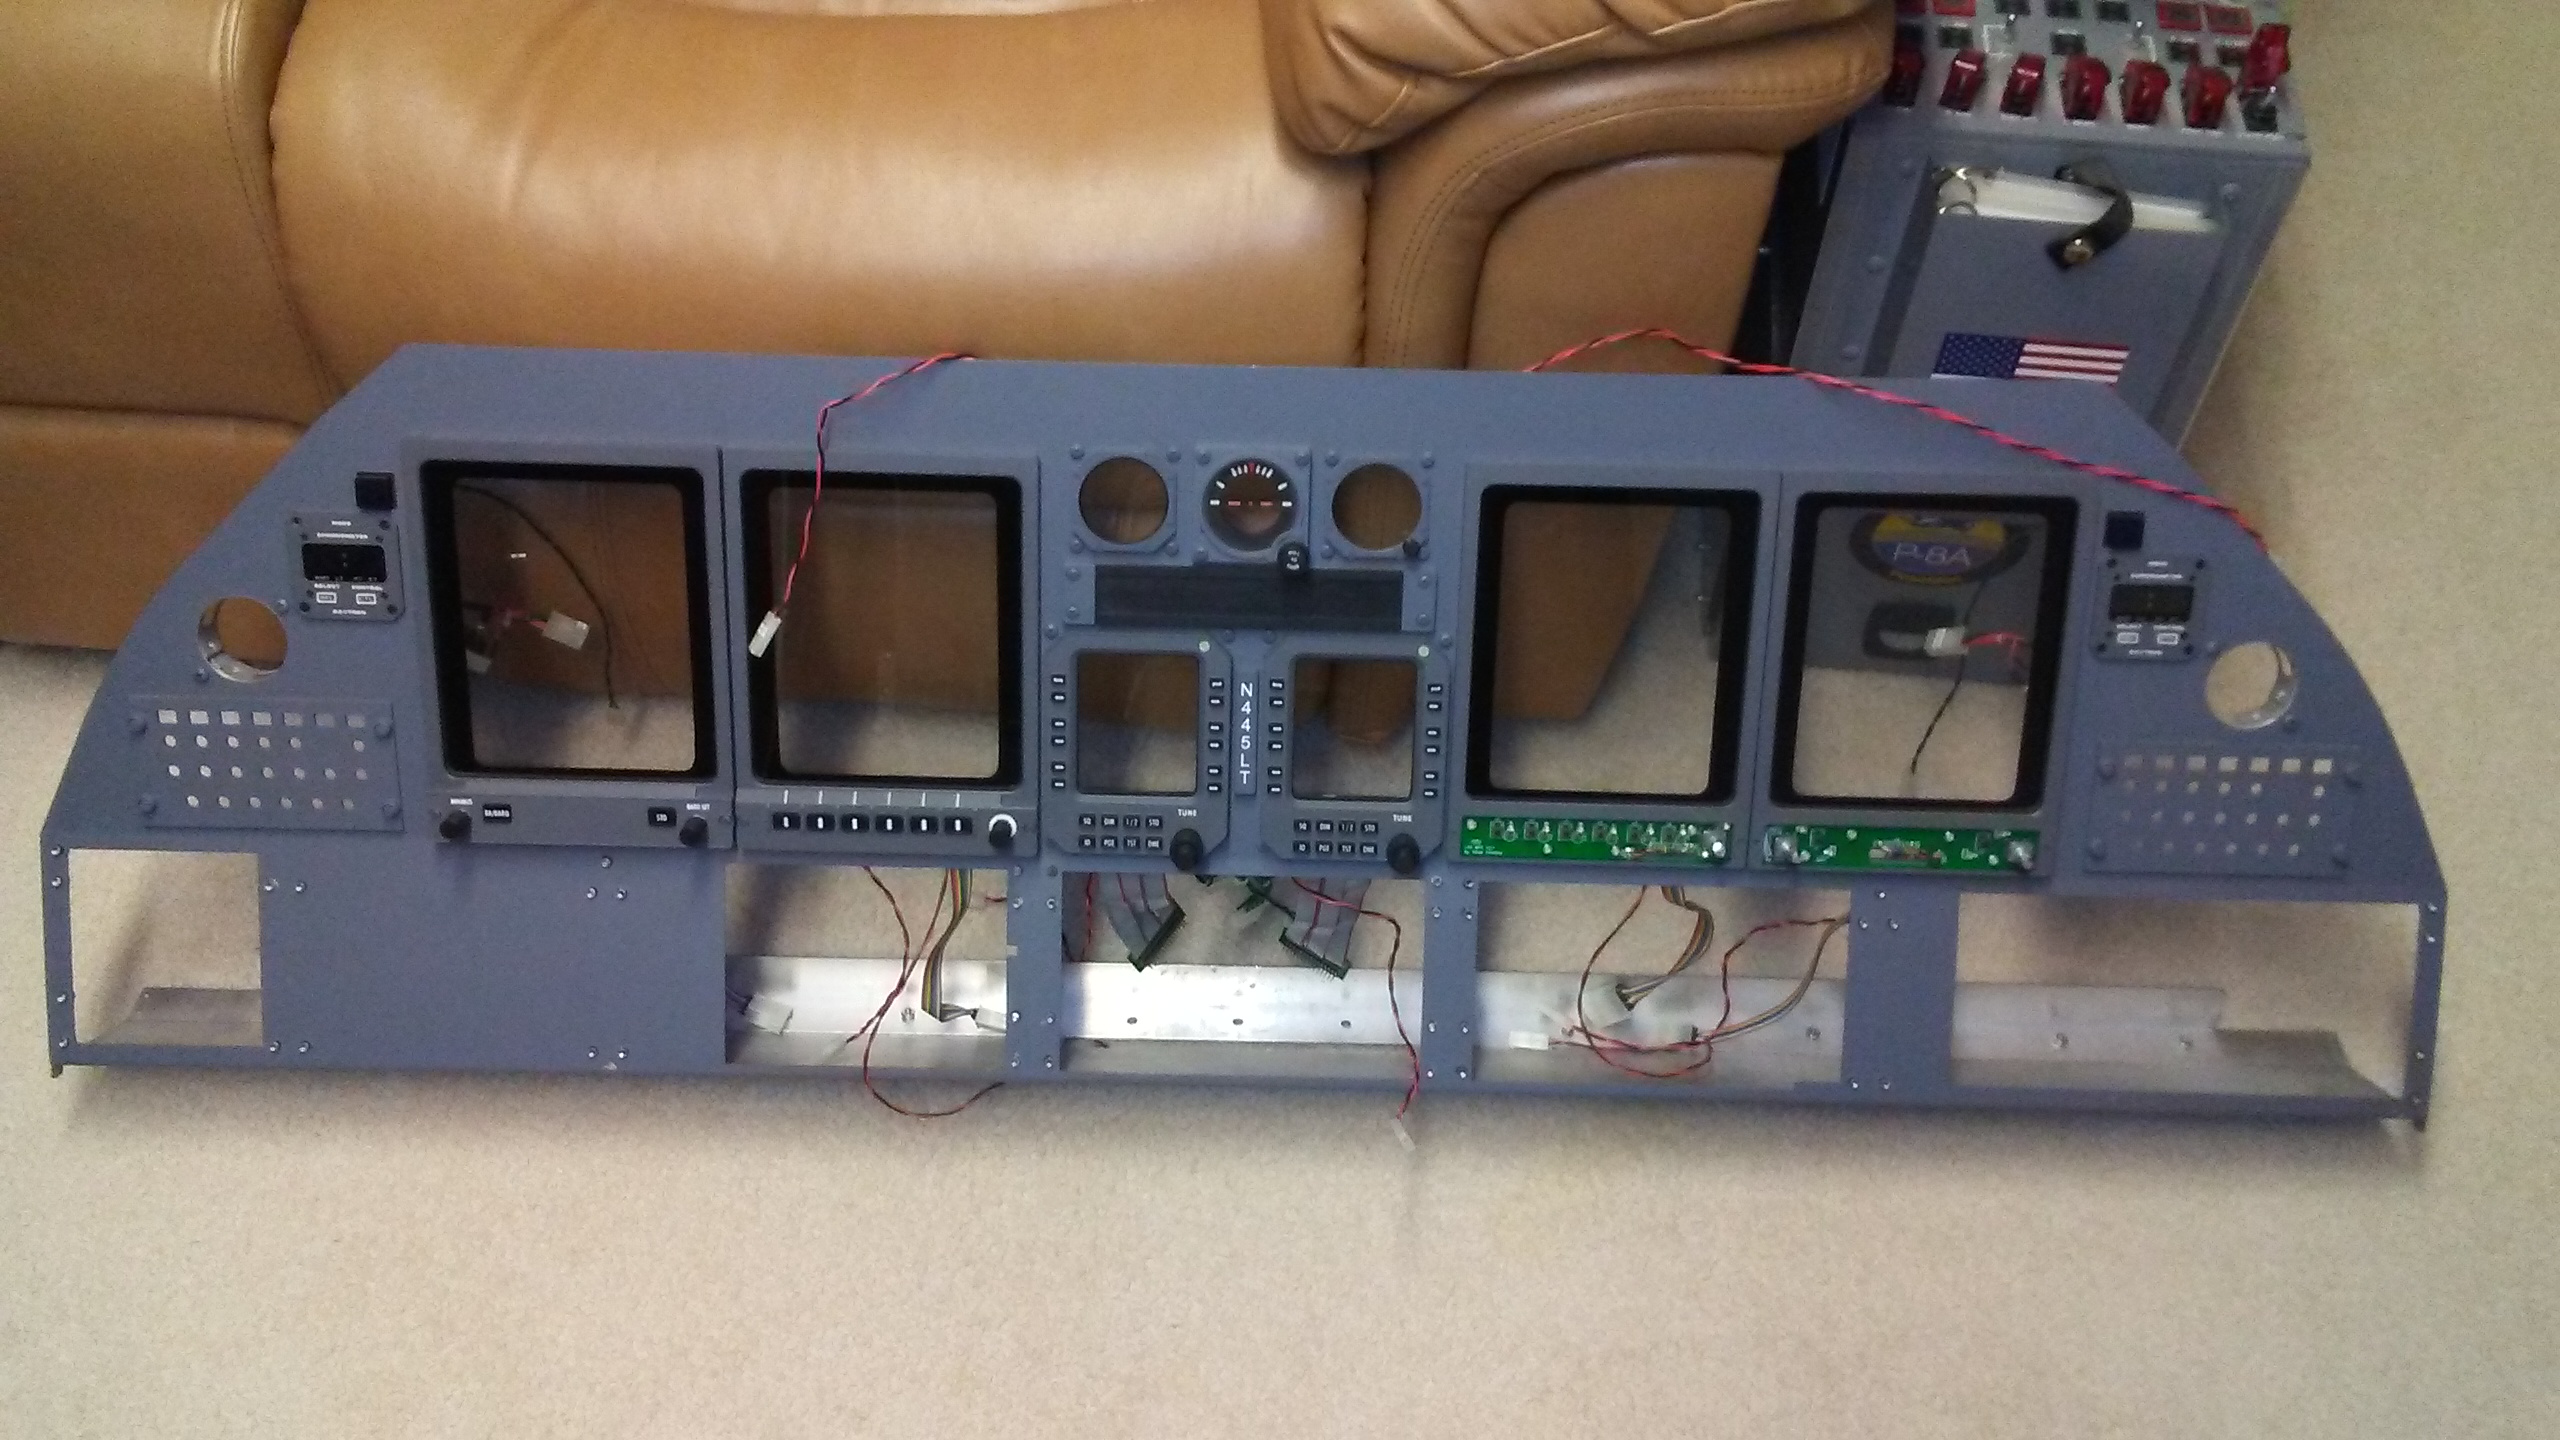
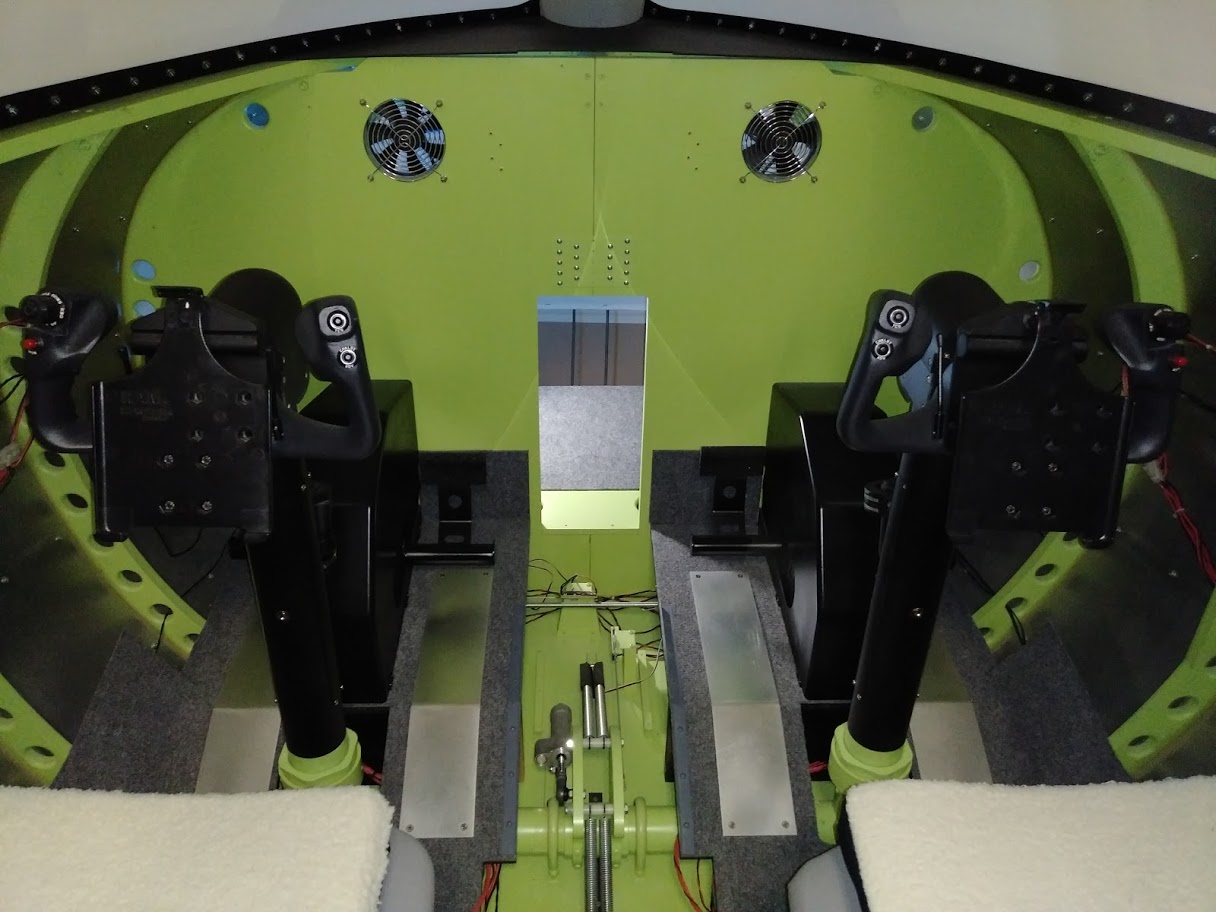
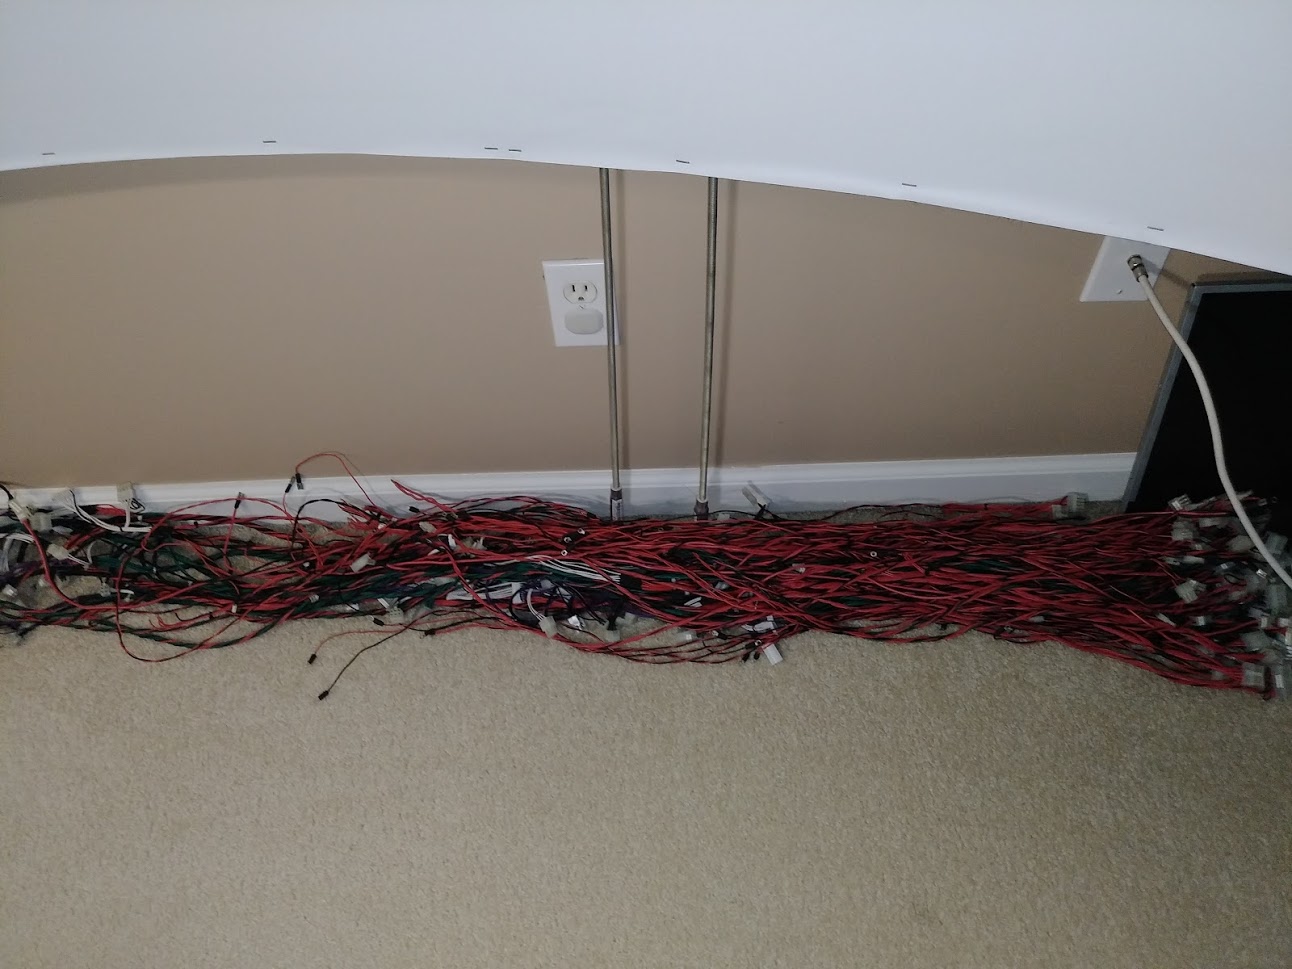
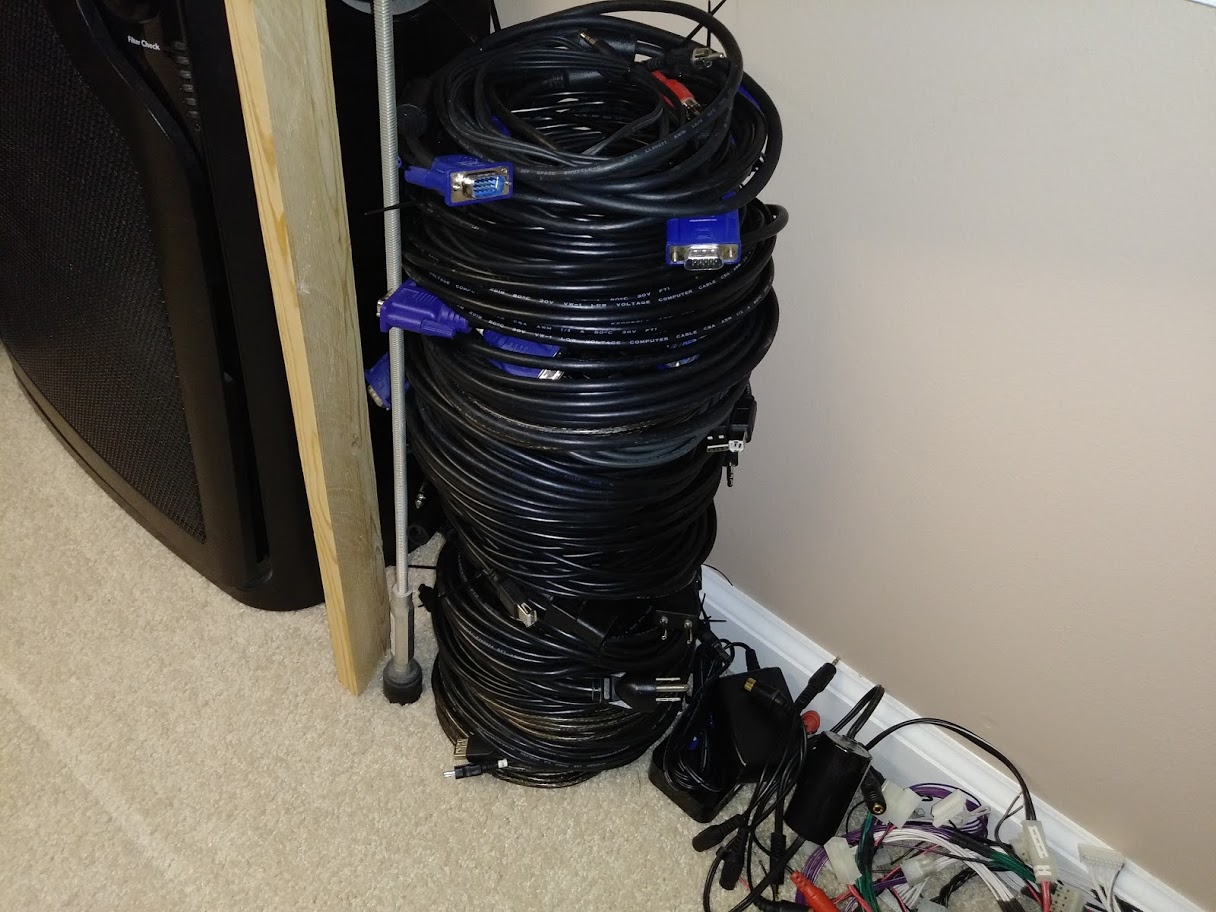
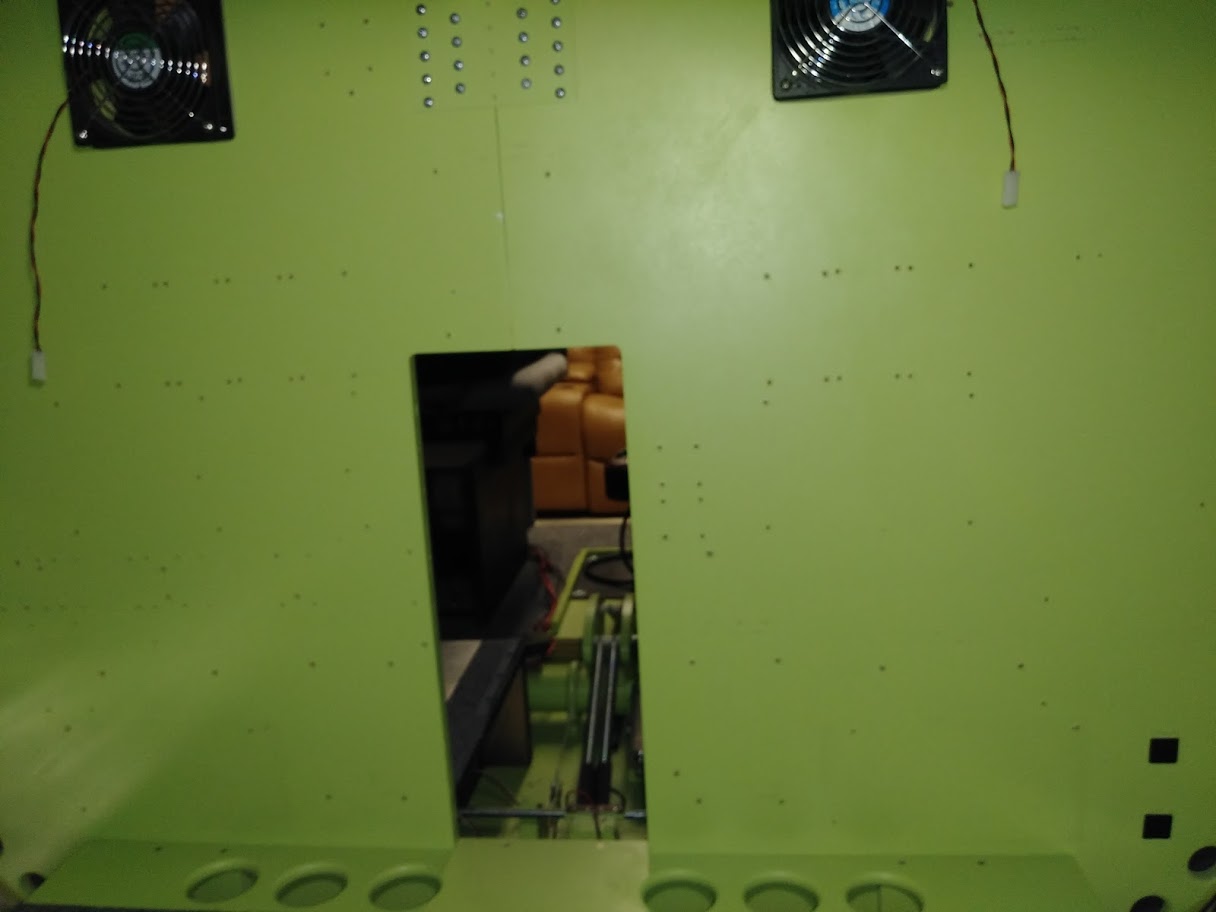
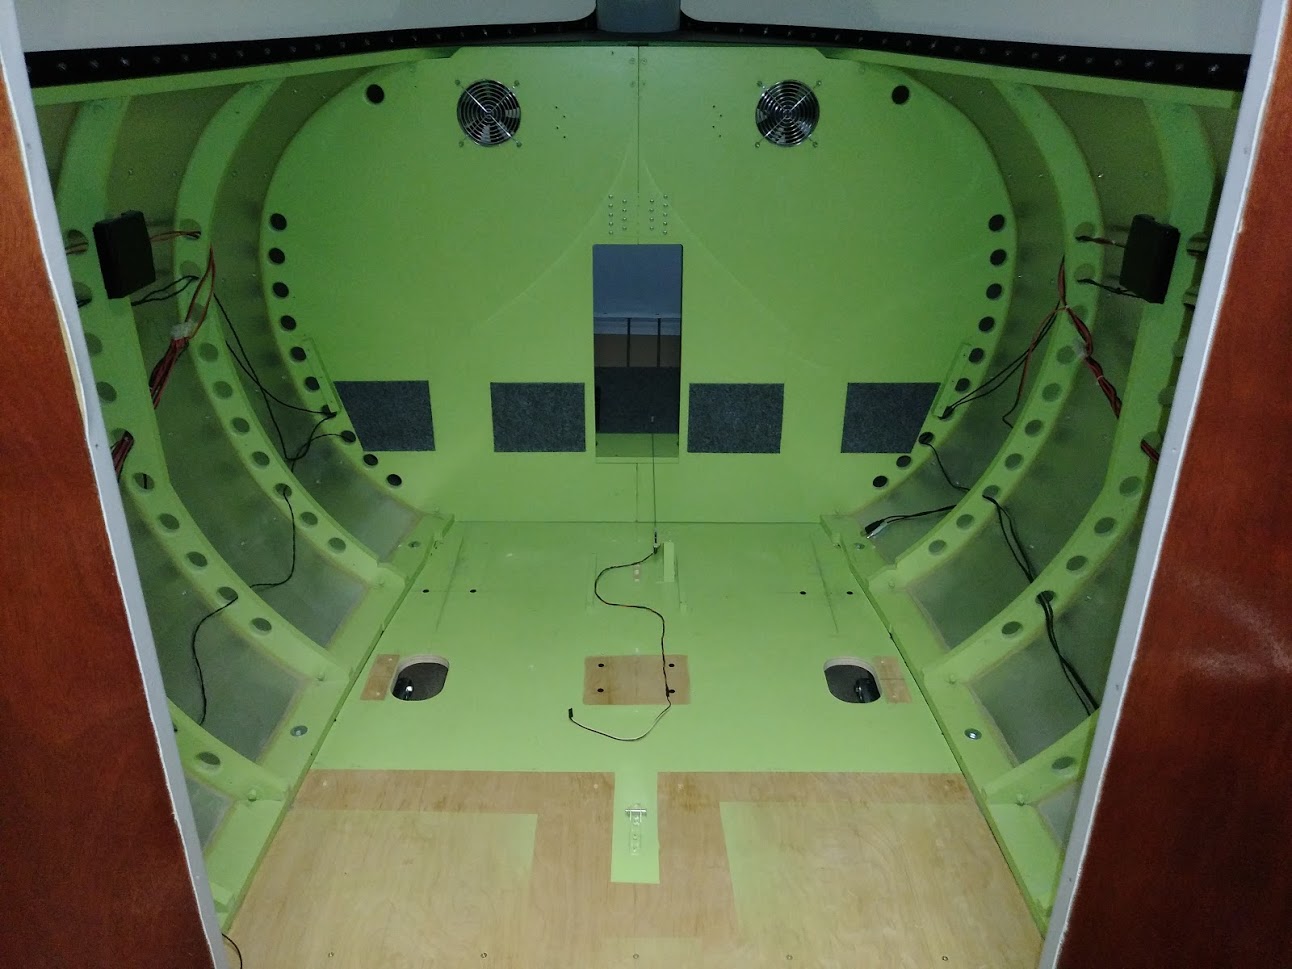
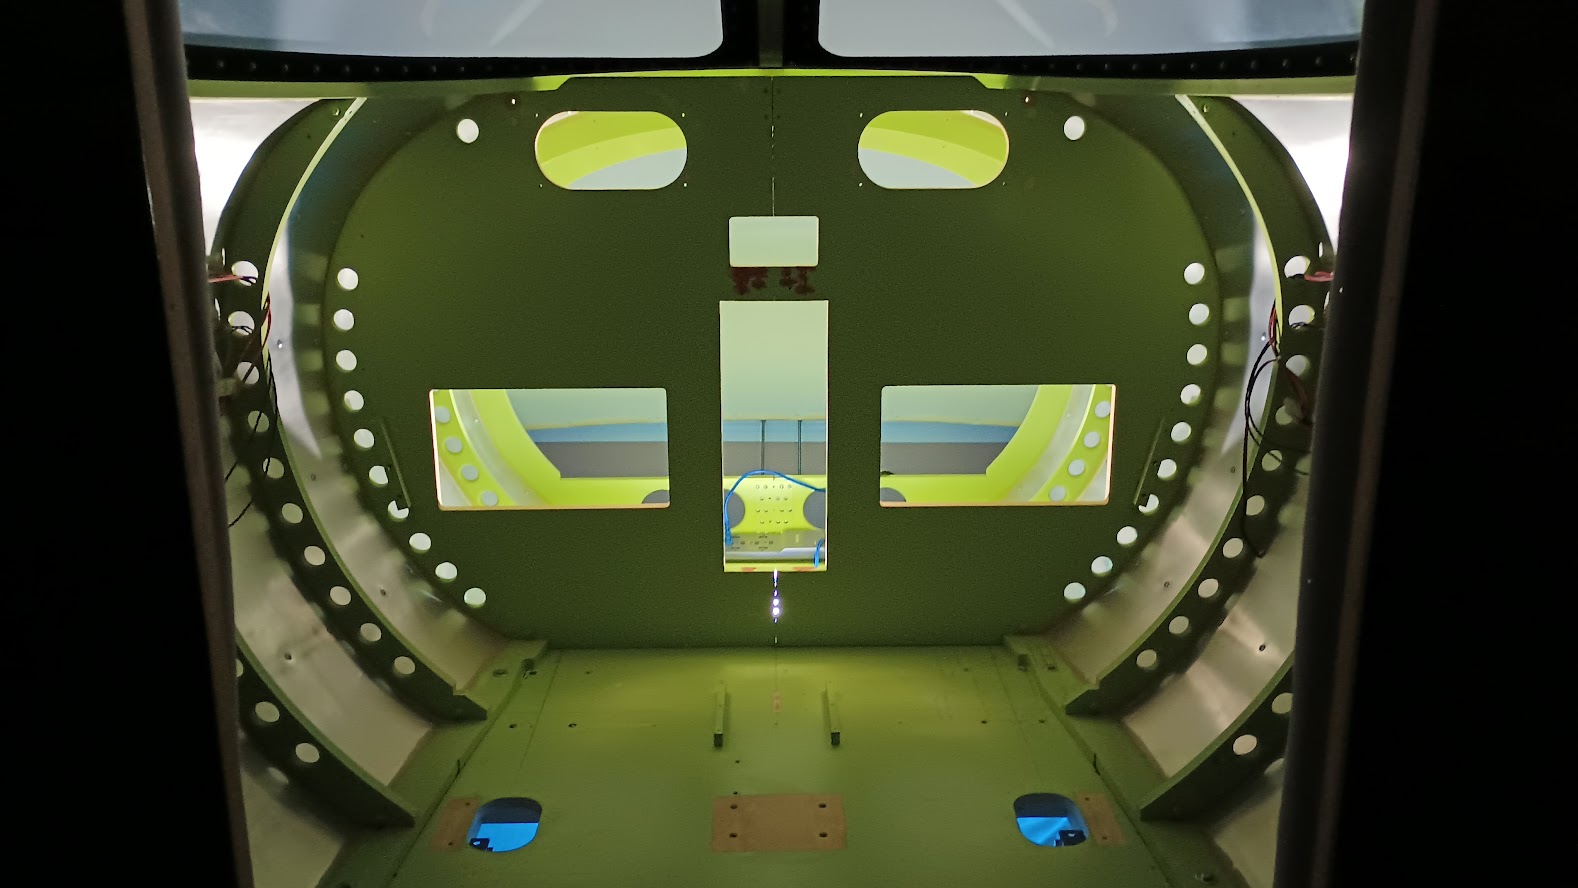
Hey guys, it has been several months since I have updated my build thread. I have certainly been active working on the project and making parts for other members but my sim has not been started up in over six months. Additionally, Prepar3D has updated to version 4 and beyond where I was still running v2.4. So this is a perfect opportunity for me to do deep modifications to the sim which requires me to remove the MIP, the MIP backer and even the MIP tower! Over the past several years I have learned a lot about flight simulation and have implemented new ways to do things in other folk's builds along the way and now it is time to update my own sim. Here are a few photos of my sim taken down: This photo shows all the panels sitting on a table waiting to go back in: The glareshield and the MIP backer pulled out: Last but not least, the MIP: I will more than likely also rewire everything so that the grounds are bundled at the back of the panels rather than in the avionics bay using the grounding terminals. This will reduce the about of wires in a wiring harness. As I update things along the way I will post them here. Hey guys, it has been several months since I have updated my build thread. I have certainly been active working on the project and making parts for other members but my sim has not been started up in over six months. Additionally, Prepar3D has updated to version 4 and beyond where I was still running v2.4. So this is a perfect opportunity for me to do deep modifications to the sim which requires me to remove the MIP, the MIP backer and even the MIP tower! Over the past several years I have learned a lot about flight simulation and have implemented new ways to do things in other folk's builds along the way and now it is time to update my own sim. Here are a few photos of my sim taken down: This photo shows all the panels sitting on a table waiting to go back in: The glareshield and the MIP backer pulled out: Last but not least, the MIP: I will more than likely also rewire everything so that the grounds are bundled at the back of the panels rather than in the avionics bay using the grounding terminals. This will reduce the about of wires in a wiring harness. As I update things along the way I will post them here. Hey guys, It has been almost 3 years since I have had a chance to update this thread. More like three years since I have had time to do any meaningful work to my sim. (That is not to say I have not been working on my sim by the way.) We have all heard of the old saying, "Sometimes you have to take two steps back to move one step forward". Well that is where I am with my build and if YOU have a fully operational sim, call it v1.0, you might find yourself following this path! Jason Hite has been developing his new Jet45 AAS v2.0 software which uses Arduino Interface cards exclusively while at the same time, I have been helping develop a Master Interface Plan to work hand in hand with Jason's Software. The end results will be nothing less than stunning, but in order to get there for anyone who has a functional Lear45 v1.0 sim, you will find yourself rewiring 98% of your sim. For the guys who have not yet started their builds, this new path forward will be a cake walk paved with painted lines! And this is why I have not been working on my sim in three years. We wanted to take the time to develop a purposeful plan forward unlike what we did the first time around. The first Lear45 sim is full of good ideas but also has a lot of areas where we had to improvise on the fly to make something work. That is not going to be the case moving forward with v2.0. Everything is being well thought through, checked, double checked and prototyped. There is no doubt that there will be a surprise here or there, but far and few between. Over the years we have all learned what works well and what ended up being the best bad idea we had at the time. The list of items is too long to mention them all now but I will as I get to them. With Jason developing his new software, this was the perfect opportunity to rework and update other areas of the sim that are more hardware oriented. It was three years ago when I started pulling things out of the shell and honestly, back then I did not see myself going as deep as I am going to end up going. Take a look at some of these photos: Clean as a whistle! I needed to get the TQ pedestal out to make a couple minor updates to it and in order to do that, I had to pull almost EVERYTHING out. I went ahead and pulled all the wires and cables out because they will need to be reworked. 85% of the USB cables will need to be changes out because the old ones are Mini USB where the Arduinos require Micro USB. This is what 98% of all the wiring looks like when laid out in a neat pile. Feels like a miles worth but probably more like a 1/8 mile. The ratty looking ends where I was hooking into DFS SYS cards on the left will be removed and replaced with TE Connectivity plugs. No more need to follow the FDS SYS eight to one common ground rule anymore. Speaking of numbers, this is a two foot tall stack of cables. It includes, USB, power, VGA, audio, etc.. I was surprised to see so many cables! The new sim will have just as many if not a few more cables because there are as many as 19 Arduino Modules! Sorry for the poor picture but I think you get the picture! It was like a sim blow out sale, Everything must go! If you refer back in this thread, you will see that my Avionics Bay was filled with FDS SYS Interface cards, a FDS Relay card, Grounding terminals, Pokeys56U cards, a Ruscool CDR control module, power supplies, hot buses, essential buses, lighting terminals, etc... Most all of this is being replaced and it's easier to mention what I will be recycling: The two 12 volt power supplies and one Leo Bodnar BU0836A card. I will say this, it was sad to have to take all this apart and a little scary! A lot of work went into my first rendition of the Lear45 project and at times while pulling it apart, I felt some anxiety. But in order to take my sim to the next level, this is what is necessary to get there. As I said before, "Sometimes you have to take two steps back to move one step forward." Hey guys, It has been almost 3 years since I have had a chance to update this thread. More like three years since I have had time to do any meaningful work to my sim. (That is not to say I have not been working on my sim by the way.) We have all heard of the old saying, "Sometimes you have to take two steps back to move one step forward". Well that is where I am with my build and if YOU have a fully operational sim, call it v1.0, you might find yourself following this path! Jason Hite has been developing his new Jet45 AAS v2.0 software which uses Arduino Interface cards exclusively while at the same time, I have been helping develop a Master Interface Plan to work hand in hand with Jason's Software. The end results will be nothing less than stunning, but in order to get there for anyone who has a functional Lear45 v1.0 sim, you will find yourself rewiring 98% of your sim. For the guys who have not yet started their builds, this new path forward will be a cake walk paved with painted lines! And this is why I have not been working on my sim in three years. We wanted to take the time to develop a purposeful plan forward unlike what we did the first time around. The first Lear45 sim is full of good ideas but also has a lot of areas where we had to improvise on the fly to make something work. That is not going to be the case moving forward with v2.0. Everything is being well thought through, checked, double checked and prototyped. There is no doubt that there will be a surprise here or there, but far and few between. Over the years we have all learned what works well and what ended up being the best bad idea we had at the time. The list of items is too long to mention them all now but I will as I get to them. With Jason developing his new software, this was the perfect opportunity to rework and update other areas of the sim that are more hardware oriented. It was three years ago when I started pulling things out of the shell and honestly, back then I did not see myself going as deep as I am going to end up going. Take a look at some of these photos: Clean as a whistle! I needed to get the TQ pedestal out to make a couple minor updates to it and in order to do that, I had to pull almost EVERYTHING out. I went ahead and pulled all the wires and cables out because they will need to be reworked. 85% of the USB cables will need to be changes out because the old ones are Mini USB where the Arduinos require Micro USB. This is what 98% of all the wiring looks like when laid out in a neat pile. Feels like a miles worth but probably more like a 1/8 mile. The ratty looking ends where I was hooking into DFS SYS cards on the left will be removed and replaced with TE Connectivity plugs. No more need to follow the FDS SYS eight to one common ground rule anymore. Speaking of numbers, this is a two foot tall stack of cables. It includes, USB, power, VGA, audio, etc.. I was surprised to see so many cables! The new sim will have just as many if not a few more cables because there are as many as 19 Arduino Modules! Sorry for the poor picture but I think you get the picture! It was like a sim blow out sale, Everything must go! If you refer back in this thread, you will see that my Avionics Bay was filled with FDS SYS Interface cards, a FDS Relay card, Grounding terminals, Pokeys56U cards, a Ruscool CDR control module, power supplies, hot buses, essential buses, lighting terminals, etc... Most all of this is being replaced and it's easier to mention what I will be recycling: The two 12 volt power supplies and one Leo Bodnar BU0836A card. I will say this, it was sad to have to take all this apart and a little scary! A lot of work went into my first rendition of the Lear45 project and at times while pulling it apart, I felt some anxiety. But in order to take my sim to the next level, this is what is necessary to get there. As I said before, "Sometimes you have to take two steps back to move one step forward." Wow we are about at the same level now of cabling ... LOL Wow we are about at the same level now of cabling ... LOL It's official. L45-002 v1.0 is in the books and the path has been cleared for the new L45-002 v2.0! As stated in the previous post, we have put a tremendous amount of thought and planning into the new Lear45 sim. Nearly everything will be reworked to some degree and all for the better. Everything will be as close to scale as possible, more detail if it was lacking prior and a lot more functionality in both mechanical hardware and with the new Jet45 software! So let this photo below be the new starting point of L45-002 v2.0. As you can see, everything has been removed that is receiving an upgrade. It is easier to mention what is not getting touched. And that single item is the pitch pot tower and linkage rod in the middle of the deck! As progress unfolds, I will update this build thread with the highlights and update the more specific build threads with all the steamy details and photos! It's official. L45-002 v1.0 is in the books and the path has been cleared for the new L45-002 v2.0! As stated in the previous post, we have put a tremendous amount of thought and planning into the new Lear45 sim. Nearly everything will be reworked to some degree and all for the better. Everything will be as close to scale as possible, more detail if it was lacking prior and a lot more functionality in both mechanical hardware and with the new Jet45 software! So let this photo below be the new starting point of L45-002 v2.0. As you can see, everything has been removed that is receiving an upgrade. It is easier to mention what is not getting touched. And that single item is the pitch pot tower and linkage rod in the middle of the deck! As progress unfolds, I will update this build thread with the highlights and update the more specific build threads with all the steamy details and photos! L45-002 V2.0 I thought I would take a minute and update you on where I am on the transformation of my simulator from v1.0 to v2.0. Back on April 2nd 2021, I thought I was at rock bottom in reference to removing everything for the upgrades. As it turns out, I had a little more "digging" to do! This photo truly shows L45-002 completely stripped with a couple modifications made to F3, the main bulkhead. Over the past two years, we have come up with better ideas for the new Dual Rudder Pedal System, ventilation system, wire management and a host of other items. Prior to installing anything, several modifications needed to be made to F3 while it is easy to access. Here you can see where the Pedal Access ports have been made along with the Dual Avionics fan openings. Additionally, I have a small Service panel opening in the top center above the main tunnel opening. (More details on these items once they are installed.) Now that I have 98% of the dirty and dusty stuff done, I am in the process of doing final sanding and paint touch up. It's getting exciting, especially since this time around we have a solid plan forward. More updates soon! L45-002 V2.0 I thought I would take a minute and update you on where I am on the transformation of my simulator from v1.0 to v2.0. Back on April 2nd 2021, I thought I was at rock bottom in reference to removing everything for the upgrades. As it turns out, I had a little more "digging" to do! This photo truly shows L45-002 completely stripped with a couple modifications made to F3, the main bulkhead. Over the past two years, we have come up with better ideas for the new Dual Rudder Pedal System, ventilation system, wire management and a host of other items. Prior to installing anything, several modifications needed to be made to F3 while it is easy to access. Here you can see where the Pedal Access ports have been made along with the Dual Avionics fan openings. Additionally, I have a small Service panel opening in the top center above the main tunnel opening. (More details on these items once they are installed.) Now that I have 98% of the dirty and dusty stuff done, I am in the process of doing final sanding and paint touch up. It's getting exciting, especially since this time around we have a solid plan forward. More updates soon!Project45 Flagship L45-002 Simulator!
![]()
![]()


![]()

![]()
![]()
Well, this is why i like this whole Sim buiding...it is never finished.
I am curious about your new setup.
Well, this is why i like this whole Sim buiding...it is never finished.
I am curious about your new setup.![]()
![]()
2017-10-10