


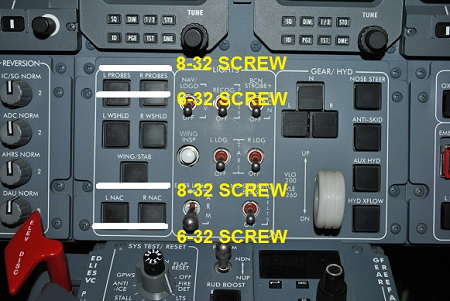
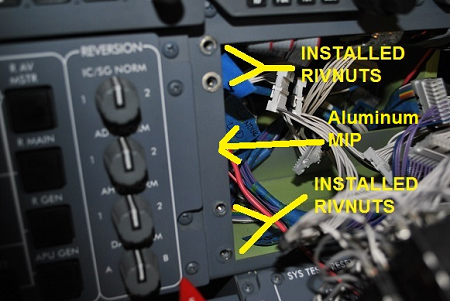
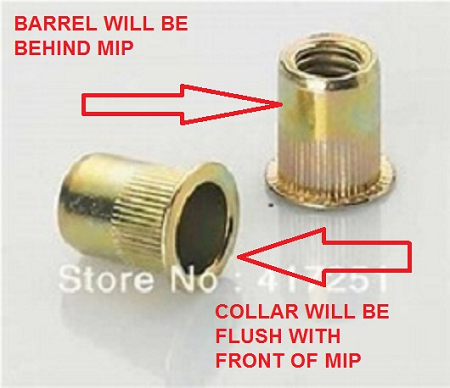
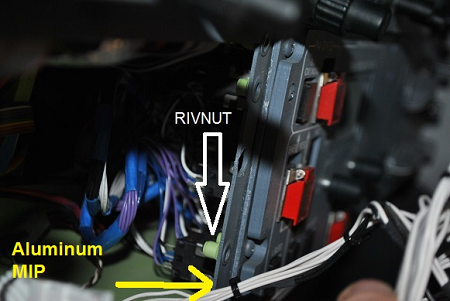
Normal false EN-US /* Style Definitions */ Hi guys, I have created a tutorial as we have several members starting to populate their MIP’s with panels. We have several panels that mechanically attach to the MIP by way of 6-32 and 8-32 screws. You can find the correct screws at McMaster Carr. Here are the links to the screws: Additionally, we have other components that attach to the MIP with screws as well such as the Davtron clocks and the Angle of Attack Indicator but we will talk about those at another time. The best time to install the Rivnuts is before you install the MIP inside your shell. Right now we are concerned with the lower MIP panels including the Left Crew Light Panel, the Weights panel, the Electrical Panel, the Landing Panel, the Environmental Panel, the Right Crew Light Panel, the two EFIS panels, and the two Reversion panels located on the upper MIP. These panels can be attached to the MIP using 6-32 threaded and 8-32 threaded Rivnuts. These are also known as a blind rivet nut or threaded insert. A tool is needed to install the Rivnut. When selecting the Rivnut you need to know the panel thickness (The thickness of the MIP) .020 - .080 to select the proper Rivnut. Also you want to select a Rivnut that has ribs to prevent the Rivnut from spinning in the hole once it has been installed and a zinc plated steel Rivnut to prevent stripping of the threads that you may encounter using an aluminum nut. Here is a photo of the Rivnut. Notice the ribs on the barrel of the nut and on the underside of the collar to prevent turning of the nut: The 6-32 Rivnut description you need is: 6-32 x .020 -.080 grip length 17/64 hole size rivet-nuts in zinc-plated steel The 8-32 Rivnut description you need is: 8-32 x .020 -.080 grip length 17/64 hole size rivet-nuts in zinc-plated steel You will also need an installation tool. Here is an Ebay link to the tool: I have also added a link on how to use the Rivet Tool. There are numerous videos on the Internet explaining how to use the tool so if you need more info remember the Internet is your friend . . . As for the screws needed, most of the screws 6-32 or 8-32 need to be at least ½ inches in length. I found a few panels required a ¾ inch length screw. This all depends on panel thickness, backer panel thickness, and the thickness of the collar of the Rivnut. So don’t be surprised if you find a panel or two that may require a little longer screw. Now let’s attach some panels. The first step is mounting the Rivnuts. You will need to look at the panel you are attaching and determine which holes are the holes to mount the backer panel (these holes will need the 8-32 Rivnuts) and which holes mount the lightplate (these holes will need the 6-32 Rivnuts): Once you have determined where each size rivnut is to be located, you will need to drill out the hole in the MIP if necessary to the correct size. In this case you will need to drill a 17/64 inch hole in the MIP. The same size hole is drilled for both Rivnuts. Note if you order the aluminum MIP from Project45 the holes will already be drilled in the correct locations to match the backer panel and lightplate but you may need to enlarge them to fit the Rivnuts. At this point be careful and double check which Rivnut you are installing and ensure it is being installed in the correct hole. Take your time. If you install the wrong Rivnut you will be spending some time with a Dremel Tool cutting the Rivnut out: After installing the Rivnuts in the correct place you can now mount your backer panel. The backer panel mounts with 8-32 screws so go ahead and mount your backer panel. Don’t forget to thread your 12v power connector thru the backer to attach to your lightplate. Once the backer panel is installed you can now mount your lightplate. Connect your 12v power connector to the lightplate and position the lightplate over the switches and into position on top of the backer panel. Now install the panel with the 6-32 screws. If you have installed the Rivnuts in the correct positions you should have no trouble getting your panels mounted. After installing all of the Rivnuts necessary to mount your panels you may notice a few of the Rivnuts especially the lower MIP panel Rivnuts may protrude thru the back of the MIP and make contact with the wood MIP Tower not allowing the MIP to fit flush with the wood tower. If so mark these locations on the wood and simply drill out the area until the Rivnut has a recessed area in the wood to fit. This will allow your MIP to sit flush once again. Using the Rivnuts suggested cost a little more but will give you a long lasting attachment method that will endure the numerous panel removals you most likely will encounter over the life of your sim. Normal false EN-US /* Style Definitions */ Hi guys, I have created a tutorial as we have several members starting to populate their MIP’s with panels. We have several panels that mechanically attach to the MIP by way of 6-32 and 8-32 screws. You can find the correct screws at McMaster Carr. Here are the links to the screws: Additionally, we have other components that attach to the MIP with screws as well such as the Davtron clocks and the Angle of Attack Indicator but we will talk about those at another time. The best time to install the Rivnuts is before you install the MIP inside your shell. Right now we are concerned with the lower MIP panels including the Left Crew Light Panel, the Weights panel, the Electrical Panel, the Landing Panel, the Environmental Panel, the Right Crew Light Panel, the two EFIS panels, and the two Reversion panels located on the upper MIP. These panels can be attached to the MIP using 6-32 threaded and 8-32 threaded Rivnuts. These are also known as a blind rivet nut or threaded insert. A tool is needed to install the Rivnut. When selecting the Rivnut you need to know the panel thickness (The thickness of the MIP) .020 - .080 to select the proper Rivnut. Also you want to select a Rivnut that has ribs to prevent the Rivnut from spinning in the hole once it has been installed and a zinc plated steel Rivnut to prevent stripping of the threads that you may encounter using an aluminum nut. Here is a photo of the Rivnut. Notice the ribs on the barrel of the nut and on the underside of the collar to prevent turning of the nut: The 6-32 Rivnut description you need is: 6-32 x .020 -.080 grip length 17/64 hole size rivet-nuts in zinc-plated steel The 8-32 Rivnut description you need is: 8-32 x .020 -.080 grip length 17/64 hole size rivet-nuts in zinc-plated steel You will also need an installation tool. Here is an Ebay link to the tool: I have also added a link on how to use the Rivet Tool. There are numerous videos on the Internet explaining how to use the tool so if you need more info remember the Internet is your friend . . . As for the screws needed, most of the screws 6-32 or 8-32 need to be at least ½ inches in length. I found a few panels required a ¾ inch length screw. This all depends on panel thickness, backer panel thickness, and the thickness of the collar of the Rivnut. So don’t be surprised if you find a panel or two that may require a little longer screw. Now let’s attach some panels. The first step is mounting the Rivnuts. You will need to look at the panel you are attaching and determine which holes are the holes to mount the backer panel (these holes will need the 8-32 Rivnuts) and which holes mount the lightplate (these holes will need the 6-32 Rivnuts): Once you have determined where each size rivnut is to be located, you will need to drill out the hole in the MIP if necessary to the correct size. In this case you will need to drill a 17/64 inch hole in the MIP. The same size hole is drilled for both Rivnuts. Note if you order the aluminum MIP from Project45 the holes will already be drilled in the correct locations to match the backer panel and lightplate but you may need to enlarge them to fit the Rivnuts. At this point be careful and double check which Rivnut you are installing and ensure it is being installed in the correct hole. Take your time. If you install the wrong Rivnut you will be spending some time with a Dremel Tool cutting the Rivnut out: After installing the Rivnuts in the correct place you can now mount your backer panel. The backer panel mounts with 8-32 screws so go ahead and mount your backer panel. Don’t forget to thread your 12v power connector thru the backer to attach to your lightplate. Once the backer panel is installed you can now mount your lightplate. Connect your 12v power connector to the lightplate and position the lightplate over the switches and into position on top of the backer panel. Now install the panel with the 6-32 screws. If you have installed the Rivnuts in the correct positions you should have no trouble getting your panels mounted. After installing all of the Rivnuts necessary to mount your panels you may notice a few of the Rivnuts especially the lower MIP panel Rivnuts may protrude thru the back of the MIP and make contact with the wood MIP Tower not allowing the MIP to fit flush with the wood tower. If so mark these locations on the wood and simply drill out the area until the Rivnut has a recessed area in the wood to fit. This will allow your MIP to sit flush once again. Using the Rivnuts suggested cost a little more but will give you a long lasting attachment method that will endure the numerous panel removals you most likely will encounter over the life of your sim. Great tutorial Shane! I really need to look into Rivnuts the next time I take my sim down. I am currently using post fasteners. A perfect fit but requires an adhesive to hold them in place rather than pressure. Thanks Shane! Great tutorial Shane! I really need to look into Rivnuts the next time I take my sim down. I am currently using post fasteners. A perfect fit but requires an adhesive to hold them in place rather than pressure. Thanks Shane!Attaching panels to the aluminum MIP
![]()
0
false
false
X-NONE
X-NONE
table.MsoNormalTable
{mso-style-name:"Table Normal";
mso-tstyle-rowband-size:0;
mso-tstyle-colband-size:0;
mso-style-noshow:yes;
mso-style-priority:99;
mso-style-parent:"";
mso-padding-alt:0in 5.4pt 0in 5.4pt;
mso-para-margin-top:0in;
mso-para-margin-right:0in;
mso-para-margin-bottom:8.0pt;
mso-para-margin-left:0in;
line-height:107%;
mso-pagination:widow-orphan;
font-size:11.0pt;
font-family:"Calibri",sans-serif;
mso-ascii-font-family:Calibri;
mso-ascii-theme-font:minor-latin;
mso-hansi-font-family:Calibri;
mso-hansi-theme-font:minor-latin;
mso-bidi-font-family:"Times New Roman";
mso-bidi-theme-font:minor-bidi;}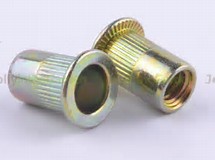
![]()
2017-10-10